background image

Please note that whilst the Nano is extremely simple to maintain, 

all work must be carried out by a competent person.

When removing checkerplate covers for maintenance purposes, 

first switch off by depressing the emergency stop/battery isolator 

button located at the base of the machine. Use appropriate safety/

personnel protection equipment where necessary.

DAILY MAINTENANCE

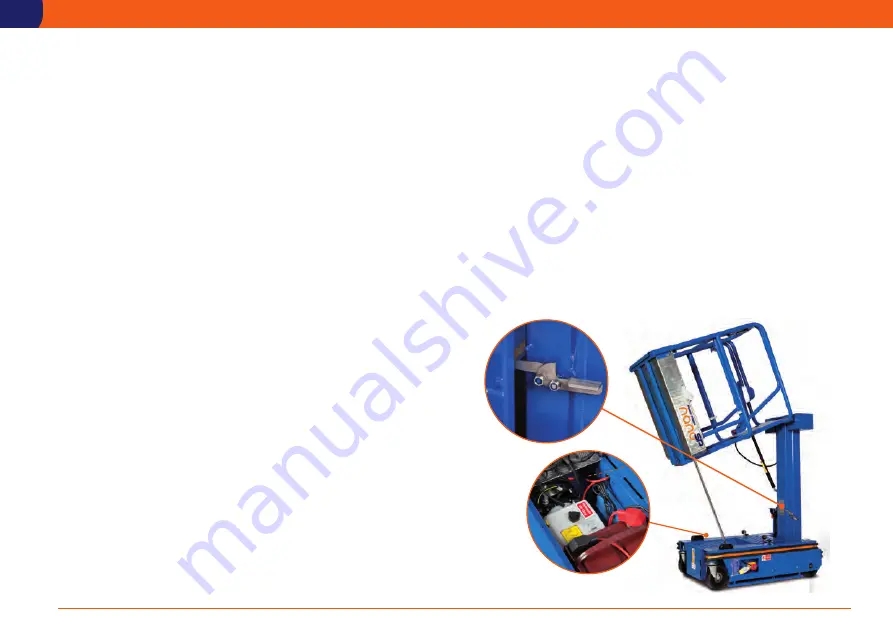
Tilt cage by releasing basket securing latch on cage mount (see 

pic).  Pull and lift cage frame from gate end and cage will lift and tilt 

assisted by gas strut.  Ensure gas strut is full extended and separate 

safety prop is in place before working under raised cage. You can now 

access the powerpack housing. Unscrew the black retaining knobs 

and lift out the checkerplate cover.

In addition to regular thorough visual inspections there are a number 

of simple daily and weekly maintenance tasks that should be carried 

out by the operator or other competent person.

Always use chemical resistant gloves and safety goggles/glasses 

when checking battery electrolyte levels.


1.  Check Battery Electrolyte Level:

    (Not applicable if AGM batteries are fitted).

    Remove battery cover, and battery caps.  Ensure the electrolyte  

    covers the plates by approximately 1-5mm.  Replenish with  


    distilled water to this level, only if the electrolytic level is below  

    the top of the plates.


2.  Check Hydraulic Oil Level:

    Ensure the tank is not overfilled.  The level must only be checked  

    when the machine is in the transport position.  The correct 

    level in this position is approximately 3/4 from the base of the   

    tank,  as indicated by the line.


3. 

Check hydraulic connections around the pump are tight and    

   undamaged.


4. 

Check the spirit level to ensure it is clearly legible and  


   undamaged.


5. 

Check all functions operate correctly including movement alarm  

    and emergency stops.


6. 

Ensure mast surfaces are clean and NOT greased.

MAINTENANCE PROCEDURES

10

Basket securing latch

Содержание nano SP

Страница 1: ...Operating and Maintenance Manual www powertowers com...

Страница 2: ...hin its operating parameters and should always be used on flat level and hard surfaces such as concrete If used for hazardous applications such as shot blasting welding paint spraying or with any othe...

Страница 3: ...N Max gradient for operation 0 Max wind force 12 5m sec Maximum weight Inc payload 478kg 200kg 678 kgs Maximum castor point load 210 kgs 2 10 kN Drive Speed Max 4 6 KpH Drive Speed Slow 1 0 KpH Elevat...

Страница 4: ...tal force 200N 5 Never drive Nano SP near holes in the floor or edge of concrete slab manholes drains etc 6 Never use in the vicinity of live conductors 7 Never extend the height or reach of the work...

Страница 5: ...5 Entrance Gate Latch Spirit Level Swivel Castor Drive Wheel Motor Gearbox Emergency Stop Battery Isolator Manual Emergency Lowering Valve Control Arm Folded Ground Control Station Tool Tray Basket re...

Страница 6: ...tandard If the operator chooses to wear a safety harness an approved fall restraint type harness should be worn Operating Procedures are divided into three key areas 1 Pre operation checks What to do...

Страница 7: ...cantilever deck and operation 2 Lifting mast structure chassis area structure 3 Pothole mechanism 4 Wheels and castors for tyre damage and fixings 5 Main control cable curly cable to control arm 6 Al...

Страница 8: ...gate to elevate backwards to descend Always check for overhead obstructions before elevating The user shall obtain the guidance and approval of the manufacturer in the event of any special working met...

Страница 9: ...modes 1 Rapid flash which indicates maximum charge rate 2 Slow pulse indicating slower charging 3 Continuous illumination indicating the battery is fully charged D 4 Additionally the battery charge in...

Страница 10: ...ntenance tasks that should be carried out by the operator or other competent person Always use chemical resistant gloves and safety goggles glasses when checking battery electrolyte levels 1 Check Bat...

Страница 11: ...t not be disconnected unless by a competent person If the connection has been disconnected then a full pressure test of the system must be conducted prior to placing the machine back into service No l...

Страница 12: ...gap between the mast section and the wear screw develops This will be evident by free sideways movement of the basket If this free movement is thought to be excessive check the gap between the screw...

Страница 13: ...in good serviceable order Handrails are undamaged and secure Operation of gate latch Basket tray condition Mechanical condition of lifting structure and chassis Swivel castor condition and security A...

Страница 14: ...dically If this is not practical then the charger should be switched on once a week for half an hour This is especially important in cold conditions The hydraulic oil must be replaced recommended afte...

Страница 15: ...levated Drive Speed limit switch PTNSP E 650 F Tilt Alarm Overide Switch PTNSP E 649 actual switch may vary from illustration G Load Sensing limit switch PTNSP E 648 H Tilt Alarm module PTNSP E 603 I...

Страница 16: ...box complete LHS PTNSP E 616L P Drive Motor Brake PTNSP E 617 Q 24 8 A Battery Charger PTNSP E 630 R 12v 105A Traction Battery PT E 002 HYDRAULIC PARTS S 24v DC Powerpack Complete PTNSP H 551 Powerpac...

Страница 17: ...TNSP M 501 D Power pack Cabinet Cover Plate PTNSP M 521 E ECU Cover Plate PTNSP M 522 F Guardrails Complete outer PTNSP M 516 G Guardrails complete inner PTNSP M 518 H Gate PTNSP M 503 Cantilever slid...

Страница 18: ...520 M Gas Strut Control Arm PTNSP M 519 N Cantilever Tread Lock PTNSP M 527 O Basket safety prop c w fixing PTNSP M 529 P Decal Set 1 PTNSP M 540 Q Decal Set 2 PTNSP M 541 R Decal Set 3 PTNSP M 542 S...

Страница 19: ...RGENCY LOWER PT E 008 8 RELAY PROTECTION BOARD 1c PTNSP E 676 9 LOWERING RELAY RY1 PTNSP E 676 10 5A FUSE PT E 012 11 START SOLENOID PTN H 552 12 POWERPACK LOWERING SOLENOID C W VALVE PTNSP H 552 13 A...

Страница 20: ...CIRCUIT DIAGRAM HYDRAULIC 20 Relief Valve preset to 65 Bar Single Action 2 stage lift cylinder Manual Bypass Solenoid Lock Valve NA HP 003 Steel Pipe 12V 24V DC Powerpack...

Страница 21: ...agents for repair or assessment against a warranty claim on any Nano SP or component Materials and or labour costs to renew repair or replace components due to fair wear and tear Faults arising from...

Страница 22: ...TEST RESULTS NOTES Description Work Carried out Date...

Страница 23: ...ALTERATIONS REPAIRS Description Work Carried out Date...

Страница 24: ...NANO SP UK 12 17 www powertowers com 100 British designed and manufactured...

Отзывы: