background image

Power-Flo Pumps & Systems • 877-24PUMPS • www.powerfl opumps.com

8

Wire Size:

If longer power cable is required consult 
a qualifi ed electrician for proper wire 
size.

Pre-Operation

1.   Check Voltage and Phase
 

Compare the voltage and phase


information stamped on the pump 

 name 

plate.

2. 

Check Pump Rotation

 - Improper 


motor rotation can result in poor 


pump performance and can damage


the motor and/or pump. Check 


rotation on three phase units by 


momentarily applying power and 

 observe 

the 

“kickback”. 


Kickback should always be in a 


counter-clockwise direction as 


viewed from motor end or opposite 


to impeller rotation. Incorrect rotation 


for Single-Phase pumps is unlikely. 


If the rotation is incorrect contact 

 factory.

3.   

Name Plate

 - Record the information


from the pump name plate to 


drawing in front of manual for future 

 reference.

4.  

Insulation Test

 - An insulation 


(megger) test should be performed 


on the motor.  Before the pump is put 


into service. The resistance values 


(ohms) as well as the voltage (volts) 


and current (amps) should be 

 recorded.

5.  

Pump-Down Test

 - Be sure pump 


has been properly wired, lowered into 


the basin, sump or lift station, check 


the system by filling with liquid and 


allowing the pump to operate through


its pumping cycle. The time needed to


empty the system, or pump-down 


time along with the volume of water, 


should be recorded.

Maintenance

No lubrication or maintenance is required. 
Perform the following checks when  pump 
is removed from operation or when pump 
performance deteriorates:
a).   Inspect motor chamber for oil level 
 and 

contamination.

b).  Inspect impeller and body for 
 

excessive build-up or clogging.

c).  Inspect motor and bearings.
d).  Inspect seal for wear or leakage.

Servicing

NOTE: Item numbers in ( ) refer to Figures 
7 & 8.

Cooling Oil - 

Anytime the pump is 

removed from operation, the cooling oil 
in the motor housing should be checked 
visually for oil level and contamination.
To check oil, set unit upright. Remove 
pipe plug (30) from housing (8).  With 
a flashlight, visually inspect the oil in 
housing (8) to make sure it is clean and 
clear, light amber in color and free from 
suspended particles. Milky white oil 
indicates the presence of water. Oil level 
should be just above the motor when 
pump is in vertical position.

Oil Testing

•  Drain oil into a clean, dry container by
  placing pump on it’s side, remove pipe 
  plug (30), from housing (8). 
•  Check oil for contamination using an 
  oil tester with a range to 30 Kilovolts 
 breakdown.
•  If oil is found to be clean and 
  uncontaminated (measuring above 
  15 KV. breakdown), refill the housing.
•  If oil is found to be dirty or 
  contaminated (or measures below 
  15 KV. breakdown), the pump must 
  be carefully inspected for leaks at the 
  shaft seal, cable assembly, square ring 
  and pipe plug, before refilling with oil. 
  Tolocate the leak, perform a pressure
 test.

After leak is repaired, dispose of old oil 
properly, and refill with new oil.

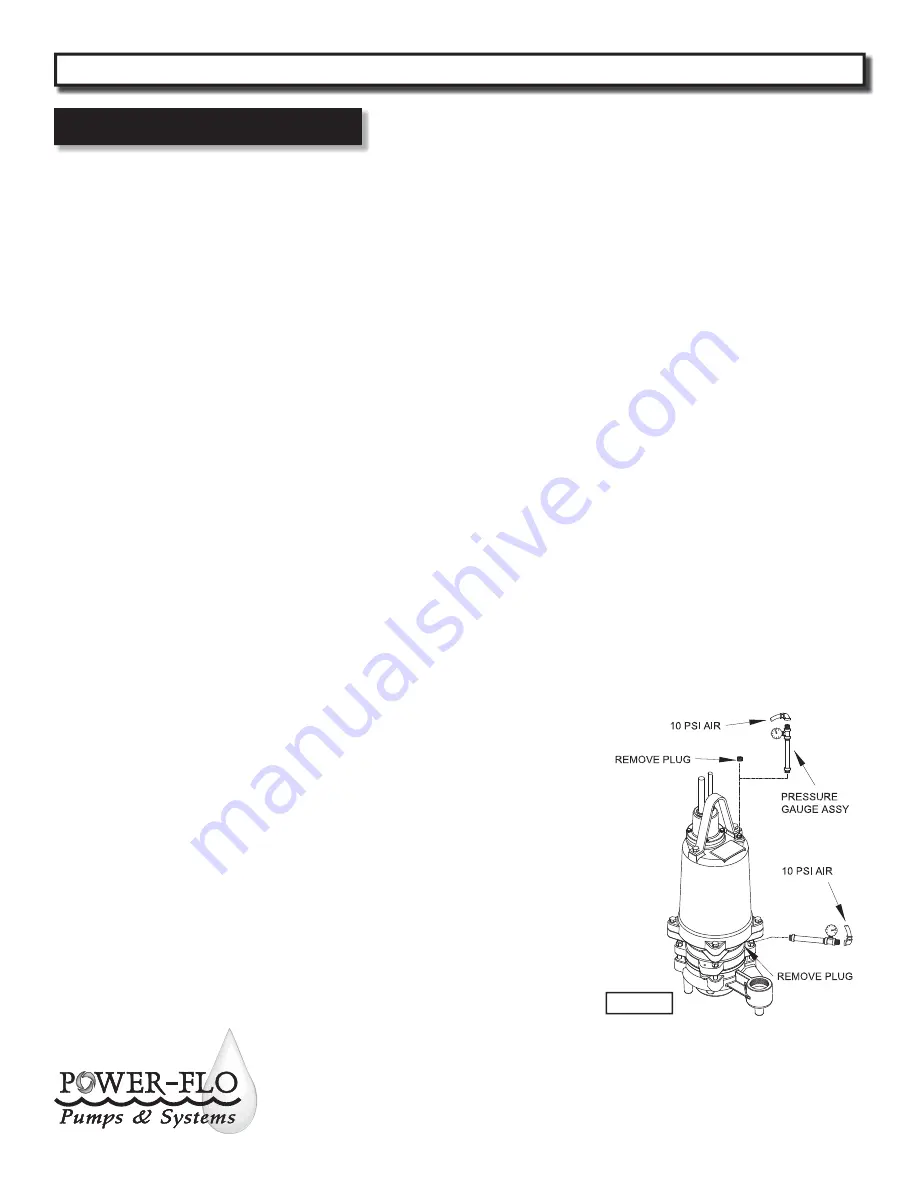
Pressure Test (If oil has been drained) 

Remove pipe plug (30) from housing (8). 
Apply pipe sealant to pressure gauge 
assembly and tighten into hole. Pressurize 
motor housing to 10 P.S.I.  Use soap 
solution around the sealed areas and 
inspect joints for “air bubbles”.  

If, after five minutes, the pressure is still 
holding constant, and no “bubbles” are 
observed, slowly bleed the pressure and 
remove the gauge assembly. Replace 
oil. Leek must be located and repaired if 
pressure does not hold.

Pressure Test (If oil has NOT been 
drained) -

 Oil should be at normal level. 

Remove pipe plug (30) from housing (8).  
Apply pipe sealant to pressure gauge 
assembly and tighten into hole. Pressurize 
motor housing to 10 P.S.I.  Use soap 
solution around the sealed areas above the 
oil level and inspect joints for “air bubbles”.  
For sealed areas below oil level, leeks will 
seep oil.  If, after five minutes, the pressure 
is still holding constant, and no “bubbles” /
oil seepage is observed, slowly bleed the 
pressure and remove the gauge assembly. 
Replace oil. Leek must be located and 
repaired if pressure does not hold.

Installation & Service

Figure 2

PFG 3, 5 & 7.5HP   


 Submersible Grinder Pumps

Содержание PFG3022

Страница 1: ...om ISP No PFGrinder357 5 13 INSTALLATION SERVICE PARTS MANUAL Power Flo Pumps Systems 877 24PUMPS www powerflopumps com Series PFG3022 PFG3062 PFG3032 PFG3042 PFG5022 PFG5062 PFG5032 PFG5042 PFG7532 P...

Страница 2: ...only Keep clear of suction and discharge openings Do not insert fingers in pump with power connected Always wear eye protection when working on pumps Do not wear loose clothing that may become entangl...

Страница 3: ...il Lubricated LOWER BEARING Sleeve Oil Lubricated POWER CORD 30 ft Cord Pressure grommet for Sealing and Strain Relief MOTOR Oil Filled Squirrel Cage Induction Class F Insulation SINGLE PHASE Capacito...

Страница 4: ...if a Power Flo control panel is not used see page 17 PFG 3 5 7 5HP Submersible Grinder Pumps Recommended Breaker Heater Sizes MODEL HP Hz Volts Ph Breaker Size Heater Size Voltage Relay Start Capacito...

Страница 5: ...Power Flo Pumps Systems 877 24PUMPS www powerflopumps com 5 Performance PFG 3 5 7 5HP Submersible Grinder Pumps...

Страница 6: ...Controls PFG series grinders require a separate approved pump control device or panel for automatic operation Be sure the electrical specification of the control selected properly match the electrical...

Страница 7: ...minimum level of 10 inches above the basin floor Electrical Connections Power cable The power cable mounted to the pump must not be modified in any way except for shortening to a specific application...

Страница 8: ...unit upright Remove pipe plug 30 from housing 8 With a flashlight visually inspect the oil in housing 8 to make sure it is clean and clear light amber in color and free from suspended particles Milky...

Страница 9: ...ove CAUTION Cutter edges are very SHARP Cutter must be removedbeforeremovingvolute Volute Remove hex nuts 25 and washers 9 from studs 26 and remove volute 23 and square ring 24 from pump Shredding Rin...

Страница 10: ...seal cavity in intermediate coupling 5 Lightly oil Do not use grease outer surface of stationary member Press seal s 4 stationary member firmly into intermediate coupling 5 using a seal tool or pipe...

Страница 11: ...Green Black 1 7 Red 2 8 White 3 9 T4 T5 T6 Together FIGURE 4 THREE PHASE 460 VOLT AC Power Cable Motor Lead Number Green Ground Green Black 1 Red 2 White 3 T4 T7 Together T5 T8 Together T6 T9 Together...

Страница 12: ...T Do not hammer on the seal pusher It will damage the seal face With seal guide tool over motor shaft Lightly oil Do not use grease guide shaft and inner surface of bellows on rotating seal With lappe...

Страница 13: ...Power Flo Pumps Systems 877 24PUMPS www powerflopumps com 13 Typical Panel Wiring Schematic PFG 3 5 7 5HP Submersible Grinder Pumps Figure 6...

Страница 14: ...UMPS www powerflopumps com 14 Figure 7 Repair Parts For Repair Part Please supply Model Number and MFG Date as shown on Name Plate and Part Description and Part Number as shown on Parts List PFG 3 5 7...

Страница 15: ...UMPS www powerflopumps com 15 Figure 8 Repair Parts For Repair Part Please supply Model Number and MFG Date as shown on Name Plate and Part Description and Part Number as shown on Parts List PFG 3 5 7...

Страница 16: ...10 4 SOW PF31030003 13B 1 Hex Plug PF30400903 13C 2 Friction ring PF91010055 13D 1 Grommet PF92010001 14 1 Moisture Temperture Sensor Cable 18 5 SOW 30Ft PF31030005 14B 1 Hex plug PF30400901 14C 2 Fr...

Страница 17: ...l Bearing 6203ZZ PF070715 Repair Kits CUTTER KIT Includes Item numbers 20 27 28 29 PFGL CT 6 OVERHAUL KIT Includes Item numbers 2 3 4 6 7 20 24 27 28 29 34 PFGL OHK SEAL PROBE KIT Includes item number...

Страница 18: ...Power Flo Pumps Systems 877 24PUMPS www powerflopumps com 18 Notes PFG 3 5 7 5HP Submersible Grinder Pumps...

Страница 19: ...hole 10 Check rotation If power supply is three phase reverse any two of three power supply leads to ensure proper impeller rotation 11 Repair fixtures as required to eliminate leakage 12 Check pump t...

Страница 20: ...that has not been installed operated or maintained in accordance with Manufacturer s installation instructions that has been exposed to outside substances including but not limited to the following sa...

Отзывы: