background image

V1.0 

Air Reciprocating Saw 

8843518 

Visit www.princessauto.com for more information 

Remove the parts and accessories from the packaging and inspect for damage. 
Make sure that all items in the contents are included. 
Contents:  • 

Reciprocating Saw  •  Blades (2) 

•  Hex Key (2) 


• 

Blade Guard 

•  Air Plug 

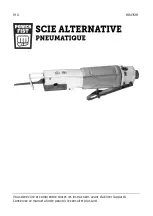
GUIDE D’IDENTIFICATION 

Saw Blade 

Blade Guard 

Chuck Cover 

Saw Body 

Throttle Lever 

Air Inlet 

ASSEMBLY & INSTALLATION 

When this manual refers to a part number, it refers to the included Parts List. 

INSTALLING AIR PLUG 

Prepare a standard 1/4 in. NPT male air plug for use with your tool. 
1. 

Wrap the external threads of the male air plug with sealant tape.  
a. 

Wrap the tape in a clockwise direction so it will not unravel. 

b.  Do not tape all the threads. Leave several leading threads unwrapped 

for easier alignment. 

2.  Screw the air plug into the tool's air inlet and tighten with a wrench until 

snug. 

3. 

Run the compressor at a low volume and check the connection for air 
leaks. Do not use the tool until all air leaks are repaired or the faulty 
component is replaced. 

BLADE GUARD INSTALLATION 

The air reciprocating saw comes with a long and 
short blade guard. Select the blade guard that is 
appropriate for the task. 
1. 

To install or replace the blade guard (Fig. 1-
1), use the 2 mm hex key wrench (Fig. 1-2) 
to loosen the set screws (Fig. 1-3). 

2.  Insert the blade guard (#34 or 50). 
3. 

Tighten the set screws using the hex key wrench. 

Fig. 1 

Содержание 8843518

Страница 1: ...V1 0 8843518 Please read and understand all instructions before use Retain this manual for future reference ...

Страница 2: ...sibility of property damage injury or death if certain instructions are not followed DANGER This notice indicates an immediate and specific hazard that will result in severe personal injury or death if the proper precautions are not taken WARNING This notice indicates a specific hazard or unsafe practice that could result in severe personal injury or death if the proper precautions are not taken C...

Страница 3: ...dren 4 Do not install or use in the presence of flammable gases dust or liquids PERSONAL SAFETY WARNING Wear personal protective equipment approved by the Canadian Standards Association CSA or American National Standards Institute ANSI PERSONAL PROTECTIVE EQUIPMENT 1 Always wear impact safety goggles that provide front and side protection for the eyes Wear a full face shield if your work creates m...

Страница 4: ...jury 5 Securely hold this tool using both hands Using a tool with only one hand can result in loss of control 6 Keep your fingers away from the trigger switch while carrying the tool attaching an air hose or an accessory Lock the trigger switch safety if available 7 Avoid unintentional starts Be sure that the regulator throttle switch is in the neutral or OFF position when not in use and before co...

Страница 5: ... the work piece 10 Hold the tool by insulated gripping surfaces when performing an operation where the cutting tool may contact hidden wiring or its own cord Contact with a live wire will also make exposed metal parts of the power tool live and shock the operator 11 Always use blades that are designed to be used with this saw Blades that do not match the mounting hardware of the saw may be launche...

Страница 6: ...ting the tool 8 Do not leave the air tool unattended with its compressed air supply on Turn off the compressed air supply and bleed the air tool of any remaining compressed air before leaving the air tool unattended 9 Serious injury may occur from loose debris being propelled at high speeds from the compressed air stream Always wear OSHA approved safety glasses to protect the eyes during operation...

Страница 7: ... loss of control of the tool leading to serious personal injury damage to the tool or workpiece Kickback can be avoided by taking proper precautions 1 Maintain a firm grip on the tool and position your body and arms to allow you to resist kickback forces Kickback will propel the tool in the direction opposite to the tool s movement at the time of snagging 2 Never place your hand near the blade If ...

Страница 8: ...rp and clean Gum and wood pitch hardened on blades slows the saw and increases potential for kickback 10 Never force the saw Forcing the tool can cause uneven cuts loss of accuracy and possible kickback Push the tool forward at a speed so that the blade cuts without slowing VIBRATION PRECAUTIONS 1 This tool vibrates during use Repeated or long term exposure to vibration may cause temporary or perm...

Страница 9: ...s of the male air plug with sealant tape a Wrap the tape in a clockwise direction so it will not unravel b Do not tape all the threads Leave several leading threads unwrapped for easier alignment 2 Screw the air plug into the tool s air inlet and tighten with a wrench until snug 3 Run the compressor at a low volume and check the connection for air leaks Do not use the tool until all air leaks are ...

Страница 10: ...he safety latch on the throttle lever 13 forward while pressing the throttle lever 13 to begin operating the reciprocating saw Allow the saw to reach full speed before placing the blade onto the workpiece 3 Cut your line Let the reciprocating saw do the work Do not place unnecessary pressure on the reciprocating saw Excessive pressure may break the blade or stall the reciprocating saw potentially ...

Страница 11: ... throttle lever a few times to distribute the oil 3 Keep the in line lubricator filled and correctly adjusted The in line lubricator should be regularly checked and filled with air tool oil Proper adjustment of the in line lubricator is performed by placing a sheet of paper next to the exhaust ports and holding the throttle open approximately 30 seconds The lubricator is properly set when a light ...

Страница 12: ...extended period apply a thin coat of lubricant to the steel parts to avoid rust Remove the lubricant before using the tool again DISPOSAL Recycle a tool damaged beyond repair at the appropriate facility TROUBLESHOOTING Visit a Princess Auto Ltd location for a solution if the tool does not function properly or parts are missing If unable to do so have a qualified technician service the tool Problem...

Страница 13: ... Have a qualified technician service the tool 2 Replace tool or parts Tool will not shut off 1 Throttle valve o ring dislodged from inlet valve seat 2 Trigger mechanism jammed or dirty 1 Replace throttle valve o rings 2 Clean trigger mechanism and lubricate Loss of power or erratic performance 1 Excessive drain on the air hose Incorrect size or type of hose connectors 2 Moisture or restriction in ...

Страница 14: ...g 1 4 Air Controller 1 5 Valve Spring 1 6 Valve Stem 1 7 O ring 1 8 Valve Bushing 1 9 Air Inlet 1 10 Cap Screw 4 11 Washer 4 12 Lever Pin 1 13 Throttle Lever 1 15 Valve Case 1 16 Bushing 1 17 Cylinder 1 18 Valve Sleeve 1 19 Actuator Valve 1 20 Washer 1 21 Cap Screw 2 22 Gasket 1 23 Valve Seat 1 24 Set Screw 2 25 Bushing 2 26 Chuck Cover 1 27 Screw 2 28 Housing 1 ...

Страница 15: ...mbly 1 30 Set Screw 2 31 Wrench 2 mm 1 32 Guide Plate 1 33 Blade Chuck 1 34 Blade Guard short 1 36 Wrench 4 mm 1 38 Screw 1 39 Upper Wear Shoe 1 40 Blade Guide 2 41 Bridge 1 42 Front Bumper 1 43 Rear Bumper 1 44 Pin 2 45 Spring 1 46 Packing 1 47 Packing 1 48 Packing 1 49 Set Screw 1 50 Blade Guard long 1 51 Soft Grip 1 ...

Страница 16: ...8843518 Air Reciprocating Saw V1 0 16 For technical questions call 1 800 665 8685 ...

Страница 17: ...V1 0 Air Reciprocating Saw 8843518 Visit www princessauto com for more information 17 ...

Страница 18: ...8843518 Air Reciprocating Saw V1 0 18 For technical questions call 1 800 665 8685 ...

Страница 19: ...V1 0 8843518 Vous devez lire et comprendre toutes les instructions avant d utiliser l appareil Conservez ce manuel afin de pouvoir le consulter plus tard ...

Страница 20: ...propriété de blessure ou de décès si on ne respecte pas certaines instructions DANGER Cet avis indique un risque immédiat et particulier qui entraînera des blessures corporelles graves ou même la mort si on omet de prendre les précautions nécessaires AVERTISSEMENT Cet avis indique un risque particulier ou une pratique non sécuritaire qui pourrait entraîner des blessures corporelles graves ou même ...

Страница 21: ...t AIRE DE TRAVAIL 1 Travaillez dans un environnement de travail sécuritaire Gardez votre aire de travail propre bien éclairée et exempte de toute distraction 2 Assurez vous que les personnes qui ne portent pas l équipement de sécurité approprié ne se trouvent pas à proximité de l aire de travail 3 Rangez les outils correctement dans un lieu sécurisé et sec Gardez les outils hors de la portée des e...

Страница 22: ...dez les mains à l écart des parties de caoutchouc exposées du tuyau PRÉCAUTIONS PERSONNELLES Gardez le contrôle de l outil de vos mouvements et de l environnement de travail pour éviter les blessures ou le bris de l outil 1 N utilisez pas l outil si vous êtes fatigué ou sous l effet de drogues d alcool ou de médicaments 2 Évitez de porter des vêtements ou des bijoux pouvant se prendre dans les piè...

Страница 23: ...ures corporelles graves 1 Utilisez le bon outil pour la tâche à effectuer Cet outil a été conçu pour une utilisation spécifique Évitez de modifier ou d altérer cet outil ou de l utiliser à une fin autre que celle pour laquelle il a été conçu 2 Les accessoires doivent présenter les caractéristiques nominales correspondant au moins au nombre de cycles recommandés par minute de l outil consultez Spéc...

Страница 24: ...ient celle ci bien serrée 13 N utilisez pas de lames émoussées ni de lames endommagées 14 Ne vous servez jamais de l outil sur un matériel qui contient de l amiante 15 Évitez de couper les clous Vérifiez si la pièce à travailler présente des clous et enlevez les avant de la couper 16 Ne touchez pas à la lame ou à la surface coupée immédiatement après avoir achevé le travail La surface sera chaude ...

Страница 25: ...t d air du compresseur Portez toujours des lunettes de sécurité approuvés OSHA afin de vous protéger les yeux lorsque vous utilisez le compresseur d air 10 Arrêtez toujours le compresseur d air et évacuez complètement la pression du réservoir avant de tenter de procéder à l entretien ou de fixer des outils pneumatiques Évacuez doucement la pression du système 11 Des blessures graves ou même la mor...

Страница 26: ...de la pièce à travailler vers l utilisateur Lorsque la lame est pincée ou coincée par le trait du meule qui se referme la lame peut se bloquer et la réaction du moteur dirige rapidement l unité vers l utilisateur Un effet de rebond peut entraîner une perte de contrôle de l outil provoquant ainsi des blessures corporelles graves des dommages sur la pièce à travailler ou l outil L effet de rebond pe...

Страница 27: ...lus grande et sur la partie la plus petite de la découpe 8 Procédez avec précaution quand vous faites une entaille en poche dans un mur existant ou autres endroits cachés La lame qui ressort risque d entailler des objets provoquant un effet de rebond 9 Utilisez uniquement les lames conçues pour l outil N utilisez pas de lames émoussées ni de lames endommagées Des lames mal affûtées ou mal réglées ...

Страница 28: ... et les accessoires de l emballage et vérifiez s il y a des dommages Assurez vous que tous les articles du contenu sont présents Contenu Scie alternative Lames 2 Clé hexagonale 2 Protecteur de lame Prise d air IDENTIFICATION KEY A Lame de scie B Protecteur de lame C Couvercle du mandrin D Corps de la scie E Levier d accélérateur F Entrée d air ASSEMBLAGE ET INSTALLATION Lorsque ce manuel fait réfé...

Страница 29: ... correspond à la tâche 1 Pour installer ou remplacer le protecteur de lame fig 1 1 desserrez les vis de calage fig 1 3 au moyen d une clé hexagonale de 2 mm fig 1 2 2 Insérez le protecteur de lame no 34 ou 50 3 Serrez les vis de calage au moyen de la clé hexagonale INSTALLATION DU LAME DE SCIE À RUBAN 1 Desserrez la vis fig 2 1 retenant le couvercle du mandrin fig 2 2 au carter de la scie alternat...

Страница 30: ...la scie alternative de la pièce à travailler et relâchez le levier d accélérateur no 13 pour arrêter la scie SOIN ET ENTRETIEN 1 Entretenez l outil avec soin Un outil en bon état sera efficace plus facile à contrôler et préviendra les problèmes de fonctionnement 2 Inspectez les fixations de l appareil l alignement les tuyaux et le cordon d alimentation périodiquement Demandez à un technicien autor...

Страница 31: ...ur ouvert pendant environ 30 secondes Le lubrificateur est correctement réglé lorsqu une légère tache d huile est visible sur le papier Évitez de mettre trop d huile dans l outil 4 L huile pour outils pneumatiques est le seul lubrifiant recommandé pour tout outil pneumatique Ne tentez jamais d utiliser d autres types de lubrifiant pour lubrifier vos outils En utilisant un lubrifiant inadéquat vous...

Страница 32: ... votre outil pneumatique Les huiles pénétrantes sont un solvant qui provoquera la décomposition de la graisse interne et par conséquent le grippage de votre outil pneumatique ENTREPOSAGE Si l outil n est pas utilisé pendant une période prolongée appliquez une mince couche de lubrifiant sur les pièces en acier pour éviter qu elles ne rouillent Enlevez le lubrifiant avant de réutiliser l outil MISE ...

Страница 33: ...a Demandez à un technicien qualifié de réparer l outil 2b Remplacez l outil ou les pièces L outil ne fonctionne pas De l air sort librement de l échappement Dommages ou usure excessive des pièces internes 1 Demandez à un technicien qualifié de réparer l outil 2 Remplacez l outil ou les pièces Il est impossible d arrêter l outil La soupape d accélérateur à joints toriques est sortie de la soupape d...

Страница 34: ...5 Ressort de soupape 1 6 Tige de soupape 1 7 Joint torique 1 8 guide de soupape 1 9 Entrée d air 1 10 Vis à capuchon 4 11 Rondelle 4 12 Cheville du levier 1 13 Levier d accélérateur 1 15 Carter de soupape 1 16 Douille 1 17 Cylindre 1 18 Manchon de valve 1 19 Actuator Valve 1 20 Rondelle 1 21 Vis à capuchon 2 22 Joint d étanchéité 1 23 Siège de soupape 1 24 Vis de pression 2 25 Douille 2 26 Couverc...

Страница 35: ...s de pression 2 31 Clé 2 mm 1 32 Plaque de guidage 1 33 Mandrin du lame 1 34 Protège lame court 1 36 Clé 4 mm 1 38 Vis 1 39 Frette supérieure 1 40 Guide de lame 2 41 Pont 1 42 Pare choc avant 1 43 Pare choc arrière 1 44 Goupille 2 45 Ressort 1 46 Garniture 1 47 Garniture 1 48 Garniture 1 49 Vis de pression 1 50 Protège lame long 1 51 Poignée 1 ...

Страница 36: ...8843518 Scie alternative pneumatique V1 0 18 En cas de questions techniques appelez le 1 800 665 8685 ...

Отзывы: