


Self power and a battery connector on the Micro
Maestro.
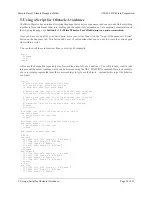
Step 3: Verify that the Maestro and servos are functioning.
The Maestro Control Center is used for configuration and control of the Micro Maestro, for testing, debugging,
scripting, and more. See
of the
[http://www.pololu.com/docs/0J40]
for
complete instructions on using the Maestro Control Center.
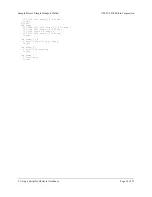
Launch the Maestro Control Center and configure your Maestro for “USB Dual Port” mode. The yellow LED
should now be mostly off, flashing very briefly about once per second. On the Status tab, enable servo ports 0, 1,
and 2, and the yellow LED will start double-blinking, indicating that some ports are active.
Next, using a piece of male header (included with the Maestro), temporarily connect a servo to port 0. Make sure
to connect the wires correctly, with the brown or black wire connected to ground. You should hear a short high-
pitched whine as the servo activates, moving to and holding a position in the middle of its range. After a fraction
of a second, when the servo has reached its position, it should be silent. Move the slider from 1000 μs to 2000 μs
to test the motion of the servo. Test all three ports and all three servos before continuing with the assembly.
Configure each of the servo ports to “Go to” 1500 μs on startup. This will make it easier to align the legs later on.
Configure ports 3, 4, and 5 to be inputs. This is important, since you will be connecting sensors later and want to
avoid shorting them out!
Disconnect the battery before continuing.
Sample Project: Simple Hexapod Walker
© 2001–2010 Pololu Corporation
3. Construction
Page 6 of 21