


Attaching the legs and Maestro to the servos.
Important:
Never apply torque to the legs with your hands, attempt to prevent them from moving,
or backdrive them. Servo gears can be easily broken, so they should only ever move under their
own power. Use the Maestro Control Center to experiment with different positions, instead of
forcing the servos.
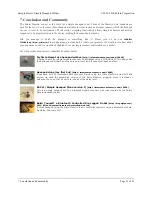
Step 7: Attaching the battery and sensors.
Glue the battery to the front of the hexapod, flush with the bottom, so that there will be as much clearance as
possible. Make sure that the middle legs have plenty of room to turn left and right without hitting the battery. Glue
the sensors to the top of the battery, angled to the left and right.
Sample Project: Simple Hexapod Walker
© 2001–2010 Pololu Corporation
3. Construction
Page 11 of 21