


Fold the third piece into an M shape, with sections of length 1.25", 1.75", 1.75", and 1.25", like this:
The middle legs of the hexapod. The segments at the end should
be 1.25" in length.
Hot-glue the legs onto servo horns. Use a straight horn for the middle legs and cross-shaped or round horns for
the front and back legs.
Gluing the hexapod legs to servo horns.
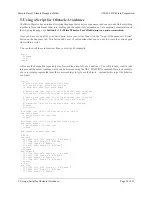
With battery power connected, so that the servos hold their neutral positions, put the horns onto the servos so that
the legs are as close as possible to neutral positions, as shown in the picture. Fix them in place with the included
screws, holding the legs as you tighten them so that you do not apply torque to the fragile servo gears. Glue the
Maestro to the back side of the servos, flush with the bottom.
Sample Project: Simple Hexapod Walker
© 2001–2010 Pololu Corporation
3. Construction
Page 10 of 21