background image

18

ENGLISH

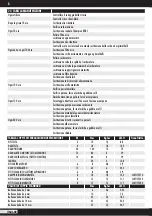
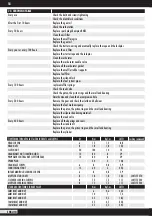
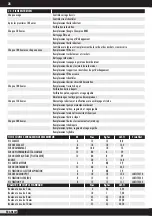
23- SERVICING TABLE

Every use

Check the bolts and screws tightening
Check the silent-block conditions

After the first 10 hours

Replace the gear oil
Check the carburation

Every 50 hours

Replace spark plug Champion RN2C
Clean the air filter
Replace the muffler ogive
Replace the gear oil
Check the starter wearing and eventually replace the rope and the lockpins

Every year or every 100 hours  

Replace the air filter
Replace the starter rope and the lockpins
Clean the carburetor
Replace the carburetor needle valve
Replace all the carburetor gasket
Replace the muffler rubber supports
Replace fuel filter
Replace the silent-block
Replace the fuel system pipes 

Every 100 hours

replace muffler springs
Check the reed valve
Check the piston, the piston rings and the small end bearing
Decarbonize and clean the decompression hole

Every 200 hours

Remove the gear and check the clutch and bell wear
Replace the fuel mechanic pump
Replace the piston, the piston rings and the small end bearing
Replace the silencer deadening material 
Replace the reed valve

Every 400 hours

Replace all the bearings and seals
Replace the crankshaft
Replace the piston, the piston rings and the small end bearing
Replace the cylinder

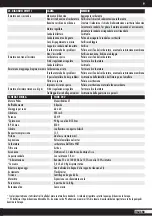
TIGHTENING TORQUE VALUE for ENGINE BOLTS and SCREWS

M

N.m

Kgf.m

Lbf.ft

Locking compound

HEAD SCREWS

6

12

1,2

8,8


HEAD NUTS

8

18

1,8

13,2


CLUTCH NUT

20

100

10

74


CRANKSHAFT NUT (IGNITION SIDE)                    

12

80

8

59


PROPELLER CENTRAL NUT (LEFT THREAD)                                                      

10

80

8

59

SPARK PLUG


20

2

14,8


CRANKCASE SCREW                                                            

6

8

0,8

5,9


COUNTERSHAFT NUT

12

60

6

44,2

INTAKE MANIFOLD LOCKING SCREWS

6

8

0,8

5,9


MUFFLER STUDS NUTS

8

18

1,8

13,2

LOCTITE 270

SILENCER LOCKING SCREWS

8

15

1,5

11,1

LOCTITE 243

MUFFLER LOCKING SCREWS

8

15

1,5

11,1

LOCTITE 243

STANDARD TIGHTENING TORQUE VALUE

N.m

Kgf.m

Lbf.ft

5MM BOLT AND NUT

6

0,6

4,44

6MM BOLT AND NUT

10

1

7,4

8MM BOLT AND NUT

25

2,5

18,5

10MM BOLT AND NUT

45

4,5

33,3

12MM BOLT AND NUT

55

5,5

40,7

Содержание THOR 202

Страница 1: ...THOR 202 MANUALE D USO E MANUTENZIONE USE AND MAINTENANCE MANUAL NOTICE POUR L UTILISATION ET L ENTRETIEN ...

Страница 2: ... Motori original spare parts The manufacturer has the right to make any modifications that can be useful to improve the features and performance of the products For all the technical details manuals optional please check www polinithor com FRANÇAIS UTILISATION ET ENTRETIEN page 21 Utiliser seulement des pièces d origine Polini Motori Le producteur sera libre d apporter les modifications qu il croi...

Страница 3: ...on concede nessuna garanzia contro incidenti rotture ferite o morte Volare richiede sempre la mas sima attenzione Siate consapevoli che volate a vostro rischio Prima di ogni utilizzo controllate le buone condizioni del motore Questo motore non è coperto da alcuna assicurazione di responsabilità L uso dello stesso determina automaticamente l assunzione di tutti i rischi inerenti lo sport del volo e...

Страница 4: ...rso tipo di motore L odierno venditore pertanto non risponderà di danni causati all utilizzatore od a terzi 2 CARBURANTE Il Thor è un motore a 2 tempi che necessita di una miscela di benzina e olio Utilizzare solo benzina verde E5 acquistata al distributore con un numero minimo di ottani pari a 95 Addizionare la benzina con olio 100 sintetico di buona qualità al 2 5 Non conservare a lungo la benzi...

Страница 5: ...ferirsi alle indicazioni del costruttore del telaio per un corretto trasporto e sulle modalità di utilizzo del serbatoio carburante durante il trasporto Porre molta attenzione al carburante una fuoriuscita dello stesso può causare un incendio ATTENZIONE Durante il trasporto del motore è vivamente consigliato di lasciare montata sul motore la flangia dell elica bloccata con il relativo dado questo ...

Страница 6: ... il livello risulta basso procedere al riempimento at traverso il raccordo di sfiato posto nella parte alta Dopo aver eseguito il controllo stringere saldamente la vite Utilizzare olio tipo ELF MOTO GEAR OIL 10 W 40 ANTI CLUTCH SLIPPAGE oppure Shell advance gear SAE 10 W 40 API GL 3 13 SOSTITUZIONE OLIO RIDUTTORE Effettuare il cambio dell olio a motore freddo Svitare l apposita vite posta nella pa...

Страница 7: ... un livello del liquido tale da coprire l ultimo elemento del radiatore foto 10 Materiale HRC UNI Stato STATO DELLE SUPERFICI HB Disegno N Codice Disegnato TOLLERANZE GENERALI Denominazione Stato Avanzamento Dimens da Toller a 6 0 0 1 OLTRE 30 0 2 6 30 120 0 3 360 30 120 0 5 0 Data Scala Peso grammi 3032 95 28 04 18 1 000 PELLICIOLI RADIATORE THOR 202 alluminio SCK 0601 011 3787 exp C Trattamento ...

Страница 8: ...male di utilizzo minimo 55 C massima 90 C Se il motore viene utilizzato in condizioni fredde e la temperatura dell acqua non raggiunge la temperatura minima di utilizzo 55 C consigliamo l installazione del termostato con apertura a 60 C cod prodotto 928 830 009 18 INSTALLAZIONE DEL MOTORE SUL TELAIO Fissare il motore al telaio utilizzando i due distanziali in alluminio h 45 in dotazione che vanno ...

Страница 9: ...ffa ed un gommino 16 Tagliare a misura i tubi dell acqua e montarli Chiudere le fascette in dotazione utilizzando una pinza apposita per il montaggio foto 17 17 21 ACCELERATORE Fissare al carburatore tramite l apposito supporto acceleratore idoneo non fornito Dopo l installazione dell acceleratore verificare che la corsa dello stesso sia sufficiente per avere una completa apertura della valvola de...

Страница 10: ...ggio riduttore e verifica usura frizione e campana Sostituzione pompa meccanica carburante Sostituzione pistone fasce elastiche e gabbia a rulli Sostituzione materiale fonoassorbente silenziatore Sostituzione pacco lamellare Ogni 300 ore Sostituzione di tutti i cuscinetti e paraoli Sostituzione albero motore Sostituzione pistone fasce elastiche e gabbia a rulli Sostituzione cilindro TABELLA COPPIE...

Страница 11: ...are la candela asciugandola o sostituendola Candela difettosa Sostituirla Candela annerita o bagnata Pulire ed asciugare la candela o sostituirla Cavo di spegnimento a massa Verifica cablaggio Cappuccio candela mal innestato Verifica Il carburatore ha dei problemi Pulizia e verifica del carburatore eventuale sostituzione membrane Non c è scintilla Verifica accensione bobina e cablaggio Il motore n...

Страница 12: ...e Cap Tel Fax Indirizzo Mail Prodotto acquistato il allego copia scontrino fiscale o fattura Firma Acquirente Ai sensi dell art 13 del D lgs 196 2003 relativo al trattamento dei dati personali il sottoscritto presta il proprio consenso al trattamento dei dati personali Vi preghiamo di inviare questo certificato via mail a news polini com al momento dell acquisto per attivare la garanzia ed essere ...

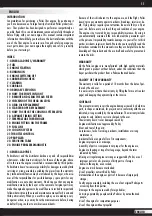
Страница 13: ...esn t give any warranty against accidents breakings injuries or de ath Flying always requires great attention Be aware that you fly at your risk Before every use check the good condition of your engine This engine is not covered by any responsibility insurance By using it you automatically assume all the risks inherent the paramotor sport or the personal responsibility towards damages to yourself ...

Страница 14: ... petrol into containers for a long time because its quality will be damaged Only use certified metallic containers for petrol carria ge Mix up the petrol with the oil ONLY when you are using it WARNING The nature of the carbon deposits on the cylinder head spark plug and exhaust port give important information about the fuel mixture burning in your engine Remember that mixes that contain too much ...

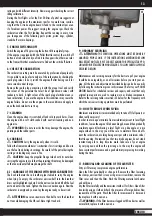
Страница 15: ...ighlighted in photo 2 with an arrow and wait till all the fuel exit and enters the tank Tighten the brass connection again Now the carburator is empty and you can lay the engine ready to be carried ATTENTION never unscrew more than half a turn the breather nut to avoid damaging the OR seal Never tight too hard 02 9 ORDINARY SERVICING ATTENTION THE SERVICING OPERATIONS MUST BE DONE BY QUALIFIED PEO...

Страница 16: ...ced in the top side of the crankcase and fill it out with 20cc of ELF Moto Gear Oil 10 W 40 ANTI Clutch Slippage oil Fit the pipe and its tube again As an alternative you can use also oil Shell advance gear SAE 10 W 40 API GL 3 or an oil with 10W40 viscosity compatible with clutch similar to motorcycle engine oil WARNING Do not throw spent oil into the environment Dispose of it correctly through a...

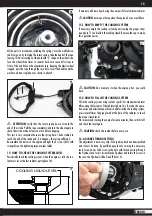
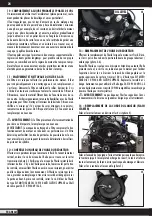
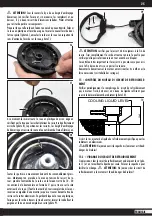
Страница 17: ...oto 10 COOLING LIQUID LEVEL 35 40 10 If necessary add some liquid using the one specific for aluminium radiator CAUTION never open the cap when the engine is hot you could burn 15 1 HOW TO EMPTY THE COOLING SYSTEM If necessary empty the cooling system by unscrewing the proper screw see photo 11 and collect the leaking liquid Remove the cap to make this operation easier 11 CAUTION Do not empty it w...

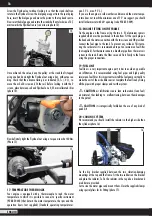
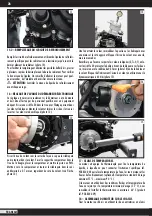
Страница 18: ...nd of quick fit 20 COOLING SYSTEM We recommend you should install the radiator in the higher side than the cylinder photo 16 16 Fix the big bracket supplied between the two vibration dumping mountings at the top and the frame Fit the two rubbers on the bracket and place the radiator To fix the radiator in the top side a bracket and a rubber are provided Cut to size the water pipes and mount them C...

Страница 19: ... fix the propeller flange CAUTION tight the propeller flange following carefully the se quence below Place the washer on the gear shaft Place the flange matching it to the rows of the gear shaft with the projecting side toward the engine Place the centering nut with left threat and hand screw it till the end on the flange the nut will be tightened at all at a later stage Place the propeller the pl...

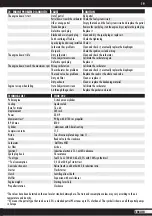
Страница 20: ...he gear and check the clutch and bell wear Replace the fuel mechanic pump Replace the piston the piston rings and the small end bearing Replace the silencer deadening material Replace the reed valve Every 400 hours Replace all the bearings and seals Replace the crankshaft Replace the piston the piston rings and the small end bearing Replace the cylinder TIGHTENING TORQUE VALUE for ENGINE BOLTS and...

Страница 21: ...park plug start the engine dry or replace the spark plug Defective spark plug Replace it Blackened or wet spark plug Clean and dry the spark plug or replace it Earth switching off cable Check the tightening Spark plug hood wrong installed Check it Carburetor has problems Clean and check it eventually replace the diaphragm No spark Check the ignition coil and wiring The engine doesn t idle Dirty ca...

Страница 22: ...hone number Fax number E Mail Address Product purchased on I enclose a copy of receipt invoice Purchaser s signature Pursuant to Art 13 of Legislative Decree No 196 2003 concerning the treatment of the personal data the undersigned authorize the treatment of the transmitted personal data Kindly send this certificate by e mail to news polini com at the moment of your purchase in order to activate t...

Страница 23: ...érents à l utilisation du moteur et du vol Polini décline toute responsabilité contre tous accidents ruptures blessures ou décès Voler requiert toujours une attention maximum Soyez con scients que vous volez sous votre propre responsabilité Avant chaque utilisation vérifier le bon état du moteur Ce moteur n est pas couvert par une assurance de responsabilité En l utilisant vous assumez auto matiqu...

Страница 24: ...s personnes pouvant provoquer blessures ou décès Par conséquent le vendeur ne répondra pas des dommages causés à l utilisateur ou à tiers Pour ces raisons les dommages causés par l installation du moteur sur appareils qui exigent moteurs certifiés sur appareils pour lesquels il n est pas approprié sur appareils qui exigent un type différent de moteur ne sont pas couverts par la garantie Le revende...

Страница 25: ...ne couleur claire de l électrode de la bougie est symptôme d une carburation trop pauvre l usage du moteur dans ces conditions peut facilement porter à la rupture du moteur N utilisez pas le moteur dans ces conditions et adressez vous à un centre autorisé pour le réglage 7 NETTOYAGE Effectuer le nettoyage du moteur seulement à moteur arrêté et froid pour éviter tout risque de brûlure Nettoyer le m...

Страница 26: ...ctionnement du moteur en réduisant ses performances Un filtre détérioré peut faciliter l entrée de particules de poussière dans le mo teur et accélérer par conséquent la normale détérioration des colliers du piston et du cylindre 12 CONTRÔLE DU NIVEAU DE L HUILE DU REDUCTEUR Effectuer ces opérations lorsque le moteur est froid En tenant le moteur vertical enlever la vis du niveau de l huile qui se...

Страница 27: ...mais à la fin de course Tirer complètement la corde et tourner encore la poulie pour vérifier qu elle puisse faire encore un tour avant de se bloquer Ce contrôle est très important car le ressort n a pas été conçu pour arri ver à la fin de course et si ça se passe il se cassera Remonter le démarreur sur le moteur en revissant les 4 vis M5 avec la force nécessaire voir tabelle des serrages 15 CONTR...

Страница 28: ...de la bougie placer le comparateur et mettre le piston au PMS Mettre à zéro le comparateur et tourner le vilebrequin dans le sens antihoraire de 3 7 mm en regardant du côté du volant voir flèche photo 13 13 Une fois atteint la valeur immobiliser la poulie ou le vilebrequin avec une main sur le côté opposé et bloquer l écrou du volant avec une clé mais sans excéder Revérifier que l avance respecte ...

Страница 29: ...ge avant chaque vol nium h 45 en dotation qui doivent être placées dans la partie inferieu re Monter la bougie et le raccord de l eau sur la culasse à l aide des deux vis et de l OR fournis Connecter la durite de l essence au réservoir Pour éviter que des éventuels résidus de saleté entrent dans le carbura teur on souhaite l usage d un filtre d essence à immersion pas fourni Connecter aussi la dur...

Страница 30: ...eur Chaque 150 heures Démontage rèducteur et vérification usure embrayage et cloche Remplacement pompe mécanique carburant Remplacement piston segments et cage aiguille Remplacement matérial insonorisant silencieux Remplacement boite à clapet Chaque 300 heures Remplacement de tous les roulements et joints spy Remplacement vilebrequin Remplacement piston segments et cage aiguille Remplacement cylin...

Страница 31: ...toyage ou remplacement Système d échappement encrassé Nettoyage et remplacement matériel insonorisation Le moteur au ralenti reste emballé Vis de réglage déréglées Faire régler le carburateur Prise d air aux joints Remplacement joints et joints spy FICHE TECHNIQUE THOR 202 Moteur Polini A deux temps monocylindrique Refroidissement A liquide Alésage et course 66 x 60 Cylindrée 205 cm3 Puissance 36 ...

Страница 32: ... Numéro de téléphone Numéro de fax Addresse Mail Produit achété le joint copie du ticket de caisse ou de la facture Signature de l acheteur Aux sens de l art 13 du Décret Législatif 196 2003 relatif au traitement des informations personnelles le soussigné donne son propre consensus au traitement des données personnelles Nous vous prions d envoyer ce certificat par mail à l adresse news polini com ...

Страница 33: ...31 FRANÇAIS ...

Страница 34: ...Polini Motori S p A viale Piave 30 24022 Alzano Lombardo BG Italy Tel 39 035 2275111 news polini com www polinithor com PI 753 02A21 ...

Отзывы: