background image

Print Setup

g

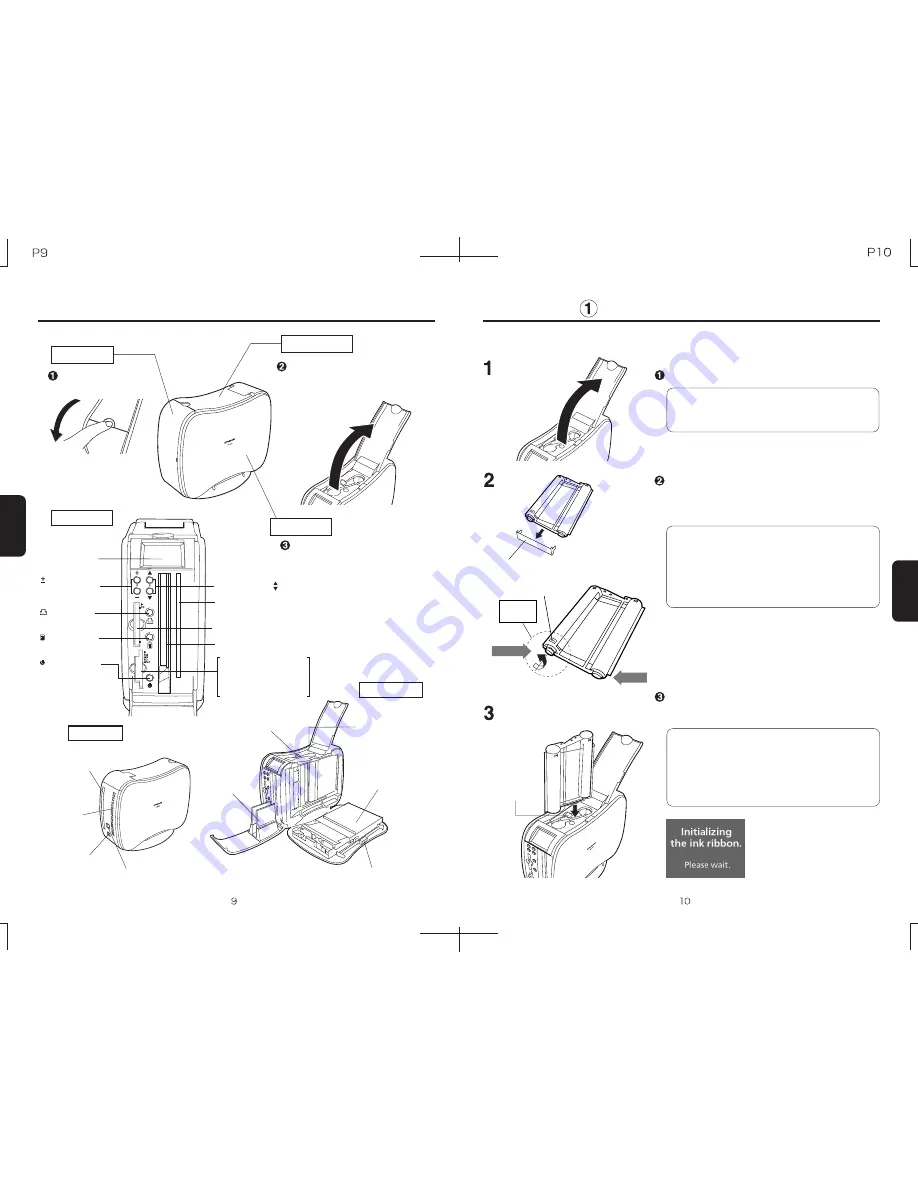
Insert the ink ribbon cassette

Parts Names

Parts Names

Print Setup

Side Cover Lock Button

Open the upper cover of the printer.

Check the orientation of the ink ribbon 

cassette, insert it into the ink ribbon cassette 

slot, and close the upper cover.

After ink ribbon initialization 

is completed, printing will be 

possible.

Note:

The  top  cover  cannot  be  opened  unless  the 

front cover is open.

Note:

When  completely  inserted,  the  ink  ribbon 

cassette will click into place, and the lock lever 

will lock the ink ribbon cassette.  To remove the 

ink  ribbon  cassette,  slide  the  lock  lever  out  of 

the  locking  position  before  removing  the  ink 

ribbon cassette.

Side Cover

Ink Ribbon 

Cassette Slot

 Lock Lever (Green)

Paper Guide

Paper Cassette

Print Quantity 

Buttons

Print Button

Paper Slit

Mode Button

Print Output Slot

Compact Flash Slot

Select Buttons

LCD Monitor

Paper Slit

DC Port

Unit Rear

Unit Front

Note: 

(Refer to diagram at left)

When taking up ink ribbon slack, do not turn 

the ink ribbon core on the take-up side.  Do 

not touch the surface of the ink ribbon.  

Fingerprints or other contaminants on the ink 

ribbon may result in printing problems.

Remove the ink ribbon stopper, and turn the 

ink ribbon axle (the ribbon core on the ink 

supply side) slightly in the direction of the 

arrow to take up any ink ribbon slack.

Remove the ink ribbon stopper

Take up ink ribbon slack

Unit Interior

* Arrow

* Check ink ribbon orientation 

  when inserting.

USB Port

Front Cover

First, open the front 

cover

Pull forward on the catch 

as shown in the diagram.

Upper Cover

After opening the front over, lift 

up on the upper cover as shown 

in the diagram.

After opening the upper cover, 

press the side cover lock button 

and slowly open the side cover.

Memory Card Slot

Smart Media Slot

SD Memory Card Slot

Multimedia Card Slot

Ventilation 

Slits

Axle

bottom

Supply side

Takeup side

Lock lever

Power Button 

(Press and hold 

for 2 seconds to 

turn power off)

Содержание PP46D

Страница 1: ...urchase Damage caused by fire earthquake flood or other act of God or damages due to abnormal operating conditions including pollution salt damage gas damage sulfides or irregular power voltage Any wa...

Страница 2: ...of Unit Contents Please confirm that all of the following items are contained in the box upon opening PP46d Paper guide AC adapter Power cable Instruction manual SOFTWARE LICENCE AGREEMENT Printer dri...

Страница 3: ...uded CD connect the printer via a USB cable sold separately and follow the computer s on screen instructions to transfer image data to the printer Please refer to the manual on the driver CD for insta...

Страница 4: ...may result This mark indicates caution points This mark indicates actions that should not be done Do not use in locations with high grease buildup high humidity large amounts of dust or severe vibrat...

Страница 5: ...to strong vibration or shocks Doing so may result in damage to memory card data or physical damage Do not unplug the printer or remove the AC adapter DC plug during printing Doing so may result in dam...

Страница 6: ...aper Slit DC Port Unit Rear Unit Front Note Refer to diagram at left When taking up ink ribbon slack do not turn the ink ribbon core on the take up side Do not touch the surface of the ink ribbon Fing...

Страница 7: ...ng the side cover guide the cover with your hand and open the cover slowly Remove any surrounding objects before opening the side cover Do not touch any of the interior parts of the printer Side cover...

Страница 8: ...rtup screen is displayed on the LCD monitor If the LCD monitor displays Insert a memory card or connect a USB device insert a memory card refer to page 14 for details or connect a USB device Set up pr...

Страница 9: ...button is held down for 2 or more seconds If the power button is held down for 2 or more seconds during printing it will turn off after the current print is finished Total number of prints Usable butt...

Страница 10: ...is as that at right 2 Press the Print button to begin printing Each index print will contain 25 image thumbnails Index prints will take longer to produce than normal prints Printing Printing Polaroid...

Страница 11: ...elect the setting item 3 Press the or buttons to change the values Polaroid PP46d Users Manual Button Button 4 Press the Print button to switch to the Image orientation settings submenu 2UP 50 8 x 70...

Страница 12: ...new ink ribbon cassette Polaroid PP46d Users Manual Printing gImage rotation gError messages If there is a problem during printing an error message will appear onscreen Please refer to page 22 Ribbon...

Страница 13: ...ation has evaporated Cause Solution The ink ribbon or paper are dirty Please use a clean ink ribbon and clean paper Please refer to page 7 Usage Cautions for details regarding ink ribbon cassettes and...

Страница 14: ...camera All company and product names appearing in this manual are the registered trademarks of their respective owners All specifications depictions and designs presented in this manual are subject t...

Страница 15: ...969 1 300 728 606 43 0 22394 7770 32 0 2 713 20 00 55 11 3167 7426 1 800 268 6970 571 312 5828 33 0 15 638 3600 49 0 696 690 1800 852 2894 0333 39 0 800 820 050 0120 412416 5255 5279 5555 31 0 252 687...

Страница 16: ......

Отзывы: