background image

32

DMC Repair Manual

        Parts Replacement

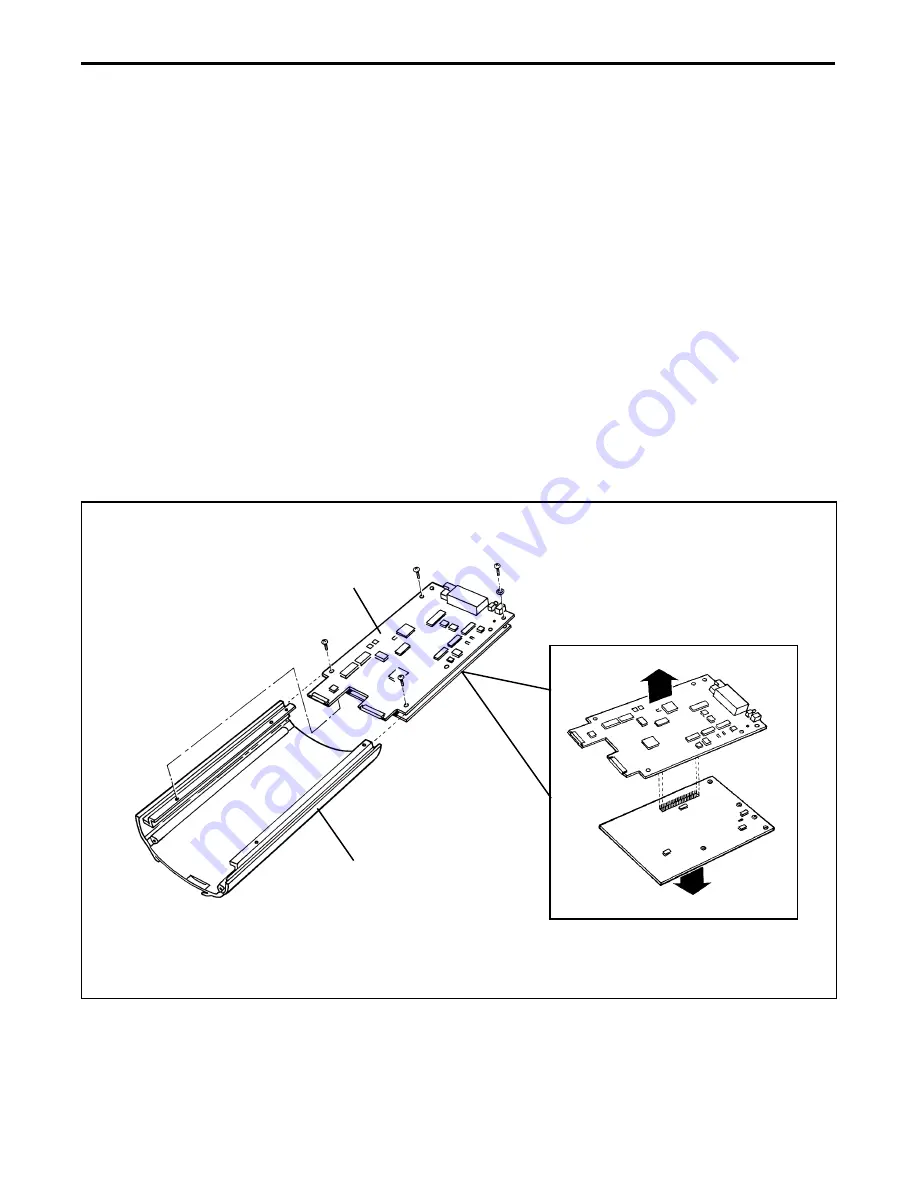
Electronics Assembly (Front End/Back End Boards) (Figure 2-9)

Removal

1. Remove the bottom extrusion.

2. Remove the front panel and optics assembly.

3. Remove the four (4) screws and star washers that secures the electronics assembly to

the top extrusion supports:

4. Slide out the electronics assembly from the top extrusion.

5. Remove the rear panel and XSYNC assembly.

6. Disconnect the back end board (male connector J3) to the front end board (female

connector J3).

Figure 2-9.  Removing electronic assembly (back/front end boards)

Top Extrusion

Electronics

Assembly

Back End

Board

Front End

Board

J3

Содержание Digital Microscope Camera

Страница 1: ...Repair Manual Americas Business Center Technical Services 201 Burlington Road Bedford MA 01730 TEL 1 781 386 5309 FAX 1 781 386 5988 Digital Microscope Camera September 1997...

Страница 2: ...onandCleaning 17 Connectors 17 Screw Replacement Front and Rear Panels 17 Disassembly AssemblyofCamera 18 BottomExtrusion 18 Removal 18 Installation 19 Rear Panel and XSYNC Assembly 20 Removal 20 Inst...

Страница 3: ...iew 40 Front Panel 40 Block Diagram 40 Icon Connector 41 Test Software 41 Tester Operation 41 Starting the Tester 41 Stopping the Tester 42 Quitting the Tester 42 Testing and Adjustment Guidelines 43...

Страница 4: ...bly 20 2 4 Removing front panel and optic assembly 21 2 5 RemovingCCDimager 23 2 6 Removing optics assembly 26 2 7 Removing anti alias optical filter 27 2 8 Removingshutterassembly 30 2 9 Removing ele...

Страница 5: ...1 Camera Overview...

Страница 6: ...6 DMC Repair Manual Camera Overview 1 Camera Overview Contents Overview 7 Features 8 Specifications 11...

Страница 7: ...to an IBM PC PowerMac or PowerPC compatible computer as high resolution 800 x 600 pixels or super high resolution 1600 x 1200 pixels TIFF images Figure 1 1 Digital microscope camera Using the Microsof...

Страница 8: ...ter SCSI port via the provided SCSI cable SCSI Selector Sets the SCSI address of the camera Preset at 4 Note Do not use 7 or 0 which are customarily reserved for the host computer and for PowerMac Pow...

Страница 9: ...camera and other SCSI devices Software Diskettes TWAIN driver for Windows 95 and Windows NT only Plug in software for PowerMac PowerPC systems and Polaroid DMC Direct camera utility software for Wind...

Страница 10: ...5 C mount adapter because it will produce image vignetting dark corners Refer to the applicable microscope s instruction manual or contact the microscope manufacturer for more information about C moun...

Страница 11: ...age 5 8 VDC 3 0A Operating Environment Operating Temperature 32 F 0 C to 120 F 48 C Optimum 60 F 16 C to 80 F 27 C Operating Relative Humidity 5 to 90 No condensation Preview Mode Black and white up t...

Страница 12: ...ows 95 or NT Hardware Requirements Mac or Powerbook 486 or later processor witha Power PC or Pentium recommended later processor RAM 8 MB available 8 MB available 16 MB recommended 16 MB recommended H...

Страница 13: ...2 Parts Replacement...

Страница 14: ...Rear Panels 17 Disassembly AssemblyofCamera 18 BottomExtrusion 18 Removal 18 Installation 19 Rear Panel and XSYNC Assembly 20 Removal 20 Installation 20 Front Panel and Optics Assembly 21 Removal 21...

Страница 15: ...5 DMC Repair Manual Parts Replacement Electronics Assembly Front End Back End Boards 32 Removal 32 Installation 33 VanityPanel 34 Removal 34 Installation 34 XSYNCConnector 35 Removal 35 Installation 3...

Страница 16: ...ent Anti static mat ESD wrist strap Lenscleaningtissue Dust and static free wiping cloth Texwipe type TX309 RTV Sealant Dow Corning 3140 Cotton gloves or finger cots Standard tool kit Front panel fixt...

Страница 17: ...path does not degrade its performance Connectors The connectors in the Digital Microscope Camera have locking tabs Figure 2 1 which secures the flex cable in place To remove a flex cable first pull b...

Страница 18: ...should be taken throughout all disassembly and reassembly procedures never to smudge or soil the camera s anti alias optical filter or CCD imager Bottom Extrusion Figure 2 2 Removal 1 Remove the two...

Страница 19: ...rusion onto the camera assembly making sure its tripod mount screw hole faces the front panel 2 Install and tighten the two 2 screws that secures the bottom extrusion to the rear panel 3 Install and t...

Страница 20: ...e XSYNC cable leads from connector J4 on the back end board Figure 2 3 Removing rear panel and XSYNC assembly Installation 1 Reconnect the XSYNC cable to connector J4 on the back end board 2 Position...

Страница 21: ...op extrusion Note Be careful not to break or damage the shutter or CCD imager flex scratch the front panel scratch or dirty the anti alias optical filter 4 Usingtweezersorasmalljewelers flatscrewdrive...

Страница 22: ...er flex and connector J5 to secure the CCD imager flex 3 Position the front panel onto the top extrusion being careful not to pinch or grimp the shutter or CCD imager flex between the top extrusion an...

Страница 23: ...front panel supports 5 Remove the CCD retainer and the backing pad 6 Gently lift off the CCD imager from the optical mount being careful not to scratch the CCD imager 7 Using tweezers or a small jewe...

Страница 24: ...ager PC board making sure that the small and large tabs are properly positioned 5 Place the CCD retainer over the CCD imager and backing pad assembly making sure that the CCD imager is properly positi...

Страница 25: ...ic mat 4 Remove the three 3 screws securing the optics assembly to its front panel supports 5 Remove the CCD retainer and the backing pad 6 Lift off the CCD imager from the optical mount being careful...

Страница 26: ...pad over the CCD imager PC board making sure that the small and large tabs are properly positioned 4 Place the CCD retainer over the CCD imager and backing pad assembly 5 Install and tighten the three...

Страница 27: ...CCD retainer and the backing pad 6 Lift off the CCD imager from the optical mount being careful not to scratch the CCD imager 7 Remove the optical mount and shutter asssembly from the front panel and...

Страница 28: ...Note Make sure that the optical mount is inserted into the optical mount fixture with the threadsidefacingupandthemotorontheshutterfacingdown 2 Placetheanti aliasopticalassemblyintotheopticalmountmak...

Страница 29: ...ver the CCD imager and backing pad assembly 10 Install and tighten the three 3 screws that secures the optics assembly to its front panel supports 11 Install the front panel and optics assembly onto t...

Страница 30: ...ove the optical mount from the front panel and place it into the optical mount fixture 7 Removetheanti aliasopticalfilterassemblybeingcarefulnottoscratchordirtyit 8 Rotate the optical mount on the opt...

Страница 31: ...ssemblytotheopticalmount 4 Rotatetheopticalmountontheopticalmountfixturetoaccessthefrontoftheopticalmount 5 Install the anti alias optical filter assembly 6 Hold the spanner nut securely while securin...

Страница 32: ...star washers that secures the electronics assembly to the top extrusion supports 4 Slide out the electronics assembly from the top extrusion 5 Remove the rear panel and XSYNC assembly 6 Disconnect the...

Страница 33: ...he notch on the base of the top extrusion Back end board slides into the channel of the the top extrusion Front end board rests above the supports of the top extrusion 3 Connect the XSYNC connector to...

Страница 34: ...anel from the channel in the top extrusion Figure 2 10 Replacing vanity panel Installation 1 Slide the replacement vanity panel into the channel in the top extrusion 2 Install and tighten the four 4 s...

Страница 35: ...mbly connector XSYNC cable and screw Nylonshoulderwasher 3 Usingthe XSYNCnutdriver removethenutandlugcableasssembly thatsecurestheXSYNC assemblytotherearpanel Note Nutandlugassemblyconsistsof nut Inne...

Страница 36: ...ly 4 Assemble the XSYNC cable assembly and the XSYNC lug cable assembly to the rear panel asfollows Place the XSYNC cable assembly and white nylon washer into its recessed support hole at the front of...

Страница 37: ...3 Testing and Adjustment...

Страница 38: ...ting the Tester 42 Testing and Adjustment Guidelines 43 Testing and Adjustments 44 Pretest 44 Required Test Equipment and Tools 44 EquipmentSetup 44 Test Procedure 47 Calibration 52 Required Test Equi...

Страница 39: ...tment Cleaning Anti Alias Optical filter and CCD Window 69 Required Test Equipment and Tools 69 EquipmentSetup 69 Test Procedure 70 ChangingCameraSerialNumber 72 Required Test Equipment and Tools 72 E...

Страница 40: ...ce It serves as an interactive interface for supplying inputs to and observing outputs from the instrumentation system LabView makes creating a front panel as simple as drawing a picture and gives the...

Страница 41: ...era tests At the completion of the specified test a report file is generated by the Tester indicating whether or not the tested functions passed Pass or failed Fail It also list the current parameters...

Страница 42: ...the mouse on the stop box to completely stop the DMC s test sequence The black arrow changes to a white arrow indicating that the run time version of LabView stopped running 2 To restart the Tester j...

Страница 43: ...and dialog boxes appear and disappear throughout the test process Use the following test guidelines to perform the requested user tasks Yes No Click on appropriate response Yes or No DialogBoxes Messa...

Страница 44: ...nt Setup Figure 3 1 1 Attach the Navitar CCTV 12 5mm C mount lens onto the camera lens 2 Set the lens to f stop 8 at 4 feet 3 Place the camera onto the test fixture camera nest 4 Connect the SCSI cabl...

Страница 45: ...as follows Power Computing Power PC On Off 0 1 switch to On 1 0 10 Vdc external power supply On Off switch to On Adjust power supply output to 6 Vdc Set the 1 ohm resistor box Manual LV switch to LV L...

Страница 46: ...t 1 Ohm Resistor Box Ribbon Cable not shown Out to computer 6 Vdc Out to PC Grn Manual LV LabView Switch 6Vdc In From external power supply 1 Ohm Resistor Box Grn Equipment Setup MacBeth Color Checker...

Страница 47: ...D icon The HD windows appears 3 Double click on the DMC folder The DMC window appears 4 Double click on the Pretest folder The Pretest window appears 5 Double click on the Pretest VI icon This action...

Страница 48: ...ck on the Power button The Power Test screen appears prompting you to turn on the DMC camera Click on the OK button The Pretest VI panel reappears SCSI Communications Test Click on the SCSI Communicat...

Страница 49: ...he Set Defaults screen appears Click on the Defaults button The action sets the EEPROM test defaults Snap Test Click on the Snap test button A window appears on the Pretest VI panel indicating that th...

Страница 50: ...approximately 1 foot in front of the camera to check for dark spots this test also checks foil for flair bloom Once white paper is placed in front of the camera click on the OK button A white screen a...

Страница 51: ...check the image for noise and horizontal streaks Click the appropriate button Yes or No SCSI ID Switch Click on the SCSI ID Switch button The SCSI ID Switch panel appears Click on the applicable SCSI...

Страница 52: ...Power Supply Camera SCSI Cable Camera Test Fixture Nest Keithly 485 AutoRanging Picoammeter or Equivalent Polaroid Model B Light Source DMC Blue Box with Photodiode attached to glass Diorama Test Benc...

Страница 53: ...rash 4 Connect the power adapter cable to the camera s external power connector 5 Place the camera onto the test fixture 6 Center the camera in front of the Model B light source making sure the test f...

Страница 54: ...r and focus Camera Power Supply Power Computing Power PC Camera SCSI Cable Model B Light Box Camera Nest Picoammeter DMC Camera Photodiode Camera Power Supply Power Computing Power PC DMC Camera Camer...

Страница 55: ...ibration test equipment setup neutral density filter Camera Power Supply Power Computing Power PC DMC Camera Camera SCSI Cable Diorama Camera Nest Diorama Bench Auxiliary Strobe Neutral Density Filter...

Страница 56: ...ve HD windows appears 3 Double click on the DMC folder The DMC window appears 4 Double click on the Calibration icon The Calibration icon window appears 5 Double click on the Calibration icon This act...

Страница 57: ...on the white arrow Arrow changes to black indicating that the test program is running 9 Click on the Start button to automatically start the selected LabView VI test program A message appears prompti...

Страница 58: ...0 Cd Ft2 candles per foot click on the Start button This action starts the selected LabView vi calibration program 15 Upon completion of the ambient portion of the calibration test program a message a...

Страница 59: ...on the Yes button The screen displays the message Is this image noisy with horizontal streaks 23 Click on the NO button The screen displays the message Is this image noisy with horizontal streaks agai...

Страница 60: ...een displays the Cal Archive window indicating whether or not a particular calibration test passed Pass or failed Fail Note If any of the calibration tests failed Fail refer to the Calibration Trouble...

Страница 61: ...the host computer SCSI connector to the camera SCSI connector Note When connecting or disconnecting SCSI cables always make sure that the computer is OFF If the computer is ON reading or writing to th...

Страница 62: ...s follows If applicable set the SCSI ID to 4 Set the Termination Selector to Off 0 Set Power Switch to On 0 Figure 3 5 Image performance test setup Kyoritso Light Box DMC Camera Camera SCSI Cable Powe...

Страница 63: ...ble click on the hard drive HD icon The HD windows appears 3 Double click on the DMC folder The DMC window appears 4 Double click on the Image Performance folder The Image Performance window appears 5...

Страница 64: ...rrow should change to black This action automatically starts the selected LabView VI test program 7 Upon completion of the image performance procedure the screen displays a panel indicating whether or...

Страница 65: ...SCSI connector Note When connecting or disconnecting SCSI cables always make sure that the computer is OFF If the computer is ON reading or writing to the internal hard drive while connecting or disco...

Страница 66: ...ter user password 2 Double click on the hard drive HD icon The HD windows appears 3 Double click on the Dust Buster folder The Dust Buster window appears HD Icon Dolan Jenner Light Source DMC Camera C...

Страница 67: ...LabView VI test program is loaded the front panel appears indicating that the selected LabView VI test program is waiting for run instructions 6 Click on the white run arrow Arrow should change to bl...

Страница 68: ...eed to step 10 Should be less than 2 dust particles in the window If more than 10 dust particles appear in the window area clean the Anti alias filter and CCD window as explained in the cleaning proce...

Страница 69: ...computer SCSI connector to the camera SCSI connector Note When connecting or disconnecting SCSI cables always make sure that the computer is OFF If the computer is ON reading or writing to the interna...

Страница 70: ...ser password 2 Double click on the hard drive HD icon The HD windows appears 3 Double click on the collimation folder The Collimation window appears 4 Double click on the Collimation VI icon This acti...

Страница 71: ...10 Should be less than 2 dust particles in the window If more than 10 dust particles appear in the window area clean the Anti alias and CCD window as explained in the cleaning procedure To save the sc...

Страница 72: ...ble Universal Camera Test Fixture Nest Equipment Setup Figure 3 8 1 Connect the SCSI cable from the host computer SCSI connector to the camera SCSI connector Note When connecting or disconnecting SCSI...

Страница 73: ...st Procedure 1 If applicable enter user password 2 Double click on the hard drive HD icon The HD windows appears 3 Double click on the DMC Serial folder The DMC Serial window appears HD Icon DMC Camer...

Страница 74: ...Manual Serial front panel appears 7 Enter Serial Number exactly as shown on Camera label Format MMYYDD cc CCC MM Month Jan Dec 01 12 YY Year 96 97 DD Day Decimal 1 31 Daily camera count 0 255 cc Confi...

Страница 75: ...ble click on the LabView Preferences box The Find local file Desktop window appears 10 Select and double click on the Hard Drive box The Find local file Hard Drive window appears 11 Select and double...

Страница 76: ...e serial number to be entered Notes If the serial number to be entered is correct click on OK If the serial number to be entered is incorrect click on cancel and then repeat this procedure to enter th...

Отзывы: