background image


29 

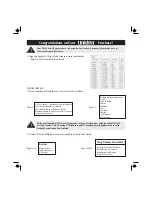
If you prefer not to see this reminder message again, you may: 


Check the box of [Do not show this message again] within this message window, 
and then click [OK] button. 


Click  on  the  QuickScan  icon 

 located  on  the  Windows  system  tray.    Uncheck 

[Enable  Warning]  from  the  menu  that  pops  up.    Click  the  [No]  button  in  the 
message box that appears. 


Attention 

If  you  would  like  to  be  prompted  with  this  message  again,  you 
may click on the QuickScan icon 

 and check [Enable Warning] 

from the menu that pops up. Click the [Yes] button in the message 
box that appears. 

Scanning Problems 

Most problems are easily solved, and some of the most common questions and their 
recommended solutions are listed below.  

Symptom 

Cause & Solution 

The scanner 
cannot be found 


The USB cables are not connected properly


Make sure that the cables are connected tightly and to the 
proper port. 


The USB cable might be too long


Please use the USB cable that comes with your scanner. 


The scanner’s power cord is not connected properly


Make sure that the AC adapter is connected to an outlet. 
If the scanner is connected to a Surge Protector, make 
sure that the Surge Protector is turned on. 


Windows didn’t detect the scanner


1) Please open [Start] > [Control Panel] > [System] > 
[Hardware] > [Device Manager]. 
2) Please check if your scanner is properly listed under 
[Imaging Devices]. If it is not listed there or the device 
icon has an exclamation mark, please refer to “

Manually 

Installing the Software

” to install the device drivers. 

Содержание OpticFilm 8100

Страница 1: ... Installation Usage Maintenance Troubleshooting ...

Страница 2: ... may be prohibited by law and or subject to criminal prosecution We recommend you to be responsible and respectful of the copyrights laws when you are scanning books magazines journals and other materials Environmental Information Recycle or disposal at end of life information please ask local distributors or suppliers for recycle and disposal information The product is designed and produced to ac...

Страница 3: ...ndows 15 MAC OS X INSTALLATION 17 CHAPTER II OPERATING THE SCANNER 19 USING INTELLISCAN BUTTON 19 USING QUICKSCAN BUTTON 20 QUICKSCAN SETTINGS AND PREVIEW WINDOW FEATURES 20 CHAPTER III BASIC SCANNING 25 STEP 1 TURN ON YOUR SCANNER 25 STEP 2 PLACE FILM IN THE HOLDER 25 STEP 3 INSERT THE FILM HOLDER 26 STEP 4 PRESS THE QUICKSCAN BUTTON 27 STEP 5 CONFIGURE QUICKSCAN SETTINGS 27 STEP 6 FINISH SCANNIN...

Страница 4: ...section of this manual describes the box contents and minimum computer requirements to use this scanner Before you start installing your scanner check the box contents to make sure all parts are included If any items are damaged or missing please contact the vendor where you purchased your scanner or our customer service directly Chapter I describes how to install scanner s software and connect th...

Страница 5: ...om a cold to a warm location after a cold room is heated when this device is placed in a damp room To avoid the moisture condensation you are recommended to follow the procedure i Seal this device in a plastic bag for it to adapt to room conditions ii Wait for 1 2 hours before removing this device from the bag 2 Do use the power adapter and USB cable provided with the scanner Use of other power ad...

Страница 6: ...s in a cool dry place out of direct sunlight Handle with care as improper storage and handling can lead to deterioration and ultimately affect your scan results System Requirements1 Windows 2 GHz CPU or above 2 GB RAM 4 GB RAM recommended 10 GB Free Hard Disk Space CD DVD Drive or Internet Connection USB Port Microsoft Windows XP Vista 7 8 Macintosh 2 GHz CPU or above INTEL based CPU NO PowerPC 2 ...

Страница 7: ...erSoft SilverFast DVD ROM Serial Number Setup Application CD ROM 35 mm IT 8 Target 35 mm IT 8 Target is not included in all scanner models Attention The SilverFast serial number is located on the front of the SilverFast DVD ROM case 2 Save the box and packing materials in case you need to transport this scanner in the future ...

Страница 8: ...se the power cord is not properly plugged into an AC power outlet IntelliScan Button You may press the button to launch the SilverFast application QuickScan Button You may press the button to perform a predefined scanning task Power Button Use this to turn the scanner ON or OFF Serial Number Sticker Located at the rear of the scanner You will need it when you contact your dealer or our service cen...

Страница 9: ...mm filmstrips max 6 frames Using Mounted Slide Holder Insert mounted slides into slots with emulsion non glossy side down There are arrows and illustrations on the frame of each slot Please follow illustrations to insert mounted slides Using filmstrip holder Place filmstrip in the film holder with emulsion non glossy side down then snap the film holder cover closed ...

Страница 10: ...canner where power cord and USB cord are located and keep emulsion non glossy side down There is text on the top and bottom of the film such as manufacturer frame numbers film codes batch numbers etc With the film oriented correctly as described above this text should be read clearly i e not backwards or up side down ...

Страница 11: ... to review the following maintenance tips Avoid using the scanner in a dusty environment When it is not in use keep the scanner covered Dust particles and other foreign objects may damage the unit Do not attempt to disassemble the scanner There is danger of an electrical shock and opening your scanner will void your warranty Do not subject the scanner to excessive vibration It may damage the inter...

Страница 12: ...mple room for the installation as well as for scanning and saving images a minimum of 10 GB of hard disk space is recommended Hardware Requirements This scanner connects to your computer through the Universal Serial Bus USB which supports hot Plug and Play Note that on some computers the USB port at the rear of the computer may be occupied and additional ports may be found on the monitor or keyboa...

Страница 13: ... power adapter into the scanner s power receptor Plug the other end of the power adapter into a standard AC power outlet Plug the square end of the included USB cable to the USB port at the rear of the scanner Plug the rectangular end of the USB cable to the USB port on the back of your computer Note If there is another USB device connected to the computer connect the scanner to an available USB p...

Страница 14: ...automatically browse your CD ROM drive and manually run the install exe file 2 Click on the Yes button if the User Account Control dialog pops up If the pop up wizard window appears click Next and click Install this driver software anyway in the Windows Security window then click Finish in the wizard window 3 Follow the on screen instructions to install all software that your new USB scanner requi...

Страница 15: ...hed and the scanner and computer are communicating with each other Appearance Status The QuickScan program has been successfully launched and the scanner is connected with the computer ready to scan mages The scanner is not connected with the computer No Display You have chosen to terminate the QuickScan program no matter the scanner is connected or disconnected with the computer Attention For Win...

Страница 16: ...the instructions in the pop up installation message 2 In the Device Manager window right click on this scanner under Other devices and select Update Driver Software from the pop up menu Click Browse my computer for driver software in the window that appears and click the Browse button 3 In the Browse For Folder window select the folder or the CD ROM drive that contains this scanner s driver and cl...

Страница 17: ...as power You are using the USB cable supplied with the scanner The square end of the USB cable is plugged into the rear of the scanner The rectangular end of the USB cable is plugged into the back of your computer If you deviated from the installation procedures defined in this manual please unplug the USB cable from the scanner and reinstall the software from the CD ROM To reinstall your scanner ...

Страница 18: ... to install the application 1 Follow the on screen instructions Please activate the I accept the terms of the License Agreement checkbox and click on Next to continue 2 Please select the components to install by activating the respective checkbox Then click on Next to continue 3 If you wish to install the application to an alternate folder please enter the exact path in the Destination Folder fiel...

Страница 19: ... then click on Start to launch the program 6 Once the program has been launched enter your First name Last name and Serial number then click on Unlock to unlock SilverFast Keep the SilverFast DVD in the computer until you have unlocked SilverFast The SilverFast serial number is located on the front of the SilverFast DVD ROM case 7 Please wait while the program is being launched This is what the ma...

Страница 20: ...t Please insert the SilverFast DVD into your optical drive and double click on SilverFast Install to launch the installation wizard then follow below illustrated guide to install the application 1 Follow the on screen instructions When prompted to agree to the terms of the software license agreement click on Agree to do so 2 Click on Install to begin installing the application 3 Enter the Password...

Страница 21: ...unch the program 6 Once the program has been launched enter your First name Last name and Serial number then click on Unlock to unlock SilverFast Keep the SilverFast DVD in the computer until you have unlocked SilverFast The SilverFast serial number is located on the front of the SilverFast DVD ROM case 7 Please wait while the program is being launched This is what the main interface of the Silver...

Страница 22: ...scanner software An image editing program has been bundled with your scanner on the included Setup Application CD ROM It will allow you to alter and correct any scanned images by using a variety of filters tools and effects QuickScan is a program that allows you to conveniently scan images without the need to work directly within any image editing application Please refer to the QuickScan Setting ...

Страница 23: ...ows system tray or right click on the QuickScan icon and from the menu that pops up point to Properties Select Scan Source the material to be scanned Purpose the post processing software to be saved or be processed File Format the format to be saved in Destination Folder the file saving path and File name prefix the film name followed by 4 digits starting from 0000 for sequential scans Check Previ...

Страница 24: ... and Gamma settings Click the Default button if you desire to return to the default settings Click the Close button to save the final settings and exit the QuickScan Setting window Important Scan Settings Purpose This menu includes File Page Manager Photoshop functions which allows you to determine which software you would like to use for the post processing of the scanned image s ...

Страница 25: ...s available in Transparency mode only Attention Due to different color processing method Auto Density feature and Color Matching feature cannot be applied simultaneously If Auto Density is checked then Color Matching feature will be in gray out status and unavailable Likewise if Color Matching is checked then Auto Density feature will be in gray out status and unavailable Multi Sampling For fast s...

Страница 26: ...canning negative films Scan Mode Tells the scanner the type of document you are scanning There are three settings to choose from 8 bit grayscale scans in 256 shades of gray giving black and white images 16 bit grayscale scans in more than 65 000 shades of gray improving the realism of b w images 24 bit Color scans in millions of colors for photo realism Choose this mode when scanning color slide o...

Страница 27: ...g Sharpen Allows you to sharpen the edges within an image by making the edges in an image more distinct The Sharpen filter also increases contrast by making dark edges darker and surrounding light edges lighter Sharpen More Adds additional sharpening Unsharpen Sharpens the edges in an image to remove the blurriness Brightness This is the amount of light that is concentrated onto a document while i...

Страница 28: ... simple guide for that purpose Step 1 Turn on Your Scanner Please make sure the scanner s USB and power cables are properly connected and that the scanner is turned on by pressing the power button The Power LED will turn on to indicate that the device is powered on Step 2 Place Film in the Holder Please use the included mounted slide holder and filmstrip holder to secure your slides and film for s...

Страница 29: ...canner to insert and remove the film holder Attention You can feel the film holder stop in its index position However before performing scan please gently push and pull the film holder to make sure the film holder is in correct position On up side of the film holder you can see Mounted Slide Holder or Filmstrip Holder Always keep this side up for correct scan results The film holder should be able...

Страница 30: ...hecked Enable and Confirm in the Preview section of the QuickScan Settings window a preview window will be opened where you can readjust some of the settings to your needs Please refer to Chapter II Preview Window for more information about the available settings Step 6 Finish Scanning Once you have confirmed that all settings are to your satisfaction please click on the Scan button to perform the...

Страница 31: ...e scanner and computer are communicating with each other Appearance Status The QuickScan program has been successfully launched and the scanner is connected with the computer ready to scan mages The scanner is not connected with the computer No Display You have chosen to terminate the QuickScan program no matter the scanner is connected or disconnected with the computer If the Windows system start...

Страница 32: ...ns and their recommended solutions are listed below Symptom Cause Solution The scanner cannot be found The USB cables are not connected properly Make sure that the cables are connected tightly and to the proper port The USB cable might be too long Please use the USB cable that comes with your scanner The scanner s power cord is not connected properly Make sure that the AC adapter is connected to a...

Страница 33: ...nge the Monitor Gamma settings in either of the programs so that they match Please consult the help files for each program to find out how to adjust the Monitor Gamma The image looks good on screen but very dark when printed The Monitor Gamma Settings or the scanner brightness settings are not set properly 1 Change the Monitor Gamma to a value between 1 0 and 1 5 Please consult your help file for ...

Страница 34: ...olution A Disk I O error message is displayed This error is caused if the hard disk drive does not have enough space available to process the image Make some space available in the hard disk drive by deleting any programs or files that you do not need Your hard disk drive might be heavily fragmented or it might contain some bad sectors Run the Scan Disk utility that came with your Windows computer...

Страница 35: ... 36 sec Multi Sampling ON 7200 dpi Approx 113 sec Multi Sampling ON Scanning Area W x L 36 8 mm x 25 4 mm 1 45 x 1 Preview Speed Negative Film Approx 8 sec Multi Sampling ON Positive Film Approx 8 sec Multi Sampling ON Action Button IntelliScan QuickScan Power Supply 15 Vdc 1 0 A Interface USB 2 0 Net Weight 1 6 Kgs 3 5 Lbs Dimensions W x D x H 120 x 272 x 119 mm 4 73 x 10 7 x 4 7 3 Hardware speci...

Страница 36: ...in Scanning Speed 3600 dpi Approx 36 sec Multi Sampling ON 7200 dpi Approx 113 sec Multi Sampling ON Scanning Area W x L 36 8 mm x 25 4 mm 1 45 x 1 Preview Speed Negative Film Approx 8 sec Multi Sampling ON Positive Film Approx 8 sec Multi Sampling ON Action Button IntelliScan QuickScan Power Supply 15 Vdc 1 0 A Interface USB 2 0 Net Weight 1 6 Kgs 3 5 Lbs Dimensions W x D x H 120 x 272 x 119 mm 4...

Страница 37: ...00 dpi Approx 36 sec Multi Sampling ON 7200 dpi Approx 113 sec Multi Sampling ON Scanning Area W x L 36 8 mm x 25 4 mm 1 45 x 1 Preview Speed Negative Film Approx 8 sec Multi Sampling ON Positive Film Approx 8 sec Multi Sampling ON IT8 Target Included for color accuracy Action Button IntelliScan QuickScan Power Supply 15 Vdc 1 0 A Interface USB 2 0 Net Weight 1 6 Kgs 3 5 Lbs Dimensions W x D x H 1...

Страница 38: ...d its model number The speed of your CPU Pentium 133 etc Your current operating system and BIOS optional Name of software package s version or release number and manufacturer of the software Other USB devices installed Service Support Information For EU country only Where appropriate the period of availability of spare parts and the possibilities of upgrading products information Please ask local ...

Страница 39: ... Upon provision of proof of purchase replacement parts assume the remaining warranty of the parts they replace Before presenting this product for warranty service you must remove all programmes data and removable storage media Products returned without guides and software will be replaced without guides and software This Limited Warranty service does not provide for carry in exchange when the prob...

Страница 40: ... protection against harmful interference in a residential installation This equipment generates uses and can radiate radio frequency energy and if not installed and used in accordance with the instructions may cause harmful interference to radio communications However there is no guarantee that interference will not occur in a particular television reception which can be determined by turning the ...

Отзывы: