background image

E-4

Main unit [1]

Printer* [1] 

Please see the instruction manual of the printer for informa-
tion about the printer accessories. 
*  Depending  on  the  type  of  product  you  have  purchased, 

the printer may be sold separately.
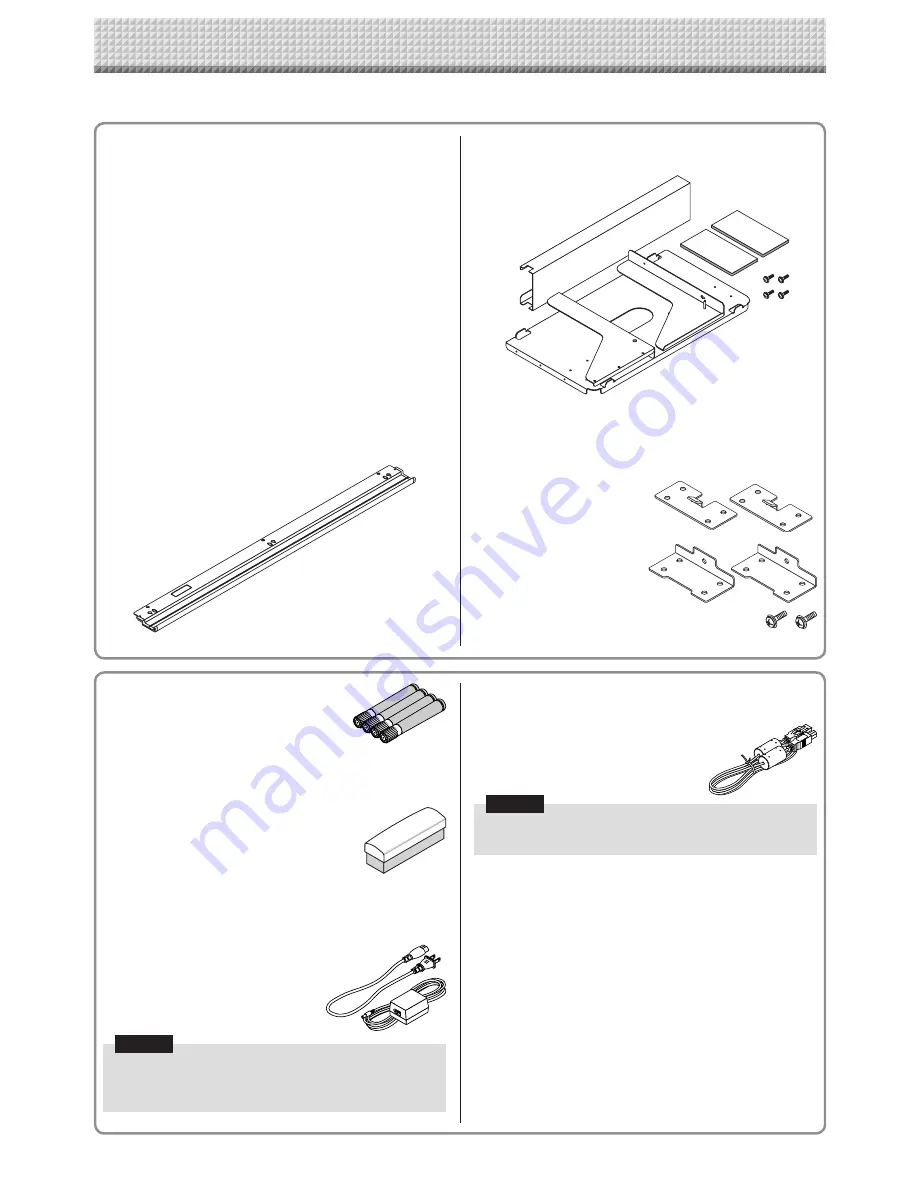
Stand [1]

A mobile stand (with casters) for supporting the main unit. A 
printer table and AC adapter box are included. For the con-
tents  of  the  stand’s  package  and  instructions  on  assembly, 
see  the  stand’s  instructions  or  the  separate  Assembly  and 
Setup Manual.

Pen tray [1]

Pen  tray  fixing  screws  (M4  ×  20)  (temporarily  fastened  on 
main unit)
N-20S/N-204: 3 screws, N-20W: 4 screws
(See the Assembly and Setup Manual for assembly instruc-
tions.)

Wall mount printer table [1 set]

Bracket fixing screws (M4 × 8): 4
AC power adapter box: 1
Velcro: 2 sets
*  Sold separately.

Wall brackets [1 set]

These  are  brackets  for  mounting  the  main  unit  on  a  wall. 
(See the Assembly and Setup Manual.)

Upper wall brackets: 2

Lower wall brackets: 2

Main unit fixing screws (M4 × 12: 2)
*  Sold separately for some products.

Dedicated eraser [1]

Use this to erase the drawing. 

Copyboard Accessories 

Dedicated markers 

(One each of black, red, blue, and green) 
Use these markers to draw on the sheet 
surface. 

AC power adapter (with power cord) [1]

This is the power adapter for supplying power to the copy-
board (See Page E-53).
(LTE36E-S2-3)

USB cable (type B 

 type A) [1]

[PLUS code 715258900]

Documents 

CD-ROM [1]

Includes the User’s Manual (this manual) in PDF format.
The User’s Manual contains instructions on using the copy-
board.

Important Safety Information [1]

Includes  instructions  to  be  heeded  in  order  to  use  the  set 
safely.

Assembly and Setup Manual

Includes  instructions  on  installing  the  set  and  connecting  it 
with the printer (sold separately).

Cable for connecting the main unit to a 
computer.
Used for making the device settings.

Notice

•  Do  not  use  this  cable  for  connection  to  the  printer 

(sold separately).

Notice

•  The  included  AC  power  adapter  and  AC  power  cord 

are exclusively for use with this unit. Never use them 
with other products.

The package contents are as described below. Please check before use. 

Package Contents

Содержание N-204

Страница 1: ...l Thank you for your purchase of the PLUS Copyboard Please read this User s Manual carefully before use to take full advan tage of the functions of this product After you have finished reading the man...

Страница 2: ...not move the sheet with tape etc attached to it Doing so could result in malfunction Do not attach template sheets or paper to the sheet Do not copy while film type objects or papers are attach to the...

Страница 3: ...ctions Specific to Model N 204 E 10 Operation Steps E 11 Setting the Time E 12 Description of Operations E 12 Printing printer sold separately E 14 Preparing the Printer E 14 Basic Printing Operation...

Страница 4: ...crews M4 12 2 Sold separately for some products Dedicated eraser 1 Use this to erase the drawing Copyboard Accessories Dedicated markers One each of black red blue and green Use these markers to draw...

Страница 5: ...printer here See the Assembly and Setup Manual Stand This stand supports the copyboard See the Assembly and Setup Manual Main unit Pen tray Depending on the product you have purchased the printer may...

Страница 6: ...er use it only with a printer This illustration does not show the printer or connection cords Personal computer PC dedicated USB port Type B Connect this with the USB port type A of the PC Used to con...

Страница 7: ...is illustration does not show the connection cords Mounting hole Hook lock screw Rear frames lock screws Stand CAUTION At least two persons should hold the main unit If not the main unit could drop or...

Страница 8: ...ry not recognized Lit red Off USB Memory storage problem USB memory not connected Memory is full Warning that disconnection of USB memory has been forgotten Reading error Flashing red Flashing red Sys...

Страница 9: ...USB A Memory port USB Type A Saves in commercially available USB memory images that have been read by the copyboard 13 Status These indicators notify of errors in the copyboard USB memory device netwo...

Страница 10: ...r Output to paper Storing on USB memory device Storing of image on computer Basic Functions Printing Storing on USB memory devices Capturing images on a com puter Network Functions Viewing images stor...

Страница 11: ...on the screen is printed out to the printer When a USB memory device or computer is connected the image on the screen is saved as image data when the Save button is pressed For the memory for computer...

Страница 12: ...ng The mode switches each time the Save button is pressed Contents of setting mode displayed on display window First 2 digits Last 2 digits Christian year Month Day Hours Minutes 3 Set the setting mod...

Страница 13: ...es the time setting Use the Color Print Increase and B W Print Decrease buttons to select 10 the month then press the Save button to enter The display switches to c4 setting of day Use the Color Print...

Страница 14: ...tion of the paper that can be used Notice Depending on the printer s specifications some time may be required for cleaning of the print head Switch on the power Press the power switch The power indica...

Страница 15: ...et surface scrolls one screen s worth to the right to the previous screen and stops automatically To stop during scrolling press the Scroll Stop or button again Note To display the next screen press t...

Страница 16: ...l be printed The one screen portion is reduced to A4 paper size and printed For wide type copyboards model N 20W the image is compressed about 75 in the horizontal direction To print with the same pro...

Страница 17: ...print thumbnails of 3 screens specify thumbnails of 4 screens arranged horizontally or vertically If there is a blank screen in the specified sequence that screen is printed as a blank If the ON Stand...

Страница 18: ...will be substantially off This product uses an endless sheet Note that the position of the scanned images may go slightly off due to stretching of the sheet or slippage Consecutive printing number ind...

Страница 19: ...rning on the power wait about 5 seconds or more after the power plug has been connected before pressing the ON Standby button Press the ON Standby button to switch on the power The LED of the display...

Страница 20: ...Press the Save button to store The reading operation is performed for a one sheet portion while the sheet is scrolled and USB memory storage starts after the scrolling completes For model N 204 multip...

Страница 21: ...e Image files are stored in this folder By factory setting upon purchase image files are named PV xxx jpg JPEG files where xxx refers to a 3 digit number starting from 001 ex PV 001 jpg When consecuti...

Страница 22: ...Disconnect the USB memory The disconnecting procedure depends on the computer s operating system For details refer to the computer s operating instructions or help files 1 Click the Hardware Removal i...

Страница 23: ...torage The memory for computer storage cannot be formatted from a computer Do not disconnect the USB cable or access the copyboard while data is being saved after pressing the copyboard s Save button...

Страница 24: ...is the scanned image file jpg png or pdf according to setting The setup folder contains the simple network settings file 3 Copy the CBImage file to My Documents etc on the computer jpg png or pdf acc...

Страница 25: ...ewall is activated The following explanation assumes that the LAN cable has been connected and the various network settings have been completed Saving scanned images on the copyboard or FTP server Pre...

Страница 26: ...e is not enough space in the save to location Delete image files to pro vide space See pages E 29 E 31 If the ON Standby button is pressed during the scanning operation saving is interrupted and the i...

Страница 27: ...to Board The scanned images are saved on the copyboard These images are downloaded transferred onto the computer connected on the network Downloading is possible even when the copyboard is in the stan...

Страница 28: ...When the radio button is clicked it is checked and a preview image is displayed Download the image onto the computer 1 Click the Download button 2 The computer s Save as screen appears 3 Select the f...

Страница 29: ...iewed when their file name is clicked Check the scanned images using their preview images before deleting them Delete the file s Be sure to transfer important image files to a computer before deleting...

Страница 30: ...e required fields on the verification screen Input the user name and password registered on the FTP server then click the Log In button Input the user name case sensitive and password case sensi tive...

Страница 31: ...image files on the FTP server At step 4 on the previous page select the folder s or image file s to be deleted right click the mouse to display a pull down menu and select Delete At the verification s...

Страница 32: ...setting For instructions on the time setting see page E 12 Select the function number then press the Save button Press the Number of Copies button the func tion switches each time the button is press...

Страница 33: ...canned image is set to 1 2 The amount of data is 1 4 that of when High Resolution is selected High Resolution The image file has the same resolu tion as the scanned image vertical horizontal size of 1...

Страница 34: ...n erased surface after which the power turns off The Erase Reminder function may not work prop erly due to dirt on the sheet adhesive or marker traces Disable USB Lit Printer Off Enable USB Off Printe...

Страница 35: ...en My Computer and in this open the copyboard removable device 1 Double click the My Computer or Computer icon to open 2 Double click the copyboard a device displayed as a removable disk to open the c...

Страница 36: ...to the LAN port on a switching hub etc 2 Launch a web browser ex Internet Explorer on a computer con nected to network 3 In the address field input http followed by the IP address that was set then p...

Страница 37: ...e sure to consult the network administrator before making the settings Note Depending on the network being used the display speed and button response may be slow and operations may not be performed If...

Страница 38: ...or s password can also be used for verification Once verification is validated the desired page is displayed See the respective pages in this manual for explanations CB Setup page E 40 Board File List...

Страница 39: ...or Input characters in the same way as you would on a computer The characters that can be input are restricted according to the item s type of setting See page E 43 Browse and Upload buttons See Heade...

Страница 40: ...inutes Do not insert spaces If the date and time setting values are incorrect an error message is displayed Get Current Time When the Get Current Time button is clicked the display switches to the com...

Страница 41: ...is a header or footer Click the radio buttons to select For instructions on creating images see page E 47 Header Browse When the Browse button is clicked the computer s Browse Files screen opens Sele...

Страница 42: ...d to log in to the FTP server and save image files Blank FTP Password This is the password registered on the FTP server This is required for the copyboard to log in to the FTP server and save image fi...

Страница 43: ...mit to the number characters that can be input is the same as for the administrator s user name admin Password Set the password The limit to the number characters that can be input is the same as for...

Страница 44: ...age memory Valid Network Storage Set whether or not to enable or disable transfer of image files to network storage folder for saving Board or FTP Server to a computer or FTP server Notice When set to...

Страница 45: ...sk Check When the Disk Check button is clicked checking of the network stor age memory starts When checking is completed the results of the check are displayed If a warning is displayed format the dis...

Страница 46: ...t Decrease button to display the network reset number The network reset number can be viewed when User Setting is selected with administrator authority The display switches as follows each time the Co...

Страница 47: ...ew data Use Windows Paint etc to paste images input characters etc to create the image When saving save in JPEG format with a size within the maximum size Registering created images on the copyboard E...

Страница 48: ...plug from the power outlet and then plug it in again Security protec tion The operation is set to Disable in the security settings Change the setting of the desired item to Enable See page E 44 Color...

Страница 49: ...P address not set other net work error An error other than one indicated by L1 to L4 has occurred Unplug the power cord from the power outlet then plug it back in Network settings reset error An error...

Страница 50: ...ntact your nearby PLUS Corporation sales office dealer or store Condition Please Check Printer Related The copyboard s power turns on but the printer s power does not Check whether the printer s power...

Страница 51: ...with the display window lit press the Number of Copies button repeatedly to display on the display window 2 Press the Color Print button for a color print the B W Print button for a black and white pr...

Страница 52: ...T 100Base TX Printing Printing resolution 300 dpi or equivalent No print colors 16 or grayscale Printer interface Conforming to USB 2 0 standards Added functions Clock Used for the timestamp and for...

Страница 53: ...ed with the printer To USB connector Printer To DC connector Printer AC power adapter supplied with the printer To wall power outlet To DC INPUT connector AC power adapter supplied Appearance of print...

Страница 54: ...26 4606 11C...

Отзывы: