


Installation manual SR85
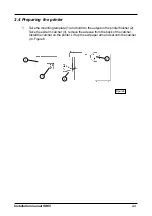
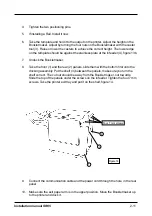
3.3 Attaching the Trimmer to the Bookletmaker
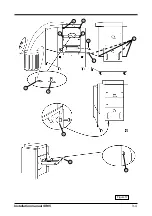
1.
Remove the two 8 mm screws (1), figure 17, which secures the Beltstacker.
2.
Remove the Beltstacker(10), figure 17.
3.
Remove the two black positioning pins for the Beltstacker (2) from the
Bookletmaker, figure 17.
4.
Take the two screws with the 20 mm washers, install them in the holes where you
removed the two black positioning pins (2), figure 17.
5.
Remove the old exit guide bracket (3) from the Bookletmaker. Make sure to cut the
cable tie on the old exit guide bracket. Replace it with the new one (4), figure 17.
Note
: Install it as high as possible!
6.
Move the Trimmer up to the Bookletmaker connect the communication cable (6)
and the power cord (7), figure 17. Adjust the height on the Trimmer by turning the
four nuts (8), figure 17. So that the two black positioning pins fits in the holes on the
Trimmer. Lower the Trimmer so that the Trimmer just hangs on the two positioning
pins. Make sure the cable not interferes with the fold pocket.
7.
Take the allen screw and the plastic distance and attach it to the Trimmer and the
Bookletmaker (9), figure 17.
8.
Take the stacker and install it on the Trimmer (10), turn the two stacker height
brackets (11) a half turn so that the stacker is in the up position, figure 17.
9.
Secure the Beltstacker with the screws (1), you removed in step 2, figure 17.
3-3
Содержание SR 85
Страница 1: ...Installation Manual Bookletmaker SR 85 and Trimmer TR 85 January 2002 x17030 ...
Страница 12: ...Installation manual SR85 Figure 11 2 6 Wiring communication cable 2 8 ...
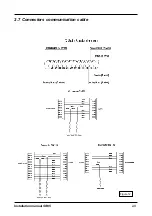
Страница 13: ...Installation manual SR85 2 7 Connectors communication cable Figure 12 2 9 ...
Страница 20: ...Installation manual SR85 2 3 4 7 2 Figure 17 3 4 10 11 9 1 1 6 8 ...


