background image

Planar User’s Manual 


ii


Canadian Doc Notice 

For Class B Computing Devices 

This digital apparatus does not exceed the Class B limits for radio noise emissions from digital apparatus as set out in the 
Radio Interference Regulation of the Canadian Department of Communications. 

“Le présent appareil numérique n’èmet pas de bruits radioélectriques dépassant les limites applicables aux appareils 
numériques de la class B prescrites dans le Règlement sur le brouillage radioélectrique édicté par le ministère des 
Communications du Canada” 


Important Operating Instructions 

Please read the following instructions carefully. This manual should be retained for future use. 

1.


To clean the LCD monitor screen, first, make sure the monitor is in the power off mode. Unplug the monitor from its 
power source before cleaning it. Do not spray liquid cleaners directly onto the unit. Without applying excessive pressure, 
clean the screen with a slightly dampened rag. 

2.


Do not place your LCD monitor near a window. Exposing the monitor to rain, water, moisture, or sunlight can severely 
damage it. 

3.


Do not place anything on top of the monitor-to-PC signal cord. Make sure the cord is placed in an area where it will not 
be stepped on. 

4.


Do not apply pressure to the LCD screen. Excessive pressure may cause permanent damage to the display. 

5.


Do not remove the cover or attempt to service this unit by yourself. You may void the warranty. Servicing of any nature 
should be performed only by an authorized technician.  

6.


Safe storage of the LCD monitor is in a range of minus 20 to plus 60 degrees Celsius. Storing your LCD monitor outside 
this range could result in permanent damage. 

7.


Only with use of supplied adapter, in case of loss or replacement contact the retailer or service center. 

8.


Immediately unplug your monitor and call an authorized technician when: 


The power or monitor-to-PC signal cord is frayed or damaged. 


Liquid has been spilled into the monitor, or it has been exposed to rain. 


The monitor has been dropped or the case has been damaged. 

Содержание CT1744NU

Страница 1: ...1 866 PLANAR 1 customerservice planar com CT1744NU Manual...

Страница 2: ......

Страница 3: ...equency energy and if not installed and used in accordance with the instructions may cause harmful inerference to radio communications However there is no guarantee that interference will not occur in...

Страница 4: ...reen with a slightly dampened rag 2 Do not place your LCD monitor near a window Exposing the monitor to rain water moisture or sunlight can severely damage it 3 Do not place anything on top of the mon...

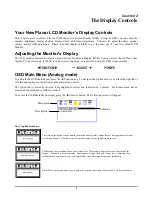
Страница 5: ...ing the Viewing Angle 3 Connecting AC Power 3 Connecting Video 3 Connecting the Stereo Speakers 4 Power Management System 4 CHAPTER 2 6 Your New Planar LCD Monitor s Display Controls 6 Adjusting the M...

Страница 6: ......

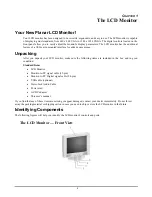
Страница 7: ...r you unpack your LCD monitor make sure the following items are included in the box and in good condition Standard Items LCD Monitor Monitor to PC signal cable 15 pin Monitor to PC Digital signal cabl...

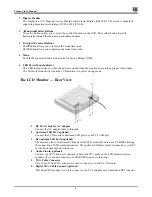
Страница 8: ...will blink slowly when the LCD monitor is in power saving mode The LCD Monitor Rear View 1 DC Power Jack for AC adaptor Connect the AC adapter cable to this jack 2 Upstream USB Port optional Connect t...

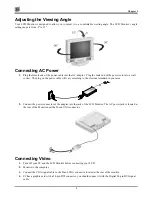
Страница 9: ...e will vary according to the electrical standard in your area 2 Connect the power connector of the adapter into the jack of the LCD Monitor The AC power jack is located at the rear of the Monitor near...

Страница 10: ...t of your PC s audio card 2 Connect the other end of the 1 5M sound cable to the LCD Monitor s line in jack 3 You can adjust the sound volume of the stereo speakers by using the speaker volume control...

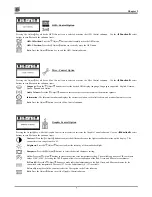
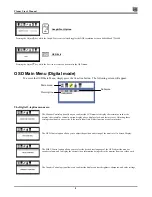
Страница 11: ...the right or left Function keys to scroll between the main menu choices The option that is currently selected is highlighted in yellow and indicated by a pointer Each main menu has an associated subme...

Страница 12: ...e out period The Monitor Control Option Pressing the Adjust key while the Monitor Control icon is selected activates the Monitor Control submenu Use the Function select buttons to scroll between the s...

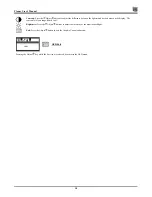
Страница 13: ...n Exit Press the Adjust button to exit the Misc Control submenu Graphic Control Option Pressing the Adjust key while the Graphic Control icon is selected activates the Graphic Control submenu Use the...

Страница 14: ...aracteristics such as the display s horizontal or vertical position display phase display clock and factory reset Adjusting these settings should only be necessary if the results from Auto Adjust func...

Страница 15: ...menu OSD V Position Press the Adjust buttons to vertically move the OSD menu Exit Press the Adjust button key to exit the OSD Control submenu Misc Control Option Pressing the Adjust key while the Mis...

Страница 16: ...arkest areas on the display The contrast level can range from 0 to 63 Brightness Press the Adjust buttons to adjust the intensity of the monitor backlight Exit Press the Adjust button to exit the Grap...

Страница 17: ...itch mm 0 27 x 0 27 Viewing Angle Horizontal 80 80 L R Vertical 80 80 U D Display Colors Dithering 16M Video Interface Analog port VGA Compatible Analog RGB 15 pin D Sub Separate Sync Composite Digita...

Страница 18: ...00x600 36 00 56 25 35 16 A D 12 SVGA 800x600 40 00 60 32 37 88 A D 13 VESA 800x600 50 00 72 19 48 08 A D 14 VESA 800x600 49 50 75 00 46 88 A D 15 VGA 720x400 28 32 70 09 31 47 A 16 XGA 1024x768 65 00...

Страница 19: ...her Adjustment Control button until the lines disappear and you have a clear display PROBLEM There is no LCD Display If there is no display on the LCD refer to the following 1 Make sure that the power...

Отзывы: