background image

~ 22 ~


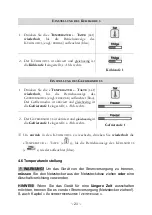
Die  Temperatureinstellung  (=  Kühl-  oder  Gefrierstufe)  für  das  Gerät  kann 
manuell vorgenommen werden. Drücken Sie dazu auf die entsprechende Taste 
für  die  Temperatureinstellung,  bis  die  gewünschte  Kühl-  oder  Gefrierstufe 
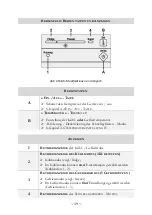
angezeigt wird; s. Kapitel 4.3 B

EDIENFELD

:


B

EDIENTASTEN UND 

A

NZEIGEN


Wenn  Sie  eine  Temperatur  (=  Kühl-  oder  Gefrierstufe)  einstellen,  stellen  Sie 
einen Durchschnittswert für das gesamte Gerät ein. Die Temperaturen innerhalb 
der  einzelnen  Bereiche  des  Gerätes  können  von  dem  eingestellten  Wert 

abweichen,  abhängig  von  der  Menge  und  der  Lagerstelle  der  eingelagerten 
Lebensmittel.  Die  Umgebungstemperatur  kann  die  eingestellte  Temperatur 
ebenfalls beeinflussen. Diese Faktoren sollten bei der Temperatureinstellung (= 
Kühl- / Gefrierstufe) des Gerätes berücksichtigt werden. 


B

ITTE  BEACHTEN 

S

IE

:  Je  kälter  die  gewählte  Temperatureinstellung 

(= 

hohe Kühl- / Gefrierstufe) 

ist, desto länger arbeitet der Kompressor, um die 

eingestellte kältere Temperatur bereitzustellen. 


Die eingestellte Kühl- / Gefrierstufe kann je nach Bedarf geändert werden. 


Sie  können  die  Kühl- / Gefriertemperatur  mittels  eines 

geeigneten


Thermometers überprüfen (

nicht Teil des Lieferumfangs

). 


Bei  extrem  hohen  sommerlichen  Temperaturen  (bitte  beachten  Sie  die 
Klimaklasse  Ihres  Gerätes  im  Kapitel  « T

ECHNISCHE 

D

ATEN


»!)  ist  es 

empfehlenswert,  die  Temperatur  (=  Kühl- / Gefrierstufe)  des  Gerätes  nach 
Bedarf  auf  eine  kältere  Einstellung  zu  stellen.  Dadurch  kann  der 
Energieverbrauch  steigen.  Stellen  Sie  im  Falle  sehr  starker  Eisbildung  die 
Temperatur wieder auf eine wärmere Einstellung zurück. 


Sehr  hohe  Umgebungstemperaturen  bei  gleichzeitigem  Betrieb  der  kältesten 
Einstellungen  können  dazu  führen,  dass  der  Kompressor 

durchgehend 

arbeitet

, um die Temperatur im Inneren des Gerätes aufrecht zu erhalten. Bitte 

beachten Sie die Klimaklasse Ihres Gerätes im Kapitel « T

ECHNISCHE 

D

ATEN


»! 


Bitte  beachten  Sie  auch  das  Kapitel  4.6.4  « E

MPFOHLENE 

E

INSTELLUNG  DER 

K

ÜHL

-

 ODER 

G

EFRIERSTUFE

 ». 


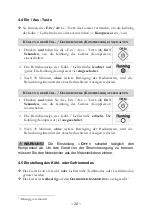
 WARNUNG!


Die  Einstellung  « 

O

FF


»

  schaltet  lediglich  den 

Kompressor  ab.  Um  das  Gerät  von  der  Stromversorgung  zu  trennen, 
müssen Sie den Netzstecker aus der Netzsteckdose ziehen.


Содержание GT 100

Страница 1: ...TECHNOLOGIE FÜR DEN HAUSHALT TECHNOLOGY FOR DOMESTIC USE 16 06 2021 Bedienungsanleitung Instruction Manual KÜHLTRUHE GEFRIERTRUHE FRIDGE FREEZER GT 100 Deutsch Seite 2 English Page 50 www pkm online de ...

Страница 2: ...Entpacken und Wahl des Standortes 11 3 2 Raumbedarf und Belüftung 12 3 2 1 Raumbedarf 12 3 2 2 Belüftung 13 3 3 Gerät ausrichten 15 4 Bedienung 16 4 1 Vor der ersten Benutzung 16 4 2 Gerätebeschreibung 17 4 3 Bedienfeld Bedientasten und Anzeigen 18 4 4 Ein Aus Taste 20 4 5 Einstellung des Kühl oder Gefriermodus 20 4 6 Temperatureinstellung 21 4 6 1 Kühlmodus Einstellung der Kühltemperatur Kühlstuf...

Страница 3: ...Fall dennoch den beschriebenen Sachverhalten Lieferung ohne Inhalt Der Hersteller behält sich das Recht vor solche Änderungen vorzunehmen die keinen Einfluss auf die Funktionsweise des Gerätes haben Entsorgen Sie das Verpackungsmaterial entsprechend den örtlichen Vorschriften Ihres Wohnorts Das von Ihnen gekaufte Gerät wurde möglicherweise inzwischen verbessert und weist somit vielleicht Unterschi...

Страница 4: ...n Das Gerät ist ausschließlich zur privaten Nutzung bestimmt sowie zur Nutzung 1 in Personalküchen von Geschäften Büros und ähnlichen Arbeitsumgebungen 2 durch Gäste von Beherbergungsbetrieben wir Hotels Motels B B 3 beim Catering oder ähnlichen nicht wiederverkaufenden Anwendern Das Gerät ist ausschließlich zum Kühlen von Lebensmitteln bestimmt Das Gerät ist ausschließlich zum Betrieb innerhalb g...

Страница 5: ... eine mögliche Beschädigung des Gerätes zur Folge hat 1 2 Sicherheitsanweisungen GEFAHR Zur Verringerung der Stromschlaggefahr 1 Eine Nichtbeachtung der Anweisungen in dieser Bedienungsanleitung gefährdet das Leben und die Gesundheit des Gerätebetreibers und oder kann das Gerät beschädigen 2 Schließen Sie das Gerät keinesfalls an die Stromversorgung an wenn das Gerät das Netzkabel oder der Netzste...

Страница 6: ...onenschäden 1 Ihr Gerät wird mit dem umweltfreundlichen Kältemittel R600a betrieben Das Kältemittel R600a ist brennbar Deshalb ist es unbedingt erforderlich dass keine Systemteile des Kühlkreislaufs während des Betriebs oder Transports des Gerätes beschädigt werden 2 Sollte ein Systemteil Beschädigungen aufweisen darf sich das Gerät auf keinen Fall in der Nähe von Feuer offenem Licht und Funkenbil...

Страница 7: ...ungen die Beschädigungen aufweisen müssen von einer qualifizierten Fachkraft Elektrotechniker in ausgewechselt werden 11 Verwenden Sie zum Anschluss des Gerätes an die Stromversorgung keine Steckdosenleisten Mehrfachsteckdosen oder Verlängerungskabel 12 Stellen Sie niemals tragbare Mehrfachsteckdosen oder tragbare Netzteile hinter das Gerät BRANDGEFAHR 13 Schließen Sie das Gerät nicht an elektroni...

Страница 8: ...Elektrik Ihres Gerätes kann ansonsten durch verschüttetes oder überkochendes Wasser nachhaltig beschädigt werden 28 Benutzen Sie kein Dampfreinigungsgerät um Ihr Gerät abzutauen oder zu reinigen Der Dampf kann in Kontakt mit elektrischen Teilen kommen und so einen Kurzschluss auslösen STROMSCHLAGGEFAHR 29 Benutzen Sie niemals mechanische Gegenstände ein Messer oder andere scharfe Gegenstände um Ei...

Страница 9: ...chten Sie darauf dass Ihre Hände immer trocken sind GEFAHR EINES ERFRIERUNGSSCHADENS 5 Achten Sie darauf dass Ihre Finger sich beim Schließen der Tür nicht zwischen der Tür und dem Gehäuse des Gerätes befinden QUETSCHGEFAHR HINWEIS 1 Lagern Sie kein Trockeneis in dem Gerät 2 1 2 und 3 Sterne Gefrierschränke eignen sich nicht für das Einfrieren frischer Lebensmittel siehe auch Kapitel BEDEUTUNG DER...

Страница 10: ...al einpacken und transportieren zu müssen 13 Benutzen Sie das Gerät nicht bevor alle dazugehörigen Teile sich ordnungsgemäß an ihren dafür vorgesehenen Stellen befinden 14 Benutzen Sie den Boden die Schubladen die Türen etc des Gerätes niemals als Standfläche oder Stütze 15 Schließen Sie niemals die Tür en des Gerätes wenn Regale oder Schubladen ausgezogen sind andernfalls können Sie die Regale Sc...

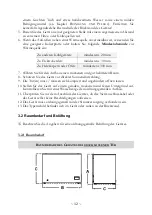
Страница 11: ...Millimetern angegeben Die benötigten Abmessungen für eine ordnungsgemäße Belüftung des Gerätes finden Sie in Kapitel 3 2 2 BELÜFTUNG 3 1 Entpacken und Wahl des Standortes WARNUNG Achten Sie beim Entpacken unbedingt darauf dass die Bestandteile der Verpackung Polyethylentüten Polystyrenstücke nicht in die Reichweite von Kindern und Tieren gelangen ERSTICKUNGSGEFAHR VERLETZUNGSGEFAHR 1 Dieses Gerät ...

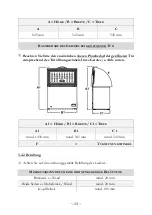
Страница 12: ...mindestens 300 mm 7 Wählen Sie für den Aufbau einen trockenen und gut belüfteten Raum 8 Schützen Sie das Gerät vor direkter Sonneneinstrahlung 9 Die Tür en muss müssen sich komplett und ungehindert öffnen lassen 10 Stellen Sie das Gerät auf einem geraden trockenen und festen Untergrund auf Kontrollieren Sie mit einer Wasserwaage den ordnungsgemäßen Aufbau 11 Überprüfen Sie vor dem Anschluss des Ge...

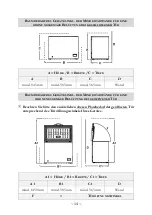
Страница 13: ...ntsprechend des Türöffnungswinkels Ihres Gerätes s Abb unten A 1 HÖHE B 1 BREITE C 1 TIEFE A 1 B 1 C 1 mind 1450 mm mind 545 mm mind 545 mm F TÜRÖFFNUNGSWINKEL 3 2 2 Belüftung Achten Sie auf eine ordnungsgemäße Belüftung des Gerätes MINDESTABSTÄNDE FÜR EINE ORDNUNGSGEMÄßE BELÜFTUNG Rückseite Wand mind 20 mm Beide Seiten Möbelstück Wand mind 20 mm Kopffreiheit mind 100 mm ...

Страница 14: ...d 585 mm mind 565 mm Wand RAUMBEDARF DES GERÄTES INKL DER MINDESTABSTÄNDE FÜR EINE ORDNUNGSGEMÄßE BELÜFTUNG BEI GEÖFFNETER TÜR Beachten Sie bitte den zusätzlichen oberen Platzbedarf der geöffneten Tür entsprechend des Türöffnungswinkels Ihres Gerätes A 1 HÖHE B 1 BREITE C 1 TIEFE A 1 B 1 C 1 D mind 1450 mm mind 585 mm mind 565 mm Wand F TÜRÖFFNUNGSWINKEL ...

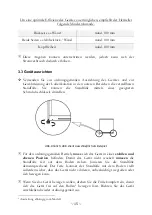
Страница 15: ...üße mittels eines geeigneten Schraubenschlüssels einstellen Abb ähnlich Abb dient ausschließlich als Beispiel Für den ordnungsgemäßen Betrieb muss sich das Gerät in einer stabilen und ebenen Position befinden Damit das Gerät nicht wackelt müssen die Standfüße fest auf dem Boden stehen Justieren Sie die Standfüße dementsprechend Der feste Kontakt der Standfüße mit dem Boden stellt außerdem sicher d...

Страница 16: ...e Zeit von der Stromversorgung getrennt war lassen Sie es für ca 3 4 Stunden auf folgender Temperaturstufe s Kapitel 4 6 TEMPERATUR EINSTELLUNG ff kühlen bevor Sie darin frische oder gefrorene Lebensmittel verstauen Kühlmodus Stufe 2 Gefriermodus Stufe 3 Wenn Sie Lebensmittel einlagern bevor das Gerät seine normale Betriebstemperatur erreicht hat können diese Lebensmittel auftauen und oder verderb...

Страница 17: ...der Umgebungstemperatur der Häufigkeit des Öffnens der Tür en sowie der Menge der Lebensmittel ab Diese Faktoren sollten bei der Temperatureinstellung Kühl Gefrierstufe des Gerätes berücksichtigt werden 9 Aufgrund des Druckunterschieds lässt sich der Deckel kurz nach dem Schließen nur schwer öffnen Warten Sie einige Minuten sodass Sie den Deckel wieder mühelos öffnen können 10 Betreiben Sie das Ge...

Страница 18: ...m Folgendem beschriebenen Anweisungen über die Steuerung der Funktionen und Modi Das Gerät kann als Kühl oder Gefriertruhe Kühlmodus oder Gefriermodus genutzt werden Wenn Sie das Gerät an die Stromversorgung anschließen leuchten alle Anzeigen des Bedienfelds für 1 Sekunde auf Nach 30 Minuten ohne weitere Betätigung der Bedientasten wird die Beleuchtungsintensität der aktuell erleuchteten Anzeigen ...

Страница 19: ... Deaktivierung des Schnellgefrieren Modus S Kapitel 4 6 TEMPERATUREINSTELLUNG ff ANZEIGEN 1 BETRIEBSANZEIGE der Kühl Gefriertruhe 2 BETRIEBSANZEIGE DES KÜHLMODUS 2 KÜHLSTUFEN Kühlmodus engl fridge Im Kühlmodus können zwei Einstellungen gewählt werden Kühlstufen 1 2 3 BETRIEBSANZEIGE DES GEFRIERMODUS 5 GEFRIERSTUFEN Gefriermodus engl freezer Im Gefriermodus können fünf Einstellungen gewählt werden ...

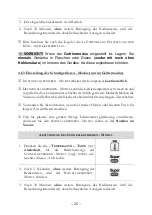
Страница 20: ...ÜHL GEFRIERTRUHE KOMPRESSOR AUSSCHALTEN 1 Drücken und halten Sie die EIN AUS TASTE A für 3 Sekunden um die Kühlung des Gerätes Kompressor auszuschalten 2 Die Betriebsanzeige der Kühl Gefriertruhe erlischt Die Kühlung Kompressor ist ausgeschaltet 3 Nach 30 Minuten ohne weitere Betätigung der Bedientasten wird die Beleuchtungsintensität der aktuell erleuchteten Anzeigen reduziert WARNUNG Die Einstel...

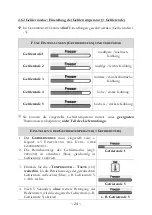
Страница 21: ...t die Gefrierstufe 1 eingestellt s Abb rechts 2 Der GEFRIERMODUS ist aktiviert und gleichzeitig ist die Gefrierstufe 1 eingestellt s Abb rechts Gefrierstufe 1 Um zurück in den KÜHLMODUS zu wechseln drücken Sie wiederholt die TEMPERATUR TASTE bis die Betriebsanzeige des KÜHLMODUS wieder aufleuchtet blau 4 6 Temperatureinstellung WARNUNG Um das Gerät von der Stromversorgung zu trennen müssen Sie den...

Страница 22: ...r bereitzustellen Die eingestellte Kühl Gefrierstufe kann je nach Bedarf geändert werden Sie können die Kühl Gefriertemperatur mittels eines geeigneten Thermometers überprüfen nicht Teil des Lieferumfangs Bei extrem hohen sommerlichen Temperaturen bitte beachten Sie die Klimaklasse Ihres Gerätes im Kapitel TECHNISCHE DATEN ist es empfehlenswert die Temperatur Kühl Gefrierstufe des Gerätes nach Bed...

Страница 23: ...ER GEFRIERMODUS 2 Die Betriebsanzeige des Kühlmodus engl FRIDGE ist erleuchtet blau gleichzeitig ist Kühlstufe 1 aktiviert Kühlstufe 1 3 Um Kühlstufe 2 einzustellen drücken Sie die TEMPERATUR TASTE SET einmal Die Betriebsanzeige der Kühlstufe 2 leuchtet auf blau s Abb rechts Kühlstufe 2 4 Nach 5 Sekunden ohne weitere Betätigung der Bedientasten wird die eingestellte Kühlstufe z B Kühlstufe 2 aktiv...

Страница 24: ...ttels eines geeigneten Thermometers überprüfen nicht Teil des Lieferumfangs EINSTELLUNG DER GEFRIERTEMPERATUR GEFRIERSTUFE 1 Der GEFRIERMODUS muss eingestellt sein s Kapitel 4 5 EINSTELLUNG DES KÜHL ODER GEFRIERMODUS 2 Die Betriebsanzeige des Gefriermodus engl FREEZER ist erleuchtet blau gleichzeitig ist Gefrierstufe 1 aktiviert Gefrierstufe 1 3 Drücken Sie die TEMPERATUR TASTE SET weiterhin bis d...

Страница 25: ...r rasch ab und sorgt dafür dass Lebensmittel schneller als üblich gefrieren Dadurch bleiben die Vitamine und Nährstoffe der frischen Lebensmittel für eine längere Zeit erhalten Verwenden Sie diesen Modus wenn Sie frisches Fleisch oder frischen Fisch für längere Zeit einfrieren möchten Falls Sie planen eine größere Menge Lebensmittel gleichzeitig einzufrieren aktivieren Sie den SCHNELLGEFRIEREN MOD...

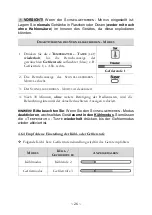
Страница 26: ...ELLGEFRIEREN MODUS erlischt 3 Der SCHNELLGEFRIEREN MODUS ist deaktiviert 4 Nach 30 Minuten ohne weitere Betätigung der Bedientasten wird die Beleuchtungsintensität der aktuell erleuchteten Anzeigen reduziert HINWEIS Bitte beachten Sie Wenn Sie den SCHNELLGEFRIEREN Modus deaktivieren wechselt das Gerät zuerst in den Kühlmodus Sie müssen die TEMPERATUR TASTE wiederholt drücken bis der Gefriermodus w...

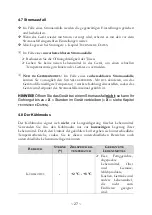
Страница 27: ...rigste Temperatur stärkste Kühlung einzustellen sodass das Gerät zum Zeitpunkt des Stromausfalls maximal gekühlt ist HINWEIS Öffnen Sie das Gerät bei einem Stromausfall nicht so kann Ihr Gefriergut bis zu X Stunden im Gerät verbleiben X siehe Kapitel TECHNISCHE DATEN 4 8 Der Kühlmodus Der Kühlmodus eignet sich nicht zur Langzeitlagerung frischer Lebensmittel Verwenden Sie also den Kühlmodus nur zu...

Страница 28: ...ansonsten von der Tür lösen kann HINWEIS Lebensmittel insbesondere öl bzw fetthaltige Lebensmittel dürfen nicht in direkten Kontakt mit der Innenverkleidung des Gerätes kommen Direkter Kontakt mit der Innenverkleidung kann Flecken oder Beschädigungen verursachen Falls Flüssigkeiten im Innenraum des Gerätes verschüttet oder verspritzt wurden entfernen Sie diese umgehend mit warmem Wasser um eine Be...

Страница 29: ... ist Beschädigte Verpackungen sind ein Hinweis auf eine mögliche Unterbrechung der Kühlkette Vermeiden bzw reduzieren Sie Temperaturschwankungen Also kaufen Sie eingefrorene Lebensmittel zuletzt ein und transportieren Sie diese immer in Isoliertaschen Isolierbeuteln Geben Sie diese Lebensmittel zuhause sofort in den Gefrierschrank Frieren Sie keine auf oder angetauten Lebensmittel wieder ein Verbr...

Страница 30: ... Sterne und 3 Sterne Gefrierbereiche eignen sich zur Lagerung von Tiefkühlkost vorgefroren und Eis oder zur Herstellung von Eis und Eiswürfeln BEREICHE STERNE ZIELSPEICHER TEMPERATUR GEEIGNETE LEBENSMITTEL GEFRIERBEREICH GEFRIERTRUHE 18 C Geeignet für Meeresfrüchte Fisch Garnelen Schalentiere Süßwasser und Fleischprodukte Empfohlene Lagerdauer 3 Monate Geeignet zum Einfrieren von frischen Lebens m...

Страница 31: ...eeresfrüchte Fisch Garnelen Schalentiere Süßwasser und Fleischprodukte Empfohlene Lagerdauer 1 Monat Nicht geeignet zum Einfrieren von frischen Lebensmitteln 0 Fach 6 C 0 C Geeignet für frische Fleischprodukte Schwein Rind Huhn etc und verarbeitete Lebensmittel die innerhalb desselben Tages oder höchstens innerhalb der nächsten 3 Tage nach Einlagerung verzehrt oder verarbeitet werden Nicht geeigne...

Страница 32: ... frisch und es wird verhindert dass die Lebensmittel austrocknen sich verfärben oder den Geschmack verlieren Außerdem wird eine Geruchsübertragung verhindert Gemüse und Obst müssen bei der Lagerung nicht verpackt werden wenn sie in der Gemüseschublade des Kühlraums aufbewahrt werden Stellen Sie sicher dass stark riechende Lebensmittel bei der Lagerung eingewickelt oder abgedeckt sind und von Nahru...

Страница 33: ...gültigen Verwendung sollten sie im Kühlbereich auf einem Teller aufbewahrt werden der locker mit Plastikfolie Wachspapier oder Folie bedeckt ist Wenn Sie Fisch oder Meeresfrüchte über Nacht oder länger lagern möchten achten Sie besonders darauf sehr frischen Fisch zu kaufen Ganze Fische sollten mit kaltem Wasser gespült werden um lose Schuppen und Schmutz zu entfernen und dann mit Papiertüchern tr...

Страница 34: ...Gefrierbereichs der Gefriertruhe ordnungsgemäß geschlossen wurde TIEFKÜHLKOST KAUFEN Die Verpackung darf nicht beschädigt sein Achten Sie auf das Mindesthaltbarkeitsdatum oder das zu verwenden bis Datum Tiefkühlkost möglichst in einem isolierten Beutel transportieren und schnell in den Gefrierbereich legen TIEFKÜHLKOST LAGERN Bei 18 C oder kälter aufbewahren Vermeiden Sie unnötiges Öffnen der Tür ...

Страница 35: ...ale Trauben ganze Äpfel Birnen und Pfirsiche Hartgekochte Eier Joghurt Milch saure Sahne und Mayonnaise TIEFKÜHLKOST VERPACKEN Um zu verhindern dass Lebensmittel ihren Geschmack verlieren oder austrocknen verpacken Sie sie in eine luftdichte Verpackung 1 Lebensmittel in eine Verpackung geben 2 Luft entfernen 3 Versiegeln Sie die Verpackung 4 Etikettieren Sie die Verpackung mit Inhalt und Einfrierd...

Страница 36: ...NWEISE Wenn Sie frische Lebensmittel mit einem Mindesthaltbarkeitsdatum oder einem zu verwenden bis Datum einfrieren müssen Sie sie einfrieren bevor dieses Datum abläuft Vergewissern Sie sich dass die Lebensmittel nicht bereits gefroren waren Tiefgefrorene Tiefkühlprodukte dürfen nicht wieder eingefroren werden Nach dem Auftauen sollten Lebensmittel schnell verzehrt werden 5 Umweltschutz 5 1 Umwel...

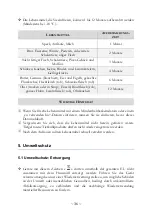
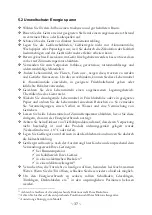
Страница 37: ...Frischhaltefolie oder ein geeignetes Papier und ordnen Sie die Lebensmittel einzelnen Bereichen zu So vermeiden Sie Verunreinigungen einen Verlust an Wasser und eine Vermischung von Gerüchen Lassen Sie heiße Lebensmittel auf Zimmertemperatur abkühlen bevor Sie diese einlagern da sonst der Energieverbrauch ansteigt Achten Sie beim Einkauf von Tiefkühlprodukten darauf dass deren Verpackung nicht bes...

Страница 38: ...t gewählt haben 6 Sie das Gerät nicht überfüllen 7 Sie kein warmes oder heißes Kühlgut in das Gerät geben 6 Reinigung und Pflege GEFAHR Berühren Sie den Netzanschlussstecker den Netzschalter oder andere elektrische Komponenten niemals mit nassen oder feuchten Händen STROMSCHLAGGEFAHR WARNUNG Trennen Sie das Gerät vor allen Wartungs und Reinigungsarbeiten von der Stromversorgung STROMSCHLAG GEFAHR ...

Страница 39: ...tzen Sie ein feuchtes in einem milden Reinigungsmittel getränktes Tuch Verwenden Sie ein geeignetes Reinigungsmittel für hartnäckige Verunreinigungen 2 Wischen Sie anschließend mit klarem Wasser nach 3 Wischen Sie die gereinigte Fläche trocken INNENREINIGUNG 1 Reinigen Sie das herausnehmbare Zubehör und die Innenseiten mit warmem Wasser und einem milden Reinigungsmittel 2 Wischen Sie anschließend ...

Страница 40: ...ENIG KONDENSWASSER Wischen Sie den Innenraum mit einem trockenen und weichen Tuch gründlich trocken b VIEL KONDENSWASSER Gehen Sie bitte genauso so vor wie unten unter GERÄT ABTAUEN GEFRIERMODUS beschrieben GERÄT ABTAUEN GEFRIERMODUS GEFRIERMODUS Um den ordnungsgemäßen Betrieb zu gewährleisten sollte das Gerät regelmäßig abgetaut werden Der Abtauprozess kann mehrere Stunden in Anspruch nehmen 1 Ne...

Страница 41: ...die Wasserablassschraube A um 180 mit dem Uhrzeigersinn s Pfeil sodass die Wasserablassöffnung B nach unten zeigt s Abb unten 8 Lassen Sie das Tauwasser mittels der Wasserablassöffnung ablaufen 9 Halten Sie den Behälter zum Auffangen des Tauwassers unter Beobachtung damit er nicht überläuft 10 Wenn der Abtauprozess beendet ist drehen Sie die Wasserablassschraube A um 180 entgegen dem Uhrzeigersinn...

Страница 42: ...t der EIN AUS TASTE wieder ein s Kapitel 4 4 EIN AUS TASTE 17 Stellen Sie eine neue Temperatur Kühl Gefrierstufe ein falls gewünscht s Kapitel 4 6 TEMPERATUREINSTELLUNG ff HINWEIS Vergessen Sie nach dem Abtauprozess nicht den Wasserablassstopfen im Inneren des Gerätes wieder zu installieren HINWEIS Wenn das Gerät längere Zeit von der Stromversorgung getrennt war lassen Sie es für ca 3 4 Stunden au...

Страница 43: ...ieters KOMPRESSOR ARBEITET NICHT 1 Fehlerhafte Energieversorgung 1 Überprüfen Sie die Energieversorgung KOMPRESSOR LÄUFT ZU LANGE 1 Gerät war kürzlich ausgeschaltet 1 Das Gerät benötigt einige Zeit zum Erreichen der Kühl Gefrier temperatur 2 Zu viele oder zu heiße Lebensmittel im Gerät 2 Entfernen Sie die heißen Lebensmittel 3 Tür en zu häufig zu lange geöffnet 3 Tür en selten kurz öffnen STARKE E...

Страница 44: ... Sie den Wasserablass stopfen im Inneren des Gerätes ordnungsgemäß DIE LEBENSMITTEL SIND NICHT RICHTIG GEFROREN 1 Das Gerät ist zu warm eingestellt 1 Stellen Sie das Gerät auf eine kältere Einstellung 2 Die Tür en des Gerätes war waren zu lange geöffnet 2 Schließen Sie die Tür en ordnungs gemäß Wenn Sie die Tür en öffnen schließen Sie diese wieder so bald als möglich 3 Das Gerät befindet sich in d...

Страница 45: ...normal dass die Seitenwände des Gerätes aufgrund des Betriebs des Kühlkreislaufs warm werden AUSGEPRÄGTE GERÄUSCHBILDUNG Bei Erstinbetriebnahme oder warmen Innentemperaturen Der Kompressor arbeitet mit hoher Leistung um schnell die Kühltemperatur zu erreichen KONDENSWASSER IM AM GERÄT kann bei hoher Luftfeuchtigkeit sehr warmen Außentemperaturen entstehen KLICKEN ist immer dann zu hören wenn sich ...

Страница 46: ... Sichern Sie alle herausnehmbaren Teile und den Inhalt des Gerätes Verpacken Sie diese getrennt falls nötig 2 Transportieren Sie das Gerät ausschließlich in einer aufrechten Position In jeder anderen Position kann der Kompressor beschädigt werden 3 Beschädigen Sie die Standfüße nicht AUßERBETRIEBNAHME ENDGÜLTIGE 1 Trennen Sie das Gerät von der Stromversorgung Um das Gerät von der Stromversorgung z...

Страница 47: ...ühlmittel Gesamtmenge R600a 38 g Türgriff integriert Innenbeleuchtung nein Ablage im Gerät 1 Drahtkorb Kontrollleuchte Betrieb ja Kontrollleuchte Schnellgefrieren Modus ja Höhenverstellbare Standfüße ja 2 vorne Abtauverfahren Kühlen Gefrieren manuell manuell Abmessungen Gerät H B T in cm 84 50 54 50 54 50 Gewicht netto brutto in kg 24 00 27 00 Technische Änderungen vorbehalten Gemäß Verordnung EU ...

Страница 48: ...achen Sie dieses vorher unbedingt funktionsuntüchtig Das bedeutet immer den Netzstecker ziehen und danach das Stromanschlusskabel am Gerät abschneiden und direkt mit dem Netzstecker entfernen und entsorgen Demontieren Sie immer die komplette Tür damit sich keine Kinder einsperren und in Lebensgefahr geraten können 5 Entsorgen Sie Papier und Kartonagen in den dafür vorgesehenen Behältern 6 Entsorge...

Страница 49: ...chswert des Produkts keinen Einfluss haben 3 Schäden infolge Betriebs und Bedienungsfehler 4 Schäden durch aggressive Umgebungseinflüsse Chemikalien Reinigungsmittel 5 Schäden am Produkt die durch nicht fachgerechte Installation oder Transport verursacht wurden 6 Schäden infolge nicht haushaltsüblicher Nutzung 7 Schäden die außerhalb des Gerätes durch ein PKM Produkt entstanden sind soweit eine Ha...

Страница 50: ...ntilation requirements 59 3 2 1 Space requirement 59 3 2 2 Ventilation 60 3 3 Levelling 62 4 Operation 63 4 1 Before initial operation 63 4 2 Description of the appliance 64 4 3 Control panel operating buttons and indicators 65 4 4 On Off button 67 4 5 Setting of the fridge or freezer mode 68 4 6 Temperature setting 69 4 6 1 Fridge mode setting of the cooling temperature cooling level 70 4 6 2 Fre...

Страница 51: ...uch a case Delivery without content Any modifications which do not influence the functions of the appliance shall remain reserved by the manufacturer Please dispose of the packaging with respect to your current local and municipal regulations The appliance you have purchased may be an enhanced version of the unit this manual was printed for Nevertheless the functions and operating conditions are i...

Страница 52: ...ied professional The appliance is intended for private use only as well as to be used 1 in staff kitchen areas of shops offices and other working environments 2 by clients in hotels motels B B and other residential type environments 3 for catering and similar non retail applications The appliance is intended for cooling food only The appliance is intended for indoor use only The appliance is not i...

Страница 53: ...he appliance 4 Do not modify the plug provided with the appliance if it will not fit the outlet have a proper outlet installed by a qualified electrician not covered by the guarantee 5 Never try to repair the appliance yourself If the appliance does not operate properly please contact the aftersales service or the shop you purchased the appliance at 19 Original spare parts should be used only 6 Al...

Страница 54: ...pliance 5 Do not install the appliance near of volatile or combustible materials e g gas fuel alcohol paints and in rooms which may have poor air circulation e g garage 6 EXPLOSION HAZARD Do not store any explosive materials or sprays which contain flammable propellants in your appliance Explosive mixtures can explode there 7 While unpacking the packaging materials polythene bags polystyrene piece...

Страница 55: ...ower plug must always be accessible after installation 24 Do not use any electric appliances inside the food storage compartments of your appliance unless they are recommended by the manufacturer of your refrigerator 25 Do not put any heat radiating appliances onto your appliance 26 Do not install the appliance in a place where it may come in contact with water rain otherwise the insulation of the...

Страница 56: ...y containers made of metal in the freezer while your hands are damp or wet Ensure that your hands are always dry RISK OF FROSTBITE 5 Always ensure that your fingers are not between the door and the housing of the appliance while closing the door RISK OF CRUSHING NOTICE 1 Do not store dry ice in the appliance 2 1 2 and 3 stars freezers are not suitable for freezing fresh food see also chapter MEANI...

Страница 57: ...at a later point of time 13 Do not operate the appliance unless all components are installed properly 14 Do not stand or lean on the base the drawers the doors etc of the appliance 15 Never close the door s of the appliance while shelves or drawers are extended otherwise you will damage the shelves drawers and the appliance 16 Do not put hot liquids or hot foodstuff into the appliance 17 The air v...

Страница 58: ...pieces etc should be kept away from children and pets CHOKING HAZARD RISK OF INJURY 1 This appliance is not intended for built in installation 2 Unpack the appliance carefully Dispose of the packaging as described in chapter waste management 3 Remove all packaging materials 4 The accessories of your appliance can be protected from damage due to transportation adhesive tapes etc Remove such tapes v...

Страница 59: ... on a level dry and solid floor Check the correct installation with a bubble level 11 Check that the appliance and the power cord are not damaged 12 Connect the appliance to the mains properly 13 The rating plate is inside the appliance or on the back 3 2 Space and ventilation requirements Observe the required minimum distances for proper ventilation 3 2 1 Space requirement SPACE REQUIREMENT OF TH...

Страница 60: ... door opening angle of your appliance s fig below A 1 HEIGHT B 1 WIDTH C 1 DEPTH A 1 B 1 C 1 min 1450 mm min 545 mm min 545 mm F DOOR OPENING ANGLE 3 2 2 Ventilation Observe the required minimum distances for proper ventilation MINIMUM DISTANCES REQUIRED FOR PROPER VENTILATION Back wall min 20 mm Sides wall min 20 mm Free space above min 100 mm ...

Страница 61: ...ILATION A HEIGHT B WIDTH C DEPTH A B C D min 945 mm min 585 mm min 565 mm Wall SPACE REQUIREMENT OF THE APPLIANCE WHEN THE DOOR IS OPEN INCL MINIMUM DISTANCES FOR PROPER VENTILATION Please observe the additional top space requirement of the open door relevant to the door opening angle of your appliance ...

Страница 62: ...sumption of the appliance 3 3 Levelling Use the adjustable supporting feet for proper levelling and for proper air circulation in the lower sectors of the appliance Adjust the supporting feet using a suitable spanner Fig similar fig serves as an example only The appliance must stand in a stable and level position to ensure proper operation The supporting feet must stand firmly on the ground so tha...

Страница 63: ...or NOTICE If you use the appliance for the first time or the appliance has been disconnected from the mains for a longer period of time allow the appliance to cool down for 3 until 4 hours at following temperature setting before you place any fresh or frozen food in the appliance fridge mode cooling level 2 freezer mode cooling level 3 s chapter 4 6 TEMPERATURE SETTING et seq If you place food in ...

Страница 64: ... the ambient temperature the amount of food and the frequency of door openings When you set the temperature of the appliance cooling freezing level these aspects should be considered 9 Due to the difference of pressure the door may be difficult to open shortly after closing Wait a few minutes and you can open the door easily 10 Operate the appliance according to the instructions described in the f...

Страница 65: ...tions about the control of the functions and modes described in the following paragraphs The appliance can be used as a fridge or freezer fridge mode freezer mode When you connect the appliance to the mains all indicators of the control panel go on for one second After 30 minutes without using any operating buttons the lighting intensity of the currently lit indicators is reduced The FREEZER MODE ...

Страница 66: ...ure Activation deactivation of the Fast Freezing Mode S chapter 4 6 TEMPERATURE SETTING et seq INDICATORS 1 OPERATIONAL STATUS INDICATOR of the fridge freezer 2 OPERATIONAL STATUS INDICATOR OF THE FRIDGE MODE FRIDGE MODE Two settings can be selected in fridge mode cooling levels 1 2 3 OPERATIONAL STATUS INDICATOR OF THE FREEZER MODE FREEZER MODE Five settings can be selected in freezer mode freezi...

Страница 67: ...utes without using any operating buttons the lighting intensity of the currently lit indicators is reduced HOW TO SWITCH THE COOLING COMPRESSOR OF THE FRIDGE FREEZER OFF 1 Press and hold the ON OFF BUTTON A for 3 seconds to switch the cooling compressor of the fridge freezer off 2 The operational status indicator of the fridge freezer goes off The cooling compressor is switched off 3 After 30 minu...

Страница 68: ...dge mode is activated and cooling level 1 is set at the same time s fig on the right Cooling level 1 HOW TO SET THE FREEZER MODE 1 Press the SET TEMPERATURE BUTTON repeatedly until the operational status indicator of the freezer mode blue goes on 2 The freezer mode is activated and freezing level 1 is set at the same time s fig on the right Freezing level 1 To return to FRIDGE MODE press the SET T...

Страница 69: ...g or freezing level these aspects should be considered PLEASE NOTE the colder the selected temperature setting high cooling freezing level the longer the compressor operates to reach the set cooling freezing temperature The set cooling freezing level can be changed as needed You can check the temperature inside the appliance using a suitable thermometer not included in the scope of delivery When t...

Страница 70: ... FRIDGE OR FREEZER MODE 2 The operational status indicator of the fridge mode is on blue cooling level 1 is set at the same time Cooling level 1 3 To set cooling level 2 press the SET TEMPERATURE BUTTON once The operational status indicator blue of the set cooling level goes on s fig on the right Cooling level 2 4 After 5 seconds without using any operating buttons the set cooling level e g coolin...

Страница 71: ...g level 5 will be activated E g freezing level 5 5 The set freezing level is in operation 6 After 30 minutes without using any operating buttons the lighting intensity of the currently lit indicators is reduced Please observe chapter 4 6 4 RECOMMENDED SETTING OF THE COOLING OR FREEZING LEVEL CAUTION Freezer mode do not store any bottled or canned beverages neither still nor carbonated inside the a...

Страница 72: ...e any bottled or canned beverages neither still nor carbonated inside the appliance as their containers could explode HOW TO DEACTIVATE THE FAST FREEZING MODE 1 Press the SET TEMPERATURE BUTTON repeatedly until the operational status indicator of the desired freezing level blue goes on e g freezing level 1 s fig on the right Freezing level 1 2 The operational status indicator of the FAST FREEZING ...

Страница 73: ...od in the appliance to avoid a rapid rise of the temperature inside the appliance IN FREEZER MODE ONLY in the event of a predictable power failure you can activate the FAST FREEZING MODE and decrease the temperature of the freezer as a precautionary measure to set the appliance to the lowest temperature strongest cooling so that it is maximally cooled at the time of the power failure NOTICE In an ...

Страница 74: ...t warm food such as cooked meals cool down before you store them in the appliance Store food in such a way that the cooled air can circulate properly Do not place heavy bottles in the bottle pocket27 as it can come off the door NOTICE Food especially oily and fatty food must not come into direct contact with the inner lining of the appliance The direct contact with the inner lining can cause stain...

Страница 75: ...DATA Only buy frozen food when its packaging is not damaged Damaged packaging may indicate an interruption of the cold chain Avoid or reduce variations in temperature buy frozen food at the end of shopping and transport it in thermally insulated bags Do not refreeze defrosted and semi defrosted food Consume within 24 hours Observe the complete information on the packaging of frozen food NOTICE Foo...

Страница 76: ...ABLE FOOD FREEZER 18 C Suitable for seafood fish shrimps shellfish freshwater and meat products Recommended storage period 3 months Suitable for freezing fresh food FREEZER 18 C Suitable for seafood fish shrimps shellfish freshwater and meat products Recommended storage period 3 months Not suitable for freezing fresh food FREEZER 12 C Suitable for seafood fish shrimps shellfish freshwater and meat...

Страница 77: ...ay or within the next three days after storage max Not suitable for freezing food or for storing frozen food 4 10 Storage of food The operation of your appliance is described generally in the chapters OPERATION et seq the following explanations will help you to store your food properly Food must not get in touch with the surfaces inside the appliance directly It must be wrapped separately in alumi...

Страница 78: ...ge compartment DAIRY FOODS AND EGGS Most pre packed dairy foods have a recommended use by best before best by date stamped on them Store them in the fridge compartment and use within the recommended time Butter can be spoiled by strong smelling food so it is best stored in a sealed container Eggs should be stored in the fridge compartment RED MEAT Place fresh red meat on a plate and cover it with ...

Страница 79: ...d will not dry out Keep for 1 2 days only Reheat leftovers once only and until steaming hot CRISPER The crisper is the optimum storage location for fresh fruit and vegetables Take care not to store the following food at temperatures of less than 7 C for long periods citrus fruit melons pineapple papaya passion fruit cucumber peppers tomatoes Undesirable changes will occur at low temperatures such ...

Страница 80: ...ood which is already frozen THE FOLLOWING FOOD IS SUITABLE FOR FREEZING Cakes and pastries Fish and seafood Meat game and poultry Vegetables fruit and herbs Eggs without shells Dairy products such as cheese and butter Ready meals and leftovers such as soups stews cooked meat and fish Potato dishes and soufflés Desserts THE FOLLOWING FOOD IS NOT SUITABLE FOR FREEZING Types of vegetables which are u...

Страница 81: ...1 month Bread ice cream sausages pies prepared shellfish oily fish 2 months Non oily fish shellfish pizza scones and muffins 3 months Ham cakes biscuits beef and lamb chops poultry pieces 4 months Butter vegetables blanched eggs whole and yolks cooked crayfish minced meat raw pork raw 6 months Fruit dry or in syrup egg whites beef raw whole chicken lamb raw fruit cakes 12 months IMPORTANT INSTRUCT...

Страница 82: ...into your appliance Store your food in colourless airtight and tasteless materials Some food like meat fish etc may become dry and release strong odours You can avoid these by wrapping them into aluminium foil or plastic wrap or putting them into an airtight bag or container Allow ample storage place for your food Do not overfill your appliance Wrap your food in plastic wrap or suitable paper and ...

Страница 83: ...ass 2 the doors close properly 3 you do not open the doors too often or too long 4 the door seals are in proper condition 5 the appliance is properly positioned 6 you have not overfilled the appliance 7 you do not store warm or hot food in the appliance 6 Cleaning and maintenance DANGER Never touch the power plug the power switch or other electrical components with wet or damp hands RISK OF ELECTR...

Страница 84: ...e valid for all surfaces of your appliance EXTERNAL CLEANING 1 Use a moist cloth and a mild non acidic detergent Use a suitable detergent for stubborn stains 2 Use clear water to rinse 3 Dry the cleaned surfaces with a cloth INTERNAL CLEANING 1 Clean the shelves and the inside with warm water and a mild detergent 2 Use clear water to rinse 3 Dry the cleaned surfaces with a cloth 4 Check the water ...

Страница 85: ...cloth b A LOT OF CONDENSATION please proceed exactly as described below under HOW TO DEFROST THE APPLIANCE FREEZER MODE HOW TO DEFROST THE APPLIANCE FREEZER MODE FREEZER MODE the appliance should be defrosted regularly to ensure proper operation The defrosting process can take several hours 1 Remove the content wrap it in several layers of newspaper and store it in a cooling box or a cool place 2 ...

Страница 86: ...ening B points downwards s fig below 8 Drain the defrost water via the water drain opening 9 Keep the container for the collection of the defrost water under supervision so that it does not overflow 10 When the defrosting process is finished turn the water drain screw A through 180 anticlockwise s arrow so that the water drain opening B points upwards again s fig below 11 Push the water drain scre...

Страница 87: ...isconnected from the mains for a longer period of time allow the appliance to cool down for 3 until 4 hours at following temperature setting before you place any fresh or frozen food in the appliance fridge mode cooling level 2 freezer mode cooling level 3 s chapter 4 6 TEMPERATURE SETTING et seq If you place food in the appliance before it has reached its normal operating temperature the food can...

Страница 88: ...itched off for a while 3 The appliance needs some time to reach the preset cooling freezing temperature 4 Too much or too hot food in the appliance 4 Remove any hot food 5 Door opened too often or too long 4 Do not open the door too often too long FORMATION OF ENCRUSTED ICE 1 The appliance is set too cold 1 Set the appliance to a warmer setting 2 The door is not properly closed 2 Close the door pr...

Страница 89: ...source 3 Please always observe the installation instructions in chapter INSTALLATION et seq 4 Too much or too warm food in the appliance within the last 24 hours 4 Set the appliance to a colder setting If the appliance shows a malfunction not noted on the schedule above or if you have checked all items on the above schedule but the problem still exists please contact the aftersales service TEMPERA...

Страница 90: ...e temperature falls below a certain level the appliance will operate with high power to reach the preset temperature CONDENSED WATER IN ON THE APPLIANCE may be generated inside or outside the appliance by high humidity or very warm ambient temperatures CLICKING You will hear the compressor click if it is activated or deactivated HUM is caused by the compressor while running KNOCKING SNAPPING may b...

Страница 91: ...ecure all removable parts and the contents of the appliance Pack them separately if necessary 2 transport the appliance in an upright position only All other positions can cause damage to the compressor 3 do not damage the feet of the appliance DECOMMISSIONING ULTIMATE 1 Disconnect the appliance from the mains To disconnect the appliance from the mains you must unplug the appliance or use a cut of...

Страница 92: ...otal quantity R600a 38 g Handle integrated Internal light Extra storage in the appliance 1 wire basket Indicator lamp operation yes Indicator lamp Fast Freezing Mode yes Adjustable supporting feet 2 in front Defrosting process fridge freezer manual manual Appliance dimensions H W D in cm 84 50 54 50 54 50 Weight net gross in kg 24 00 27 00 Technical modifications reserved According to regulation E...

Страница 93: ... Unplug the appliance and cut off the entire power cord Dispose of the power cord and the plug immediately Remove the door completely so children are not able to get into the appliance as this endangers their lives 5 Dispose of any paper and cardboard into the corresponding containers 6 Dispose of any plastics into the corresponding containers 7 If suitable containers are not available at your res...

Страница 94: ...o not influence the utility value of the product 3 damage caused by handling errors or false operation 4 damage caused by aggressive environmental conditions chemicals detergents 5 damage caused by non professional installation and haulage 6 damage caused by non common household use 7 damages which have been caused outside the appliance by a PKM product unless a liability is forced by legal regula...

Страница 95: ...finden alle Informationen zum Kundendienst auf der Einlage in dieser Bedienungsanleitung Aftersales service information on the leaflet inside this instruction manual Änderungen vorbehalten Subject to alterations STAND UPDATED 16 06 2021 06 16 2021 PKM GmbH Co KG Neuer Wall 2 47441 Moers ...

Отзывы: