background image

Перед началом


Названия частей


Установка


Начальная настройка


Воспроизведение


Расширенная настройка  

Обновление встроенного программного обеспечения  

Другие функции


Spotify 


Основные операции 

Подключив аппарат к той же сети, что и смартфон или 
планшет, можно воспроизводить Spotify Connect. Чтобы 
использовать Spotify Connect, установите приложение 
Spotify на смартфоне или планшете и создайте 
премиум-аккаунт Spotify. 
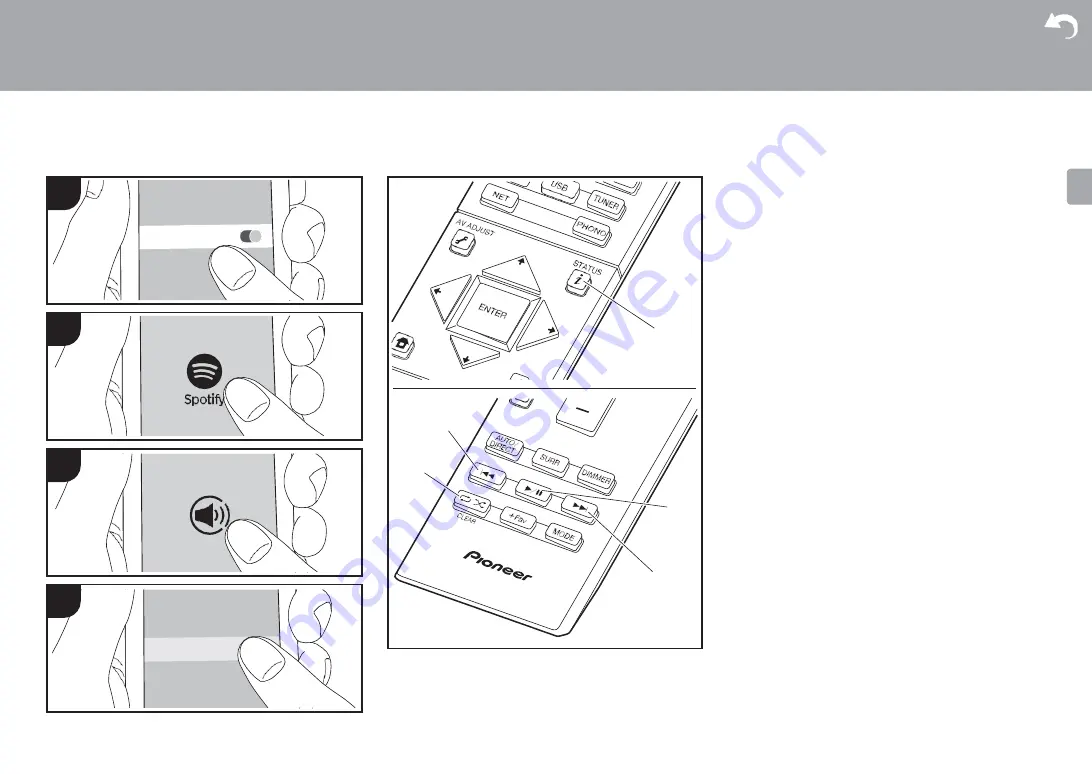
1. 

Подключите смартфон к той же сети, что и аппарат. 

2. 

Нажмите значок Connect на экране воспроизведения 
композиций приложения Spotify. 

3. 

Выберите аппарат. 

4. 

Аппарат автоматически включится, селектор входов 
переключится на NET, и запустится потоковая 
передача Spotify. 

В случае установки "Hardware" - "Power Management" 

- "Network Standby" 

на "Off" в меню System Setup из 

Home, вручную включите аппарат, а затем нажмите 
NET на пульте ДУ. 

Более подробную информацию о настройках Spotify 

см. на веб-сайте: 

www.spotify.com/connect/ 

Программное обеспечение Spotify регулируется 

лицензиями третьих лиц, с которыми можно 
ознакомиться по следующему адресу: 
www.spotify.com/connect/third-party-licenses 


Указанные ниже операции также можно выполнить с 
помощью пульта ДУ. 
(a) 

при нажатии этой кнопки в процессе воспроизведения 
меняется информация о текущей композиции. 

(b) 

Воспроизведение предыдущей композиции. 

(c) 

повтор воспроизведения композиции или 
воспроизведение в случайном порядке. При 
последовательном нажатии этой кнопки осуществляется 
переход от одного режима повтора к другому. 

(d) 

При нажатии в момент воспроизведения последнее 
приостанавливается (пауза). Нажатие в момент 
паузы перезапускает воспроизведение. 

(e) 

воспроизведение следующей композиции. 


21 


U


3


2


1


Wi-Fi


4


Pioneer VSX-XXXX XXXX


a


b


c


d


e


Содержание VSX-S520

Страница 1: ...VSX S520D VSX S520 Language select Sélection de la langue Selección de idioma Selezione lingua Sprachauswahl Taal selecteren Выбор языка English Français Español Italiano Deutsch Nederlands Русский ...

Страница 2: ...nents 12 4 Connect the Audio Components 13 5 Connect Other Cables 14 Initial Setup Initial Setup with Auto Start up Wizard 15 Playback AV Component Playback 18 Internet Radio 19 Spotify 21 Music Server 22 USB Storage Device 24 AirPlay 26 BLUETOOTH Playback 27 Listening to the FM DAB Radio 28 Listening Modes 31 AV Adjust 40 Advanced Setup System Setup 42 MCACC 51 Network Bluetooth 54 Firmware Updat...

Страница 3: ...not accept responsibility for damage arising from the connection of equipment manufactured by other companies 0 Functionality may be introduced by firmware updates and service providers may cease services meaning that some network services and content may become unavailable in the future Furthermore available services may vary depending on your area of residence 0 Specifications and appearance are...

Страница 4: ...ni plug Ø 3 5 mm are connected 7 MCACC SETUP MIC jack The supplied speaker setup microphone is connected 8 USB port A USB storage device is connected so that music files stored in it can be played You can also supply power maximum 5V 1A to USB devices with a USBcable 9 FL OFF indicator This lights when you have pressed DIMMER repeatedly to turn the display off 10 NETWORK indicator When the power o...

Страница 5: ...nalog audio cable 4 SIGNAL GND terminal The ground wire of the turntable is connected 5 DIGITAL IN OPTICAL COAXIAL jacks Input TV or AV component digital audio signals with a digital optical cable or digital coaxial cable 6 Power cord 7 NETWORK port Connect to the network with an Ethernetcable 8 HDMI OUT jack Connect a HDMI cable to transfer video signals and audio signals to a TV 9 HDMI IN jacks ...

Страница 6: ...og audio cable 4 SIGNAL GND terminal The ground wire of the turntable is connected 5 DIGITAL IN OPTICAL COAXIAL jacks Input TV or AV component digital audio signals with a digital optical cable or digital coaxial cable 6 Power cord 7 NETWORK port Connect to the network with an Ethernetcable 8 HDMI OUT jack Connect a HDMI cable to transfer video signals and audio signals to a TV 9 HDMI IN jacks Inp...

Страница 7: ...s again to cancelmuting 8 Listening mode buttons Allows you to select the listening mode P31 9 Play buttons You can start play of the Music Server or USB 10 button You can start repeat or random play of the Music Server or USB CLEAR button Deletes all characters you have entered when entering text on the TV screen 11 STATUS button Switches the information on the display 12 button Returns the displ...

Страница 8: ...put selector is selected 2 Lights when operating the NET or USB input selector indicating remote controller cursor operations are possible in screens showing list of tracks for example 3 Lights when headphones areconnected 4 Lights when operating the NET or USB input selector when tracks are played or paused 5 Lights according to the type of input digital audio signals and the listening mode 6 Lig...

Страница 9: ...oofer reproduces bass sounds and creates rich sound field The front speakers should be positioned at ear height while the surround speakers should be positioned just above ear height Center speaker should be set up facing the listening position Place the powered subwoofer towards the front Placing it between the center speaker and a front speaker gives you a natural sound even when playing music 1...

Страница 10: ...able tightly before inserting into the terminals Make correct connection between the unit s jacks and speaker s jacks to and to foreach channel If connection is wrong a bass sound may become poor due to reverse phase Either a powered subwoofer or passive subwoofer may be connected To connect a powered subwoofer use a subwoofer cable and connect to the SUBWOOFER PRE OUT jack To connect a passive su...

Страница 11: ...eakers do not stick out of the speaker terminals when connecting If the exposed wires of the speakers touch the rear panel or the and wires touch each other the protection circuit will be activated P60 Setup 0 Settings for the speaker configuration you have connected need to be made in 1 Full Auto MCACC P16 in Initial Setup 10 E N ...

Страница 12: ... that supports ARC when connecting To Non ARC TV For a TV that does not support the ARC Audio Return Channel feature connect both the HDMI cable in illustration a and the digital optical cable in b Setup 0 Settings are required to use the ARC function Select Yes in 4 Audio Return Channel P17 in the Initial Setup 0 Please refer to the TV s operation manual for directions on connections and setup fo...

Страница 13: ...as the HDMI CEC feature that links with the input selector and the HDMI Standby Through feature which allows you to play video and audio from AV components on the TV even when this unit is in standby mode P67 0 To play 4K or 1080p video use the high speed HDMI cable Setup 0 Settings are required to use the HDMI CEC and HDMI Standby Through features P47 48 Make settings after all connections are co...

Страница 14: ...MM type cartridge to the PHONO jack 0 If the turntable has a built in audio equalizer connect it to an AUDIO IN jack other than the PHONO jack Further if the turntable uses an MC type cartridge install an audio equalizer compatible with the MC type cartridge between the unit and the turntable then connect to any AUDIO IN jack other than the PHONO jack If the turntable has a ground wire connect it ...

Страница 15: ...he radio to find the position with the best reception Network Hookup Connect this unit to the network using wired LAN or Wi Fi wireless LAN You can enjoy network features such as internet radio by connecting the unit to the network If you connect by wired LAN connect with an Ethernet cable to the NETWORK port as shown in the illustration To connect by Wi Fi then after selecting Wireless in 3 Netwo...

Страница 16: ...ings requiredforstartup 4 Follow the on screen instructions to select the item with the cursors of the remote controller and press ENTERto confirm your selection 0 To return to the previous screen press To redo Initial Setup If you terminate the procedure on the way or want to change a setting made during Initial Setup press on the remote controller select Miscellaneous Initial Setup in the System...

Страница 17: ...the power and volume of the subwoofer The low frequencies played by the subwoofer may not be discernible so set its volume to at least halfway 3 Test tones are emitted by the speakers and firstly the unit detects the speakers connected and the noise in the environment 4 After the results of the above measurements are displayed select Next press ENTER on the remote controller and the test tones are...

Страница 18: ... the input characters Privacy policy A confirmation screen asking you to agree to the privacy policy is displayed during network setting Select Yes and press ENTER to indicate agreement 4 Audio Return Channel If you have connected a TV that supports ARC select Yes This unit s ARC setting turns on and you can listen to the TV s audio through this unit 0 If you select Yes the HDMI CEC function is en...

Страница 19: ...ress the input selector a on the remote controllerwith the same name as the jack to which you connected the player to switch the input For example press BD DVD to play the player connected to the BD DVD jack Press TV to listen the TV s sound 0 Note that when the CEC link function works the input switches automatically when you have connected a CEC compliant TV and player to this unit using HDMI co...

Страница 20: ...er music you ll love After selecting Pandora do the following 1 Use a on the remote controller to select I have a Pandora Account or I m new to Pandora and then press ENTER b If you are new to Pandora select I m new to Pandora You will see an activation code on your TV screen Please write down this code Go to an Internet connected computer and point your browser to www pandora com pioneer Enter yo...

Страница 21: ...Give a track thumbs up and Pandora will play more music like it I don t like this track Give a track thumbs down and Pandora will ban that track from the current station Automatically find stations matching your preferences based on genre specific artists and songs and delete those stations you don t need 20 E N ...

Страница 22: ...ardware Power Management Network Standby is set to Off in the System Setup menu from Home manually turn the unit on and then press NET on the remote controller 0 Refer to the following for Spotify settings www spotify com connect 0 The Spotify software is subject to third party licenses found here www spotify com connect third party licenses The following remote controller operations are also poss...

Страница 23: ...rn on your PC and start Windows Media Player 12 2 In the Stream menu select Turn on media streaming to display a dialog box 0 If media streaming is already turned on select More streaming options in the Stream menu to list players in the network and then go to step 4 3 Click Turn on media streaming to list players inthe network 4 Select this unit in Media streaming options andcheck that it is set ...

Страница 24: ...s displayed on the TV connected to the HDMI output of the unit 6 Adjust the volume using the volume bar on the Playto window 0 Sometimes the volume displayed on the remote playback window may differ from that appeared on the display of the unit Also when the volume is adjusted from this unit this is not reflected in the Play to window 0 Remote playback is not possible when using a network service ...

Страница 25: ...e cursors and press ENTER b to confirm your selection 0 To return to the previous screen press d 5 With the cursors on the remote controller select the music file and then press ENTER b to startplayback 0 The USB port of this unit conforms with the USB 2 0 standard The transfer speed may be insufficient for some content you play which may cause some interruption in sound The following remote contr...

Страница 26: ...rmats MPEG 1 MPEG 2 Audio Layer 3 0 Supported sampling rates 44 1 kHz 48 kHz 0 Supported bitrates Between 8 kbps and 320 kbps and VBR WMA wma WMA 0 Supported sampling rates 44 1 kHz 48 kHz 0 Supported bitrates Between 5 kbps and 320 kbps and VBR 0 WMA Pro Voice WMA Lossless formats are not supported WAV wav WAV WAV files include uncompressed PCM digital audio 0 Supported sampling rates 44 1 kHz 48...

Страница 27: ... you do steps 3 and 4 above this unit automatically comes on and input switches to NET To reduce the amount of power consumed in standby mode press the button on the remote controller then in the Home menu displayed set System Setup Hardware Power Management Network Standby to Off 0 Due to the characteristics of AirPlay wireless technology the sound produced on this unit may slightly be behind the...

Страница 28: ...il Now Pairing is displayed then perform step 2 above This unit can store the data of up to eight paired devices 0 The coverage area is 15 meters 48 feet Note that connection is not always guaranteed with all BLUETOOTH enabled devices Playing Back 1 When the unit is on perform the connection procedure on the BLUETOOTH enabled device 2 The input selector on this unit automatically switchesto BT AUD...

Страница 29: ...emote controller again so that AUTO appears on the display The unit tunes automatically into a radio station Frequency step setting North American models Press the button on the remote controller to select System Setup Miscellaneous Tuner FM Frequency Step and select the frequency step foryour area Note that when this setting is changed all radio presets are deleted Using RDS European models RDS s...

Страница 30: ...select DAB the Auto Tuning function automatically scans the DAB Band 3 for the multiplexes i e stations available in your area 0 Once the scanning process is complete the first station that was detected is selected 0 If a new DAB station is introduced or you move to a new area press the button on the remote controller then in the Home menu displayed set System Setup Miscellaneous Tuner DAB Auto Sc...

Страница 31: ...ess the cursor buttons a on the remote controller to select a number between 1 and 40 4 Press Fav d on the remote controller again toregister the station When registered the preset number stops flashing Selecting a Preset Radio Station 1 Press TUNER on the remotecontroller 2 Press the cursor buttons a on the remote controller to select a preset number Deleting a Preset Radio Station 1 Press TUNER ...

Страница 32: ...reo for 2 channel input signals etc and an indicator such as Dolby D is displayed on the display For details on the effects of each of the listening modes see Listening Mode Effects P32 For listening modes selectable for each of the audio formats in the input signals refer to Selectable listening modes P35 The listening mode last selected for the source is remembered for each of the AUTO DIRECT an...

Страница 33: ...ters Unlike existing surround systems Dolby Atmos doesn t rely on channels but rather enables the accurate placement of sound objects that have independent motion in a three dimensional space with even greater clarity Dolby Atmos is an optional audio format on Blu ray Discs and achieves a three dimensional sound field by introducing a sound field above the listener 0 To enable transfer of this aud...

Страница 34: ...Inc This format is an optional audio format on DVD Video and a standard on Blu ray Discs It enables recording of 5 1 channels two front channels a center channel two surround channels and the LFE channel dedicated to the bass region sound elements for the subwoofer The content is recorded with a rich volume of data with maximum sampling rate of 48 kHz at a resolution of 24 bits and a bit rate of 1...

Страница 35: ...ded Mono In this mode all speakers output the same sound in mono so the sound you hear is the same regardless of where you are within the listening room In this mode sound localization is distinct with emphasis on bass Ext Stereo Extended Stereo Ideal for background music this mode fills the entire listening area with stereo sound from the front surround and surround back speakers F S Surround Fro...

Страница 36: ... F S Surround Front Stage Surround cannot be selected On firmware version before DTS X support 0 You can select Neo 6 Cinema and Neo 6 Music On firmware version after DTS X support 0 You can select DTS X and DTS Neural X You cannot select Neo 6 Cinema and Neo 6 Music after updating 1 A center speaker or surround speakers need to be installed 2 Surround speakers need to be installed 1 A center spea...

Страница 37: ...t Listening Mode Dolby Atmos Stereo Dolby Atmos Surround Virtual Classical Unplugged Ent Show Drama AdvancedGame Action Rock Pop Sports Ext Stereo Ext Mono F S Surround Input Format Listening Mode Multich PCM Stereo Multich PCM 1 Dolby Surround Surround Virtual DTS Neural X Classical 2 Unplugged 2 Ent Show 2 Drama 2 AdvancedGame 2 Action 2 Rock Pop 2 Sports 2 Ext Stereo 1 Ext Mono 1 F S Surround E...

Страница 38: ... need to be installed 3 Can only be selected when the input format is 2 ch and a center speaker or surround speakers are installed 4 Surround speakers need to be installed 37 Input Format Listening Mode Dolby TrueHD Stereo Dolby TrueHD 1 2 Dolby Surround Surround Virtual PL Ⅱ Movie 3 PL Ⅱ Music 3 PL Ⅱ Game 3 Neo 6 Cinema 3 Neo 6 Music 3 Classical 4 Unplugged 4 Ent Show 4 Drama 4 AdvancedGame 4 Act...

Страница 39: ...an only be selected when the input format is 2 ch and a center speaker or surround speakers are installed 4 Surround speakers need to be installed 38 Input Format Listening Mode DTS Express Stereo DTS Express 1 2 PL Ⅱ Movie 3 PL Ⅱ Music 3 PL Ⅱ Game 3 Neo 6 Cinema 3 Neo 6 Music 3 DTS Neural X Classical 4 Unplugged 4 Ent Show 4 Drama 4 AdvancedGame 4 Action 4 Rock Pop 4 Sports 4 Ext Stereo 2 Ext Mon...

Страница 40: ...to be installed 1 Cannot be selected when the input format is 2 ch 2 A center speaker or surround speakers need to be installed 3 Can only be selected when the input format is 2 ch and a center speaker or surround speakers are installed 4 Surround speakers need to be installed 39 E N Input Format Listening Mode DTS HD HR Stereo DTS HD HR 1 2 PL Ⅱ Movie 3 PL Ⅱ Music 3 PL Ⅱ Game 3 Neo 6 Cinema 3 Neo...

Страница 41: ... This setting cannot be selected if Full Auto MCACC setting has not been performed 0 It cannot be set if the listening mode is Pure Direct Manual EQ Select Select Preset 1 to Preset 3 configured in MCACC Manual MCACC EQ Adjust P51 in the Home The same sound field setting is applied all ranges when set to Off 0 It cannot be set if the listening mode is Pure Direct Phase Control Correct phase distur...

Страница 42: ...djust the width of the front sound field when playing in the Dolby Pro LogicⅡMusic listening mode Set a small number to concentrate sound in the middle Set a large number to distribute the central sound out to the left and right Dialog Control You can increase the dialog portion of the audio in 1 dB steps up to 6 dB so that you can make dialog easier to hear over background noise 0 This cannot be ...

Страница 43: ...ings with the cursors 0 To return to the previous screen press 4 To exit the settings press Input Output Assign TV Out OSD 1080p 4K Upscaling When using a TV that supports 4K video signals input at 1080p can be automatically upscaled to 4K for output Off Default Value When not using this function Auto Use this function 0 Select Off if your TV does not support 4K Super Resolution When you have set ...

Страница 44: ...s Default Value 5 minutes 10 minutes and Off BD DVD COAXIAL OPTICAL Assign a desired DIGITAL IN jack to the BD DVD input selector Default Value is CBL SAT COAXIAL OPTICAL Assign a desired DIGITAL IN jack to the CBL SAT input selector Default Value is GAME COAXIAL OPTICAL Assign a desired DIGITAL IN jack to the GAME input selector Default Value is STRM BOX COAXIAL OPTICAL Assign a desired DIGITAL I...

Страница 45: ...low range capabilities for each channel by setting either small or large Small Default Value For small speakers whose low range capabilities may be limited Large For full range speakers with sufficient low range capabilities 0 When Front is set to Small this is set to Small 0 If an item cannot be selected even though connection is correct check that the settings in Configuration Speaker Channels m...

Страница 46: ...etween 12 dB and 12 dB in 1 dB increments A test tone will be output each time you change the value Select the desired level Default Value is 0 dB 45 Surround Left Select a value between 12 dB and 12 dB in 1 dB increments A test tone will be output each time you change the value Select the desired level Default Value is 0 dB Subwoofer Select a value between 15 dB and 12 dB in 1 dB increments A tes...

Страница 47: ...Pressing CLEAR on the remote controller will remove all the input characters 2 After inputting select OK with the cursors and press ENTER The input name will be saved E N Loudness Management When playing Dolby TrueHD enable the dialog normalization function which keeps the volume of dialog at a certain level Note that when this setting is Off the DRC function that allows you to enjoy surround at l...

Страница 48: ...the unit 0 If abnormal operation occurs when you set the setting to On set it to Off 0 When connecting a non CEC compatible component or when you are not sure whether it is compatible set the setting to Off E N Audio Select ARC When giving priority to input signal from ARC compatible TV 0 The setting can be selected only when Hardware HDMI Audio Return Channel is set to Auto and also the TV input ...

Страница 49: ...efault Value Automatic correction will be enabled Off Automatic correction will be disabled HDMI Standby Through When this is set to anything other than Off you can play the video and audio of an HDMI connected player on the TV even if the unit is in standby mode Only Auto and Auto Eco can be selected if HDMI CEC is set to On If you select anything else set HDMI CEC to Off Default Value is Off 0 P...

Страница 50: ...ity without any video or audio input When USB Power Out at Standby or Network Standby is on this becomes the HYBRID STANDBY mode which reduces the increase in power consumption to a minimum On The unit will automatically enter standby mode ASb will stay lit Off The unit will not automatically enter standby mode 0 Auto Standby is displayed on the display of this unit and TV screen 30 seconds before...

Страница 51: ...setting if a USB storage device is not connected or there is nothing to update in the USB storage device 0 Wait for a while if Firmware Update cannot be selected It will appear when the network feature is started Initial Setup You can make the Initial Setup from the System Setup menu 0 Wait for a while if Initial Setup cannot be selected It will appear when the network feature is started Lock Load...

Страница 52: ...crophone in the listening position measure the test tones emitted by the speakers then the unit automatically sets the optimum volume level for each speaker the crossover frequencies and the distance from the listening position This also automatically adjusts the equalizers for the speakers and enables correction of distortion caused by the acoustic environment of the room Refer to 1 Full Auto MCA...

Страница 53: ...Hz and 250 Hz with the cursors adjust the volume of that frequency between 12 0 dB and 12 0 dB with Default Value is 0 0 dB 0 This cannot be selected if No is set in System Setup Speaker Configuration Subwoofer P44 Front Left After selecting the speaker frequency from between 63 Hz and 16 kHz with the cursors adjust the volume of that frequency between 12 0 dB and 12 0 dB with Default Value is 0 0...

Страница 54: ...the number of speaker channels connected and the large and small settings you have set for the low range reproduction capabilities for each of the speakers Channel Level You can check the output level settings for each of the speakers Speaker Distance You can check the distance from each speaker to the listening position Acoustic Calibration EQ You can check the calibration values for the frequenc...

Страница 55: ...0 When LAN is configured with a DHCP set DHCP to Enable to configure the setting automatically To assign fixed IP addresses to each component you must set DHCP to Disable and assign an address to this unit in IP Address as well as set information related to your LAN such as Subnet Mask and Gateway Wi Fi Connect the unit to network via wireless LAN router On Wireless LAN connection Off Wired Defaul...

Страница 56: ...y Policy but select No for this setting the information will not be collected Network Check You can check the network connection Press ENTER when Start is displayed 0 Wait for a while if Network cannot be selected It will appear when the network feature is started 55 E N MAC Address This is the MAC address of this unit This value is specific to the component and cannot be changed DHCP Enable Defau...

Страница 57: ...enabled device is connected Off The function is disabled 0 If the input is not switched automatically set to Off and change the input manually Auto Reconnect This function automatically reconnects to the BLUETOOTH enabled device connected last when you change the input to BT AUDIO On Default Value Use this function Off Do not use this function 0 This may not work with some BLUETOOTH enabled device...

Страница 58: ...or headphones or perform any operation on the component such as turn off its power Accessing this unit from a PC or smartphone using an application Disclaimer The program and accompanying online documentation are furnished to you for use at your own risk We will not be liable and you will have no remedy for damages for any claim of any kind whatsoever concerning your use of the program or the acco...

Страница 59: ...b function arenot supported Do not connect these devices to theunit 0 Delete any data stored on the USB storage device 0 Turn off the controller component PC etc connected to the network 0 Stop any playing Internet radio USB storage device or server content 0 When System Setup Hardware HDMI HDMI CEC in the Home is set to On set it to Off 0 Some USB storage devices may take long to load may not be ...

Страница 60: ...unittoturn theunitinto standbymode Theprocessis completedandyour firmwareisupdatedtothelatest version 0 Do not use Íon the remote controller If an error message is displayed When an error occurs Error is displayed on the display of this unit represents an alphanumeric character Check the following 0 01 10 USB storage device not found Check whether the USB storage device or USB cable is correctly i...

Страница 61: ... Before Start Part Names Install Initial Setup Playback Advanced Setup Firmware Update Others 59 ...

Страница 62: ...e sure that the power cord is properly plugged into the wall outlet 0 Unplug the power cord from the wall outlet wait 5 seconds or more then plug it in again The unit turns off unexpectedly 0 The unit automatically switches to standby when the System Setup Hardware Power Management Auto Standby setting in the Home functions 0 If CHECK SP WIRE appears on the display the speaker cables may be short ...

Страница 63: ...cording to the format of the source in the Blu ray Disc player settings try setting BD video supplementary sound or re encode secondary sound video additional audio etc to Off Change the listening mode for each source after changing the setting toconfirm 0 We plan to provide support for the Dolby Atmos and DTS X audio format through firmware updates for this unit About DTS signals 0 With media tha...

Страница 64: ...the BLUETOOTH function of the BLUETOOTH enabled device is enabled Music playback is unavailable on the unit even after successful BLUETOOTH connection 0 When the audio volume of your BLUETOOTH enabled device is set low the playback of audio may be unavailable Turn up the volume on the BLUETOOTH enabled device 0 Some BLUETOOTH enabled devices may be equipped with a Send Receive selector switch Sele...

Страница 65: ...encryption WEP etc is correct Make sure the network settings of the unit is properly set 0 Connection to an SSID that includes multi byte characters is not supported Name the SSID of the wireless LAN router using single byte alphanumeric characters only and try again Connected to an SSID different to the SSID selected 0 Some wireless LAN routers allow you to set multiple SSIDs for one unit If you ...

Страница 66: ... unplugging the power cord of the other unit use different wall outlets for this unit and the other unit When performing Full Auto MCACC the message Noise Error appears 0 This can be caused by a malfunction in your speaker unit Check if the unit produces normal sounds DRC function does not work 0 Make sure the source material is Dolby Digital Dolby Digital Plus Dolby TrueHD or DTS 64 E N ...

Страница 67: ...1 a b g n standard Wi Fi standard 5 GHz 2 4 GHz band BLUETOOTH Section Communication system BLUETOOTH Specification version 4 1 LE Frequency band 2 4 GHz band Modulation method FHSS Freq Hopping Spread Spectrum Compatible BLUETOOTH profiles A2DP 1 2 AVRCP 1 3 HOGP Host Client HOGP HID Device Server HID Service HIDS Supported Codecs SBC AAC Transmission range A2DP 20 Hz 20 kHz Sampling frequency 44...

Страница 68: ...vanced Setup Firmware Update Others 1 BD DVD 2 CBL SAT PHONO designated Audio Outputs Analog SUBWOOFER PRE OUT Speaker Outputs FRONT L R CENTER SURROUND L R SUBWOOFER Phones PHONES Front Ø 3 5 mm Others USB 1 Front Ver 2 0 5 V 1 A Ethernet 1 Setup Mic 1 66 E N ...

Страница 69: ...andby the input signals from AV components are transmitted to the TV Deep Color By connecting devices supporting Deep Color video signals input from the devices can be reproduced on the TV with even more colors x v Color This technology realizes even more realistic colors by broadening the color gamut 3D You can transmit 3D video signals from AV components to the TV 4K This unit supports 4K 3840 a...

Страница 70: ...e Bluetooth word mark and logos are registered trademarks owned by the Bluetooth SIG Inc PANDORA the PANDORA logo and the Pandora trade dress are trademarks or registered trademarks of Pandora Media Inc Used with permission BLACKFIRE This Mark Certifies that this product is compliant with the BLACKFIRE ALLIANCE Standard Please refer to WWW BLACKFIREALLIANCE COM for more information BLACKFIRETM is ...

Страница 71: ...enue de Marais F 95816 Argenteuil Cedex FRANCE Tel 33 0 969 368 050 Корпорация О энд Пи 2 3 12 Яэсу Чуо ку г Токио 104 0028 ЯПОНИЯ 2016 Onkyo Pioneer Corporation All rights reserved 2016 Onkyo Pioneer Corporation Tous droits de reproduction et de traduction réservés http www pioneer audiovisual com privacy Pioneer and MCACC logo are trademarks of Pioneer Corporation and are used under license F160...

Страница 72: ...AV HDMI 12 4 Raccorder les Appareils Audio 13 5 Raccorder d autres câbles 14 Configuration initiale Configuration initiale avec l assistant de démarrage automatique 15 Lecture Lecture d un appareil AV 18 Radio Internet 19 Spotify 21 Music Server 22 Périphérique de stockage USB 24 AirPlay 26 Lecture BLUETOOTH 27 Écoute de la radio FM DAB 28 Modes d écoute 31 AV Adjust 40 Configuration avancée Syste...

Страница 73: ...n à des équipements fabriqués par d autres sociétés 0 Des fonctionnalités peuvent être mises en place par des mises à jour du micrologicielet des services de fournisseurs pourraient cesser ce qui signifie que certains services réseau ainsi que leurs contenus pourraient devenir inaccessibles dans le futur De plus les services disponibles peuvent être différents en fonction de votre lieu de résidenc...

Страница 74: ...éo avec une mini fiche Ø 3 5mm 7 Prise MCACC SETUP MIC Le micro de réglage d enceinte fourni est connecté 8 Port USB Un appareil de stockage USB est connecté afin que les fichiers musicaux qu il contient puissent être lus Vous pouvez également fournir l alimentation maximum 5V 1A aux périphériques USB avec un câble USB 9 Témoin FL OFF Il s allume quand vous avez appuyé sur DIMMER plusieurs fois po...

Страница 75: ... SIGNAL GND Le fil de terre de la platine tourne disque est connecté 5 Prises DIGITAL IN OPTICAL COAXIAL Entrée des signaux audio numérique composante TV ou AV avec un câble optonumérique ou un câble coaxialnumérique 6 Cordon d alimentation 7 Port NETWORK Permet de se connecter au réseau à l aide d un câble Ethernet 8 Prise HDMI OUT Sert à raccorder un câble HDMI pour transférer des signaux vidéo ...

Страница 76: ...AL GND Le fil de terre de la platine tourne disque est connecté 5 Prises DIGITAL IN OPTICAL COAXIAL Entrée des signaux audio numérique composante TV ou AV avec un câble optonumérique ou un câble coaxialnumérique 6 Cordon d alimentation 7 Port NETWORK Permet de se connecter au réseau à l aide d un câble Ethernet 8 Prise HDMI OUT Sert à raccorder un câble HDMI pour transférer des signaux vidéo et de...

Страница 77: ...l audio en sourdine Appuyer une nouvelle fois pour annuler la mise en sourdine 8 Touches mode d écoute Permet de sélectionner le mode d écoute P31 9 Touches Lecture Permet de démarrer la lecture du Music Server ou de l USB 10 Touche Vous pouvez démarrer la répétition de lecture ou la lecturealéatoire du Music Server ou de l USB Touche CLEAR Supprime tous les caractères que vous avez saisis sur l é...

Страница 78: ...lume lorsque vous utilisez le sélecteur d entrée NET ou USB indiquant que les commandes avec les touches du curseur de la télécommande sont possibles sur les écrans montrant la liste des pistes parexemple 3 S allume lorsque le casque audio estconnecté 4 S allume lorsque vous utilisez le sélecteur d entrée NET ou USB lorsque les pistes sont lues ou en pause 5 S allume en fonction du type de l entré...

Страница 79: ...sson de basse reproduit les sons graves et produit un riche champ sonore Les enceintes avant devront être positionnées à hauteur d oreille tandis que les enceintes surround devront être positionnées juste au dessus de la hauteur d oreille L enceinte centrale devra faire face à la position d écoute Placez le caisson de basse sous tension vers l avant En le plaçant entre l enceinte centrale et une e...

Страница 80: ...dans les bornes Effectuez les bons raccordements entre les bornes de l appareil et les bornes de l enceinte avec et avec pour chaque canal Si une connexion est mauvaise un son grave peut se détériorer à cause d une inversion de phase Il est possible de raccorder soit un caisson de basse sous tension soit un caisson de basse passif Pour raccorder un caisson de basse sous tension utiliser un câble p...

Страница 81: ...nceintes ne dépassent pas des bornes d enceinte lors du raccordement Si les fils dénudés des enceintes entrent en contact avec le panneau arrière ou si les fils et se touchent le circuit de protection sera activé P60 Setup 0 Les réglages pour la configuration de l enceinte que vous avez raccordée doivent être faits dans 1 Full Auto MCACC P16 dans la Initial Setup 10 F R ...

Страница 82: ... prend en charge la fonctionnalité ARC Vers un téléviseur non compatible ARC Avec un téléviseur qui ne prend pas en charge la fonctionnalité ARC Audio Return Channel raccordez un câble HDMI selon le croquis a ainsi qu un câble optonumérique selon le croquis b Setup 0 Des réglages sont nécessaires pour utiliser la fonctionnalité ARC Sélectionnez Yes dans 4 Audio Return Channel P17 dans la Initial S...

Страница 83: ...DMI CEC qui établit une liaison avec le sélecteur d entrée et le HDMI Standby Through qui vous permet de lire la vidéo et le son provenant d un appareil AV sur le téléviseur même si cet appareil est en veille P67 0 Pour lire des vidéos de 4 K ou de 1080p utilisez le câble HDMI haute vitesse Setup 0 Des réglages sont nécessaires pour utiliser les fonctionnalités HDMI CEC et HDMI Standby Through P47...

Страница 84: ...ant une cartouche de type MM à la prise PHONO 0 Si la platine disque possède un égaliseur audio intégré branchez la à une autre prise AUDIO IN que la prise PHONO De plus si la platine disque utilise une cartouche de type MC installez un égaliseur audio compatible avec les cartouches de type MC entre l appareil et la platine disque puis raccordez n importe quelle prise AUDIO IN autre que la prise P...

Страница 85: ...re position de réception a Antenne DAB FM b Antenne FM intérieure c Câble Ethernet d Cordon d alimentation Raccordement au réseau Connectez cet appareil au réseau à l aide du LAN filaire ou du Wi Fi LAN sans fil Vous pouvez profiter des fonctionnalités réseau comme la radio Internet en connectant l appareil au réseau Si vous vous connectez par LAN filaire raccordez un câble Ethernet au port NETWOR...

Страница 86: ... réglages nécessaires au démarrage 4 Suivez les instructions à l écran pour sélectionner l élément grâce aux touches du curseur de la télécommande et appuyez sur ENTER pour validervotre sélection 0 Pour retourner à l écran précédent appuyez sur Pour refaire la Initial Setup Si vous interrompez la procédure en cours ou si vous désirez modifier un réglage effectué lors de la Initial Setup appuyez su...

Страница 87: ...n pour définir si vous avez raccordé un caisson de basse 0 Si vous avez raccordé un caisson de basse vérifiez la puissance et le volume de celui ci Les fréquences basses lues par le caisson de basse peuvent être imperceptibles donc réglez son volume au moins à mi course 3 Des tonalités de test sont émises par les enceintes et en premier lieu l appareil détecte les enceintes connectées ainsi que le...

Страница 88: ... l afficher textuellement appuyez sur la touche Fav de la télécommande Appuyer sur CLEAR supprimera tous les caractères saisis Politique de confidentialité Un écran de confirmation vous demandant d accepter la politique de confidentialité s affiche pendant la configuration du réseau Sélectionnez Yes et appuyez sur ENTER pour accepter 4 Audio Return Channel Si vous avez raccordé un téléviseur qui p...

Страница 89: ...Appuyez sur le sélecteur d entrée a de la télécommande portant le même nom que la prise à laquelle vous avez raccordé le lecteur pourchanger l entrée Par exemple appuyez sur BD DVD pour lire le lecteur raccordé à la prise BD DVD Appuyez sur TV pour écouter le son du téléviseur 0 Lorsque la fonction de liaison CEC marche l entrée change automatiquement si vous avez raccordé un téléviseur et un lect...

Страница 90: ...dora États Unis uniquement Pandora est un service de radio Internet gratuit et personnalisé qui vous permet d écouter la musique que vous connaissez et de découvrir celle que vous aimerez Après avoir choisi Pandora effectuez ce qui suit 1 Utilisez a de la télécommande pour sélectionner I have a Pandora Account ou I m new to Pandora puis appuyez sur ENTER b Si vous êtes nouveau sur Pandora sélectio...

Страница 91: ...ation Vous pouvez effectuer ce qui suit en sélectionnant l icône à l aide des touches a de la télécommande et en appuyant sur ENTER b J aime ce morceau Donnez un morceau thumbs up et Pandora diffusera encore plus de musique du même style Je n aime pas ce morceau Donnez un thumbs down à un morceau et Pandora interdira ce morceau dans la station actuelle Recherchez automatiquement les stations corre...

Страница 92: ...glé sur Off dans le menu System Setup depuis Home mettez en marche l appareil manuellement et appuyez sur la touche NET de la télécommande 0 Consultez ce qui suit pour configurer Spotify www spotify com connect 0 Le logiciel Spotify est soumis à des licences de tiers que vous trouverez ici www spotify com connect third party licenses Les actions suivantes sur la télécommande sont également possibl...

Страница 93: ... est déjà activée sélectionnez More streaming options dans le menu Stream pour afficher la liste de lecteurs réseau puis passez à l étape 4 3 Cliquez sur Turn on media streaming pour afficher une liste de lecteurs dans le réseau 4 Sélectionnez cet appareil dans Media streaming options et vérifiez qu il est réglé sur Allow 5 Cliquez sur OK pour fermer la boîte dedialogue 0 En fonction de la version...

Страница 94: ...de volume dansla fenêtre Play to 0 Quelquefois levolumeaffichédanslafenêtredelectureà distancepeutêtredifférentdeceluiaffichésurl écrande l appareil Deplus lorsquelevolumeestréglédepuiscet appareil lavaleurn estpasrépercutéedanslafenêtre Playto 0 La lecture à distance n est pas possible en utilisant un service réseau ou pour lire des fichiers de musique présents sur un périphérique de stockage USB...

Страница 95: ...lider votresélection 0 Pour revenir sur l écran précédent appuyez sur d 5 Avec les touches du curseur de la télécommande sélectionnez le fichier de musique puis appuyez sur ENTER b pour lancer la lecture 0 Le port USB de cet appareil est conforme à la norme USB 2 0 La vitesse de transfert peut être insuffisante pour certains des contenus que vous lisez ce qui peut causer des coupures du son Les ac...

Страница 96: ...tre lus sur cet appareil MP3 mp3 MP3 0 Formats pris en charge MPEG 1 MPEG 2 Audio Layer 3 0 Taux d échantillonnage pris en charge 44 1 kHz 48 kHz 0 Débits binaires pris en charge Entre 8 kbps 320 kbps et VBR WMA wma WMA 0 Taux d échantillonnage pris en charge 44 1 kHz 48 kHz 0 Débits binaires pris en charge Entre 5 kbps 320 kbps et VBR 0 Les formats WMA Pro Voice WMA Lossless ne sont pas pris en c...

Страница 97: ...apes 3 et 4 ci dessus cet appareil se met automatiquement en marche et l entrée passe sur NET Pour réduire la quantité d énergie consommée en mode veille appuyez sur la touche de la télécommande puis dans le menu Home affiché réglez System Setup Hardware Power Management Network Standby sur Off 0 À cause des caractéristiques de la technologie sans fil AirPlay le son produit par cet appareil peut ê...

Страница 98: ...che puis effectuez l étape 2 ci dessus Cet appareil peut contenir les données de jusqu à huit périphériques jumelés 0 La zone de couverture est d environ 15 mètres 48 pieds Notez que la connexion n est pas toujours garantie avec tous les périphériques compatibles BLUETOOTH Écouter 1 Lorsque cet appareil est en marche effectuez la procédure de connexion sur le périphériquecompatible BLUETOOTH 2 Le ...

Страница 99: ... est relâché Rechercher en regardant l écran Pour revenir au mode de syntonisation automatique Appuyez de nouveau sur la touche MODE e de la télécommande pour que AUTO apparaisse sur l afficheur L appareil syntonise automatiquement une station de radio Réglage des pas de fréquence Modèles nord américains Appuyez sur la touche de la télécommande pour sélectionner System Setup Miscellaneous Tuner FM...

Страница 100: ... paramètre par défaut Tri des stations par ordre alphabétique Multiplex Tri des stations par bouquet Affichage des informations de la radio DAB 1 Appuyez plusieurs fois sur la touche b pour afficher plus d informations sur la station DABsélectionnée DLS Dynamic Label Segment Lorsqu il est syntonisé sur une station qui émet des données texte DLS le texte défile à travers l afficheur Type de program...

Страница 101: ... les touches du curseur a de la télécommande pour sélectionner un numéro entre 1 et 40 4 Appuyez de nouveau sur la touche Fav d de la télécommande pour mémoriser la station Lorsqu il est enregistré le numéro de préréglage s arrête de clignoter Sélectionner une station de radio préréglée 1 Appuyez sur TUNER sur la télécommande 2 Appuyez sur les touches du curseur a de la télécommande pour sélection...

Страница 102: ...ies etc puis un témoin comme DolbyD apparait sur l afficheur Pour avoir des détails sur les effets de chaque mode d écoute voir Les effets du mode d écoute P32 Pour connaitre les modes d écoute sélectionnables pour chacun des formats audio des signaux d entrée consultez Modes d écoute sélectionnables P35 Le mode Direct coupe certaines fonctions qui peuvent affecter la qualité du son comme les comm...

Страница 103: ... afin d élargir l image stéréo et simule la résonance naturelle d une grande salle Dolby Atmos Ce mode reproduit fidèlement la conception du son enregistré au format audio Dolby Atmos Le format audio Dolby Atmos a été implanté dans les cinémas équipés des dernières installations et permet de faire une expérience révolutionnaire du son avec les home cinémas Contrairement aux systèmes surround exist...

Страница 104: ...ma Adapté pour les émissions TV produites dans un studio de télévision Ce mode renforce les effets surround sur l ensemble du son pour donner de la clarté aux voix et créer une image acoustique réaliste DSD Mode adapté pour la lecture des sources enregistrées en DSD 0 Cet appareil prend en charge les signaux DSD via la prise HDMI IN Toutefois selon le lecteur raccordé il est possible d obtenir un ...

Страница 105: ...récis des sons ainsi que par la capacité à exprimer le mouvement 0 Pour activer le transfert de ce format audio raccordez un câble HDMI et réglez la sortie audio du lecteur sur la sortie bitstream Ent Show Entertainment Show Adapté pour le rock et la musique pop Écouter de la musique dans ce mode permet de créer un champ sonore vivant avec une image acoustique puissante comme dans un club ou à un ...

Страница 106: ... Virtual peutêtre sélectionné F S Surround Front Stage Surround ne peut pas être sélectionné Avec la version du micrologiciel précédant la prise en charge du DTS X 0 Vous pouvez choisir les formats Neo 6 Cinema et Neo 6 Music Avec la version du micrologiciel suivant la prise en charge du DTS X 1 Une enceinte centrale ou des enceintes surround doivent être installées 2 Les enceintes surround doiven...

Страница 107: ...Les enceintes surround doivent être installées 36 Format d entrée Listening Mode Dolby Atmos Stereo Dolby Atmos Surround Virtual Classical Unplugged Ent Show Drama AdvancedGame Action Rock Pop Sports Ext Stereo Ext Mono F S Surround Format d entrée Listening Mode Multich PCM Stereo Multich PCM 1 Dolby Surround Surround Virtual DTS Neural X Classical 2 Unplugged 2 Ent Show 2 Drama 2 AdvancedGame 2 ...

Страница 108: ... À la place vous pouvez sélectionner le mode d écoute Dolby D 4 Peut uniquement être sélectionné lorsque le format d entrée est 2 canaux et qu une enceinte centrale ou des enceintes surround sontinstallées 5 Les enceintes surround doivent être installées 1 Ne peut pas être sélectionné si le format d entrée est 2 ch 2 Une enceinte centrale ou des enceintes surround doivent être installées 3 Peut un...

Страница 109: ...ne enceinte centrale ou des enceintes surround doivent être installées 3 Peut uniquement être sélectionné lorsque le format d entrée est 2 canaux et qu une enceinte centrale ou des enceintes surround sont installées 4 Les enceintes surround doivent être installées 38 Format d entrée Listening Mode DTS Express Stereo DTS Express 1 2 PL Ⅱ Movie 3 PL Ⅱ Music 3 PL Ⅱ Game 3 Neo 6 Cinema 3 Neo 6 Music 3...

Страница 110: ...es enceintes surround doivent être installées 1 Ne peut pas être sélectionné si le format d entrée est 2 ch 2 Une enceinte centrale ou des enceintes surround doivent être installées 3 Peut uniquement être sélectionné lorsque le format d entrée est 2 canaux et qu une enceinte centrale ou des enceintes surround sont installées 4 Les enceintes surround doivent être installées 39 F R Format d entrée L...

Страница 111: ...Active ou désactive la fonction égaliseur qui corrige la déformation causée par l environnement acoustique de la pièce 0 Ce réglage ne peut pas être sélectionné si le paramètre Full Auto MCACC n a pas été effectué 0 Il ne peut pas être défini si le mode d écoute est Pure Direct Manual EQ Select Sélectionnez Preset 1 à Preset 3 configuré dans MCACC Manual MCACC EQ Adjust P51 depuis Home Le même rég...

Страница 112: ...cer le son vers l arrière Center Width Réglez la largeur du champ sonore avant lors de la lecture en mode d écoute Dolby Pro Logic Ⅱ Music Définissez un petit numéro pour concentrer le son au centre Définissez un grand numéro pour distribuer le son central vers la gauche ou la droite Dialog Control Vous pouvez augmenter la partie dialogue du son par incréments de 1 dB à 6 dB de manière à rendre le...

Страница 113: ...0 Pour retourner à l écran précédent appuyez sur 4 Pour quitter les réglages appuyez sur Input Output Assign TV Out OSD 1080p 4K Upscaling En utilisant un téléviseur qui prend en charge le 4K les signaux vidéo qui entrent en 1080p peuvent être convertis de façon ascendante et être reproduit en 4K Off Valeur par défaut Pour ne pas utiliser cette fonction Auto Pour utiliser cette fonction 0 Sélectio...

Страница 114: ...ise HDMI IN désirée au sélecteur d entrée STRM BOX Si vous n attribuez pas une prise sélectionnez Pour sélectionner une prise HDMI IN déjà attribuée à un autre sélecteur d entrée modifiez d abord le réglage sur du sélecteur d entrée pour La valeur par défaut est HDMI 3 HDCP 2 2 F R Impose OSD Choisissez d afficher ou non les informations sur le téléviseur lorsque le volume est réglé ou lorsque l e...

Страница 115: ...s capacités de la gamme des graves de chaque canal en réglant sur petit ou grand Small Valeur par défaut Pour les petits haut parleurs dont les capacités de la gamme des graves peuvent être limitées Large Pour les haut parleurs large bande avec des capacités de gamme des graves suffisantes 0 Si Configuration Subwoofer est sur No Front sera fixé sur Large et la gamme des graves des autres canaux se...

Страница 116: ...aut est 0 dB Center Sélectionnez une valeur située entre 12 dB et 12 dB par incréments de 1 dB Une tonalité de test sera émise àchaque fois que vous changez la valeur Sélectionnez le niveau désiré la valeur par défaut est 0 dB Front Right Sélectionnez une valeur située entre 12 dB et 12 dB par incréments de 1 dB Une tonalité de test sera émise àchaque fois que vous changez la valeur Sélectionnez l...

Страница 117: ...rs de la lecture en Dolby Digital Plus Dolby TrueHD On Valeur par défaut Utilisez cette fonction Off Pour ne pas utiliser cette fonction F R Name Edit 1 Sélectionnez un caractère ou un symbole avec les touches du curseur et appuyez sur ENTER Répétez le pour saisir 10 caractères ou moins A a Commute entre les boîtiers supérieur et inférieur Appuyer sur la touche MODE de la télécommande permet égale...

Страница 118: ...ètre sur On réglez le sur Off 0 Lors de la connexion d un composant non compatible CEC ou si vous n êtes pas certain qu il est compatible réglez le paramètre sur Off Audio Select ARC Pour donner la priorité au signal d entrée provenant d un téléviseur compatible ARC 0 Le paramètre ne peut être sélectionné que si Hardware HDMI Audio Return Channel est réglé sur Auto et si l entrée TV est sélectionn...

Страница 119: ...automatiquement toute désynchronisation entre les signaux vidéo et audio en se basant sur les données provenant du téléviseur compatible HDMI LipSync On Valeur par défaut La correction automatique est activée Off La correction automatique sera désactivée HDMI Standby Through Lorsque ceci est paramétré sur autre chose que Off il est possible de lire la vidéo et le son d un lecteur raccordé par HDMI...

Страница 120: ...etooth Wakeup ne peuvent pas être sélectionnés Il s affiche lorsque la fonctionnalité réseau est lancée Miscellaneous Tuner 49 F R Sleep Timer Permet à l appareil de se mettre automatiquement en veille une fois que la durée définie s est écoulée Choisissez parmi 30 minutes 60 minutes et 90 minutes Off Valeur par défaut Ne met pas automatiquement l appareil en veille Auto Standby Ce réglage met aut...

Страница 121: ... Patientez un moment si Firmware Update ne peut être sélectionné Il s affiche lorsque la 50 Setup Parameter Verrouillez le menu Configuration pour protéger les paramètres Locked Le menu est verrouillé Unlocked Valeur par défaut Le menu est déverrouillé F R Load Default Réinitialisez l appareil pour qu il revienne comme il était au moment de son achat La réinitialisation est terminéelorsque Clear a...

Страница 122: ...inte fourni sur la position d écoute mesurez les tonalitésdetestémisesparlesenceintes l appareilrèglealorsautomatiquementleniveaude volumeoptimal pourchaque enceinte lesfréquencesdecroisement etladistance depuis la position d écoute Ceci règle également automatiquement les égaliseurs des enceintes et permet la correction de la déformation causée par l environnement acoustique de la pièce Consultez...

Страница 123: ...oute 0 Si vous souhaitez effectuer les réglages tout en écoutant quelque chose appuyez sur la touche de la télécommande et sélectionnez d abord le préréglage que vous désirez régler dans AV Adjust MCACC Manual EQ Select P40 52 F R Front Left Après avoir choisi la fréquence de l enceinte entre 63 Hz et 16 kHz avec les touches du curseur réglez le volume de cette fréquence entre 12 0 dB et 12 0 dB a...

Страница 124: ... vérifier le nombre de canaux d enceinte connectés ainsi que le paramètre grand ou petit que vous avez défini pour la capacités de reproduction de la gamme des graves de chacune des enceintes Channel Level Vous pouvez vérifier les réglages du niveau de sortie pour chaque enceinte Speaker Distance Vous pouvez vérifier la distance entre chaque enceinte et la position d écoute Acoustic Calibration EQ...

Страница 125: ... réseau LAN est configuré avec un serveur DHCP réglez DHCP sur Enable pour configurer automatiquement les réglages Pour attribuer des adresses IP fixes à chaque appareil vous devez régler DHCP sur Disable et attribuer une adresse à cet appareil dans le champ IP Address ainsi que définir des informations relatives à votre réseau local telles que le masque de sous réseau et la passerelle Wi Fi Conne...

Страница 126: ...a Politique de Confidentialité mais que vous choisissez No pour ce paramètre les informations neseront pascollectées Network Check Vous pouvez vérifier la connexion réseau Appuyez sur ENTER lorsque Start s affiche 0 Patientez un moment si Network ne peut être sélectionné Il s affiche lorsque la fonctionnalité réseau est lancée 55 F R MAC Address Il s agit de l adresse MAC de cet appareil Cette val...

Страница 127: ... vers l appareil On Valeur par défaut L entrée devient automatiquement BT AUDIO lorsqu un périphérique compatible BLUETOOTH est connecté Off La fonction est désactivée 0 Si l entrée ne bascule pas automatiquement réglez sur Off et modifiez manuellement l entrée Auto Reconnect Cette fonction se reconnecte automatiquement au dernier périphérique compatible BLUETOOTH connecté lorsque vous commutez l ...

Страница 128: ...périphérique de stockage USB configurer le microphone ou le casque des enceintes oueffectuer toute opération sur le composant tel que couper l alimentation Accès à cet appareil à partir d un ordinateur oud un smartphone à l aide d une application Avertissement Le programme et la documentation en ligne qui l accompagne vous sont fournis pour une utilisation à vos propres risques Nous ne serons pas ...

Страница 129: ...our cettefonction Les périphériques de stockage USB avec des fonctions de sécurité ne sont pas pris encharge Les concentrateurs USB et les périphériques USB avec une fonction de concentrateur ne sont pas pris en charge Ne branchez pas ces périphériques à l appareil 0 Supprimez toutes les données enregistrées sur le périphérique de stockage USB 0 Éteignez le composant du contrôleur PC etc connecté ...

Страница 130: ...ur l afficheur de cet appareil L écran du téléviseur restera noir jusqu à la fin de la mise à jour et jusqu à la remise sous tension 0 Lors de la mise à jour n éteignez pas le périphérique de stockage USB ne le débranchez rebranchez pas 0 Completed s affiche lorsque la mise à jour est terminée Si un message d erreur s affiche Lorsqu une erreur se produit Error apparait sur l afficheur de cet appar...

Страница 131: ...es avant de commencer à fairecela 1 Appuyez sur la touche de la télécommande sélectionnez System Setup Miscellaneous Load Default dans Home et appuyez sur ENTER 2 Sélectionnez Yes et appuyez sur ENTER 3 L appareil se met en veille et les réglagessont réinitialisés Alimentation Impossible d allumer cet appareil 0 Assurez vous que le cordon d alimentation est correctement branché dans la prise mural...

Страница 132: ...e coaxial numérique ou un câble optonumérique La sortie du son devra être réglée sur la sortie bitstream du lecteur de Blu ray Disc ou un autre périphérique 0 Appuyez plusieurs fois sur la touche de la télécommande pour changer l affichage sur cetappareil pour vérifier le format d entrée Vérifiez les points suivants si ce qui précède n a pas réglé le problème Impossible de sélectionner le mode d é...

Страница 133: ... par HDMI réglez Hardware HDMI HDMI Standby Through sur Auto dans le menu System Setup Émissions FM La réception radio est mauvaise ou bien il y a beaucoup de parasites 0 Vérifiez à nouveau la connexion de l antenne 0 Éloignez l antenne du câble d enceinte ou du cordon d alimentation 0 Déplacez l appareil à l écart de votre téléviseur ou votre PC 0 Le passage de véhicules et d avions peut provoque...

Страница 134: ...au ou les NAS compatibles avec la fonctionnalité réseau domestique 0 Vous aurez besoin d effectuer certains réglages sur Windows Media Player P22 0 En utilisant un ordinateur seuls les fichiers de musique mémorisés dans la bibliothèque de Windows Media Player peuvent être lus La lecture s arrête pendant que vous écoutez des fichiers de musique sur le réseau du serveur 0 Assurez vous que le serveur...

Страница 135: ...x reportez vous au manuel d instructions fourni avec votre routeur LAN sans fil 0 Il pourrait ne pas y avoir assez de largeur de bande disponible avec le réseau LAN sans fil Raccordez à l aide d un câble Ethernet Télécommande 0 Assurez vous que les piles ont été insérées en respectant la polarité 0 Insérez des piles neuves Ne mélangez pas différents types de piles ou des piles neuves et usagées 0 ...

Страница 136: ...SE T 100BASE TX LAN sans fil Norme IEEE 802 11 a b g n Norme Wi Fi Bande 5 GHz 2 4 GHz Section BLUETOOTH Système de communication Caractéristique BLUETOOTH version 4 1 LE Bande de fréquence Bande 2 4 GHz Méthode de modulation FHSS Freq Hopping Spread Spectrum Profils BLUETOOTH compatibles A2DP 1 2 AVRCP 1 3 HOGP Host Client Périphérique HOGP HID Serveur Service HID HIDS Codecs pris en charge SBC A...

Страница 137: ...ancée Mise à jour du micrologiciel Autres Analogique 1 BD DVD 2 CBL SAT PHONO indiqué Sorties audio Analogique SUBWOOFER PRE OUT Sorties haut parleurs FRONT L R CENTER SURROUND L R SUBWOOFER Casques PHONES Avant Ø 3 5 mm Autres USB 1 Avant Ver 2 0 5 V 1 A Ethernet 1 Configuration micro 1 66 F R ...

Страница 138: ...s pouvez également envoyer le son du téléviseur vers cet appareil HDMI Standby Through Même si cet appareil esten veille les signaux entrant depuis les appareils AV sont transmis autéléviseur Deep Color En raccordant des périphériques prenant en charge la fonction Deep Color les signaux vidéo provenant des périphériques peuvent être reproduits sur le téléviseur avec encore plus de couleurs x v Col...

Страница 139: ... 10 2 2 or later The Bluetooth word mark and logos are registered trademarks owned by the Bluetooth SIG Inc PANDORA the PANDORA logo and the Pandora trade dress are trademarks or registered trademarks of Pandora Media Inc Used with permission BLACKFIRE This Mark Certifies that this product is compliant with the BLACKFIRE ALLIANCE Standard Please refer to WWW BLACKFIREALLIANCE COM for more informat...

Страница 140: ...e Marais F 95816 Argenteuil Cedex FRANCE Tel 33 0 969 368 050 Корпорация О энд Пи 2 3 12 Яэсу Чуо ку г Токио 104 0028 ЯПОНИЯ 2016 Onkyo Pioneer Corporation All rights reserved 2016 Onkyo Pioneer Corporation Tous droits de reproduction et de traduction réservés http www pioneer audiovisual com privacy Pioneer and MCACC logo are trademarks of Pioneer Corporation and are used under license F1609 0 SN...

Страница 141: ...nexión de los componentes de audio 13 5 Conexión de otros cables 14 Configuración inicial Configuracióninicialconelasistentedearranqueautomático 15 Reproducción Reproducción de componente AV 18 Radio por Internet 19 Spotify 21 Music Server 22 Dispositivo de almacenamiento USB 24 AirPlay 26 BLUETOOTH Reproducción 27 Escuchar la radio FM DAB 28 Modos de audición 31 AV Adjust 40 Configuración avanzad...

Страница 142: ...pos fabricados por otras compañías 0 Puede que se amplíen las funcionalidades mediante actualizaciones de firmware y que los proveedores de servicios cesen su actividad lo que significa que algunos servicios de red y contenidos puede que no estén disponibles en el futuro Además los servicios disponibles podrían variar dependiendo de su zona de residencia 0 Las especificaciones y las característica...

Страница 143: ...3 5mm 7 Conector MCACC SETUP MIC El micrófono para la configuración de los altavoces suministrado está conectado 8 Puerto USB Un dispositivo de almacenamiento USB está conectado de manera que los archivos de música almacenados se pueden reproducir También puede suministrar alimentación máximo 5V 1A a dispositivos USB con un cableUSB 9 Indicador FL OFF Éste se enciende cuando ha pulsado DIMMER repe...

Страница 144: ...nalógico 4 Terminal SIGNAL GND Está conectado el cable de puesta a tierra de la tornamesa 5 Conectores DIGITAL IN OPTICAL COAXIAL Introduzca señales de audio digital desde un componente AV o un TV con un cable óptico digital o un cable coaxial digital 6 Cable de alimentación 7 Puerto NETWORK Conecte con la red a través de un cableEthernet 8 Conector HDMI OUT Conecte un cable HDMI para transferir s...

Страница 145: ...gico 4 Terminal SIGNAL GND Está conectado el cable de puesta a tierra de la tornamesa 5 Conectores DIGITAL IN OPTICAL COAXIAL Introduzca señales de audio digital desde un componente AV o un TV con un cable óptico digital o un cable coaxial digital 6 Cable de alimentación 7 Puerto NETWORK Conecte con la red a través de un cableEthernet 8 Conector HDMI OUT Conecte un cable HDMI para transferir señal...

Страница 146: ...lmente Pulse de nuevo para cancelar el silencio 8 Botones de modo de audición Le permite seleccionar el modo de audición P31 9 Botones de reproducción Puede iniciar la reproducción de Music Server o del USB 10 Botón Puede iniciar la reproducción repetida o aleatoria de Music Server o del USB Botón CLEAR Borra todos los caracteres que ha introducido al introducir texto en la pantalla del TV 11 Botó...

Страница 147: ... 2 Se ilumina cuando se accione el selector de entrada NET o USB e indica que se pueden llevar a cabo operaciones del cursor del mando a distancia en pantallas que muestran una lista de pistas porejemplo 3 Se ilumina cuando se conectan unosauriculares 4 Se ilumina cuando se acciona el selector de entrada NET o USB cuando se reproducen o se pausan pistas 5 Se ilumina de acuerdo al tipo de señales d...

Страница 148: ...oofer reproduce sonidos bajos y crea un campo de sonido rico Los altavoces delanteros deberían colocarse a la altura de la oreja mientras que los altavoces envolventes deberían ubicarse justo por encima de la altura de la oreja El altavoz central debería instalarse orientado hacia la posición de audición Coloque el subwoofer con fuente de alimentación propia orientado al frente Colocándolo entre e...

Страница 149: ... de introducirlos en los terminales Realice una conexión correcta entre las conexiones de la unidad y las conexiones del altavoz a y a para cada canal Si la conexión está mal un sonido bajo puede volverse pobre debidoa una fase inversa Se puede conectar tanto un subwoofer con fuente de alimentación propia como un subwoofer pasivo Para conectar un subwoofer con fuente de alimentación propia utilice...

Страница 150: ...xpuestos de los altavoces no sobresalgan de los terminales de los altavoces al conectarlos Si los cables expuestos de los altavoces tocan el panel trasero o los cables y se tocan entre sí el circuito de protección se activará P60 Setup 0 Es necesario realizar ajustes para la configuración de los altavoces que ha conectado en 1 Full Auto MCACC P16 en Initial Setup 10 E S ...

Страница 151: ... HDMI IN en el TV compatible con ARC al realizar la conexión Con un televisor incompatible con ARC Para un televisor incompatible con la función ARC Audio Return Channel conecte tanto el cable HDMI de la ilustración a como el cable óptico digital en b Setup 0 Para usar la función ARC se requieren algunos ajustes Seleccione Yes en 4 Audio Return Channel P17 en la Initial Setup 0 Consulte el manual ...

Страница 152: ...able HDMI como la función HDMI CEC que vincula con el selector de entrada y la función HDMI Standby Through que le permite reproducir vídeo y audio desde componentes AV en el TV incluso cuando esta unidad está en modo de espera P67 0 Para reproducir vídeo de 4K o 1080p use un cable HDMI de alta velocidad 0 Para utilizar las funciones HDMI CEC y HDMI Standby Through se requieren algunos ajustes P47...

Страница 153: ...ornamesa que tenga un cartucho de tipo MM al conector PHONO 0 Si la tornamesa tiene un ecualizador de audio integrado conéctelo a un conector AUDIO IN distinto del conector PHONO Además si la tornamesa usa un cartucho de tipo MC instale un ecualizador de audio compatible con el cartucho de tipo MC entre la unidad y el tocadiscos después conéctelo a cualquier conector AUDIO IN excepto al conector P...

Страница 154: ...a encontrar la posición con mejor recepción a Antena DAB FM b Antena FM para interiores c cable Ethernet d cable de alimentación Conexión de red Conecte esta unidad a la red usando una LAN con cable o Wi Fi LAN sin cables Podrá disfrutar de funciones de red como la radio por internet si conecta la unidad a la red Si realiza la conexión mediante LAN con cable conecte un cable Ethernet al puerto NET...

Страница 155: ...e podrá realizar los ajustes necesarios para el arranque 4 Siga las instrucciones en pantalla para seleccionar el elemento con los cursores del mando a distancia ypulse ENTER para confirmar su selección 0 Para volver a la pantalla anterior pulse Para rehacer Initial Setup Si finaliza el procedimiento durante su curso o desea cambiar un ajuste realizado durante la Initial Setup pulse en el mando a ...

Страница 156: ...uto MCACC durante el proceso desconecte el micrófono de configuración de los altavoces 2 Seleccione la configuración de los altavoces conectados La imagen en la pantalla cambia cuando elige el número de canales en Speaker Channels de modo que consúltela cuando realice los ajustes Utilice esta pantalla también para seleccionar la conexión de un subwoofer 0 Si ha conectado un subwoofer compruebe la ...

Страница 157: ...n el botón del mando a distancia y pulse ENTER después siga las instrucciones en pantalla Entrada de teclado Para cambiar entre mayúsculas y minúsculas seleccione A a en la pantalla y pulse ENTER Para seleccionar si enmascarar la contraseña con o mostrarla en texto sin formato pulse Fav en el mando a distancia Pulse CLEAR para borrar todos los caracteres introducidos Política de privacidad Durante...

Страница 158: ...or de entrada a en el mando adistancia con el mismo nombre que el conector al que ha conectado el reproductor para cambiar laentrada Por ejemplo pulse BD DVD para reproducir el reproductor conectado al conector BD DVD Pulse TV para escuchar el sonido de la TV 0 Tenga en cuenta que cuando la función de vínculo CEC está en funcionamiento la entrada cambia automáticamente cuando ha conectado un telev...

Страница 159: ...o un programa de My Presets en TuneIn Radio Pandora Solo EE UU Pandora es un servicio de radio por Internet gratuito y personalizado que reproduce la música que conoce y le ayuda a descubrir música que le encantará Después de seleccionar Pandora haga lo siguiente 1 Utilice a en el mando a distancia para seleccionar I have a Pandora Account o I m new to Pandora y después pulse ENTER b Si es la prim...

Страница 160: ...s se reproduce una emisora Puede realizar estas operaciones si selecciona el icono con a en el mando a distancia y pulsa ENTER b Me gusta esta pista Dé un thumbs up a una pista y Pandora reproducirá más música parecida Esta pista no me gusta Dé un thumbs down a una pista y Pandora prohibirá dicha pista de la emisora actual Encuentre automáticamente emisoras que se adapten a sus gustos en función d...

Страница 161: ... Power Management Network Standby está configurado como Off en el menú System Setup desde Home encienda la unidad manualmente y pulse NET en el mando a distancia 0 Consulte el siguiente enlace para configurar Spotify www spotify com connect 0 El software de Spotify está sujeto a licencias de terceros Puede consultarlas aquí www spotify com connect third party licenses También se pueden llevar a ca...

Страница 162: ...óndemediosyaestáactivada seleccione More streaming options en el menú Stream para ver la lista de reproductores de la red y acontinuación vaya al paso 4 3 Haga clic en Turn on media streaming paravisualizar una lista de los reproductores en la red 4 Seleccione esta unidad en Media streaming options y compruebe que está ajustada a Allow 5 Haga clic en OK para cerrar el cuadro dediálogo 0 Dependiend...

Страница 163: ...tana Play to 0 A veces el volumen visualizado en la ventana de reproducción remota podría diferir del que aparece en la pantalla de la unidad Además cuando se ajusta el volumen desde la unidad esto no se ve reflejado en la ventana Play to 0 La reproducción a distancia no es posible cuando se utiliza un servicio de red o se reproducen archivos de música en un dispositivo de almacenamiento USB 0 Dep...

Страница 164: ...úsica en el dispositivo de almacenamiento USB son visualizados Seleccione la carpeta con los cursores y pulseENTER b para confirmar su selección 0 Para volver a la pantalla anterior pulse d 5 Con los cursores en el mando a distancia seleccioneel archivo de música y a continuación pulse ENTER b para comenzar la reproducción 0 El puerto USB de esta unidad cumple con el estándar USB 2 0 Puede que la ...

Страница 165: ...a unidad es compatible con los siguientes formatos de archivo de música Tenga en cuenta que los archivos de sonido que están protegidos por las leyes de derechos de autor no se pueden reproducir en esta unidad MP3 mp3 MP3 0 Formatos compatibles MPEG 1 MPEG 2 Audio Layer 3 0 Tasas de muestreo compatibles 44 1 kHz 48 kHz 0 Tasas de bits compatibles Entre 8 kbps y 320 kbps y VBR WMA wma WMA 0 Tasas d...

Страница 166: ...alice los pasos 3 y 4 anteriores esta unidad se enciende automáticamente y la entrada cambia a NET Para reducir la cantidad de energía consumida durante el modo en espera pulse el botón del mando a distancia y después en el menú Home visualizado establezca System Setup Hardware Power Management Network Standby en Off 0 Debido a las características de la tecnología inalámbrica AirPlay el sonido pro...

Страница 167: ... realice el paso 2 anterior Esta unidad puede almacenar la información de hasta ocho dispositivos emparejados 0 El área de cobertura es de 15 metros 48 pies Tenga en cuenta que la conexión con todos los dispositivos que tengan BLUETOOTH no siempre está garantizada Reproducción 1 Cuando la unidad esté encendida lleve a cabo el procedimiento de conexión en el dispositivohabilitado con BLUETOOTH 2 El...

Страница 168: ...ón se suelta Ajuste mirando a lapantalla Para volver al modo de sintonización automática Pulse otra vez MODE e en el mando a distancia de modo que AUTO aparezca en la pantalla La unidad sintoniza automáticamente una emisora de radio Ajuste del paso de frecuencia modelos norteamericanos Pulse el botón del mando a distancia para seleccionar System Setup Miscellaneous Tuner FM Frequency Step y elija ...

Страница 169: ...ionar DAB en la pantalla 0 La primera vez que seleccione la opción DAB la función de sintonización automática buscará automáticamente la Banda 3 DAB para los múltiplex es decir las estaciones disponibles en su zona 0 Una vez concluido el proceso de búsqueda se seleccionará la primera emisora que se haya detectado 0 Si se introduce una nueva emisora DAB o si se traslada a una nueva zona pulse el bo...

Страница 170: ...or a en el mando a distancia para seleccionar un número entre 1 y 40 4 Pulse otra vez Fav d en el mando a distancia para registrar la emisora Cuando se ha finalizado elregistro el número preestablecido deja de parpadear Selección de una emisora de radio preajustada 1 Pulse TUNER en el mando a distancia 2 Pulse los botones de cursor a en el mando a distancia para seleccionar un númeropreestablecido...

Страница 171: ... de audio Dolby Digital para las señales de entrada multicanal Stereo para las señales de entrada de dos canales etc y en la pantalla se mostrará un indicador como Dolby D Para obtener más información acerca de los efectos de cada uno de los modos de audición consulte Efectos del modo de audición P32 Para ver los modos de audición que se pueden seleccionar para cada uno de los formatos de audio de...

Страница 172: ...y Atmos Este modo reproduce fielmente el diseño del sonido grabado en el formato de audio Dolby Atmos El formato de audio Dolby Atmos se ha implementado en salas de cine equipadas con las últimas tecnologías y hace posible una experiencia sonora revolucionaria en los sistemas de cine en casa A diferencia de los sistemas de sonido envolvente existentes Dolby Atmos no emplea canales y en su lugar pe...

Страница 173: ...lezca una conexión a través de un cable HDMI y configure la salida de audio del reproductor como salida de secuencia de bits Drama Adecuada para los programas de televisión producidos en un estudio de televisión Este modo aumenta los efectos de sonido envolvente a todo el sonido para dar nitidez a las voces y crear una imagen acústica realista DSD Modo adecuado para reproducir fuentes grabadas enD...

Страница 174: ...ada en formatos de canal antiguos y objetos basados en la mezcla de audio dinámica Se caracteriza por el posicionamiento precisode los sonidos y la capacidad de expresarmovimiento 0 Para poder transferir este formato de audio establezca una conexión a través de un cable HDMI y configure la salida de audio del reproductor como salida de secuencia de bits Ent Show Entertainment Show Adecuada para mú...

Страница 175: ...a actualización Además cuando puede seleccionarse Surround Virtual no puede seleccionarse F S Surround Front Stage Surround En la versión de firmware antes de ser compatible con DTS X 0 Puede seleccionar Neo 6 Cinema y Neo 6 Music En la versión de firmware después de ser compatiblecon DTS X 0 Puede seleccionar DTS X y DTS Neural X No puede 1 El altavoz central o los altavoces envolventes necesitan...

Страница 176: ...os 4 Los altavoces envolventes necesitan estar instalados 36 Formato de entrada Listening Mode Dolby Atmos Stereo Dolby Atmos Surround Virtual Classical Unplugged Ent Show Drama AdvancedGame Action Rock Pop Sports Ext Stereo Ext Mono F S Surround Formato de entrada Listening Mode Multich PCM Stereo Multich PCM 1 Dolby Surround Surround Virtual DTS Neural X Classical 2 Unplugged 2 Ent Show 2 Drama ...

Страница 177: ...u ray En su lugar puede seleccionar el modo de audición Dolby D 4 Solo se puede seleccionar cuando el formato de entrada es de 2 canales y cuando hay un altavoz central o unos altavoces envolventes instalados 5 Los altavoces envolventes necesitan estar instalados 1 No se puede seleccionar cuando el formato de entrada es de 2 canales 2 El altavoz central o los altavoces envolventes necesitan estar ...

Страница 178: ... de 2 canales 2 El altavoz central o los altavoces envolventes necesitan estar instalados 3 Solo se puede seleccionar cuando el formato de entrada es de 2 canales y cuando hay un altavoz central o unos altavoces envolventes instalados 4 Los altavoces envolventes necesitan estar instalados 38 Formato de entrada Listening Mode DTS Express Stereo DTS Express 1 2 PL Ⅱ Movie 3 PL Ⅱ Music 3 PL Ⅱ Game 3 ...

Страница 179: ...os altavoces envolventes necesitan estar instalados 1 No se puede seleccionar cuando el formato de entrada es de 2 canales 2 El altavoz central o los altavoces envolventes necesitan estar instalados 3 Solo se puede seleccionar cuando el formato de entrada es de 2 canales y cuando hay un altavoz central o unos altavoces envolventes instalados 4 Los altavoces envolventes necesitan estar instalados 3...

Страница 180: ... o inhabilite la función del ecualizador que corrige la distorsión causada por el ambiente acústico de la habitación 0 Esta configuración no se puede seleccionar si no se ha llevado a cabo la configuración de Full Auto MCACC 0 No puede ajustarse si el modo de audición es Pure Direct Manual EQ Select Seleccione las opciones Preset 1 a Preset 3 configuradas en MCACC Manual MCACC EQ Adjust P51 en Hom...

Страница 181: ...gure un valor grande para desplazar el sonido hacia atrás Center Width Ajuste la anchura del campo de sonido frontal durante la reproducción en el modo de audición Dolby Pro Logic Ⅱ Music Configure un valor pequeño para concentrar el sonido en el medio Configure un valor grande para distribuir el sonido central hacia la izquierda y la derecha Dialog Control Puede incrementar la porción de diálogo ...

Страница 182: ...ajustes con los cursores 0 Para volver a la pantalla anterior pulse 4 Para salir de los ajustes pulse Input Output Assign TV Out OSD 1080p 4K Upscaling Cuandouseuntelevisorqueseacompatiblecon4K lasseñalesde vídeode1080psepuedenmejorarautomáticamenteparasalidaa4K Off Valor predeterminado Cuando no use esta función Auto Utilice esta función 0 Seleccione Off si su televisor no es compatible con 4K Su...

Страница 183: ...o para iniciar el salvapantallas Seleccione un valor de entre 3 minutes Valor predeterminado 5 minutes 10 minutes y Off BD DVD COAXIAL OPTICAL AsigneelconectorDIGITALINdesuelección al selector de entrada BD DVD El valor predeterminado es CBL SAT COAXIAL OPTICAL Asigne el conector DIGITAL IN de su elección al selector de entrada CBL SAT El valor predeterminado es GAME COAXIAL OPTICAL Asigneelconect...

Страница 184: ...lección al selector de entrada TV El valor predeterminado es Front Configure las características de rango bajo de cada canal ajustándolo como pequeño o grande Small Valor predeterminado Para altavoces pequeños cuyas características de rango bajo podrían estar limitadas Large Para altavoces de rango completo con características de rango bajo suficientes 0 Si Configuration Subwoofer está en No Front...

Страница 185: ...LFE efecto de frecuencia baja reprodujese los graves 0 Se puede establecer el valor de 50Hz a 200Hz El valor predeterminado es 80Hz Double Bass Esto solo se puede seleccionar cuando Configuration Subwoofer esté en Yes y Front esté en Large Potencia la salida de graves mediante la alimentación de sonidos bajos desde los altavoces delantero izquierdo y derecho y los altavoces centrales alsubwoofer O...

Страница 186: ...en el mando a distancia Mueve el cursor a la dirección de la flecha Elimina un carácter a la izquierda del cursor Inserta un espacio 0 Al pulsar CLEAR en el mando a distancia se borran todos los caracteres introducidos 2 Cuando termine seleccione OK con los cursores y pulse ENTER El nombre de entrada se guardará E S Loudness Management Cuando reproduzca Dolby TrueHD habilite la función de normaliz...

Страница 187: ...ustes de la unidad o de la TV o baje el volumen de la unidad 0 Si se produce un funcionamiento anómalo con el ajuste configurado como On cámbielo a Off 0 Cuando conecte un componente incompatible con CEC o si no está seguro de si es compatible configure este ajuste como Off Audio Select ARC Al dar prioridad a la señal de entrada desde el TV compatible con ARC 0 El ajuste se puede seleccionar única...

Страница 188: ...orrige automáticamente cualquier desincronización existente entre las señales de vídeo y de audio basándose en los datos del televisor compatible con HDMI LipSync On Valor predeterminado Se activará la corrección automática Off Se desactivará la corrección automática HDMI Standby Through Cuando esto se encuentra en una opción distinta a Off usted puede reproducir el vídeo y el audio de un reproduc...

Страница 189: ...n Aparecerá cuando se inicie la función de red Miscellaneous Tuner 49 E S Sleep Timer Permite que la unidad entre en modo de espera automáticamente cuando pase el tiempo especificado Seleccione entre 30 minutes 60 minutes y 90 minutes Off Valor predeterminado No coloca la unidad automáticamente en el modo de espera Auto Standby Este ajuste pone la unidad en modo de espera automáticamente después d...

Страница 190: ...a su selección Aparecerá cuando se inicie la función de red 50 Setup Parameter Bloquee el menú de configuración para proteger los ajustes Locked El menú está bloqueado Unlocked Valor predeterminado El menú está desbloqueado E S Load Default Reinicie la unidad para devolver los ajustes al estado que tenían en el momento de envío La restauración habrá finalizado cuando en la pantalla aparezca Clear ...

Страница 191: ...a anterior pulse 4 Para salir de los ajustes pulse Full Auto MCACC Coloque el micrófono de configuración de altavoces suministrado en la posición de escucha y mida los tonos de prueba emitidos por los altavoces a continuación la unidad establecerá automáticamente el nivel de volumen óptimo para cada altavoz las frecuencias de cruce y la distancia desde la posición de escucha Esto también ajusta au...

Страница 192: ...ido en Large en System Setup Speaker Crossover P44 Subwoofer Después de seleccionar la frecuencia del altavoz entre 31 Hz y 250 Hz con los cursores ajuste el volumen de esa frecuencia entre 12 0 dB y 12 0 dB con El valor predeterminado es 0 0 dB 0 Esto no puede seleccionarse si No está en System Setup Speaker Configuration Subwoofer P44 Front Left Después de seleccionar la frecuencia del altavoz e...

Страница 193: ...r Setting Puede comprobar la cantidad de canales de los altavoces conectados y los ajustes grande y pequeño configurados para las características de reproducción de rango bajo de cada altavoz Channel Level Puede comprobar los ajustes del nivel de salida de cada altavoz Speaker Distance Puede comprobar la distancia entre cada altavoz y la posición de audición Acoustic Calibration EQ Puede comprobar...

Страница 194: ...s pulse Network 0 CuandolaLANestáconfiguradaconunDHCP ajuste DHCP a Enable paraconfigurarlos ajustes automáticamente Para asignar direcciones IP fijas a cada componente debe ajustar DHCP como Disable y asignarunadirecciónaestaunidaden IPAddress además de ajustarlainformaciónrelacionadaconsuLAN comolaSubnetMaskyGateway Wi Fi Conecte la unidad a la red a través de un router de LAN inalámbrica On Con...

Страница 195: ...a la Política de Privacidad pero selecciona No para este ajuste la información no se recopilará Network Check Puede comprobar la conexión de red Pulse ENTER cuando aparezca Start 0 Espere un momento si Network no está disponible para su selección Aparecerá cuando se inicie la función de red 55 E S MAC Address Esta es la dirección MAC de esta unidad Este valor es específico para el componente y no ...

Страница 196: ...ositivo habilitado con BLUETOOTH On Valor predeterminado La entrada pasará de inmediato a ser BT AUDIO cuando se conecte un dispositivo habilitado con BLUETOOTH Off La función está desactivada 0 Si la entrada no se cambia automáticamente ajuste en Off y cambie la entrada manualmente Auto Reconnect Esta función vuelve a conectar automáticamente al dispositivo habilitado con BLUETOOTH conectado por ...

Страница 197: ...alización no Desconecte y vuelva a conectar cualquier cable dispositivo de almacenamiento USB micrófono o auriculares de configuración de altavoz ni realice ninguna operación en el componente como por ejemplo apagarlo Acceso a esta unidad desde un PC osmartphone usando una aplicación Descargo de responsabilidad El programa y la documentación en línea incluida se le proporcionan para que los use ba...

Страница 198: ...ector de tarjetas USB no se pueden utilizar para estafunción Los dispositivos de almacenamiento USB confunción de seguridad no son compatibles Los concentradores USB y los dispositivos USB con función de concentrador no son compatibles No conecte a la unidad estos dispositivos 0 Elimine los datos almacenados en el dispositivo de almacenamiento USB 0 Apague el componente del controlador PC etc cone...

Страница 199: ...V permanecerá en negro hasta que se complete la actualización y se haya encendido nuevamente la alimentación 0 Durante la actualización no apague ni desconecte y vuelva a conectar el dispositivo de almacenamiento USB 0 Se visualizará Completed cuando se haya Si se visualiza un mensaje de error Cuando ocurre un error aparece el mensaje Error en la pantalla de esta unidad representa un carácter alfa...

Страница 200: ...ción está correctamente conectado en la toma de corriente 0 Desconecte el cable de alimentación de la toma de corriente espere 5 segundos o más y conéctelonuevamente La unidad se apaga inesperadamente 0 La unidad pasa automáticamente al modo de espera cuando funciona el ajuste System Setup Hardware Power Management Auto Standby en Home 0 Si aparece CHECK SP WIRE en la pantalla los cables del altav...

Страница 201: ...ición deseado 0 Dependiendodelestadodeconexióndelaltavoz algunos modosdeaudiciónnosepuedenseleccionar P35 No hay sonido con Dolby TrueHD Dolby Atmos DTS HD Master Audio y DTS X 0 Si no puede emitir formatos como Dolby TrueHD Dolby Atmos DTS HD Master Audio o DTS X de acuerdo con el formato de la fuente en los ajustes del reproductor de discos Blu ray pruebe a ajustar BD video supplementary sound o...

Страница 202: ...de que la recepción FM se vuelva más nítida si utiliza el conector de la antena en la pared que se utiliza para el televisor BLUETOOTH función 0 Intente conectar desconectar la alimentación de la unidad e intente encender apagar el dispositivo habilitado con BLUETOOTH Reiniciar el dispositivo habilitado con BLUETOOTH podría ser efectivo 0 Los dispositivos habilitados con BLUETOOTH deben ser compat...

Страница 203: ...idor Windows Media Player 12 etc 0 Si el PC está descargando o copiando archivos grandes la reproducción podría ser interrumpida Dispositivo de almacenamiento USB No se visualiza el dispositivo de almacenamiento USB 0 Compruebe que el dispositivo de almacenamiento USB o el cable USB estén correctamente insertados en el puerto USB de la unidad 0 Desconecte el dispositivo de almacenamiento USB de la...

Страница 204: ...distancia 0 Asegúrese de que las pilas están instaladas con la polaridad correcta 0 Instale pilas nuevas No mezcle distintos tipos de pilas o pilas nuevas con usadas 0 Asegúrese de que esta unidad no esté expuesta a la luz solar directa o a luces fluorescentes de tipo inversión Reubique si es necesario 0 Si esta unidad está instalada en un estante o una vitrina con puertas de cristal de color o si...

Страница 205: ...net LAN 10BASE T 100BASE TX LAN inalámbrico Estándar IEEE 802 11 a b g n Estándar Wi Fi Banda 5 GHz 2 4 GHz Sección BLUETOOTH Sistema de comunicación Versión de especificación BLUETOOTH 4 1 LE Banda de frecuencia Banda 2 4 GHz Método de modulación FHSS Espectro ensanchado por salto de frecuencia Perfiles BLUETOOTH compatibles A2DP 1 2 AVRCP 1 3 HOGP Host Cliente HOGP Dispositivo HID Servidor Servi...

Страница 206: ...lización de Firmware Otros COAXIAL CD Analógico 1 BD DVD 2 CBL SAT PHONO designado Salidas de audio Analógico PRESALIDA DE SUBWOOFER Salidas de altavoces FRONT L R CENTER SURROUND L R SUBWOOFER Auriculares PHONES Delantero Ø 3 5 mm Otros USB 1 Delantero Ver 2 0 5 V 1 A Ethernet 1 Configuración del micrófono 1 66 E S ...

Страница 207: ... señales de entrada desde los componentes AV se transmiten al TV incluso si esta unidad está en modo de espera Deep Color Si conecta dispositivos compatibles con Deep Color podrá reproducir las señales de entrada de vídeo de los dispositivos en el televisor con más colorestodavía x v Color Esta tecnología produce colores incluso más reales al ampliar la gama de color 3D Puede transmitir las señale...

Страница 208: ...C with iTunes 10 2 2 or later The Bluetooth word mark and logos are registered trademarks owned by the Bluetooth SIG Inc PANDORA the PANDORA logo and the Pandora trade dress are trademarks or registered trademarks of Pandora Media Inc Used with permission BLACKFIRE This Mark Certifies that this product is compliant with the BLACKFIRE ALLIANCE Standard Please refer to WWW BLACKFIREALLIANCE COM for ...

Страница 209: ...nue de Marais F 95816 Argenteuil Cedex FRANCE Tel 33 0 969 368 050 Корпорация О энд Пи 2 3 12 Яэсу Чуо ку г Токио 104 0028 ЯПОНИЯ 2016 Onkyo Pioneer Corporation All rights reserved 2016 Onkyo Pioneer Corporation Tous droits de reproduction et de traduction réservés http www pioneer audiovisual com privacy Pioneer and MCACC logo are trademarks of Pioneer Corporation and are used under license F1609...

Страница 210: ...DMI AV 12 4 Collegare i componenti Audio 13 5 Collegare gli altri cavi 14 Initial Setup Initial Setup con installazione guidata 15 Riproduzione Riproduzione di un componente AV 18 Internet radio 19 Spotify 21 Music Server 22 Dispositivo di archiviazione USB 24 AirPlay 26 Riproduzione BLUETOOTH 27 Ascolto della radio FM DAB 28 Modalità di Ascolto 31 AV Adjust 40 Impostazioni avanzate System Setup 4...

Страница 211: ...i apparecchiature prodotte da altre aziende 0 È possibile che gli aggiornamenti del firmware introducano nuove funzionalità o chei provider cessino la fornitura di servizi per cui alcuni servizi di rete e contenuti potrebbero non essere più disponibili in futuro I servizi disponibili inoltre possono variare a seconda della zona di residenza 0 Le specifiche tecniche e l aspetto sono soggetti a vari...

Страница 212: ...ere le cuffie stereo con un connettore mini Ø 3 5 mm 7 Jack MCACC SETUP MIC È collegato il microfono di impostazione diffusore in dotazione 8 Porta USB Consente di connettere un dispositivo di memorizzazione USB per poter riprodurre i file musicali in esso memorizzati È anche possibile alimentare massimo 5V 1A dei dispositivi USB tramite un cavo USB 9 Indicatore FL OFF Si accende dopo aver premuto...

Страница 213: ...alogico 4 Terminale SIGNAL GND Il cavo di terra del giradischi è collegato 5 Jack DIGITAL IN OPTICAL COAXIAL Ingresso segnali audio digitali provenienti da un televisore o da un componente AV con un cavo digitale ottico o un cavo digitale coassiale 6 Cavo di alimentazione 7 Porta NETWORK Permette il collegamento alla rete con un cavo Ethernet 8 Jack HDMI OUT Permette di collegare un cavo HDMI per ...

Страница 214: ... 4 Terminale SIGNAL GND Il cavo di terra del giradischi è collegato 5 Jack DIGITAL IN OPTICAL COAXIAL Ingresso segnali audio digitali provenienti da un televisore o da un componente AV con un cavo digitale ottico o un cavo digitale coassiale 6 Cavo di alimentazione 7 Porta NETWORK Permette il collegamento alla rete con un cavo Ethernet 8 Jack HDMI OUT Permette di collegare un cavo HDMI per trasfer...

Страница 215: ...audio Premere nuovamente per annullare il muting 8 Pulsanti modalità di ascolto Consente di selezionare la modalità di ascolto P31 9 Tasti di riproduzione È possibile avviare la riproduzione da Music Server o USB 10 Pulsante È possibile avviare la riproduzione ripetuta o casuale da Music Server o USB Pulsante CLEAR Cancella tutti i caratteri immessi quando si immette del testo sullo schermo del te...

Страница 216: ...igitale 2 Si accende quando si utilizza il selettore di ingresso NET o USB indicando le operazioni del cursore del telecomando in schermate che mostrano elenchi di brani ad esempio 3 Si accende quando sono collegate le cuffie 4 Si accende quando si utilizza il selettore di ingresso NET o USB quando vengono riprodotti o sono messi in pausa dei brani 5 Si accende a seconda del tipo di segnale audio ...

Страница 217: ...ubwoofer riproduce i suoni bassi e crea un ricco campo sonoro I diffusori anteriori devono essere posizionati all altezza delle orecchie mentre i diffusori surround devono essere posizionati appena al di sopra Il diffusore centrale deve essere posizionato rivolto verso la posizione di ascolto Posizionare il subwoofer attivo nell area anteriore Collocandolo tra il diffusore centrale e un diffusore ...

Страница 218: ...serirli all interno dei terminali Effettuare un collegamento corretto tra i terminali dell unità e i terminali dei diffusori da a e da a per ciascun canale Se il collegamento è errato il suono dei bassi potrebbe diventare scadente a causa della faseinversa È possibile collegare un subwoofer attivo o un subwoofer passivo Per collegare un subwoofer attivo usare un cavo per subwoofer e collegarlo al ...

Страница 219: ...conduttori spellati dei cavi dei diffusori non fuoriescano dai terminali dei diffusori Se i conduttori spellati dei cavi dei diffusori toccano il pannello posteriore o i conduttori e si toccano tra loro il circuito di protezione si attiva P60 Setup 0 Le impostazioni per la configurazione di diffusori collegati devono essere effettuate in 1 Full Auto MCACC P16 in Initial Setup 10 I T ...

Страница 220: ...erminale HDMI IN sul televisore che supporta la funzione ARC A televisore non ARC Per un televisore che non supporta la funzione ARC Audio Return Channel collegare sia il cavo HDMI nell illustrazione a sia il cavo digitale ottico in b Setup 0 Per utilizzare la funzione ARC è necessario effettuare alcune impostazioni Selezionare Yes in 4 Audio Return Channel P17 in Initial Setup 0 Fare riferimento ...

Страница 221: ...DMI CEC che automatizza la selezione dell ingresso e HDMI Standby Through che consente di riprodurre segnali video e audio provenienti da componenti AV sul televisore anche quando questa unità si trova in standby P67 0 Per riprodurre video 4K o 1080p usare il cavo HDMI ad alta velocità Setup 0 Per utilizzare le funzioni HDMI CEC e HDMI Standby Through è necessario effettuare alcune impostazioni P4...

Страница 222: ...le collegare un piatto con testina di tipo MM al terminale PHONO 0 Se il giradischi ha un pre fono incorporato collegarlo ad un ingresso AUDIO IN diverso da PHONO Se il piatto utilizza una testina di tipo MC installare inoltre un pre fono compatibile con una testina di tipo MC tra l unità e il piatto quindi collegarlo a qualsiasi terminale AUDIO IN diverso dal terminale PHONO Se il giradischi ha u...

Страница 223: ...tisce la ricezione migliore Collegamento di rete Collegare questa unità alla rete utilizzando una LAN cablata o Wi Fi LAN wireless Collegando l unità ad una rete è possibile utilizzare funzioni di rete quali Internet radio Se si utilizza una LAN cablata effettuare il collegamento tramite un cavo Ethernet alla porta NETWORK come mostrato nell illustrazione Per la connessione Wi Fi dopo aver selezio...

Страница 224: ...azioni necessarie all avvio 4 Seguire le istruzioni visualizzate sullo schermo per selezionare la voce con i tasti cursore del telecomandoe premere ENTER per confermare la selezione 0 Per tornare alla schermata precedente premere Per effettuare nuovamente Initial Setup Se si termina la procedura prima della fine o si desidera cambiare un impostazione definita durante InitialSetup premere sul telec...

Страница 225: ...collegare il microfono in dotazione per il setup dei diffusori 2 Selezionare la configurazione dei diffusoricollegati L immagine sullo schermo cambia ogni volta che si sceglie il numero di canali in Speaker Channels fare riferimento a tale immagine quando si effettuano le impostazioni Usare questa schermata anche per selezionare se è stato collegato un subwoofer 0 Se è collegato un subwoofer contr...

Страница 226: ...r tramiteil tasto sul telecomando quindi premere ENTER e seguire le istruzionisu schermo Immissione tramite tastiera Per passare da caratteri maiuscoli a minuscoli e viceversa selezionare A a sullo schermo e premere ENTER Per scegliere se nascondere la password con o visualizzarla in formato testo premere Fav sul telecomando Premendo CLEAR verranno cancellati tutti i caratteri immessi Politica sul...

Страница 227: ...ato all unità 2 Per cambiare ingresso premere il selettore di ingresso a sul telecomando con lo stesso nome dell ingressoa cui è connesso il lettore Premere ad esempio BD DVD per utilizzare il lettore collegato al terminale BD DVD Premere TV per ascoltare l audio del televisore 0 Quando la funzione CEC è attiva l ingresso viene commutato automaticamente quando è stato collegato un televisore e un ...

Страница 228: ... Pandora è un servizio Internet radio gratuito e personalizzato che consente di riprodurre musica già conosciuta ed aiuta a conoscere nuova musica Dopo aver selezionato Pandora effettuare le seguenti operazioni 1 Usare a sul telecomando per selezionare I have a Pandora Account o I m new to Pandora quindi premere ENTER b Se non si conosce Pandora selezionare I m new to Pandora Viene visualizzato un...

Страница 229: ... e premendo ENTER b è possibile eseguire le seguenti operazioni Mi piace questo brano Contrassegnando un brano con thumbs up Pandora riprodurrà della musica simile Non mi piace questo brano Contrassegnando un brano con thumbs down Pandora eliminerà quel brano dalla stazione attuale Ricerca automatica di stazioni che soddisfano le preferenze dell utente in base a genere artisti specifici e canzoni ...

Страница 230: ... menu System Setup da Home accendere manualmente l unità quindi premere NET sul telecomando 0 Per informazioni sulle impostazioni di Spotify consultare il seguente sito Web www spotify com connect 0 Il software Spotify è soggetto a licenze di terze parti consultabili all indirizzo www spotify com connect third party licenses È inoltre possibile eseguire le seguenti operazioni da telecomando a Se p...

Страница 231: ...e il PC e lanciare Windows Media Player 12 2 Nel menu Stream selezionare Turn on media streaming per visualizzare una finestra didialogo 0 Se la trasmissione multimediale è già stata attivata selezionare Altre opzioni flusso nel menu Flusso per elencareilettorinellarete quindiprocederealpassaggio4 3 Fare clic su Attiva flusso di file multimediali per visualizzare un elenco di lettori nella rete 4 ...

Страница 232: ...ll unità 6 Regolare il volume utilizzando la barra del volume sulla finestra Play to 0Alcunevolte ilvolumevisualizzatosullafinestradiriproduzione daremotopotrebbedifferiredaquellovisualizzatosuldisplay dell unità Quandoilvolumevieneregolatodaquestaunità inoltre nonvieneriportatonellafinestra Playto 0 La riproduzione in remoto non è possibile quando si utilizza un servizio di rete o si riproducono ...

Страница 233: ... Premere ENTER b sul telecomando nella schermata successiva Viene visualizzato l elenco delle cartelle e dei file musicali presenti sul dispositivo diarchiviazione USB Selezionare la cartella con i cursori e premere ENTER b per confermare la selezione 0 Per tornare alla schermata precedente premere d 5 Utilizzando i cursori sul telecomando selezionare ilfile musicale quindi premere ENTER b per avv...

Страница 234: ...ttuare il backup dei file musicali importanti in anticipo Formati audio supportati Per la riproduzione da server e la riproduzione da un dispositivo di archiviazione USB questa unità supporta i seguenti formati di file musicali Non è possibileriprodurre file audio protetti da copyright su questaunità MP3 mp3 MP3 0 Formati supportati MPEG 1 MPEG 2 Audio Layer 3 0 Frequenze di campionamento supporta...

Страница 235: ...quando si eseguono i passaggi 3 e 4 sopra descritti questa unità si accende immediatamente e l ingresso viene commutato su NET Per ridurre la quantità di corrente che si consuma in modalità standby premere il pulsante sul telecomando quindi nel menu Home visualizzato impostare System Setup Hardware Power Management Network Standby su Off 0 Date le caratteristiche della tecnologia wireless AirPlay ...

Страница 236: ...ualizzato Now Pairing quindi eseguire il passaggio 2 sopra descritto Questa unità può memorizzare i dati fino a un massimo di otto dispositivi accoppiati 0 L area di copertura è di circa 15 metri Si noti che la connessione non è sempre garantita con tutti i dispositivi abilitati BLUETOOTH In riproduzione 1 Quando l unità è accesa effettuare la proceduradi collegamento sul dispositivoBLUETOOTH 2 Il...

Страница 237: ...re alla modalità di sintonizzazione automatica Premere nuovamente MODE e sul telecomando in modo che sul display appaia AUTO L unità si sintonizza automaticamente su una stazione radio Impostazione passo frequenza modelli per il Nord America Premere il pulsante sul telecomando per selezionare System Setup Miscellaneous Tuner FM Frequency Step e selezionare il passo della frequenza per la propria a...

Страница 238: ...ipetutamente TUNER sul telecomando per selezionare DAB suldisplay 0 La prima volta che si seleziona DAB la funzione di Sintonizzazione Automatica scandisce automaticamente la Banda DAB 3 alla ricerca di multiplex cioè stazioni disponibili nella propria area 0 Una volta completato il processo di scansione viene selezionata la prima stazione rilevata 0 Se viene introdotta una nuova stazione DAB oppu...

Страница 239: ... i tasti cursore a sul telecomando per selezionare un numero compreso tra 1 e40 4 Premere nuovamente Fav d sul telecomando per memorizzare la stazione Il numero preimpostatosmette di lampeggiare dopo laregistrazione Selezione di una stazione radio preimpostata 1 Premere TUNER sul telecomando 2 Premere i tasti cursore a sul telecomando per selezionare una stazionememorizzata Eliminazione di una sta...

Страница 240: ...influenzano la qualità audio in modo da ottenere una riproduzione più fedele dell audio originale In questo caso la calibrazione dei diffusori effettuata con MCACC viene disabilitata Tasto SURR c Premendo ripetutamente è possibile selezionare il formato audio dei segnali in ingresso e scegliere tra diverse modalità di ascolto Selezionare la modalità che meglio si adatta alle proprie preferenze La ...

Страница 241: ...rbero naturale di una sala di grandi dimensioni Dolby Atmos Questa modalità riproduce fedelmente le caratteristiche dell audio registrato in formato Dolby Atmos Il formato audio Dolby Atmos viene utilizzato nei cinema dotati di attrezzature di ultima generazione e offre un esperienza sonora rivoluzionaria negli ambienti domestici A differenza dei sistemi surround esistenti Dolby Atmos non si basa ...

Страница 242: ... di tutto il suono per dare maggior chiarezza alle voci e creare un immagine acustica realistica DSD Modalità adatta per la riproduzione di sorgenti registrate in DSD 0 Questa unità supporta segnali DSD tramite HDMI IN Tuttavia a seconda del lettore collegato è possibile ottenere un audio migliore quando il segnale viene emesso dall uscita PCM del lettore 0 Questa modalità di ascolto non può esser...

Страница 243: ...dal posizionamento preciso dei suoni e dalla capacità di esprimere movimento 0 Per consentire il trasferimento di questo formato audio eseguire il collegamento usando un cavo HDMI e impostare l uscita audio del lettore su bitstream Ent Show Entertainment Show Adatta per la musica rock o pop Questa modalità di ascolto crea un campo sonoro con una potente immagine acustica come se ci si trovasse in ...

Страница 244: ...o Inoltre quando è possibile selezionare Surround Virtual non è possibile selezionare F S Surround Front Stage Surround Con la versione del firmware precedente al supporto del formato DTS X 0 È possibile selezionare Neo 6 Cinema e Neo 6 Music Con la versione del firmware successiva al supporto del formato DTS X 0 È possibile selezionare DTS X e DTS Neural X Non è possibile selezionare Neo 6 Cinema...

Страница 245: ...llare i diffusori surround 36 Formato ingresso Modalità di Ascolto Dolby Atmos Stereo Dolby Atmos Surround Virtual Classical Unplugged Ent Show Drama AdvancedGame Action Rock Pop Sports Ext Stereo Ext Mono F S Surround Formato ingresso Modalità di Ascolto Multich PCM Stereo Multich PCM 1 Dolby Surround Surround Virtual DTS Neural X Classical 2 Unplugged 2 Ent Show 2 Drama 2 AdvancedGame 2 Action 2...

Страница 246: ... Disc É invece possibile selezionare la modalità di ascolto Dolby D 4 Può essere selezionato solo quando il formato di ingresso è 2 canali e sono presenti un diffusore centrale o dei diffusori surround 5 È necessario installare i diffusori surround 1 Non può essere selezionato quando il formato di ingresso è 2 canali 2 È necessario installare il diffusore centrale o i diffusori surround 3 Può esse...

Страница 247: ...ssario installare il diffusore centrale o i diffusori surround 3 Può essere selezionato solo quando il formato di ingresso è 2 canali e sono presenti un diffusore centrale o dei diffusori surround 4 È necessario installare i diffusori surround 38 Formato ingresso Modalità di Ascolto DTS Express Stereo DTS Express 1 2 PL Ⅱ Movie 3 PL Ⅱ Music 3 PL Ⅱ Game 3 Neo 6 Cinema 3 Neo 6 Music 3 DTS Neural X C...

Страница 248: ...essario installare i diffusori surround 1 Non può essere selezionato quando il formato di ingresso è 2 canali 2 È necessario installare il diffusore centrale o i diffusori surround 3 Può essere selezionato solo quando il formato di ingresso è 2 canali e sono presenti un diffusore centrale o dei diffusori surround 4 È necessario installare i diffusori surround 39 I T Formato ingresso Modalità di As...

Страница 249: ...itare o disabilitare la funzione di equalizzazione che corregge la distorsione causata dall ambiente acustico della stanza 0 Questa impostazione non può essere selezionata se l impostazione Full Auto MCACC non è stata eseguita 0 Non può essere impostato se la modalità di ascolto è Pure Direct Manual EQ Select Selezionare da Preset 1 a Preset 3 configurato in MCACC Manual MCACC EQ Adjust P51 in Hom...

Страница 250: ...postare il suono verso la parte posteriore Center Width Regolazione dell ampiezza del campo sonoro anteriore durante la riproduzione in modalità di ascolto Dolby Pro Logic Ⅱ Music Impostare un valore ridotto per concentrare il suono al centro Impostare un valore più alto per distribuire il suono centrale verso sinistra e verso destra Dialog Control È possibile aumentare il volume dei dialoghi a pa...

Страница 251: ...r uscire dalle impostazioni premere Input Output Assign TV Out OSD 1080p 4K Upscaling Quando si utilizza un televisore che supporta il formato 4K è possibile eseguire automaticamente l upscaling dei segnali video in ingresso a1080p convertendoli insegnaliinuscitainformato4K Off Valore predefinito Quando non si utilizza questa funzione Auto Questa funzione verràutilizzata 0 Selezionare Off se il te...

Страница 252: ...finito 5 minutes 10 minutes e Off BD DVD COAXIAL OPTICAL Assegnare un ingresso DIGITAL IN a piacere al selettore di ingresso BD DVD Il valore predefinito è CBL SAT COAXIAL OPTICAL Assegnare un ingresso DIGITAL IN a piacere al selettore di ingresso CBL SAT Il valore predefinito è GAME COAXIAL OPTICAL Assegnare un ingresso DIGITAL IN a piacere al selettore di ingresso GAME Il valore predefinito è ST...

Страница 253: ...frequenzeperciascun canale definendo un impostazione a scelta tra Small e Large Small Valore predefinito Per i diffusori di piccole dimensioni con capacità di riproduzione delle basse frequenze limitate Large Per i diffusori full range con capacità di riproduzione delle basse frequenze sufficienti 0 Se Configuration Subwoofer è impostato su No Front verrà impostato su Large e la gamma di bassa fre...

Страница 254: ...bile impostare un valore compreso nell intervallo da 50Hz a 200Hz Il valore predefinito è 80Hz Double Bass Può essere selezionato solo quando Configuration Subwoofer è impostato su Yes e Front è impostato su Large Rafforzare l uscita dei bassi emettendo il suono dei bassi dagli altoparlanti anteriore sinistro e destro e dall altoparlante centrale al subwoofer On L uscita dei bassi sarà rafforzata ...

Страница 255: ...lecomando si rimuovono tutti i caratteri immessi 2 Dopo l inserimento selezionare OK con i cursori e premere ENTER Il nome dell ingresso verrà salvato I T Loudness Management Durante la riproduzione di audio Dolby TrueHD abilita la funzione di normalizzazione del parlato che mantiene il volume del parlato ad un determinato livello Notare che quando questa impostazione è su Off la funzione DRC che ...

Страница 256: ...re ridurre il volume dell unità 0 Se si verifica un funzionamento anomalo quando si imposta su On impostare su Off 0 Quando si collega un dispositivo non compatibile CEC o quando non si è sicuri che sia compatibile impostare l opzione su Off Audio Select ARC Quandovienedataprioritàalsegnalediingressodal televisore compatibile con ARC 0 L impostazione può essere selezionata solo quando Hardware HDM...

Страница 257: ...ticamente ogni eventuale difetto di sincronizzazione tra i segnali audio e video in base ai dati dal televisore compatibile con HDMI LipSync On Valore predefinito La correzione automatica sarà attivata Off La correzione automatica sarà disattivata HDMI Standby Through Quando questa impostazione è diversa da Off è possibile riprodurre il video e l audio di un lettore HDMI collegato al televisore an...

Страница 258: ...uto al minimo dall ingresso automatico nella modalità HYBRID STANDBY in cui solo il circuito essenziale è in funzione 0 L impostazione rimane su Off se Network Bluetooth Bluetooth Auto Input Change è impostato su Off Sleep Timer Consente all unità di entrare automaticamente in standby una volta trascorso il tempo specificato Selezionare tra 30 minutes 60 minutes e 90 minutes Off Valore predefinito...

Страница 259: ...rà stata avviata Initial Setup È possibile effettuare Initial Setup dal menu System Setup 0 Attendere alcuni istanti se non è possibile selezionare Initial Setup Apparirà quando la 50 Setup Parameter Bloccare il menu Setup per proteggere leimpostazioni Locked Il menu è bloccato Unlocked Valore predefinito Il menu è sbloccato I T Load Default Resettare l unità per riportare le impostazioni allo sta...

Страница 260: ... Auto MCACC Collocare il microfono di configurazione dei diffusori nella posizione di ascolto e misurare i toni di prova emessi dai diffusori l unità imposterà automaticamente il livello del volume le frequenze di crossover e la distanza dalla posizione di ascolto ottimali per ciascun diffusore In questo modo verranno inoltre regolati automaticamente gli equalizzatori per i diffusori e sarà possib...

Страница 261: ...ore scegliendo un valorecompresotra 31Hz e 250Hz conicursori regolareil volumeallafrequenzainquestione scegliendounvalorecompreso tra 12 0 dB e 12 0 dB con Il valore predefinito è 0 0 dB 0 Questa impostazione non può essere selezionata se si è impostato No in System Setup Speaker Configuration Subwoofer P44 Front Left Dopo aver selezionato la frequenza del diffusore scegliendo un valorecompresotra...

Страница 262: ...numero di canali dei diffusori collegati e le impostazioni relative alle dimensioni definite in base alle capacità di riproduzione delle basse frequenze per ciascun diffusore Channel Level È possibile verificare le impostazioni del livello di uscita per ciascun diffusore Speaker Distance È possibile verificare la distanza tra ciascun diffusore e la posizione di ascolto Acoustic Calibration EQ È po...

Страница 263: ...emere Network 0 Quando la LAN è configurata con DHCP impostare DHCP su Enable per configurare l impostazioneautomaticamente Perassegnareindirizzi IP fissiaciascuncomponente si deveimpostare DHCP su Disable eassegnare unindirizzoaquestaunitàin IPAddress nonchéimpostareleinformazionirelativeallapropriaLAN qualiSubnetMaskeGateway Wi Fi Collegare l unità alla rete tramite un router LAN wireless On Con...

Страница 264: ... la politica sulla privacy ma si seleziona No per questa impostazione le informazioni non verranno raccolte Network Check È possibile controllare la connessione di rete Premere ENTER quando viene visualizzato Start 0 Attendere alcuni istanti se non è possibile selezionare Network Apparirà quando la funzione di rete sarà stata avviata 55 I T MAC Address Questo è l indirizzo MAC di questa unità Ques...

Страница 265: ...LUETOOTH e l unità On Valore predefinito L ingresso diventerà automaticamente BT AUDIO quando viene collegato un dispositivo BLUETOOTH Off La funzione è disabilitata 0 Se l ingresso non cambia automaticamente impostare su Off e modificare l ingresso manualmente Auto Reconnect Questa funzione effettua la riconnessione automatica al dispositivo BLUETOOTH collegato per ultimo quando si cambia l ingre...

Страница 266: ...ollegare qualsiasi cavo dispositivodi archiviazione USB microfono di configurazione degli altoparlanti o cuffie né effettuare alcuna operazione sul componente come spegnerel alimentazione Accesso a questa unità da un PC o unosmartphone mediante un applicazione Dichiarazione liberatoria Il programma e la relativa documentazione online sono forniti per l uso sotto la propria responsabilità Non sarem...

Страница 267: ...i schede USBnon possono essere utilizzati per questafunzione I dispositivi di archiviazione USB con funzioni di sicurezza non sono supportati Gli hub USB e i dispositivi USB dotati della funzione hub non sono supportati Non collegare talidispositivi all unità 0 Eliminare tutti i dati memorizzati sul dispositivo di archiviazione USB 0 Spegnere il componente di controllo PC ecc collegato alla rete 0...

Страница 268: ...ndo l aggiornamento è completo viene visualizzato Completed 9 Scollegare il dispositivo di archiviazione USB daquesta unità 10 PremereÍSTANDBY ONsuquestaunitàper mettere l unitàinstandby Ilprocessoècompletatoeil firmwareè aggiornato all ultima versionedisponibile 0 Non utilizzare Ísul telecomando Se viene visualizzato un messaggio di errore Quando si verifica un errore sul display dell unità viene...

Страница 269: ...ibile accendere l unità 0 Assicurarsi che il cavo di alimentazione sia inserito correttamente nella presa di corrente 0 Scollegare il cavo di alimentazione dalla presa di corrente attendere almeno 5 secondi quindi ricollegarlo L unità si spegne inaspettatamente 0 L unità va automaticamente in standby quando è impostato System Setup Hardware Power Management Auto Standby nelle funzioni Home 0 Sesul...

Страница 270: ...o di collegamento dell altoparlante alcune modalità di ascolto potrebbero non essere selezionate P35 Nessun audio con Dolby TrueHD Dolby Atmos DTS HD Master Audio e DTS X 0 Se non è possibile emettere formati come Dolby TrueHD Dolby Atmos DTS HD Master Audio o DTS X secondo il formato della sorgente nelle impostazioni del lettoreBlu ray provare ad impostare BD video supplementary sound o re encode...

Страница 271: ...zione in mono 0 La ricezione FM potrebbe migliorare utilizzando il terminale per antenna a muro usato per il televisore Funzione BLUETOOTH 0Provareacollegare scollegarel alimentazionedell unitàe provare ad accendere spegnere il dispositivo abilitato BLUETOOTH Il riavvio del dispositivo abilitato BLUETOOTH può risultare efficace 0 I dispositivi abilitati BLUETOOTH devono supportare il profilo A2DP ...

Страница 272: ... è visualizzato 0 Controllare se il dispositivo di archiviazione USB o il cavo USB sono correttamente inseriti nella portaUSB dell unità 0 Scollegare il dispositivo di archiviazione USB dall unità quindi provare a ricollegarlo 0 Le prestazioni dell hard disk che riceve l alimentazione dalla porta USB dell unità non sono garantite 0 A seconda del tipo di formato la riproduzione potrebbe non essere ...

Страница 273: ...curarsi che questa unità non sia esposta a luce solare diretta o a luci fluorescenti di tipo a invertitore Riposizionare se necessario 0 Se questa unità è installata in uno scaffale o in un armadietto con sportelli di vetro colorato o se le porte sono chiuse il telecomando potrebbe non funzionare in modo affidabile Display OSD Il display non si illumina 0 Quando il Dimmer è in funzione il display ...

Страница 274: ...z Canale predefinito 40 Sezione rete Ethernet LAN 10BASE T 100BASE TX LAN Wireless Standard IEEE 802 11 a b g n Wi Fi standard Banda 5 GHz 2 4 GHz Sezione BLUETOOTH Sistema di comunicazione Specifica BLUETOOTH versione 4 1 LE Banda di frequenza Banda 2 4 GHz Metodo di modulazione FHSS Freq Hopping Spread Spectrum Profili BLUETOOTH compatibili A2DP 1 2 AVRCP 1 3 HOGP Host Client Dispositivo HOGP HI...

Страница 275: ...nzate Aggiornamento del firmware Altri COAXIAL CD Analogico 1 BD DVD 2 CBL SAT PHONO designato Output Audio Analogico SUBWOOFER PRE OUT Uscite del diffusore FRONT L R CENTER SURROUND L R SUBWOOFER Cuffie PHONES anteriore Ø 3 5 mm Altri USB 1 anteriore Ver 2 0 5 V 1 A Ethernet 1 Setup Mic 1 66 I T ...

Страница 276: ...ità si trova in standby i segnali in ingresso provenienti dai componenti AV vengono trasmessi al televisore Deep Color Collegando dispositivi che supportano Deep Color è possibile riprodurre sul televisore i segnali video che arrivano dai dispositivi con ancora più colori x v Color Questa tecnologia consente di ottenere colori ancora più realistici ampliando il gamut dei colori 3D Consente di tras...

Страница 277: ...nes 10 2 2 or later The Bluetooth word mark and logos are registered trademarks owned by the Bluetooth SIG Inc PANDORA the PANDORA logo and the Pandora trade dress are trademarks or registered trademarks of Pandora Media Inc Used with permission BLACKFIRE This Mark Certifies that this product is compliant with the BLACKFIRE ALLIANCE Standard Please refer to WWW BLACKFIREALLIANCE COM for more infor...

Страница 278: ...el 44 0 208 836 3612 France 6 Avenue de Marais F 95816 Argenteuil Cedex FRANCE Tel 33 0 969 368 050 Корпорация О энд Пи 2 3 12 Яэсу Чуо ку г Токио 104 0028 ЯПОНИЯ 2016 Onkyo Pioneer Corporation All rights reserved 2016 Onkyo Pioneer Corporation Tous droits de reproduction et de traduction réservés http www pioneer audiovisual com privacy Pioneer and MCACC logo are trademarks of Pioneer Corporation...

Страница 279: ...12 4 Anschließen der Audio Komponenten 13 5 Anschließen weiterer Kabel 14 Erste Einrichtung ErsteEinrichtung mitdemautomatischenStartup Assistenten 15 Wiedergabe Wiedergabe von AV Komponenten 18 Internetradio 19 Spotify 21 Music Server 22 USB Speichergerät 24 AirPlay 26 BLUETOOTH Wiedergabe 27 Wiedergabe von FM DAB Radio 28 Wiedergabemodi 31 AV Adjust 40 Erweiterte Einrichtung System Setup 42 MCAC...

Страница 280: ...rittanbietergeräten entstehen 0 Es werden möglicherweise Funktionen über Firmware Updates ergänzt und Dienste werden möglicherweise von ihren Anbietern eingestellt sodass einige Netzwerkdienste zukünftig möglicherweise nicht mehr verfügbar sind Außerdem können die verfügbaren Dienste je nach Region variieren 0 Änderungen der technischen Daten und des Erscheinungsbildes ohne vorherige Ankündigung v...

Страница 281: ...sen werden 7 MCACC SETUP MIC Buchse Zum Anschluss des mitgelieferten Messmikrofons fürdie Lautsprecher 8 USB Anschluss Ein USB Speichergerät wird angeschlossen sodass die darauf gespeicherten Musikdateien abgespielt werden können Es können auch USB Geräte über ein USB Kabel mit Strom versorgt werden maximal5V 1A 9 FL OFF Anzeige Diese Anzeige leuchtet wenn Sie mehrfach DIMMER gedrückt haben um das...

Страница 282: ... GND Anschluss Zum Anschluss des Erdungskabels des Plattenspielers 5 DIGITAL IN OPTICAL COAXIAL Buchsen Hier können digitale Audiosignale von Fernsehern oder AV Komponenten über ein digitales optisches Kabel oder ein digitales Koaxialkabel eingegeben werden 6 Netzkabel 7 NETWORK Anschluss Hier ist ein Netzwerkanschluss über ein Ethernet Kabel möglich 8 HDMI OUT Buchse Hier kann ein HDMI Kabel ange...

Страница 283: ...ND Anschluss Zum Anschluss des Erdungskabels des Plattenspielers 5 DIGITAL IN OPTICAL COAXIAL Buchsen Hier können digitale Audiosignale von Fernsehern oder AV Komponenten über ein digitales optisches Kabel oder ein digitales Koaxialkabel eingegeben werden 6 Netzkabel 7 NETWORK Anschluss Hier ist ein Netzwerkanschluss über ein Ethernet Kabel möglich 8 HDMI OUT Buchse Hier kann ein HDMI Kabel angesc...

Страница 284: ...nd aus Drücken Sie die Taste erneut um die Stummschaltungaufzuheben 8 Wiedergabemodustasten Ermöglicht die Auswahl des Wiedergabemodus P31 9 Wiedergabetasten Hiermit kann die Wiedergabe von Music Server oder USB gestartet werden 10 Taste Hiermit können Wiederholungs und Zufallsmodus bei der Wiedergabe von Music Server oder USB aktiviert werden CLEAR Taste Hiermit werden bei der Texteingabe auf dem...

Страница 285: ...wählt 2 Leuchtet wenn der NET oder USB Eingangsselektor bedient wird um anzuzeigen dass Bedienvorgänge mit den Cursortasten der Fernbedienung möglich sind z B beim Anzeigen von Track Listen 3 Leuchtet wenn ein Kopfhörer angeschlossenist 4 Leuchtet wenn der NET oder USB Eingangsselektor bedient wird und Tracks wiedergegeben oder pausiert werden 5 Leuchtet je nach Typ der digitalen Audioeingangssign...

Страница 286: ...gen das hintere Klangfeld Der Subwoofer reproduziert Basstöne und erzeugt volle Klangfelder Frontlautsprecher sollten in Kopfhöhe Surround Lautsprecher etwas höher platziert werden Der Center Lautsprecher sollten der Hörposition zugewandt platziert werden Der aktive Subwoofer sollte vorne platziert werden Wird er zwischen Center Lautsprecher und einem Frontlautsprecher platziert so ergibt sich auc...

Страница 287: ...bels fest bevor Sie diese in die Anschlüsse einsetzen Verbinden Sie die Buchsen des Geräts und die der Lautsprecher für jeden Kanal korrekt miteinander zu und zu Wenn die Verbindung falsch ausgeführt wird können die Bässe aufgrund der Phasenumkehr schwach sein Es kann ein aktiver oder passiver Subwoofer angeschlossen werden Verwenden Sie zum Anschließen eines aktiven Subwoofers ein Subwoofer Kabel...

Страница 288: ...el die freiliegenden Drähte nicht aus den Lautsprecheranschlüssen herausragen Wenn die freiliegenden Lautsprecherdrähte die Geräterückwand berühren oder das und das Kabel einander berühren wird die Schutzschaltung aktiviert P60 Setup 0 Einstellungen für die Konfiguration der angeschlossenen Lautsprecher müssen in 1 Full Auto MCACC P16 in Initial Setup erfolgen 10 D E ...

Страница 289: ...r aus von der ARC unterstützt wird An Nicht ARC Fernseher Verwenden Sie bei nicht ARC fähigen Fernsehern Audio Return Channel sowohl das HDMI Kabel wie in Abbildung a als auch das digitale optische Kabel wie in Abbildung b Setup 0 Es sind bestimmte Einstellungen erforderlich um die ARC Funktion zu verwenden Wählen Sie Yes in 4 Audio Return Channel P17 unter Initial Setup aus 0 Anweisungen zum Ansc...

Страница 290: ...üpft ist sowie die HDMI Standby Through Funktion verwendet werden mit der Video und Audio von AV Komponenten auch dann über den Fernseher wiedergegeben werden können wenn dieses Gerät sich im Standby Modus befindet P67 0 Verwenden Sie das Hochgeschwindigkeits HDMI Kabel um ein 4K oder 1080p Video wiederzugeben Setup 0 Es sind Einstellungen erforderlich um die Funktionen HDMI CEC und HDMI Standby T...

Страница 291: ...er an die PHONO Buchse anschließen 0 Wenn der Plattenspieler über einen eingebauten Audioequalizer verfügt schließen Sie ihn an eine andere AUDIO IN Buchse als die PHONO Buchse an Wenn der Plattenspieler über einen MC Tonabnehmer verfügt installieren Sie einen kompatiblen Audioequalizer zwischen den Plattenspieler und dieses Gerät Verwenden Sie eine beliebige AUDIO IN Buchse jedoch nicht die PHONO...

Страница 292: ...st bewegen Sie die Zimmerantenne durch den Raum bis Sie die Position mit dem besten Empfang ermittelt haben a DAB FM Antenne b FM Zimmerantenne c Ethernet Kabel d Netzkabel Netzwerkanschluss VerbindenSiediesesGerätüberLANoderWLAN WirelessLAN mit dem Netzwerk Sie können Netzwerkfunktionen wie Internetradiogenießen wennSiedasGerätmiteinemNetzwerk verbinden Bei kabelgebundenem LAN schließen Sie ein E...

Страница 293: ...ellungen für die Inbetriebnahme vornehmen können 4 Folgen Sie den Anweisungen auf dem Bildschirm um die Option mit dem Cursors der Fernbedienung auszuwählen und drücken Sie ENTER um Ihre Auswahl zu bestätigen 0 Um zum vorigen Bildschirm zurückzukehren drücken Sie Zum Wiederholen Initial Setup Wenn Sie den Vorgang abbrechen oder die Einstellungen der ersten Einrichtung Initial Setup ändern möchten ...

Страница 294: ...hereinstellung ab 2 Wählen Sie die aktuelle Lautsprecherkonfigurationaus Die Darstellung auf dem Bildschirm ändert sich entsprechend der Kanalanzahl die Sie unter Speaker Channels auswählen Berücksichtigen Sie die aktuelle Darstellung wenn Sie die Einstellungen vornehmen Verwenden Sie diesen Bildschirm außerdem um anzugeben ob Sie einen Subwoofer angeschlossen haben 0 Wenn Sie einen Subwoofer ange...

Страница 295: ...e im Bildschirm mit der SSID Liste Other mit der Taste auf der Fernbedienung aus drücken ENTER und folgen den Anweisungen auf dem Bildschirm Tastatureingabe Zum Wechseln zwischen Groß und Kleinschreibung wählen Sie A a auf dem Bildschirm aus und drücken ENTER Um auszuwählen ob das Passwort mit maskiert oder im Klartext angezeigt werdensoll drücken Sie Fav auf der Fernbedienung MitCLEAR werden alle...

Страница 296: ...Drücken Sie auf der Fernbedienung den Eingangsselektor a mit dem Namen der Buchse an die der Player angeschlossen ist um den entsprechenden Eingang auszuwählen Drücken Sie beispielsweise BD DVD um den Player wiederzugeben der an die BD DVD Buchse angeschlossen ist Drücken Sie TV um den Fernsehton wiederzugeben 0 Beachten Sie dass der Eingang automatisch gewechselt wird wenn die CEC Linkfunktion ve...

Страница 297: ...öscht einen Radiosender oder ein Programm aus My Presets im TuneIn Radio Pandora nur USA Pandora ist ein kostenloser personalisierter Internetradiodienst zur Wiedergabe von Musik die Sie kennen sowie zum Entdecken von Musik die Sie lieben werden Wählen Sie Pandora aus und führen Sie dann folgende Schritte aus 1 Verwenden Sie a auf der Fernbedienung um I have a Pandora Account oder I m new to Pando...

Страница 298: ...abe eines Radiosenders werden auf dem Bildschirm Symbole angezeigt Wenn Sie ein Symbol mit a auf der Fernbedienung auswählen und ENTER b drücken können Sie Folgendes tun Mir gefällt dieser Track Geben sie einem Titel ein thumbs up und Pandora spielt mehr Musik die ähnlich ist Mir gefällt dieser Track nicht Geben Sie einem Titel ein thumbs down und Pandora entfernt diesen Titel aus dem aktuellen Se...

Страница 299: ...ardware Power Management Network Standby auf Off im System Setup Menü unter Home eingestellt ist schalten Sie das Gerät manuell ein und drücken NET auf der Fernbedienung 0 Informationen zu Spotify Einstellungen finden Sie unter www spotify com connect 0 Die Spotify Software benötigt Lizenzen dritter Parteien die Sie hier finden www spotify com connect third party licenses Die folgenden Fernbedienu...

Страница 300: ...Media Player können sich die Namen der auswählbaren Elemente unterscheiden Windows Media Player 12 1 Schalten Sie Ihren PC ein und starten SieWindows Media Player 12 2 Wählen Sie im Menü Stream die Option Turn on media streaming aus um ein Dialogfeld zuöffnen 0 Wenn Medienstreaming bereits eingeschaltet ist wählen Sie Weitere Datenstromoptionen im Menü Datenstrom um die Player im Netzwerk aufzulis...

Страница 301: ...rtwird klicken Sieauf Playto undwählendanndiesesGerätaus BeiPCsmitWindows 10klickenSieauf CasttoDevice undwählen dieses Gerät aus Bedienvorgänge während der Remotewiedergabe könnenamPCimFenster Playto vorgenommenwerden Der Wiedergabebildschirm wird auf dem Fernseher angezeigt der am HDMI Anschluss dieses Gerätes angeschlossen ist 6 Stellen Sie die Lautstärke mit der Lautstärkeleiste im Fenster Pla...

Страница 302: ...e ENTER b um Ihre Auswahl zubestätigen 0 Drücken Sie d um zum vorigen Bildschirmzurückzukehren 5 Wählen Sie mit denCursortasten auf der Fernbedienungdie Musikdatei ausunddrückenSieENTER b umdieWiedergabezustarten 0 Der USB Anschluss dieses Geräts entspricht dem USB 2 0 Standard Die Übertragungsgeschwindigkeit kann für einige wiederzugebende Inhalte unzureichend sein wodurch es zu Unterbrechungen d...

Страница 303: ... werden können MP3 mp3 MP3 0 Unterstützte Formate MPEG 1 MPEG 2 Audio Layer 3 0 Unterstützte Abtastfrequenzen 44 1 kHz 48 kHz 0 Unterstützte Bitraten Zwischen 8 kbps und 320 kbps und VBR WMA wma WMA 0 Unterstützte Abtastfrequenzen 44 1 kHz 48 kHz 0 Unterstützte Bitraten Zwischen 5 kbps und 320 kbps und VBR 0 Die Formate WMA Pro Voice WMA Lossless werden nicht unterstützt WAV wav WAV WAV Dateien en...

Страница 304: ...die Schritte 3 und 4 oben ausführen wird dieses Gerät automatisch eingeschaltet und die Eingabe wird zu NET gewechselt Um den Stromverbrauch im Standby Modus zu verringern drücken Sie die Taste auf der Fernbedienung und legen dann im angezeigten Home Menü für System Setup Hardware Power Management Network Standby den Wert Off fest 0 Aufgrund der Eigenschaften der drahtlosen AirPlay Technologie kan...

Страница 305: ...t wird und führen dann den oben beschriebenen Schritt 2 aus Dieses Gerät kann die Daten von bis zu acht gepaarten Gerätenspeichern 0 Der Empfangsbereich beträgt etwa 15 Meter Beachten Sie dass die Verbindung mit BLUETOOTH fähigen Geräten nicht garantiert werden kann Wiedergabe 1 Wenn das Gerät eingeschaltet ist führen Sie das Verbindungsverfahren am BLUETOOTH fähigenGerät aus 2 Der Eingangsselekto...

Страница 306: ...sgelassen wird Suchen Sie durch Anschauen des Displays Zurück zur automatischen Sendersuche Drücken Sie noch einmal MODE e auf der Fernbedienung sodass AUTO auf dem Display angezeigt wird Es wird automatisch ein Radiosender eingestellt Einstellen des Frequenzschritts Modelle für Nordamerika Drücken Sie die Taste auf der Fernbedienung um System Setup Miscellaneous Tuner FM Frequency Step und dann d...

Страница 307: ...ormationen angezeigt Wiedergabe von DAB Digitalradio VSX S520D 1 Drücken Sie mehrfach TUNER auf der Fernbedienung um DAB auf dem Display auszuwählen 0 Wenn Sie DAB erstmalig auswählen wird automatisch im DAB Band 3 nach Multiplexen d h Sendern gesucht die in Ihrer Region verfügbar sind 0 Sobald der Suchlauf abgeschlossen ist wird der erste gefundene Sender ausgewählt 0 Wenn ein neuer DAB Sender ve...

Страница 308: ...m eine Nummer zwischen 1 und 40 auszuwählen 4 Drücken Sie noch einmal Fav d auf der Fernbedienung um den Radiosender zu registrieren Die voreingestellte Nummer hört auf zu blinken wenn sie registriert ist Auswahl eines voreingestellten Radiosenders 1 Drücken Sie TUNER auf der Fernbedienung 2 Drücken Sie die Cursortasten a auf der Fernbedienung um eine voreingestellteNummer auszuwählen Löschen eine...

Страница 309: ...erden noch mehr Prozesse ausgeschaltet welche die Klangqualität beeinträchtigen können Sie erhalten dadurch eine naturgetreuere Wiedergabe des Originalklangs In diesem Fall wird die Lautsprecherkalibrierung mit MCACC deaktiviert SURR Taste c Drücken Sie mehrfach um das Audioformat der Eingangssignale und einen von zahlreichen Wiedergabemodi auszuwählen Wählen Sie den Modus aus der Ihren Präferenze...

Страница 310: ...dus werden im Audioformat Dolby Atmos aufgenommene Klangdesigns originalgetreu wiedergegeben Das Dolby Atmos Audioformat wurde in modern ausgestatteten Kinos eingerichtet und ermöglicht auch im Heimkino ein revolutionäres Klangerlebnis Im Unterschied zu herkömmlichen Surroundsystemen basiert Dolby Atmos nicht auf Kanälen sondern ermöglicht ein präzises freies Platzieren von Klangobjekten im dreidi...

Страница 311: ...ios produzierte Fernsehsendungen Dieser Modus verstärkt die Surroundeffekte des gesamten Klangs gibt den Stimmen mehr Klarheit und erstellt ein realistisches Klangbild DSD Modus der sich zur Wiedergabe von in DSD aufgenommenen Quellen eignet 0 Von diesem Gerät werden DSD Signale unterstützt die über HDMI IN eingehen Je nach angeschlossenem Player kann jedoch ein besserer Klang erzielt werden wenn ...

Страница 312: ...kanalbasierter Formate und objektbasierter dynamischer Audiomischung Sie kennzeichnet sich durch die präzise Klangpositionierung und die Möglichkeit Bewegung wiederzugeben 0 Zur Übertragung dieses Audioformats verwenden Sie ein HDMI Kabel und wählen den Bitstream Audioausgang des Players aus Ent Show Entertainment Show Geeignet für Rock und Popmusik Dieser Modus kreiert ein lebhaftes Klangfeld mit...

Страница 313: ...uswahl von F S Surround Front Stage Surround nicht möglich Bei Firmware Versionen vor DTS X Unterstützung 0 Sie können Neo 6 Cinema und Neo 6 Music auswählen Bei Firmware Versionen nach DTS X Unterstützung 0 Sie können DTS X und DTS Neural X auswählen Nach dem Update können Sie Neo 6 Cinema und Neo 6 Music nicht mehr auswählen 1 Es müssen Surround Lautsprecher bzw ein Center Lautsprecher installie...

Страница 314: ...n Surround Lautsprecher installiert werden 36 Eingangsformat Wiedergabemodus Dolby Atmos Stereo Dolby Atmos Surround Virtual Classical Unplugged Ent Show Drama AdvancedGame Action Rock Pop Sports Ext Stereo Ext Mono F S Surround Eingangsformat Wiedergabemodus Multich PCM Stereo Multich PCM 1 Dolby Surround Surround Virtual DTS Neural X Classical 2 Unplugged 2 Ent Show 2 Drama 2 AdvancedGame 2 Acti...

Страница 315: ...as Eingangsformat 2 Kanal ist 2 Es müssen Surround Lautsprecher bzw ein Center Lautsprecher installiert werden 3 Kann nur bei 2 Kanal Eingangsformat ausgewählt werden wenn Surround Lautsprecher oder ein Center Lautsprecher installiert wurden 4 Es müssen Surround Lautsprecher installiert werden 37 Eingangsformat Wiedergabemodus Dolby TrueHD Stereo Dolby TrueHD 1 2 Dolby Surround Surround Virtual PL...

Страница 316: ...üssen Surround Lautsprecher bzw ein Center Lautsprecher installiert werden 3 Kann nur bei 2 Kanal Eingangsformat ausgewählt werden wenn Surround Lautsprecher oder ein Center Lautsprecher installiert wurden 4 Es müssen Surround Lautsprecher installiert werden 38 Eingangsformat Wiedergabemodus DTS Express Stereo DTS Express 1 2 PL Ⅱ Movie 3 PL Ⅱ Music 3 PL Ⅱ Game 3 Neo 6 Cinema 3 Neo 6 Music 3 DTS N...

Страница 317: ... Surround Lautsprecher installiert werden 1 Kann nicht ausgewählt werden wenn das Eingangsformat 2 Kanal ist 2 Es müssen Surround Lautsprecher bzw ein Center Lautsprecher installiert werden 3 Kann nur bei 2 Kanal Eingangsformat ausgewählt werden wenn Surround Lautsprecher oder ein Center Lautsprecher installiert wurden 4 Es müssen Surround Lautsprecher installiert werden 39 D E Eingangsformat Wied...

Страница 318: ...llung wird auf den vorigen Status zurückgesetzt wenn Sie das Gerät in den Standby Modus schalten MCACC MCACC EQ Aktivieren deaktivieren Sie die Equalizer Funktion zur Korrektur von Verzerrungen durch die akustischen Raumgegebenheiten 0 Diese Einstellung kann nicht ausgewählt werden wenn Full Auto MCACC nicht ausgeführt wurde 0 Kann nicht eingestellt werden wenn der Wiedergabemodus Pure Direct laut...

Страница 319: ...mension Passen Sie im Dolby Pro Logic Ⅱ Music Wiedergabemodus die räumliche Tiefe des Klangfelds an Bei kleinen Zahlen wird der Klang nach vorne verschoben Bei großen Zahlen wird der Klang nach hinten verschoben Center Width Passen Sie im Dolby Pro Logic Ⅱ Music Wiedergabemodus die Breite des vorderen Klangfelds an Mit kleinen Zahlen wird der Klang in der Mitte konzentriert Mit großen Zahlen wird ...

Страница 320: ...rückzukehren drücken Sie 4 Um die Einstellungen zu verlassen drücken Sie Input Output Assign TV Out OSD 1080p 4K Upscaling Bei Verwendung eines Fernsehers der 4K unterstützt können Videosignale die mit 1080p eingehen automatisch auf eine 4K Ausgabe hochskaliert werden Off Standardwert Wenn diese Funktion nicht verwendet wird Auto Diese Funktion wird verwendet 0WählenSiedieEinstellung Off aus wennI...

Страница 321: ...ngangsselektor die gewünschte DIGITAL IN Buchse zu Standardwert CD COAXIAL OPTICAL Weisen Sie dem CD Eingangsselektor die gewünschte DIGITAL IN Buchse zu Der Standardwert ist COAXIAL 43 D E GAME HDMI 1 HDCP 2 2 bis HDMI 4 HDCP 2 2 Weisen Sie dem GAME Eingangsselektor die gewünschte HDMI IN Buchse zu Wenn Sie keine Buchse zuweisen wählen Sie aus Um eine HDMI IN Buchse auszuwählen die bereits einem ...

Страница 322: ...selektor die gewünschte AUDIO IN Buchse zu Der Standardwert ist AUDIO 2 GAME AUDIO 1 bis AUDIO 2 Weisen Sie dem GAME Eingangsselektor die gewünschte AUDIO IN Buchse zu Standardwert STRM BOX AUDIO 1 bis AUDIO 2 Weisen Sie dem STRM BOX Eingangsselektor die gewünschte AUDIO IN Buchse zu Standardwert CD AUDIO 1 bis AUDIO 2 Weisen Sie dem CD Eingangsselektor die gewünschte AUDIO IN Buchse zu Standardwe...

Страница 323: ...e Option nicht gewählt werden kann obwohl die Verbindung korrekt ist überprüfen Sie ob die Einstellungen in Configuration Speaker Channels der Anzahl der angeschlossenen Kanäle entspricht Crossover Wenn Lautsprecher vorhanden sind für die der Wert Small ausgewählt wurde legen Sie den Frequenzbereich für die Basswiedergabe der anderen Lautsprecher sowie des LFEs Low Frequency Effect fest 0 Es könne...

Страница 324: ...eichen links vom Cursor wird entfernt Fügen Sie hiermit Leerzeichen ein 0 Durch Drücken der CLEAR Taste auf der Fernbedienung werden alle eingegebenen Zeichen gelöscht 2 Wählen Sie nach der Eingabe OK mit den Cursortasten aus und drücken Sie ENTER Der Eingangsname wird gespeichert D E Subwoofer WählenSieeinenWertzwischen 15dB und 12dB inSchrittenvon1dB aus EinTesttonwirdjedesMal wennSiedenWertverä...

Страница 325: ...ie die Lautstärke desGeräts 0 Wenn bei Einstellung auf On außergewöhnlicher Betrieb auftritt wählen Sie den Wert Off aus 0 Bei Anschluss eines nicht CEC kompatiblen Geräts oder wenn Sie nicht sicher sind ob es kompatibel ist wählen Sie für diese Einstellung den Wert Off aus D E Audio Select ARC Wenn dem Eingangssignal vom ARC kompatiblen Fernseher Priorität zugewiesen wird 0 Die Einstellung kann n...

Страница 326: ...uto Delay In dieser Einstellung wird jede Nichtsynchronizität zwischen Video und Audiosignalen automatisch auf Basis der Daten des HDMI LipSync kompatiblen Fernsehers korrigiert On Standardwert Die automatische Korrektur wird aktiviert Off Die automatische Korrektur ist deaktiviert HDMI Standby Through Wenn diese Einstellung nicht den Wert Off aufweist können Sie Video und Audiosignale eines über ...

Страница 327: ...t auf Off eingestellt wenn Network Bluetooth Bluetooth Auto Input Change P56 den Wert Off aufweist Sleep Timer Mit dieser Funktion kann das Gerät nach Ablauf der angegebenen Zeit automatisch in den Standby Modus schalten Sie können zwischen 30 minutes 60 minutes und 90 minutes auswählen Off Standardwert Setzt das Gerät nicht automatisch auf Standby Auto Standby Diese Einstellung setzt das Gerät na...

Страница 328: ...mware Update nicht ausgewählt werden kann warten Sie eine Weile ab Die 50 Setup Parameter Sperren Sie das System Setup Menü um die Einstellungenzu schützen Locked Das Menü ist gesperrt Unlocked Standardwert Das Menü ist entriegelt D E Load Default Setzen Sie die Einstellungen dieses Geräts auf den Status bei Auslieferung zurück Das Zurücksetzen ist abgeschlossen wenn Clear auf dem Display angezeig...

Страница 329: ... 0 Um zum vorigen Bildschirm zurückzukehren drücken Sie 4 Um die Einstellungen zu verlassen drücken Sie Full Auto MCACC Platzieren Sie das mitgelieferte Mikrofon zur Lautsprechereinstellung in Hörposition und messen Sie die von den Lautsprechern ausgegebenen Testtöne Die optimalen Lautstärkepegel Crossoverfrequenzen und Abstände zur Hörposition werden von diesem Gerät automatisch für jeden Lautspr...

Страница 330: ... kannnurausgewähltwerden wenndieserLautsprecherdenWert Large unter SystemSetup Speaker Crossover P44 aufweist Subwoofer Nach dem Auswählen der Lautsprecherfrequenz zwischen 31 Hz und 250 Hz mit den Cursortasten passen Sie die Lautstärke der Frequenz mit zwischen 12 0 dB und 12 0 dB an Standardwert 0 0 dB 0 Diese Auswahl ist nicht verfügbar wenn No in System Setup Speaker Configuration Subwoofer P4...

Страница 331: ...geschlossenen Lautsprecherkanäle und die ausgewählten großen kleinen Werte für die Wiedergabe im niederfrequenten Bereich der einzelnen Lautsprecher überprüfen Channel Level Sie können die Ausgangspegel Einstellungen der einzelnen Lautsprecher überprüfen Speaker Distance Sie können den Abstand der einzelnen Lautsprecher zur Hörposition überprüfen Acoustic Calibration EQ Sie können die Kalibrierung...

Страница 332: ...en drücken Sie Network 0 WennLANmitDHCPkonfiguriertwird stellenSiefür DHCP denWert Enable ein damitdieEinstellung automatisch konfiguriert wird Damit den Komponenten jeweils feste IP Adressen zugewiesen werden können muss DHCP denWert Disable aufweisen diesemGerätmussin IPAddress eineAdressezugewiesen werden und es müssen LAN Informationen wie Subnetzmaske und Gateway eingegeben werden Wi Fi Verbi...

Страница 333: ... Informationen nicht gesammelt werden Network Check Sie können die Netzwerkverbindung überprüfen Drücken Sie ENTER wenn Start angezeigt wird 0 Wenn Network nicht ausgewählt werden kann warten Sie eine Weile ab Die Option wird angezeigt wenn die Netzwerk Funktion gestartet wurde 55 D E MAC Address Dies ist die MAC Adresse dieses Geräts Dieser Wert ist speziell für die Komponente eingestellt und kan...

Страница 334: ...r ein BLUETOOTH fähiges Gerät erfolgt On Standardwert Der Eingang wird automatisch zu BT AUDIO gewechselt wenn ein BLUETOOTH fähiges Gerät angeschlossen wird Off Die Funktion ist deaktiviert 0 Wenn der Eingang nicht automatisch gewechselt wird stellen Sie Off ein und ändern den Eingang manuell Auto Reconnect Durch diese Funktion wird die Verbindung mit dem BLUETOOTH fähigen Gerät automatisch aktiv...

Страница 335: ...ng der Komponenten wie z B den Stromausschalten Zugreifen auf dieses Gerät von einem PC odereinem Smartphone aus mithilfe einer Anwendung Haftungsausschluss Das Programm und die begleitende OnlinedokumentationerhaltenSiezurVerwendungaufeigenesRisiko Wir übernehmen keinerlei Haftung bei Schadenersatzansprüchen oder anderen Forderungen bezüglich Ihrer Verwendung des Programms oder der begleitende On...

Страница 336: ...format Datenträger die in ein USB Kartenlesegerät eingelegt wurden dürfen für diese Funktion nicht verwendet werden USB Speichergeräte mit Sicherheitsfunktionwerden nicht unterstützt USB Hubs und USB Geräte mit Hubfunktion werden nicht unterstützt Schließen Sie diese Geräte nicht an das Gerät an 0 Löschen Sie alle Daten auf dem USB Speichergerät 0 Schalten Sie die Steuerung aus PC usw die mit dem ...

Страница 337: ...rüfen Sie in diesem Fall den Fortschritt auf dem Display dieses Geräts Der TV Bildschirm bleibt schwarz bis das Update abgeschlossen und die Stromversorgung wieder verfügbarist 0 Während der Aktualisierung das USB Speichergerät nicht ausschalten oder trennen und dann wieder anschließen 0 Completed wird angezeigt wenn das Update Wenn eine Fehlermeldung angezeigt wird Wenn ein Fehler auftritt wird E...

Страница 338: ... sicher dass das Netzkabel ordnungsgemäß in die Steckdose eingesteckt ist 0 ZiehenSiedasNetzkabelausderSteckdose wartenSie mindestens5SekundenundsteckenSieesdannwiederein Das Gerät wird unerwartet ausgeschaltet 0 DasGerätwirdautomatischindenStandby Modusgeschaltet wenn die Einstellung System Setup Hardware Power Management Auto Standby in den Home Funktionen aktiviert ist 0 WennaufdemDisplay CHECK...

Страница 339: ...itte nicht behoben wurde Kann den gewünschten Wiedergabemodus nicht auswählen 0 Je nach Anschlussstatus der Lautsprecher können einige Wiedergabemodi nicht ausgewählt werden P35 Bei Dolby TrueHD Dolby Atmos DTS HD Master Audio und DTS X werden keine Audiosignalewiedergegeben 0 Wenn Formate wie Dolby TrueHD Dolby Atmos DTS HD Master Audio oder DTS X nicht gemäß dem Quellenformat wiedergegeben werde...

Страница 340: ...ht oder weist Störgeräusche auf 0 Den Anschluss der Antenne erneut überprüfen 0 Entfernen Sie die Antenne weiter von Lautsprecherkabeln und Netzkabel 0 Stellen Sie das Gerät nicht in der Nähe Ihres Fernsehers oder PCs auf 0 Vorbeifahrende Autos und Flugzeuge können Störungen verursachen 0 Betonwände schwächen die Radiosignale ab 0 Hören Sie den Sender in Mono 0 Der FM Empfang kann möglicherweise v...

Страница 341: ...kfunktion 0 Möglicherweise müssen Sie einige Einstellungen bei Windows Media Player vornehmen P22 0 Wird ein PC verwendet können nur Musikdateien wiedergegeben werden die in der Bibliothek von Windows Media Player registriert sind Die Wiedergabe stoppt beim Hören der Musikdateien auf dem Netzwerkserver 0 Vergewissern Sie sich dass der Netzwerkserver mit diesem Gerät kompatibel ist 0 Wenn der PC al...

Страница 342: ...er Kanäle finden Sie in der Anleitung Ihres WLAN Routers 0 Mit WLAN ist möglicherweise nicht genügend Bandbreite verfügbar Verwenden Sie ein Ethernet Kabel Fernbedienung 0 Stellen Sie sicher dass die Batterien mit der richtigen Polarität eingelegt sind 0 Legen Sie neue Batterien ein Keine Batterien unterschiedlicher Sorten oder alte und neue Batterien mischen 0 Achten Sie darauf dass das Gerät kei...

Страница 343: ... LAN 10BASE T 100BASE TX WLAN IEEE 802 11 a b g n Standard Wi Fi Standard 5 GHz 2 4 GHz Band BLUETOOTH Bereich Datenübertragungssystem BLUETOOTH Spezifikation Version 4 1 LE Frequenzband 2 4 GHz Band Modulationsverfahren FHSS Freq Hopping Spread Spectrum Kompatible BLUETOOTH Profile A2DP 1 2 AVRCP 1 3 HOGP Host Client HOGP HID Gerät Server HID Service HIDS Unterstützte Codecs SBC AAC Übertragungsb...

Страница 344: ...htung Firmware Update Sonstiges Analog 1 BD DVD 2 CBL SAT PHONO designiert Audio Ausgänge Analog SUBWOOFER PRE OUT Lautsprecherausgänge FRONT L R CENTER SURROUND L R SUBWOOFER Kopfhörer PHONES Vorderseite Ø 3 5 mm Andere USB 1 Vorderseite Ver 2 0 5 V 1 A Ethernet 1 Messmikrofon 1 66 D E ...

Страница 345: ...hrough Auch wenn sich dieses Gerätim Standby Modus befindet werden die Eingangssignale von AV Komponenten an den Fernseher übertragen Deep Color Werden Geräte angeschlossen die Deep Color unterstützen so können Videosignale vondiesen Geräten mit noch mehr Farben über den Fernseher wiedergegeben werden x v Color Mit dieser Technologie werden noch realistischere Farben erzeugt indem der Farbumfang e...

Страница 346: ...oth word mark and logos are registered trademarks owned by the Bluetooth SIG Inc PANDORA the PANDORA logo and the Pandora trade dress are trademarks or registered trademarks of Pandora Media Inc Used with permission and the badge are trademarks of Google inc BLACKFIRE This Mark Certifies that this product is compliant with the BLACKFIRE ALLIANCE Standard Please refer to WWW BLACKFIREALLIANCE COM f...

Страница 347: ...el 44 0 208 836 3612 France 6 Avenue de Marais F 95816 Argenteuil Cedex FRANCE Tel 33 0 969 368 050 Корпорация О энд Пи 2 3 12 Яэсу Чуо ку г Токио 104 0028 ЯПОНИЯ 2016 Onkyo Pioneer Corporation All rights reserved 2016 Onkyo Pioneer Corporation Tous droits de reproduction et de traduction réservés http www pioneer audiovisual com privacy Pioneer and MCACC logo are trademarks of Pioneer Corporation...

Страница 348: ...Verbind de HDMI AV componenten 12 4 Verbind de audiocomponenten 13 5 Verbinden met andere kabels 14 Begininstelling Eerste Setup met de Automatische Opstart Wizard 15 Afspelen Afspelen van een AV component 18 Internetradio 19 Spotify 21 Music Server 22 USB opslagapparaat 24 AirPlay 26 BLUETOOTH Afspelen 27 Naar de FM DAB radio luisteren 28 Luistermodussen 31 AV Adjust 40 Geavanceerde Setup System ...

Страница 349: ...ige schade als gevolg van de verbinding van apparatuur die door andere bedrijven geproduceerd is 0 De functionaliteit kan geïntroduceerd worden door firmware updates en service providers kunnen diensten beëindigen wat betekent dat sommige netwerkdiensten en inhoud in de toekomst mogelijk niet meer beschikbaar zijn Bovendien kunnen beschikbare diensten variëren afhankelijk van de regio waarin u woo...

Страница 350: ... mm verbonden 7 MCACC SETUP MIC aansluiting De meegeleverde luidsprekerinstellingsmicrofoon is aangesloten 8 USB poort Een USB opslagapparaat is aangesloten zodat muziekbestanden die hierop zijn opgeslagen kunnen worden afgespeeld U kunt ook stroom maximaal 5V 1A naar USB apparaten toevoeren met een USB kabel 9 FL OFF controlelampje Dit brandt als u herhaaldelijk op DIMMER gedrukt heeft om het dis...

Страница 351: ...een analoge audiokabel 4 SIGNAL GND aansluiting De aarddraad van de platenspeler is aangesloten 5 DIGITAL IN OPTICAL COAXIAL aansluitingen Voert digitale audiosignalen van TV of AV component in met een digitale optische kabel of een digitale coaxiale kabel 6 Netsnoer 7 NETWORK poort Maakt verbindingmet het netwerk met een Ethernetkabel 8 HDMI OUT aansluiting Verbind een HDMI kabel om vidiosignalen...

Страница 352: ...analoge audiokabel 4 SIGNAL GND aansluiting De aarddraad van de platenspeler is aangesloten 5 DIGITAL IN OPTICAL COAXIAL aansluitingen Voert digitale audiosignalen van TV of AV component in met een digitale optische kabel of een digitale coaxiale kabel 6 Netsnoer 7 NETWORK poort Maakt verbindingmet het netwerk met een Ethernetkabel 8 HDMI OUT aansluiting Verbind een HDMI kabel om vidiosignalen en ...

Страница 353: ...elijk het geluid Druk er nogmaals op om het dempen te annuleren 8 Luistermodus knoppen Hiermee kunt u de beluisterstand selecteren P31 9 Afspeelknoppen U kunt het afspelen van de Music Server of USB starten 10 knop U kunt herhaald of willekeurig afspelen van de Music Server of USB starten CLEAR knop Wist alle karakters die u ingevoerd heeft wanneer u tekst op het TV scherm invoert 11 STATUS knop V...

Страница 354: ...s geselecteerd 2 Brandt wanneer de NET of USB ingangskeuzeschakelaar bediend wordt en geeft aan dat de bediening van de cursorknoppen van de afstandsbediening mogelijk is op schermen die bijvoorbeeld de lijst met nummerstonen 3 Gaat branden wanneer een hoofdtelefoonis aangesloten 4 Brandt wanneer de NET of USB ingangskeuzeschakelaar bediend wordt wanneer nummers gespeeld of gepauzeerdworden 5 Bran...

Страница 355: ...er reproduceert bass geluiden en creëert een rijk geluidsveld De voorluidsprekers moeten op oorhoogte geplaatst worden terwijl de surroundluidsprekers vlak boven oorhoogte geplaatst moeten worden De middenluidspreker moet in de richting van de luisterpositie geplaatst worden Plaats de actieve subwoofer naar voren gericht Door hem tussen de middenluidspreker en een voorluidspreker te plaatsen verkr...

Страница 356: ...e aansluitingen steekt Maak voor ieder kanaal de correcte verbinding tussen de aansluitingen van het toestel en de aansluitingen van de luidsprekers met en met Als de aansluiting verkeerd is kan een basgeluid misschien zwak worden als gevolg van een omgekeerde fase Een actieve of passieve subwoofer kan verbonden worden Om een actieve subwoofer te verbinden een subwooferkabel gebruiken en verbinden...

Страница 357: ...sprekers niet uit de luidsprekeraansluitingen naar buiten steken Als de naar buiten stekende draaduiteinden van de luidsprekers het achterpaneel raken of als de en draden elkaar raken zal het veiligheidscircuit geactiveerd worden P60 Setup 0 De instellingen voor de luidsprekerconfiguratie die u verbonden heeft moeten uitgevoerd worden in 1 Full Auto MCACC P16 in Initial Setup 10 N L ...

Страница 358: ...ARC ondersteunt wanneer u de verbinding maakt Naar niet ARC TV Verbind voor een TV die geen ARC Audio Return Channel ondersteunt zowel de HDMI kabel in afbeelding a als de digitale optische kabel in b Setup 0 Voor het gebruik van de ARC functie zijn bepaalde instellingen vereist Selecteer Yes in 4 Audio Return Channel P17 in de Initial Setup 0 Raadpleeg de gebruiksaanwijzing van de TV voor aanwijz...

Страница 359: ...heeft met de ingangskeuzeschakelaar en van een kenmerk zoals HDMI Standby Through dat u in staat stelt video en audio afkomstig van AV componenten op de TV af te spelen zelfs als dit toestel op stand by staat P67 0 Voor het afspelen van 4k of 1080P video gebruik een HDMI kabel met hoge snelheid Setup 0 Voor het gebruik van de HDMI CEC en HDMI Standby Through functies zijn bepaalde instellingen ver...

Страница 360: ...g verbinden 0 Als de draaitafel een ingebouwde audio equalizer heeft verbind deze dan met een andere AUDIO IN aansluiting dan de PHONO aansluiting Als de draaitafel bovendien gebruik maakt van een MC type element installeer dan een audio equalizer die compatibel is met het MC type element tussen het toestel en de draaitafel en maak vervolgens verbinding met ongeacht welke AUDIO IN aansluiting die ...

Страница 361: ...ijl u de radio afspeeltomdepositiemetdebesteontvangsttevinden a DAB FM antenne b FM binnenantenne c Ethernet kabel d Netsnoer Het netwerk aansluiten Verbind dit toestel met het netwerk met gebruik van een bedraad LAN ofWi Fi draadloos LAN Ukunt genieten van netwerkkenmerken zoals internetradio door het toestel met het netwerk teverbinden Als u verbondenbent via een bedraad LAN maak dan met een Eth...

Страница 362: ...ingen te makendienodigzijnvoorhetopstarten 4 Volg de instructies op het scherm om het item met de cursorknoppen van de afstandsbediening teselecteren en druk op ENTER om uw keuze te bevestigen 0 Om terug te keren naar het vorige scherm druk op Om Initial Setup opnieuw uit te voeren Als u de procedure onderwijl beëindigt of een instelling wilt veranderen die gemaakt is tijdens Initial Setup druk op...

Страница 363: ...nt u de luidsprekerinstellingsmicrofoon af te sluiten 2 Selecteer de configuratie van de verbonden luidspreker Het beeld op het scherm verandert als u het aantal kanalen in Speaker Channels kiest dus kijk ernaar als u de instellingen uitvoert Gebruik dit scherm ook om te selecteren of u een subwoofer verbonden heeft 0 Als u een subwoofer verbonden heeft controleer dan de stroom en het volume van d...

Страница 364: ... ENTER en volg de instructies die op het scherm verschijnen Gebruik van het toetsenbord Om tussen hoofdletters en kleine letters te schakelen selecteert u A a op het scherm en drukt u op ENTER Om te selecteren of het wachtwoord verborgen wordt met of dat het wordt weergegeven met normale tekst drukt u op Fav op de afstandsbediening Door op CLEAR te drukken zullen alle ingevoerde karakters gewist w...

Страница 365: ...ng op de ingangskeuzeschakelaar a met dezelfde naam alsde aansluiting waarmee u de speler wilt verbinden om de ingang om te schakelen Druk bijvoorbeeld op BD DVD om de speler af te spelen die met de BD DVD aansluiting verbonden is Druk op TV om naar het geluid van de TV te luisteren 0 Houd er rekening mee dat als de CEC koppelingsfunctie werkt de ingang automatisch omschakelt wanneer een CEC compa...

Страница 366: ...ndora is een gratis gepersonaliseerde internetradiodienst die de muziek afspeelt die u kent en u helpt de muziek te ontdekken waar u van houdt Na het selecteren van Pandora het volgende doen 1 Gebruik a op de afstandsbediening om I have a Pandora Account of I m new to Pandora teselecteren en druk dan op ENTER b Als u Pandora nog niet kent selecteer dan I m new to Pandora U ziet een activeringscode...

Страница 367: ...door de icoon te selecteren met a op de afstandsbediening en op ENTER b te drukken Ik vind dit nummer leuk Geef een nummer thumbs up en Pandora zal meer muziek zoals dit afspelen Ik vind dit nummer niet leuk Geef een nummer thumbs down en Pandora verbant dat nummer van de huidige zender Vindt automatisch zenders die met uw voorkeur overeenkomen gebaseerd op genre specifieke artiest en liedjes en w...

Страница 368: ...gement Network Standby op Off in het System Setup menu vanaf Home ingesteld is schakel het toestel dan met de hand in en druk op NET op de afstandsbediening 0 Raadpleeg de volgende site voor de instellingen van Spotify www spotify com connect 0 De Spotify software is onderworpen aan licenties van derde partijen die hier gevonden worden www spotify com connect third party licenses De volgende hande...

Страница 369: ...PC in en start Windows Media Player 12 2 Selecteer in het Stream menu Turn onmedia streaming om een dialoogvenster teopenen 0 Als mediastreamen al is ingeschakeld selecteer More streaming options in het Stream menuom spelers in het netwerk weer te geven en ga dan naar stap4 3 Klik op Turn on media streaming om een lijstmet spelers in het netwerk weer te geven 4 Selecteer deze unit in Media streami...

Страница 370: ...eergegeven op de TV die op de HDMI uitgang van de unit aangesloten is 6 Pas het volume aan met behulp van de volumebalk in het Play to venster 0 Soms kan het volume dat wordt weergegeven op het afstandafspeelscherm verschillen van dat wat verschijnt op het display van de unit Wanneer het volume wordt aangepast vanaf dit toestel wordt dit bovendien niet weerspiegeld in het Play to venster 0 Het afs...

Страница 371: ... d omterugtekerennaarhetvorigescherm 5 Selecteer met de cursorknoppen op de afstandsbediening het muziekbestand en druk vervolgens op ENTER b om het afspelen tebeginnen 0 De USB poort van dit toestel is conform de USB 2 0 standaard De overzetsnelheid kan onvoldoende zijn voor bepaalde inhoud die u wilt afspelen wat enige onderbrekingen in het geluid kan veroorzaken De volgende handelingen van de a...

Страница 372: ...ersteunde formaten MPEG 1 MPEG 2 Audio Layer 3 0 Ondersteunde bemonsteringsfrequenties 44 1 kHz 48 kHz 0 Ondersteunde bitsnelheden Tussen 8 kbps en 320kbps en VBR WMA wma WMA 0 Ondersteunde bemonsteringsfrequenties 44 1 kHz 48 kHz 0 Ondersteunde bitsnelheden Tussen 5 kbps en 320kbps en VBR 0 WMA Pro Voice WMA Lossless formaten worden niet ondersteund WAV wav WAV WAV bestanden bevatten ongecomprime...

Страница 373: ...tvoert wordt dit toestel automatisch ingeschakeld en schakelt de ingang naar NET Om de hoeveelheid stroom die in de stand by modus verbruikt wordt te verlagen drukt u op de afstandsbediening op de knop en zet u daarna in het weergegeven Home menu System Setup Hardware Power Management Network Standby op Off 0 Vanwege de kenmerken van draadloze technologie van AirPlay kan het geluid dat op dit toes...

Страница 374: ...ven wordt en voert u daarna bovenstaande stap 2 uit Deze unit kan de gegevens opslaan van maximaal acht gepaardeapparaten 0 Het dekkingsgebied is 15 meter 48 voet Houd er rekening mee dat de verbinding met alle BLUETOOTH geactiveerde apparaten niet altijd gegarandeerd wordt Afspelen 1 Als het toestel ingeschakeld is voer dan de verbindingsprocedure uit op het BLUETOOTH geactiveerde apparaat 2 De i...

Страница 375: ...ukt en stopt wanneer de knop wordt losgelaten Stem af door op het display te kijken Terugkeren naar de automatische tuning modus Druk op de afstandsbediening opnieuw op MODE e zodat AUTO op het display verschijnt Het toestel tunet automatisch in op een radiozender Frequentie stapinstelling Noord Amerikaanse modellen Druk op de afstandsbediening op de knop om System Setup Miscellaneous Tuner FM Fre...

Страница 376: ...ogelijk niet weergegeven Naar de DAB digitale radio luisteren VSX S520D 1 Druk herhaaldelijk op TUNER op deafstandsbediening om DAB op het display te selecteren 0 De allereerste keer dat u DAB selecteert scant de Auto Tuning functie automatisch DAB band 3 voor de multiplexen zenders die beschikbaar zijn in uw gebied 0 Is het scanproces eenmaal voltooid dan wordt de eerste zender die gedetecteerd w...

Страница 377: ... afstandsbediening op de cursorknoppen a om een nummer tussen 1 en 40 te selecteren 4 Druk op de afstandsbediening opnieuw op Fav d om de zender te registreren Wanneer geregistreerd stopt het vooringestelde nummer met knipperen Een voorkeuzezender selecteren 1 Druk op TUNER op de afstandsbediening 2 Druk op de afstandsbediening op de cursorknoppen a om een voorkeuzenummer te selecteren Een voorkeu...

Страница 378: ...rocessen af die van invloed op de geluidskwaliteit kunnen zijn om een nog betrouwbaardere reproductie van het originele geluid te verkrijgen In dit geval wordt de luidsprekerkalibratie die met MCACC uitgevoerd wordt uitgeschakeld SURR knop c Door herhaaldelijk te drukken kunt u het audioformaat van de in te voeren signalen selecteren en tussen een verscheidenheid aan luistermodussen schakelen Sele...

Страница 379: ...Het Dolby Atmos audioformaat is geïmplementeerd in bioscoopzalen die uitgerust zijn met de meest recente voorzieningen en maakt een revolutionaire geluidservaring in home theaters mogelijk Dolby Atmos steunt niet op kanalen zoals bestaande surround systemen doen maar activeert de nauwkeurige plaatsing van geluidsobjecten die een onafhankelijke beweging in een driedimensionale ruimte hebben met zel...

Страница 380: ...gang gezet worden Drama Geschikt voor TV programma s die in een TV studio opgenomen zijn Deze modus verbetert de surroundeffecten op het gehele geluid om helderheid aan stemmen te geven en een realistisch akoestisch beeld te creëren DSD Modus geschikt voor afspelen van bronnen die met DSD opgenomen zijn 0 Dit toestel ondersteunt DSD signalen die ingevoerd worden via HDMI IN Echter afhankelijk van ...

Страница 381: ...maat is een combinatie van mixing methodologie gebaseerd op vroegere formaten die op kanalen gebaseerd waren en op object gebaseerde dynamische audiomixing en wordt gekenmerkt door de precieze positionering van geluiden en de capaciteit om beweging uit te drukken 0 Om de overdracht van dit audioformaat mogelijk te maken moet verbinding via de HDMI kabel gemaakt worden en moet de audio uitgang op d...

Страница 382: ...n kan wanneer Surround Virtual geselecteerd kan worden F S Surround Front Stage Surround niet geselecteerd worden Op firmware versie vóór ondersteuning van DTS X 0 U kunt Neo 6 Cinema en Neo 6 Music selecteren Op firmware versie na ondersteuning van DTS X 0 U kunt DTS X en DTS Neural X selecteren U kunt Neo 6 Cinema en Neo 6 Music na het updaten niet selecteren 1 Er moeten een middenluidspreker of...

Страница 383: ...eten surroundluidsprekers geïnstalleerd worden 36 Ingangsformaat Listening Mode Dolby Atmos Stereo Dolby Atmos Surround Virtual Classical Unplugged Ent Show Drama AdvancedGame Action Rock Pop Sports Ext Stereo Ext Mono F S Surround Ingangsformaat Listening Mode Multich PCM Stereo Multich PCM 1 Dolby Surround Surround Virtual DTS Neural X Classical 2 Unplugged 2 Ent Show 2 Drama 2 AdvancedGame 2 Ac...

Страница 384: ...formaat 2 kan is 2 Er moeten een middenluidspreker of surroundluidsprekers geïnstalleerd worden 3 Kan alleen geselecteerd worden als het ingangsformaat 2 kan is en een middenluidspreker of surroundluidsprekers geïnstalleerd zijn 4 Er moeten surroundluidsprekers geïnstalleerd worden 37 Ingangsformaat Listening Mode Dolby TrueHD Stereo Dolby TrueHD 1 2 Dolby Surround Surround Virtual PL Ⅱ Movie 3 PL...

Страница 385: ...ten een middenluidspreker of surroundluidsprekers geïnstalleerd worden 3 Kan alleen geselecteerd worden als het ingangsformaat 2 kan is en een middenluidspreker of surroundluidsprekers geïnstalleerd zijn 4 Er moeten surroundluidsprekers geïnstalleerd worden 38 Ingangsformaat Listening Mode DTS Express Stereo DTS Express 1 2 PL Ⅱ Movie 3 PL Ⅱ Music 3 PL Ⅱ Game 3 Neo 6 Cinema 3 Neo 6 Music 3 DTS Neu...

Страница 386: ...n surroundluidsprekers geïnstalleerd worden 1 Kan niet geselecteerd worden als het ingangsformaat 2 kan is 2 Er moeten een middenluidspreker of surroundluidsprekers geïnstalleerd worden 3 Kan alleen geselecteerd worden als het ingangsformaat 2 kan is en een middenluidspreker of surroundluidsprekers geïnstalleerd zijn 4 Er moeten surroundluidsprekers geïnstalleerd worden 39 N L Ingangsformaat Liste...

Страница 387: ...zal terug worden gezet naar de vorige status wanneer u de unit naar de stand by modus schakelt MCACC MCACC EQ Schakel de equalizer functie in of uit die de vervorming corrigeert die veroorzaakt wordt door de akoestische omgeving van de kamer 0 Deze instelling kan niet worden geselecteerd als de Full Auto MCACC instelling niet werd uitgevoerd 0 Het kan niet ingesteld worden als de luistermodus Pure...

Страница 388: ...odus Dolby Pro Logic Ⅱ Music afspeelt Stel een laag nummer in om het geluid naar voren te verplaatsen Stel een hoog nummer in om het geluid terug te verplaatsen Center Width Pas de breedte van het geluidsveld aan wanneer u in de luistermodus Dolby Pro Logic Ⅱ Music afspeelt Stel een laag nummer in om het geluid in het midden te concentreren Stel een hoog nummer in om het centrale geluid naar links...

Страница 389: ...erug te keren naar het vorige scherm druk op 4 Druk op om de instellingen te verlaten Input Output Assign TV Out OSD 1080p 4K Upscaling Als een TV gebruikt wordt die 4K ondersteunt kunnen de videosignalen die met 1080p ingevoerd worden voor de uitvoer automatisch tot 4K opgewaardeerd worden Off Standaardwaarde Wanneerdezefunctienietwordtgebruikt Auto Gebruik deze functie 0 Selecteer Off als uw TV ...

Страница 390: ...ngangskeuzeschakelaar Standaardwaarde is CD COAXIAL OPTICAL Ken een gewenste DIGITAL IN aansluiting toe aan de CD ingangskeuzeschakelaar Standaardwaarde is COAXIAL 43 N L GAME HDMI 1 HDCP 2 2 tot HDMI 4 HDCP 2 2 Ken een gewenste HDMI IN aansluiting toe aan de GAME ingangskeuzeschakelaar Als u geen aansluiting toewijst selecteert u Om een HDMI IN aansluiting te selecteren die al aan een andere inga...

Страница 391: ...en gewenste AUDIO IN aansluiting toe aan de CBL SAT ingangskeuzeschakelaar Standaardwaarde is AUDIO 2 GAME AUDIO 1 tot AUDIO 2 Ken een gewenste AUDIO IN aansluiting toe aan de GAME ingangskeuzeschakelaar Standaardwaarde is STRM BOX AUDIO 1 tot AUDIO 2 Ken een gewenste AUDIO IN aansluiting toe aan de STRM BOX ingangskeuzeschakelaar Standaardwaarde is CD AUDIO 1 tot AUDIO 2 Ken een gewenste AUDIO IN...

Страница 392: ...ntroleer dan of de instelling in Configuration Speaker Channels overeenkomt met het aantal verbonden kanalen Crossover Als er luidsprekers zijn die op Small gezet zijn stel dan de Hz in waaronder u wilt dat andere luidsprekers de lage tonen afspelen en stel ook de Hz in waaronder u wilt dat de LFE laagfrequentie effect de lage tonen afspeelt 0 De waarde van 50Hz tot 200Hz kan ingesteld worden Stan...

Страница 393: ... a Wisselt tussen hoofdletters en kleine letters Door op de afstandsbediening op MODE te drukken wordt ook tussen hoofdletters en kleine letters geschakeld Verplaatst de cursorknop naar de pijlrichting Verwijdert een teken aan de linkerkant van de cursor Voert een spatie in 0 Door op de afstandsbediening op CLEAR te drukken zullen alle ingevoerde karakters verwijderd worden 2 Selecteernahetinvoere...

Страница 394: ...optreedt wanneer u de instelling op On instelt stel deze dan in op Off 0 Wanneerueenniet CEC compatibelcomponentaansluit ofwanneeruniet zekerweetofhetcompatibelis steldeinstellingdaninop Off N L Audio Select ARC Bij het geven van voorrang aan ingangssignaal van ARC compatibele TV 0 De instelling kan alleenworden geselecteerd als Hardware HDMI Audio Return Channel op Auto gezet isenookde TV ingangg...

Страница 395: ...eze instelling corrigeert automatisch de desynchronisatie tussen de video en audiosignalen op basis van gegevens van de HDMI LipSync compatibele TV On Standaardwaarde Automatische correctie wordt ingeschakeld Off Automatische correctie wordt uitgeschakeld HDMI Standby Through Als dit op iets anders dan Off gezet is kunt u de video en audio van een met HDMI verbonden speler op de TV afspelen zelfs ...

Страница 396: ...tisch over te schakelen naar de HYBRID STANDBY modus waarin alleen het essentiële circuit in werking is 0 Deze instelling staat vast op Off als Network Bluetooth Bluetooth Auto Input Change P56 op Off gezet is Sleep Timer Stelt het toestel in staat automatisch de stand by modus binnen te gaan als de gespecificeerde tijd verstrijkt Selecteer uit 30 minutes 60 minutes en 90 minutes Off Standaardwaar...

Страница 397: ...en 0 Wacht even als Initial Setup niet kan worden geselecteerd Dit zal verschijnen als het netwerk wordt opgestart 50 Setup Parameter Vergrendel het instelmenu om de instellingen te beveiligen Locked Het menu is vergrendeld Unlocked Standaardwaarde Het menu is ontgrendeld N L Load Default Verricht een reset op het toestel om de instellingen weer op de fabrieksinstellingen te zetten Reset is voltoo...

Страница 398: ...e instellingen te verlaten Full Auto MCACC Plaats de bijgeleverde luidsprekerinstellingsmicrofoon in de luisterpositie en meet de testtonen die door de luidsprekers uitgezonden worden waarna het toestel automatisch voor iedere luidspreker het optimale volumeniveau de crossover frequentie en de afstand ten opzichte van de luisterpositie instelt Dit regelt tevens automatisch de equalizers voor de lu...

Страница 399: ...tisin SystemSetup Speaker Crossover P44 Subwoofer Na het selecteren van de luidsprekerfrequentie tussen 31 Hz en 250 Hz met de cursorknoppen regelt u het volume van die frequentie tussen 12 0 dB en 12 0 dB met Standaardwaarde is 0 0 dB 0 Dit kan niet geselecteerd worden als No ingesteld is in System Setup Speaker Configuration Subwoofer P44 Front Left Na het selecteren van de luidsprekerfrequentie...

Страница 400: ...ntal verbonden luidsprekerkanalen controleren en de grote en kleine instellingen die u voor de weergave van het lage bereik van iedere luidspreker uitgevoerd heeft Channel Level U kunt de instellingen van het uitgangsniveau van iedere luidspreker controleren Speaker Distance U kunt de afstand tussen iedere luidsprekers en de luisterpositie controleren Acoustic Calibration EQ U kunt de kalibratiewa...

Страница 401: ...laten Network 0 Als LAN met een DHCP geconfigureerd is zet DHCP dan op Enable om de instelling automatischteconfigureren OmvasteIP adressenaanallecomponententoetekennen dientu DHCP op Disable tezetteneneenadresaandit toesteltoetekennenin IPAddress entevens deinformatieintestellendiebetrekkingheeftopuwLAN zoalsSubnetMaskerenGateway Wi Fi Sluit de unit via een draadloze LAN router op het netwerk aan...

Страница 402: ...u instemtmethetPrivacybeleidmaar No voordezeinstellingselecteert de informatie niet verzameld zalworden Network Check U kunt de netwerkverbinding controleren Druk op ENTER wanneer Start wordt weergegeven 0 Wacht even als Network niet kan worden geselecteerd Dit zal verschijnen als het netwerk wordt opgestart 55 N L MAC Address Dit is het MAC adres van dit toestel Dezewaardeisspecifiekvoordecompone...

Страница 403: ...H geactiveerd apparaat verbinding met het toestel gemaakt wordt On Standaardwaarde De ingang wordt automatisch BT AUDIO wanneer een BLUETOOTH geactiveerd toestel is aangesloten Off De functie is uitgeschakeld 0 Als de ingang niet automatisch omgeschakeld wordt stel dan Off in en verander de ingang met de hand Auto Reconnect Deze functie maakt automatisch opnieuw verbinding met het laatst verbonden...

Страница 404: ...erbinden of een bediening uitvoeren op decomponentzoalsdestroomuitschakelen Verschaf u toegang tot dit toestel vanuit een PCof smartphone met gebruik van een applicatie Disclaimer Het programma en de bijbehorende online documentatiewordenubezorgdvoor gebruik opeigenrisico Wij zullen niet aansprakelijk worden gesteld en u heeft geen remedievoorschadevooraansprakenvanwelkeaardookmet betrekking tot h...

Страница 405: ...n gebruikt voor deze functie USB opslagapparaten met beveiligingsfunctieworden niet ondersteund USB hubs en USB apparaten met hub functieworden niet ondersteund Sluit nooit deze apparaten aan op het toestel 0 Wis alle gegevens die zijn opgeslagen op het USB opslagapparaat 0 Zet de controllercomponent PC enz die is aangesloten op het netwerk uit 0 Stop het afspelen van internet radio USB opslagappa...

Страница 406: ...pdate is voltooid 9 Verwijder het USB opslagapparaat van dit toestel 10 DrukopÍSTANDBY ONopdittoestelomhet toestelin de stand by modus te zetten Het proces is voltooid en uwfirmwareisgeüpdatetnaardelaatste versie 0 Gebruik niet Í op de afstandsbediening Als een foutbericht weergegeven wordt Wanneer zich een fout voordoet wordt Error op het display van het toestel getoond symboliseert een alfanumer...

Страница 407: ...lingen worden gereset Voeding Kan het toestel niet inschakelen 0 Zorgervoordathetnetsnoergoedisaangeslotenophetstopcontact 0 Trekdestekkervanhetnetsnoeruithetstopcontact wacht5 secondenoflangerensteekdestekkerweerinhetstopcontact Het toestel schakelt onverwacht uit 0 Het toestel schakelt automatisch naar stand by als de instelling System Setup Hardware Power Management Auto Standby in het Home wer...

Страница 408: ... van de verbindingsstatus van de luidspreker kunnen sommige modi niet worden geselecteerd P35 Er is geen geluid met Dolby TrueHD Dolby Atmos DTS HD Master Audio en DTS X 0 Als u geen formaten zoals Dolby TrueHD Dolby Atmos DTS HD Master Audio of DTS X kunt uitvoeren volgens het formaat van de bron probeer dan bij de instellingen van de Blu ray Disc speler BD video supplementary sound of hercoderen...

Страница 409: ...uur gebruikt die voor de TV gebruikt wordt BLUETOOTH functie 0 Probeer de stroom van het toestel in uit te schakelen en het BLUETOOTH geactiveerd apparaat in uit te schakelen Heropstarten van het BLUETOOTH geactiveerde apparaat kan effectief zijn 0 De BLUETOOTH geactiveerde apparaten moeten het A2DP profiel ondersteunen 0 Nabij componenten zoals een magnetron of draadloze telefoons die de radiogol...

Страница 410: ...worden onderbroken USB opslagapparaat USB geheugen wordt niet weergegeven 0 Controleer of het USB opslagapparaat of de USB kabel goed naar binnen gestoken zijn in de USB poort van het toestel 0 Sluit het USB opslagapparaat af van het toestel en probeer het vervolgens opnieuw te verbinden 0 De prestaties van de harde schijf die spanning ontvangt via de USB poort van het toestel wordt niet gegarande...

Страница 411: ...juiste richting zijn geplaatst 0 Plaats nieuwe batterijen Gebruik geen verschillende soorten batterijen of nieuwe en oude batterijen door elkaar 0 Zorg ervoor dat dit toestel niet wordt blootgesteld aan direct zonlicht of TL verlichting van het type inverter Verplaats indien nodig 0 Als dit toestel is geïnstalleerd in een rek of kast met gekleurde glazen deuren of als de deuren gesloten zijn zal d...

Страница 412: ...Ethernet LAN 10BASE T 100BASE TX Draadloze LAN IEEE 802 11 a b g n standaard Wi Fi standaard 5 GHz 2 4 GHz band BLUETOOTH Sectie Communicatie systeem BLUETOOTH Specificatie versie 4 1 LE Frequentieband 2 4 GHz band Modulatiemethode FHSS Freq Hopping Spread Spectrum Compatibele BLUETOOTH profielen A2DP 1 2 AVRCP 1 3 HOGP Host Client HOGP HID Apparaat Server HID Service HIDS Ondersteunde codecs SBC ...

Страница 413: ...irmware update Overige COAXIAL CD Analoog 1 BD DVD 2 CBL SAT PHONO toegewezen Audio uitgangen Analoog SUBWOOFER PRE OUT Luidspreker uitgangen FRONT L R CENTER SURROUND L R SUBWOOFER Hoofdtelefoon PHONES Voorkant Ø 3 5 mm Overige USB 1 Voorkant Ver 2 0 5 V 1 A Ethernet 1 Instellingsmicrofoon 1 66 N L ...

Страница 414: ...I Standby Through Zelfs als dit toestel op stand by staat worden de ingangssignalen afkomstig van de AV componenten naar de TV gezonden Deep Color Door apparaten te verbinden die Deep Color ondersteunen kunnen videosignalen die van die apparaten ingevoerd worden zelfs met meer kleuren op de TV weergegeven worden x v Color Deze technologie realiseert zelfs nog realistischer kleuren door het kleuren...

Страница 415: ...later The Bluetooth word mark and logos are registered trademarks owned by the Bluetooth SIG Inc PANDORA the PANDORA logo and the Pandora trade dress are trademarks or registered trademarks of Pandora Media Inc Used with permission BLACKFIRE This Mark Certifies that this product is compliant with the BLACKFIRE ALLIANCE Standard Please refer to WWW BLACKFIREALLIANCE COM for more information BLACKFI...

Страница 416: ...dom Tel 44 0 208 836 3612 France 6 Avenue de Marais F 95816 Argenteuil Cedex FRANCE Tel 33 0 969 368 050 Корпорация О энд Пи 2 3 12 Яэсу Чуо ку г Токио 104 0028 ЯПОНИЯ 2016 Onkyo Pioneer Corporation All rights reserved 2016 Onkyo Pioneer Corporation Tous droits de reproduction et de traduction réservés http www pioneer audiovisual com privacy Pioneer and MCACC logo are trademarks of Pioneer Corpor...

Страница 417: ...еаудиовидеоустройствсподдержкойHDMI 12 4 Подключение аудиоустройств 13 5 Подключение других кабелей 14 Начальная настройка Начальная настройка с использованием мастера автоматическогозапуска 15 Воспроизведение Воспроизведение с аудиовидеоустройства 18 Интернет радио 19 Spotify 21 Music Server 22 Устройство памяти USB 24 AirPlay 26 Воспроизведение через BLUETOOTH 27 Прослушивание радио FM DAB 28 Ре...

Страница 418: ...из за подключения оборудования изготовленного другими компаниями 0 При обновлении встроенного программного обеспечения могут быть добавлены новые функции а поставщики услуг могут прекратить их предоставление то есть некоторые сетевые службы и контент в будущем могут стать недоступными Кроме того доступные службы зависят от вашего места жительства 0 Технические характеристики и внешний вид изменяют...

Страница 419: ...здо PHONES подключение стереонаушников с миништекером Ш 3 5мм 7 Гнездо MCACC SETUP MIC для подключения микрофона для настройки АС из комплекта поставки 8 Порт USB порт подключения устройства памяти USB для воспроизведения сохраненных музыкальных файлов Также используется для подачи питания не более 5 В 1A на устройства USB по кабелюUSB 9 Индикатор FL OFF загорается при периодическом нажатии кнопки...

Страница 420: ...ода аудиосигналов с аудиовидеоустройства с помощью аналогового аудиокабеля 4 Разъем SIGNAL GND для подключения провода заземления электропроигрывателя 5 Гнезда DIGITAL IN OPTICAL COAXIAL для ввода цифровых аудиосигналов с телевизора или аудиовидеоустройства с помощью цифрового волоконно оптического кабеля или цифрового коаксиального кабеля 6 Шнур питания 7 Порт NETWORK для подключения к сети через...

Страница 421: ...аудиосигналов с аудиовидеоустройства с помощью аналогового аудиокабеля 4 Разъем SIGNAL GND для подключения провода заземления электропроигрывателя 5 Гнезда DIGITAL IN OPTICAL COAXIAL для ввода цифровых аудиосигналов с телевизора или аудиовидеоустройства с помощью цифрового волоконно оптического кабеля или цифрового коаксиального кабеля 6 Шнур питания 7 Порт NETWORK для подключения к сети через каб...

Страница 422: ...кость Эта кнопка также отменяет отключение звука 7 Кнопка временно отключает звук Нажмите ее еще раз чтобы отменить отключение звука 8 Кнопки режима прослушивания позволяют выбрать режим прослушивания P31 9 Кнопки воспроизведения запуск воспроизведения Music Server или USB 10 Кнопка используется для операций повтора или воспроизведения в случайном порядке с Music Server или USB Кнопка CLEAR удаляе...

Страница 423: ...спользовании положений NET или USB селектора входов указывая на доступность управления курсором с пульта ДУ например на экранах со списками дорожек 3 Горит при подключенныхнаушниках 4 Загорается при управлении селектором входов NET или USB в процессе воспроизведения композиций и в режиме паузы 5 Загорается в соответствии с типом входных цифровых аудиосигналов и режимом прослушивания 6 Загорается п...

Страница 424: ...я создают тыловое звуковое поле Сабвуфер воспроизводит звуки низкой частоты и создает глубокое звуковое поле Фронтальные АС следует расположить на уровне ушей слушателя а АС объемного звучания чуть выше ушей слушателя Центральную АС следует установить напротив места прослушивания Активный сабвуфер разместите спереди Если разместить его между центральной АС и фронтальной АС звучание будет естествен...

Страница 425: ...сунке Плотно скрутите провода динамика перед присоединением к зажимам Соедините однополярные к и к зажимы АС и аппарата для каждого канала При неправильном подключении качество низких частот будет плохим из за обратнойполярности Возможно подключение или активного сабвуфера или пассивного сабвуфера Для подключения активного сабвуфера соедините его кабелем для сабвуфера с гнездом SUBWOOFER PRE OUT Д...

Страница 426: ... обеспечения Другие функции При подключении убедитесь что оголенные провода АС не торчат из разъемов АС Если оголенные провода АС коснутся задней панели или провода и коснутся друг друга сработает цепь защиты P60 Настройка 0 Настройки для конфигурации подключенных АС необходимо выполнять в 1 Full Auto MCACC P16 в Initial Setup 10 R U ...

Страница 427: ...ыберите гнездо HDMI IN на телевизоре с поддержкой ARC Телевизор без поддержки ARC Для телевизора без поддержки ARC реверсивный звуковой канал выполните показанное на рисунке соединение a с помощью кабеля HDMI и соединение b с помощью цифрового оптического кабеля Настройка 0 Для использования функции ARC необходимо выполнить настройки Выберите Yes в 4 Audio Return Channel P17 в Initial Setup 0 Указ...

Страница 428: ...пользовать функцию HDMI CEC обеспечивающую связь с селектором входа и функцию HDMI Standby Through позволяющую воспроизводить на телевизоре видео и аудиосигналы с аудиовидеоустройств даже когда аппарат находится в ждущем режиме P67 0 Для воспроизведения видео 4K или 1080p используйте высокоскоростной кабель HDMI Настройка 0 Для использования функций HDMI CEC и HDMI Standby Through необходимо выпол...

Страница 429: ... головкой звукоснимателя типа MM к гнезду PHONO 0 Если электропроигрыватель оснащен встроенным эквалайзером подключите его к гнезду AUDIO IN отличающемуся от гнезда PHONO Кроме того если в электропроигрывателе используется головка звукоснимателя типа MC установите эквалайзер совместимый с головкой звукоснимателя типа MC между аппаратом и электропроигрывателем а затем подключите к любому гнезду AUD...

Страница 430: ...тной антенны FM обеспечивающее наилучший прием a Антенна DAB FM b Комнатная антенная FM c Кабель Ethernet d Шнур питания Подключение к сети Подключите аппарат к сети с помощью проводного локального соединения или Wi Fi беспроводного локального соединения Подключив аппарат к сети можно пользоваться такими сетевыми функциями как интернет радио Если подключение выполняется по проводной локальной сети...

Страница 431: ...я экран Initial Setup первоначальнойнастройки 4 В соответствии с инструкциями на экране выберите параметр с помощью кнопок курсора на пульте ДУ и для подтверждения выбора нажмитеENTER 0 Чтобы вернуться к предыдущему экрану нажмите Повторное выполнение Initial Setup если вы прерываете процедуру на полпути или желаете изменить параметр заданный во время Initial Setup нажмите на пульте ДУ выберите Mi...

Страница 432: ...выполнения функции Full Auto MCACC отсоедините микрофон настройки АС 2 Выберите конфигурациюподключенных АС Изображение на экране зависит от числа каналов указанного в Speaker Channels и его следует использовать в процессе настройки На этом экране также указывается наличие или отсутствие подключенногосабвуфера 0 Если вы подключили сабвуфер проверьте его питание и громкость Воспроизводимые сабвуфер...

Страница 433: ...ражается наэкране со списком SSID выберите Other кнопкой на пульте ДУ и нажмите ENTER затем выполните инструкции на экране Ввод на клавиатуре для переключения между верхним и нижним регистром выберите A a на экране и нажмите ENTER Чтобы выбрать скрытие пароля с помощью или его отображение открытым текстом нажмите Fav на пульте ДУ Чтобы удалить все введенные символы нажмитеCLEAR Политика конфиденци...

Страница 434: ...ляаппарата 2 Нажмите селектор входа a на пульте ДУ с таким же названием как и гнездо к которому подключен проигрыватель чтобы переключить вход Например нажмите BD DVD для воспроизведения с проигрывателя подключенного к гнезду BD DVD Для прослушивания звука с телевизора нажмите кнопку TV 0 Обратите внимание что когда работает функция связи CEC входной сигнал переключается автоматически при подключе...

Страница 435: ...в списке My Presets Remove from My Presets удаление радиостанции или передачи из My Presets в TuneIn Radio Pandora только для США Pandora свободная персонализированная радиовещательная интернет радиослужба предлагающая музыку которую вы знаете и любите После выбора Pandora выполните следующие действия 1 Используя кнопки a на пульте ДУ выберите I have a Pandora Account или I m new to Pandora и нажм...

Страница 436: ...ьную радиостанцию Сведения о меню Pandora в процессе прослушивания станции на экране отображаются значки Выбрав значок кнопками a на пульте ДУ и нажав ENTER b можно выполнить следующее мне нравится эта композиция выберите для этой композиции thumbs up и Pandora будет проигрывать подобную музыку мне не нравится эта композиция выберите для этой композиции thumbs down и Pandora исключит ее списка тек...

Страница 437: ... на Off в меню System Setup из Home вручную включите аппарат а затемнажмите NET на пульте ДУ 0 Более подробную информацию о настройках Spotify см на веб сайте www spotify com connect 0 Программное обеспечение Spotify регулируется лицензиями третьих лиц с которыми можно ознакомиться по следующему адресу www spotify com connect third party licenses Указанные ниже операции также можно выполнить с пом...

Страница 438: ...открыть диалоговое окно 0 Если потоковое вещание уже включено выберите More streaming options в меню Stream чтобы отобразить подключенные к сети проигрыватели затем перейдите к шагу 4 3 Нажмите Turn on media streaming чтобы отобразить подключенные к сети проигрыватели 4 Выберите аппарат в Media streaming options и убедитесь что для него установлено состояние Allow 5 Нажмите OK чтобы закрыть диалог...

Страница 439: ...ется на телевизоре подключенном к выходу HDMI аппарата 6 Отрегулируйте уровень звука с помощью регулятора в диалоговом окне Playto 0 Иногда уровни громкости отображаемые в диалоговом окне дистанционного воспроизведения и на дисплее аппарата могут отличаться Кроме того когда уровень громкости регулируется с аппарата эти изменения не отражаются в окне Playto 0Прииспользованиисетевойслужбыиливоспроиз...

Страница 440: ...а пульте ДУ На дисплее отображается список папок и музыкальных файлов на устройстве памяти USB Выберите папку с помощью кнопок курсора и для подтверждения выбора нажмите ENTER b 0 Чтобы вернуться к предыдущему экрану нажмите d 5 С помощью кнопок курсора на пульте ДУ выберите музыкальный файл и нажмите ENTER b для запуска воспроизведения 0 Порт USB аппарата соответствует стандарту USB 2 0 Для воспр...

Страница 441: ...USB аппарат поддерживает следующие форматы музыкальных файлов Обратите внимание что на этом аппарате невозможно воспроизведение звуковых файлов защищенных авторским правом MP3 mp3 MP3 0 Поддерживаемые форматы MPEG 1 MPEG 2 Audio Layer 3 0 Поддерживаемые частоты дискретизации 44 1 кГц 48 кГц 0 Поддерживаемые скорости передачи данных от 8 до 320 кбит с WMA wma WMA 0 Поддерживаемыечастотыдискретизаци...

Страница 442: ...ия Network Standby включена поэтому после выполнения указанных выше шагов 3 и 4 аппарат автоматически включается а входной сигнал переключается на NET Чтобы снизить количество потребляемой энергии в ждущем режиме нажмите кнопку на пульте ДУ затем в открывшемся меню Home установите System Setup Hardware Power Management Network Standby на Off 0 Вследствие особенностей беспроводной технологии AirPla...

Страница 443: ...к другому устройству с поддержкой функции BLUETOOTH нажмите и удерживайте кнопку пока не появится Now Pairing а затем выполните указанный выше шаг2 В аппарате можно зарегистрировать до восьми сопряженных устройств 0 Зона действия сети составляет 15 метров Обратите внимание что соединение со всеми устройствами с функцией BLUETOOTH не всегда гарантируется Воспроизведение 1 Когда аппарат включен выпо...

Страница 444: ...опки Настройтесь на станцию смотря на дисплей Возврат в режим автоматической настройки Нажмите кнопку MODE e на пульте ДУ еще раз чтобы на дисплее отобразилось AUTO Аппарат автоматически настроится на радиостанцию Настройка шага частоты модели для Северной Америки Нажмите кнопку на пульте ДУ чтобы выбрать System Setup Miscellaneous Tuner FM Frequency Step и выберите шаг частоты для своего региона ...

Страница 445: ...ормация может не отображаться в случае слабого сигнала станции Прослушивание цифрового радио DAB VSX S520D 1 Несколько раз нажмите кнопку TUNER на пультеДУ чтобы выбрать DAB на дисплее 0 При первом выборе DAB функция автоматической настройки сканирует диапазон 3 DAB на предмет мультиплексов т е радиостанций доступных в вашем регионе 0 После завершения процесса сканирования выбирается первая обнару...

Страница 446: ...ый номер мигает примерно 8 секунд выберите кнопками курсора a на пульте ДУ число в диапазоне от 1 до 40 4 Еще раз нажмите кнопку Fav d на пульте ДУ чтобы зарегистрировать радиостанцию После выполнения регистрации установленный номер перестает мигать Выбор зарегистрированной радиостанции 1 Нажмите TUNER на пульте ДУ 2 Выберите кнопками курсора a на пульте ДУ установленный номер Удаление зарегистрир...

Страница 447: ...ect после чего будет автоматически выбран наиболее подходящий для данного аудиоформата режим прослушивания Dolby Digital для многоканальных входных сигналов Stereo для двухканальных входных сигналов и т п и надисплее отобразится индикатор например Dolby D Подробную информацию о каждом режиме прослушивания см в разделе Эффекты режимов прослушивания P32 Информацию о режимах прослушивания доступных д...

Страница 448: ...нического образа и имитации естественной реверберации большого зала Dolby Atmos Данный режим обеспечивает точное воспроизведение звукового дизайна записанного в аудиоформате Dolby Atmos Аудиоформат Dolby Atmos используется в самых современных кинотеатрах и создает революционно новые ощущения от прослушивания в домашних кинотеатрах В отличие от существующих систем объемного звучания система Dolby A...

Страница 449: ...нного аудиоформата подключите кабель HDMI и настройте аудиовыход проигрывателя на вывод цифровогопотока Drama Подходит для просмотра телешоу записанного в телестудии Этот режим усиливает эффекты объемного звучания для всего звука обеспечивая четкость голосов и создавая реалистичный акустическийобраз DSD Режим подходит для воспроизведения источников записанных в формате DSD 0 Аппарат поддерживает в...

Страница 450: ...удиоформате DTS X Аудиоформат DTS X представляет собой комбинацию методики микширования построенной на предыдущих форматах на основе каналов и динамического микширования звуковых сигналов на основе объектов и отличается возможностями точного определения положения источников звука и передачи движения 0 Для передачи данного аудиоформата подключите кабель HDMI и настройте аудиовыход проигрывателя на ...

Страница 451: ... Ⅱ Кроме того если можно выбрать режим Surround Virtual режим F S Surround Front Stage Surround недоступен В версиях встроенного программного обеспечения до начала поддержки DTS X 0 Можно выбрать режимы Neo 6 Cinema и Neo 6 Music В версиях встроенного программного обеспечения после начала поддержкиDTS X 0 Можно выбрать режимы DTS X и DTS Neural X 1 Необходимо установить центральную АС или АС объем...

Страница 452: ...бъемного звучания 36 Формат входного сигнала Режим прослушивания Dolby Atmos Stereo Dolby Atmos Surround Virtual Classical Unplugged Ent Show Drama AdvancedGame Action Rock Pop Sports Ext Stereo Ext Mono F S Surround Формат входного сигнала Режим прослушивания Multich PCM Stereo Multich PCM 1 Dolby Surround Surround Virtual DTS Neural X Classical 2 Unplugged 2 Ent Show 2 Drama 2 AdvancedGame 2 Act...

Страница 453: ... ray формат Dolby D недоступен Вместо этого можно выбрать режим прослушивания Dolby D 4 Можно выбрать только при двухканальном входном сигнале и установленной центральной АС или АС объемного звучания 5 Необходимо установить АС объемного звучания 1 Невозможно выбрать если на вход поступает двухканальный сигнал 2 Необходимо установить центральную АС или АС объемного звучания 3 Можно выбрать только п...

Страница 454: ...нтральную АС или АС объемного звучания 3 Можно выбрать только при двухканальном входном сигнале и установленной центральной АС или АС объемного звучания 4 Необходимо установить АС объемного звучания 38 Формат входного сигнала Режим прослушивания DTS Express Stereo DTS Express 1 2 PL Ⅱ Movie 3 PL Ⅱ Music 3 PL Ⅱ Game 3 Neo 6 Cinema 3 Neo 6 Music 3 DTS Neural X Classical 4 Unplugged 4 Ent Show 4 Dram...

Страница 455: ... 4 Необходимо установить АС объемного звучания 1 Невозможно выбрать если на вход поступает двухканальный сигнал 2 Необходимо установить центральную АС или АС объемного звучания 3 Можно выбрать только при двухканальном входном сигнале и установленной центральной АС или АС объемного звучания 4 Необходимо установить АС объемного звучания 39 R U Формат входного сигнала Режим прослушивания DTS HD HR St...

Страница 456: ...аппарата в ждущий режим выполненная настройка сбросится в предыдущее состояние MCACC MCACC EQ Включение или выключение функции эквалайзера по коррекции искажений вызванных акустической средой помещения 0 Этот параметр невозможно выбрать если не выполнена настройка функции Full Auto MCACC 0 Эта настройка невозможна в режиме прослушивания Pure Direct Manual EQ Select Выберите Preset 1 Preset 3 настр...

Страница 457: ...ежиме прослушивания Dolby Pro Logic Ⅱ Music Установите небольшое значение для перемещения звука вперед Установите большое значение для перемещения звука назад Center Width Отрегулируйте ширину фронтального звукового поля в режиме прослушивания Dolby Pro Logic Ⅱ Music Установите небольшое значение для концентрации звука в центре Установите большое значение для распределения центрального звука влево...

Страница 458: ...параметров 0 Чтобы вернуться к предыдущему экрану нажмите 4 Для завершения настроек нажмите Input Output Assign TV Out OSD 1080p 4K Upscaling При использовании телевизора поддерживающего 4K вход видеосигнала формата 1080p автоматически повышается на 4K Off значениепоумолчанию еслиэтафункциянеиспользуется Auto функцияиспользуется 0 Если телевизор не поддерживает 4K выберите Off Super Resolution Есл...

Страница 459: ...тображается измените разрешение подключенного устройства Screen Saver Время запуска экранной заставки Выберите требуемое значение из вариантов 3 minutes значение по умолчанию 5 minutes 10 minutes и Off BD DVD COAXIAL OPTICAL назначьте желаемое гнездо DIGITAL IN селектору входа BD DVD Значение по умолчанию CBL SAT COAXIAL OPTICAL назначьте желаемое гнездо DIGITAL IN селектору входа CBL SAT Значение...

Страница 460: ...войства каждого канала путем выбора варианта Small или Large Small Значение по умолчанию для небольших АС низкочастотные свойства которых могут быть ограниченными Large для широкодиапазонных АС с хорошими низкочастотными свойствами 0 Если для параметра Configuration Subwoofer выбрано значение No параметр Front фиксируется на значении Large и через фронтальные АС выводится низкочастотный диапазон д...

Страница 461: ...ффектов LFE 0 Возможен выбор значений в диапазоне от 50Hz до 200Hz Значение по умолчанию 80Hz Double Bass Это возможно только в том случае если параметр Configuration Subwoofer имеет значение Yes а параметр Front Large Усиление низких частот путем их вывода от фронтальных АС левой правой и центральной на сабвуфер On выводимые низкие частоты усиливаются Off выводимые низкие частоты не усиливаются 0...

Страница 462: ...е курсора в направлении стрелки стирание символа слева откурсора ввод пробела 0 Для удаления всех введенных символов можнонажать кнопку CLEAR на пульте ДУ 2 После завершения ввода символов выберите OK кнопками курсора и нажмите ENTER Введенное имя сохранится R U Loudness Management При воспроизведении звука Dolby TrueHD включите функцию облегчения восприятия разговора поддерживающую громкость разг...

Страница 463: ...тельные эффекты выберите значение Off 0 При подключении устройства не отвечающего требованиям CEC а также если вы не уверены в его совместимости выберите значение Off R U Audio Select ARC приоритет отдается входному сигналу от телевизора с функцией ARC 0 Этот параметр можно выбрать только в случае когда параметр Hardware HDMI Audio Return Channel имеет значение Auto и выбран вход TV HDMI приоритет...

Страница 464: ...идео и аудиосигналами на основе данных поступающих из телевизора с функцией HDMI LipSync On Значение по умолчанию Автоматическая коррекция включена Off автоматическая коррекция выключена HDMI Standby Through Если этот параметр имеет любое другое значение отличное от Off видео и звук с подключенного HDMI проигрывателя будут воспроизводиться на телевизоре даже если аппарат находится в ждущем режиме ...

Страница 465: ...Выберите шаг частоты для своего региона Выберите 0 2 MHz Значение по умолчанию или 0 05 MHz 0 При изменении этого параметра всезарегистрированные радиостанцииудаляются R U Sleep Timer Обеспечивает автоматический переход в ждущий режим по истечении указанного времени Выберите из вариантов 30 minutes 60 minutes и 90minutes Off Значение по умолчанию функция автоматического перехода в ждущий режим вык...

Страница 466: ...а новое место жительства DAB DRC VSX S520D При помощи функции DRC динамическое управление диапазоном можно уменьшить динамический диапазон цифрового радио DAB с тем чтобы вы все еще могли слышать тихие фрагменты при низких уровнях громкости идеально для прослушивания радио поздним вечером когда вы не хотите никого беспокоить Off Значение по умолчанию функция DRC выключена Large большое уменьшение ...

Страница 467: ...C Поместите микрофон для настройки АС из комплекта поставки на место прослушивания измерьте тестовые тональные сигналы издаваемые АС и затем аппарат автоматически установитоптимальныйуровеньгромкостидлякаждойАС частотуразделенияирасстояние от места прослушивания При этом также автоматически корректируются настройки эквалайзеров АС и искажения вызванные акустической средой помещения См 1 Full Auto ...

Страница 468: ...имапрослушивания 0 Чтобы выполнить регулировки в процессе прослушивания аудиозаписи сначала нажмите кнопку на пульте ДУ и выберите в параметре AV Adjust MCACC Manual EQ Select P40 пресет который требуется изменить 52 R U Front Left После выбора частоты АС в диапазоне от 63 Hz до 16 kHz кнопками курсора п с отрегулируйте громкость для выбранной частоты в диапазоне от 12 0 dB до 12 0 dB с помощью кн...

Страница 469: ... Speaker Setting Имеется возможность проверки количества подключенных каналов АС значений Large и Small свойств низкочастотного воспроизведения для всех АС Channel Level Имеется возможность проверки выходного уровня для каждой АС Speaker Distance Имеется возможность проверки расстояния от каждой АС до места прослушивания Acoustic Calibration EQ Имеется возможность проверки калибровочных значений ч...

Страница 470: ...ойке сети используется DHCP установите для параметра DHCP значение Enable чтобы настроить параметр автоматически Чтобы назначить каждому компоненту фиксированные IP адреса для параметра DHCP необходимо установить значение Disable назначить адрес аппарата в поле IP Address и задать параметры вашей сети такие как маска подсети и шлюз Wi Fi Подключите аппарат к сети через беспроводной маршрутизатор O...

Страница 471: ...при согласии с политикой конфиденциальности и выборе No для этого параметра информация собираться не будет Network Check Проверка подключения к сети Когда на дисплее отображается Start нажмите кнопку ENTER 0 Если выбор параметра Network не доступен немного подождите Он отобразится после запуска сетевой функции 55 R U MAC Address Этот параметр задает MAC адрес аппарата Данное значение является спец...

Страница 472: ...ского переключения входа аппарата в режим BT AUDIO при подключении к аппарату с устройства с функцией BLUETOOTH On Значение по умолчанию при подключении устройства с функцией BLUETOOTH автоматически выбирается вход BT AUDIO Off функция выключена 0 Если вход не переключается автоматически установите значение Off и измените вход вручную Auto Reconnect Функция автоматического возобновления соединения...

Страница 473: ...динять и подсоединять какие либо кабели устройства памяти USB микрофон настройки АСи наушники а также выполнять какие либо операции с компонентами например выключениепитания получать доступ к аппарату с ПК илисмартфона через приложение Отказ от ответственности Программа и сопроводительная онлайновая документация предоставляются для использования вами на свой страх и риск Мы не несем ответственност...

Страница 474: ... в устройства чтения карт памятис интерфейсом USB Для этой цели не подходят устройства памяти USB с защитными функциями Для этой цели не подходят концентраторы USB или устройства с функциями концентраторов USB Не подключайте такие устройства к аппарату 0 Удалите все данные с устройства памяти USB 0 Выключите управляющее оборудование ПК и т п подключенное к сети 0 Остановите прослушивание интернет ...

Страница 475: ...ролируйте процесс по дисплею аппарата Экран телевизора останется черным до завершения обновления и повторного включения питания 0 В процессе обновления не выключайте питание и не отсоединяйте с последующим подключением устройство памяти USB 0 После завершения обновления отображается Если появляется сообщение об ошибке при возникновении ошибки на дисплее аппарата отображается Error Звездочка предст...

Страница 476: ... выберите System Setup Miscellaneous Load Default в менюHome и нажмите ENTER 2 Выберите Yes и нажмите ENTER 3 Аппарат переходит в режим ожидания и настройки сбрасываются Питание Аппарат не включается 0 Проверьте правильность присоединения шнура питания к розетке 0 Отсоедините шнур питания от розетки подождите не менее 5 секунд и присоедините его снова Аппарат самопроизвольно выключается 0 Аппарат ...

Страница 477: ...ие для аудиосигналов необходимо выполнить с помощью кабеля HDMI цифрового коаксиального кабеля или цифрового волоконно оптического кабеля На подключенном проигрывателе дисков Blu ray или другом устройстве должен быть выбран аудиовыход Bitstream output 0 Нажмите кнопку на пульте ДУ несколько раз чтобы перейти на аппарате к экрану проверки входногоформата Если описанные выше действия не помогли устр...

Страница 478: ...кнопку на пульте ДУ и измените значение параметра Other Sound Delay в меню AVAdjust Связанная работа Отсутствуетсвязаннаяработа с CEC совместимыми устройствами например телевизором 0 В меню Home аппарата выберите для параметра System Setup Hardware HDMI HDMI CEC значение On 0 Кроме того необходимо настроить связь HDMI на CEC совместимом устройстве См руководство по эксплуатации 0 При подключении п...

Страница 479: ...снова 0 Если какая то радиостанция оказывается недоступной проверьте правильно ли указан URL адрес и поддерживается ли аппаратом формат вещания радиостанции 0 При необходимости настройте прокси сервер если это требуется вашим интернет провайдером 0 Убедитесь что маршрутизатор и или модем поддерживается вашим интернет провайдером Отсутствует доступ к сетевому серверу 0 Аппарат необходимо подключить...

Страница 480: ...й сети точку доступа и аппарат в одной и той же комнате 0 Если рядом с аппаратом находится металлический предмет подключение к беспроводной сети может оказаться невозможным поскольку близость металла может влиять нарадиоволны 0 Если рядом с аппаратом используются другие устройства с беспроводным подключением к сети могут возникать различные неполадки такие как прерывания воспроизведения и связи Эт...

Страница 481: ...МГц Количество пресетов 40 Сеть Сеть Ethernet 10BASE T 100BASE TX Беспроводная сеть Стандарт IEEE 802 11 a b g n Стандарт Wi Fi Диапазон 5 ГГц 2 4 ГГц BLUETOOTH Система связи Версия BLUETOOTH 4 1 LE Диапазон частот Диапазон 2 4 ГГц Метод модуляции FHSS расширение спектра со скачкообразной перестройкой частоты Совместимые профили BLUETOOTH A2DP 1 2 AVRCP 1 3 HOGP Host клиент HOGP HID Device сервер ...

Страница 482: ...Express DSD PCM Максимальное разрешение видеосигнала 4k 60 Гц YCbCr 4 4 4 Аудиовходы Цифровые OPTICAL TV COAXIAL CD Аналоговые 1 BD DVD 2 CBL SAT PHONO выделенный Аудиовыходы Аналоговые SUBWOOFER PRE OUT Выходы на АС FRONT L R CENTER SURROUND L R SUBWOOFER Наушники PHONES передн Ш 3 5 mm Другие функции USB 1 передн верс 2 0 5 В 1 А Ethernet 1 Микрофон для настройки 1 66 R U ...

Страница 483: ...ndby Through Даже если аппарат находится в ждущем режиме входные сигналы с аудиовидеоустройств передаются на телевизор Deep Color При подключении устройств с функцией Deep Color входные видеосигналы от них могут выводиться на телевизор даже с еще более высоким разрешением цветов x v Color Данная технология обеспечивает дополнительную реалистичность цветов за счет расширенной цветовой гаммы 3D Функ...

Страница 484: ...with iTunes 10 2 2 or later The Bluetooth word mark and logos are registered trademarks owned by the Bluetooth SIG Inc PANDORA the PANDORA logo and the Pandora trade dress are trademarks or registered trademarks of Pandora Media Inc Used with permission BLACKFIRE This Mark Certifies that this product is compliant with the BLACKFIRE ALLIANCE Standard Please refer to WWW BLACKFIREALLIANCE COM for mo...

Страница 485: ...m Tel 44 0 208 836 3612 France 6 Avenue de Marais F 95816 Argenteuil Cedex FRANCE Tel 33 0 969 368 050 Корпорация О энд Пи 2 3 12 Яэсу Чуо ку г Токио 104 0028 ЯПОНИЯ 2016 Onkyo Pioneer Corporation All rights reserved 2016 Onkyo Pioneer Corporation Tous droits de reproduction et de traduction réservés http www pioneer audiovisual com privacy Pioneer and MCACC logo are trademarks of Pioneer Corporat...

Отзывы: