11
8
KRP-M01
1
2
3
4
A
B
C
D
E
F
1
2
3
4
On the MR
On the MR
On the Panel
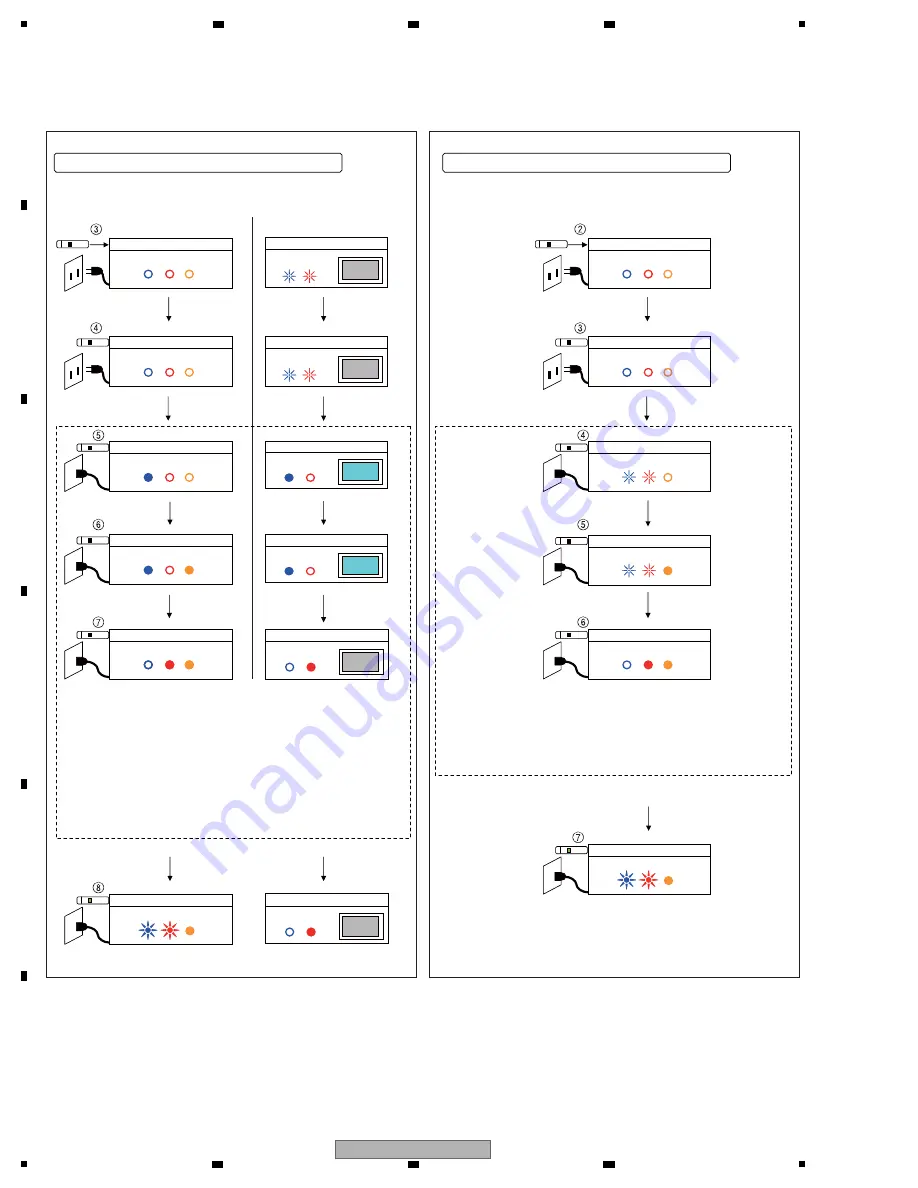
(2) Procedures for USB updatin
g
Connect a USB
memory device.
Plug in the AC
power cord.
Connect a USB
memory device.
Plug in the AC
power cord.
Note:
If you interrupt the updating procedure in this step, updating is not
started, and normal startup will begin.
N
E
V
ER use the remote control unit. (Especially DO
N
OT use the Power
key.)
[If you use any key on the remote control unit in Steps
5
to
7
]
If the unit does not shift to Step
8
, disconnect the USB memory device
then try the procedures from the beginning.
If the unit shifts to Step
8
, continue the updating procedures as described.
LED
MR: AC OFF
LED
MR: AC OFF
LED
MR: Power O
N
Screen (O
N
)
Panel: Screen O
N
LED
LED
MR: System Standby
Screen (OFF)
Panel: Screen OFF
LED
LED
MR: Performing USB updating
Panel: Screen OFF
LED
LED
MR: AC OFF (All LEDs unlit)
LED
MR:
N
o status change
LED
MR: System Standby
LED
MR: Performing USB updating
MR: Power O
N
LED
LED
[If you use any key on the remote control unit in Steps
4
to
6
]
If the unit does not shift to Step
7
, disconnect the USB memory device
then try the procedures from the beginning.
If the unit shifts to Step
7
, continue the updating procedures as described.
Panel: MR AC OFF
LED
Panel: MR AC OFF
LED
LED
MR: Orange LED O
N
Panel: Screen O
N
LED
MR: Orange LED O
N
LED
Connect a USB memory device, then plug in the AC power cord.
(2) Procedures for USB updatin
g
Connect a USB memory device, then plug in the AC power cord.
Содержание krp-m01
Страница 8: ...8 KRP M01 1 2 3 4 A B C D E F 1 2 3 4 2 3 PANEL FACILITIES ...
Страница 9: ...9 KRP M01 5 6 7 8 5 6 7 8 A B C D E F Remote Control Unit ...
Страница 14: ...14 KRP M01 1 2 3 4 A B C D E F 1 2 3 4 4 BLOCK DIAGRAM 4 1 OVERALL WIRING DIAGRAM ...
Страница 121: ...121 KRP M01 5 6 7 8 5 6 7 8 A B C D E F ...


