manualshive.com logo in svg
background image

OWNER'S MANUAL

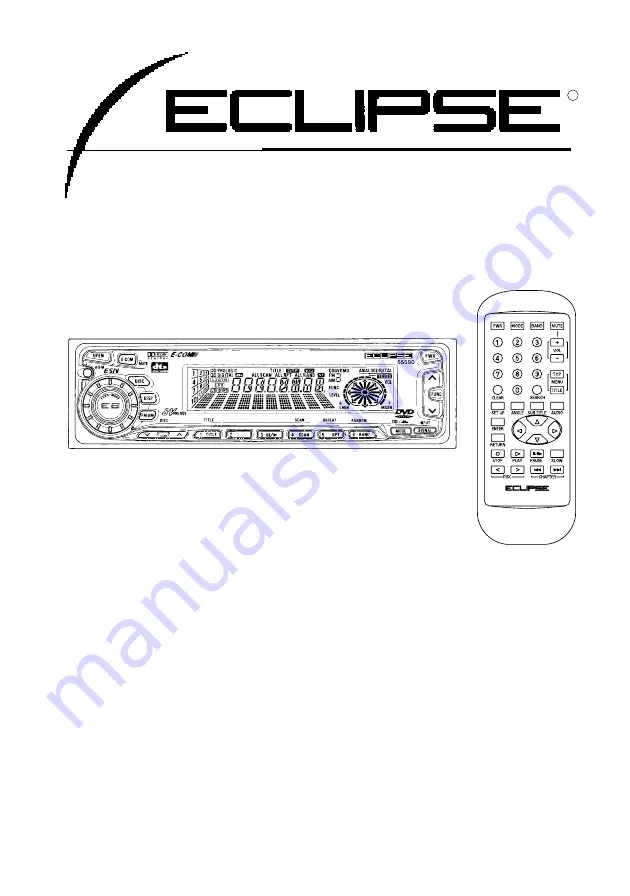
ESN E8 DVD TUNER WITH CDC/E-COM/DSP

CONTROL AND REMOTE

We appreciate your purchase of this tuner.

Please read through this manual for correct operation.

We suggest that after reading it you keep this manual

in a safe place for future reference.

MODEL

55090

by FUJITSU TEN

R

Содержание 55090

Страница 1: ...COM DSP CONTROL AND REMOTE We appreciate your purchase of this tuner Please read through this manual for correct operation We suggest that after reading it you keep this manual in a safe place for fut...

Страница 2: ...indicates a situation in which incorrect handling through disregard of a sign might result in personal injury or may result solely in damage to property Do not modify this system for use other than t...

Страница 3: ...functioning condition for instance when the audio does not play Doing so may result in an accident fire or electrical shock If an abnormal situation occurs such as foreign matter entering or liquid sp...

Страница 4: ...ties to prevent them from interfering with moving parts If they should entangle the steering wheel shift lever or brake pedal an accident may result Never supply power to another electrical appliance...

Страница 5: ...a fire or personal injury due to a battery explosion or chemical leaks Pay attention to the and polarity of the battery when installing them in the product Incorrect installation may cause personal i...

Страница 6: ...rwise it may become dislodged and cause an accident or injury If this product is not connected properly a short circuit fire or accident may occur When routing cables use care so that they do not cont...

Страница 7: ...ronic Serial Number 22 Basic operation 23 Turning the power on and off 23 Playing back discs 23 Listening to the tuner 24 Adjusting audio volume 25 Adjusting the angle of the front panel 25 Displaying...

Страница 8: ...ng a CD to pause play 56 Ejecting the disc 56 Creating a title for a CD 57 Changing a previously set title 59 Deleting a previously created title 60 Displaying CD text 60 How to operate the tuner 61 T...

Страница 9: ...to operate the receiver with an optional DIGITAL SOUND PROCESSOR DORBY DIGITAL DORBY PRO LOGIC DTS DECODER 83 How to operate the DSP functions 83 How to operate the EQ functions 85 Speaker settings 8...

Страница 10: ...inside a vehicle for long periods CDs cannot be played back until all sessions recorded on the CD R have been closed CD RW discs cannot be played back This player can only play CDs and DVDs bearing th...

Страница 11: ...ew water condensation may also settle on the deck When this occurs disc playback may become intermittent or impossible Dehumidify the air in the vehicle for a while before resuming playback Cleaning t...

Страница 12: ...ty sound performance Do not leave an ejected disc in the disc slot for very long the disc may warp Discs should be stored in their cases and kept away from high temperature and humidity Do not stick a...

Страница 13: ...ect disc and to improve sound quatily and antivibration effect but they can do more harm than good in regular uses The most common problems are Insert Eject related problems and No playback problems d...

Страница 14: ...scratch the recorded surface of the disc About irregularly shaped discs Specially shaped discs like heart shaped or octagonal discs cannot be played Do not attempt to play them even with an adapter s...

Страница 15: ...ace an object or rest your hands or the like on the front panel When inserting or removing CDs and DVDs be careful not to cause interference with the display or other parts ASM button DISC button PWR...

Страница 16: ...urned on 2 Press and hold button 1 then the FM AM button and hold both for more than one second A SEC message appears then in two seconds it will change to DISC The front panel opens the 55090 is now...

Страница 17: ...cel the Key CD 1 Turn the vehicle s ignition on Press the PWR button or FM AM button to activate the tuner mode The tuner is now turned on 2 Press and hold button 1 then the FM AM button and hold both...

Страница 18: ...inserted in order to return the unit to normal operation Inserting a CD other than the Key CD will not cancel the protection Instead the display will show ERR for two seconds then the normal CD playb...

Страница 19: ...s turned on after disconnecting the battery power a SEC message will appear for two seconds Thereafter the message changes to DISC and the 55090 is ready to accept your Key CD into the slot 2 Insert y...

Страница 20: ...empt the display reads CALL800 and the security indicator lights steadily Number of errors Numbers indicated at _ show the number of errors that occurred l Note l If after 5 tries the correct Key CD i...

Страница 21: ...it is protected However if you do not want this visible deterrent it may be turned off 1 With the tuner mode ON press the DISP button then FM AM button and hold both for more than one second 2 IND FLA...

Страница 22: ...n to activate the tuner mode 2 Press button 4 then the FM AM button and hold both for more than one second ESN appears on the display followed by an eight digit number this number is your electronic s...

Страница 23: ...ample a European car keep the PWR button depessed for more than two seconds You may also press the FM AM button to turn on the power When there is a disc loaded you may also press the DISC button to t...

Страница 24: ...tune to a station A tap on either the or button for less than one second will enable manual station tuning Hold one button down for more than two seconds to start the automatic station search button S...

Страница 25: ...adjustment After the angle has been adjusted the front panel will then open fully if the OPEN button is pressed for less than one second and will close fully if the OPEN button is pressed again for mo...

Страница 26: ...procedure 1 Press and release the FUNC button 2 Press and hold button 6 until the BEEP OFF display appears on the screen Pressing the button will switch modes between the BEEP ON and the BEEP OFF 3 P...

Страница 27: ...less than one second Pressing the button repeatedly will allow you to control adjustments of BASS low frequencies MID middle frequencies TREB high frequencies FAD front rear speaker balance BAL left r...

Страница 28: ...the screen To disable the loudness feature repeat the above procedure to display the LOUD OFF indication t Switching the display 1 Press the DISP button for less than one second Changes the mode as f...

Страница 29: ...the DISP button for more than one second while displaying spectrum analyzer mode Each press of the button changes the sensitivity of the spectrum analyzer t Changing the eye contact analyzer display...

Страница 30: ...FUNC button Pressing the button will cancel Function mode t Disabling the Tone Control Cancel feature 1 Press the FUNC button 2 Press the ASM button to switch on or off 3 Press the FUNC button Pressi...

Страница 31: ...rations In addition if a appears on the screen during an operation it means that the player or the disc has caused the operation to be canceled and so that operation cannot be carried out 1 2 3 4 5 7...

Страница 32: ...he DVD pictures will then be played back n Changing to DVD mode 1 Press the MODE button to change to disc mode The mode changes between tuner and disc modes each time the button is pressed 2 Press the...

Страница 33: ...n pressed and released immediately the picture moves to the beginning of the current chapter When pressed and held for one second or more the pictures are rewound The contents of DVDs are separated in...

Страница 34: ...button The pictures for the number which was entered will then start playing back If you make a mistake when entering the number you can press the CLEAR button to clear the entry n Repeat playback REP...

Страница 35: ...pause If you press the PAUSE button while the picture is paused the picture will play back one frame at a time To return to normal playback press the PLAY button n Stopping playback 1 Press the STOP b...

Страница 36: ...if using a DVD disc which has a menu recorded 1 Press the TOP button The DVD menu will turn on and off each time the button is pressed 2 Use the cursor buttons to select an item and then press the ENT...

Страница 37: ...h has a title menu recorded 1 Press the TITLE button The title menu will turn on and off each time the button is pressed TITLE MENU ON OFF will appear in the display 2 Use the cursor buttons to select...

Страница 38: ...ecting different subtitle languages If the SUB TITLE button is pressed during DVD Video playback the subtitle languages which are recorded on the DVD disc can be displayed on the screen if using a DVD...

Страница 39: ...angles recorded 1 Press the ANGLE button The multiplex angle changes each time the button is pressed If a appears on the screen during an operation it means that the player or the disc has caused the...

Страница 40: ...e used for audio tracks subtitles and menu displays 1 Use the and cursor buttons on the remote control to select AUDIO SUBTITLE or MENU LANGUAGE and then press the ENTER button 2 Use the and cursor bu...

Страница 41: ...pear t Display size setting 1 Use the and cursor buttons on the remote control to select TV SCREEN and then press the ENTER button 2 Use the and cursor buttons on the remote control to select the disp...

Страница 42: ...lect PARENTAL LOCK CHANGE and enter the new password If you forget the password press the RESET button on the player refer to page 93 to reset the password to 0000 Press the CLEAR button to clear the...

Страница 43: ...ogram to be played back 4 Press the SET UP button DVD setting mode will be cleared t Multiplex angle indicator display 1 Use the and cursor buttons on the remote control to select ANGLE INDICATOR and...

Страница 44: ...be played back which are different for each country The region number number for regions where the disc can be played back is set to 1 or ALL on this player Check the region number for the disc you a...

Страница 45: ...signals will be output as down mixed signals In order to play sources such as 5 1 channel sources in their proper format such as 5 1 channel the 39011 digital surround unit sold separately is require...

Страница 46: ...from a rear view which are recorded on the DVD video disc Indicates the number of audio tracks Use the AUDIO button on the remote control to select the desired audio track from the track which are rec...

Страница 47: ...orbidden by law This player is manufactured under license from Dolby Laboratories Licensing Corporation Manufactured under licence from Dolby Laboratories Dolby and the double D symbol are trademarks...

Страница 48: ...lied vary depending on the type of DVD video so that the disc may be completely unplayable or scenes with excessive violence for example may be cut or other scene may be inserted in their place automa...

Страница 49: ...o a disc is not included in the region numbers which have been programmed into the DVD player then that disc cannot be played back on that DVD player Refer to page 45 for further details on region num...

Страница 50: ...rts Group and is an international standard for video compression Some DVDs use this format for digital compression of audio tracks also Linear PCM PCM is an abbreviation for Pulse Code Modulation and...

Страница 51: ...0 6 0 1 1 3 0 1 1 8 0 1 1 9 0 1 2 5 0 1 2 6 0 2 0 1 0 2 0 5 0 2 0 7 0 2 0 8 0 2 0 9 0 2 1 4 0 2 1 5 0 2 1 8 0 3 0 1 0 3 1 5 0 3 1 9 0 3 2 5 0 4 0 1 0 4 2 6 0 5 1 5 Estonian Basque Persian Finnish Fij...

Страница 52: ...1 4 0 1 1 4 0 5 1 4 1 5 1 5 0 3 1 5 1 3 1 5 1 8 1 6 0 1 1 6 1 2 1 6 1 9 1 6 2 0 1 7 2 1 1 8 1 3 1 8 1 4 1 8 1 5 1 8 2 3 1 9 0 1 1 9 0 4 1 9 0 7 1 9 0 8 1 9 0 9 Slovak Slovenian Samoan Shona Somali Al...

Страница 53: ...ISC button This turns on the disc mode and starts CD play If an external CD changer is connected each additional tap of the button will switch modes from DVD CD player CD changer 1 CD changer 2 A chan...

Страница 54: ...olding the button will fast forward through a track while pressing the button will fast reverse n Playing the beginning of tracks SCAN 1 Press button 4 SCAN Tapping the button causes the player to mov...

Страница 55: ...to play the tracks in random order To cancel press button 6 again Occasionally the same track happens to be played selected two or more times in a row this is normal operation and is no sign of a pro...

Страница 56: ...and press the OPEN button The front panel closes l Caution l If the front panel is closed while the ejected disc is still in the slot the disc may get scratched Be sure to close the front panel after...

Страница 57: ...1 TITLE The disc title creation mode starts 2 Press button 2 to select the character type Pressing the button will switch types from ABC 123 upper case and alphanumeric characters to abc 123 lower cas...

Страница 58: ...entered repeat steps 2 and 3 A maximum of 10 characters may be entered per title A maximum of 30 titles may be stored 5 Press button 1 The CD title is now memorized Symbol Initial value Up direction...

Страница 59: ...he position in the title for inserting or changing characters Button 3 Moves the cursor to the left Button 4 Advances the cursor to the right 3 Press either button 5 or 6 to make changes in the charac...

Страница 60: ...Press either the button Use these buttons to select the title to be deleted 3 Hold the ASM button down for more than two seconds The title has now been deleted To cancel the mode press button 1 ESC n...

Отзывы: