120
KRP-M01
1
2
3
4
A
B
C
D
E
F
1
2
3
4
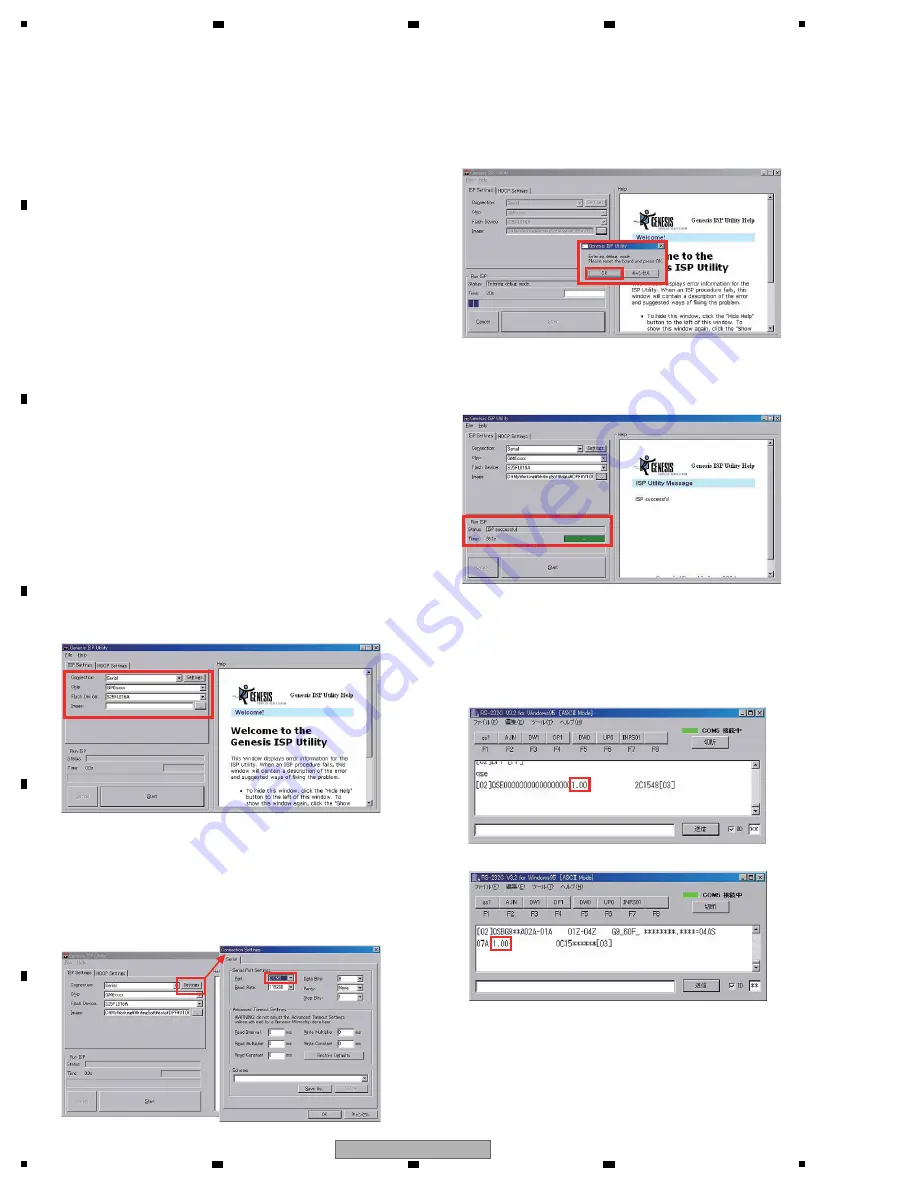
8.3 HOW TO UPDATE DISPLAY PORT FIRMWARE
1. Preparation of Tools
1. Activate the “ISPUtility xxxxxxxx.exe” file to install the ISP
Utility.
On each screen, select “
N
ext” until the installation wizard
is
finished.
2. Activate the “CGProbe Redistributable xxxx.exe” file.
On each screen, select “
N
ext” until the wizard is finished.
3. Place the following files in the designated paths:
chip.xml
C:¥Program Files¥Genesis Microchip¥ISP Utility¥
SAFELite-ISP_S25FL016A.hex
C:¥Program Files¥Genesis Microchip¥ISP Utility¥Isp¥safe-lite
Note:
If you changed the program installation path, the
above-mentioned paths may be different.
2. Updatin
g
1. Connect the PC with the Media Receiver (MR) or Panel
(Display), using an RS-232C straight cable.
2. Set the connected MR or Panel to Standby mode.
3. Disconnect the DP cable.
4. Start up the program for sending RS-232C commands:
Baud rate: 9600
COM
port:
Select, according to the environment of the PC.
5. Send the “UF
W
” command. Check that the red and blue
LEDs
flash.
6. Issue a command corresponding to the firmware to be
updated.
[In a case where the DP firmware on the MR is updated]
Issue the “DPT” command.
[In a case where the DP firmware on the display is updated]
Issue the “DPR” command.
7.
W
ith the program for sending RS-232C commands,
terminate the connection.
8. Start up the ISP Utility program and set up the ISP
Settings
screen.
Connection: Serial
Chip: GM6xxxx
Flash Device: S25FL016A
Image: Select the “.hex” file to write to.
W
hen “Serial” is selected in the “Connection” box, selection
of Com ports is enabled. Click on “Settings” then select a
Com port, according to the environment of the PC.
9. After all necessary settings are completed, click on
Start to start updating.
10.
W
hen the following message is displayed, click on OK.
11. The current status is displayed in the “Status” box.
W
hen “ISP Successful” is displayed, updating is
completed
successfully.
12. Terminate the utility program and turn the MR or display
off then back on again.
W
ith the program for sending RS-232C commands,
reestablish the connection. Then send the command for
version
check.
13. Check that the version has been properly updated.
This completes the updating procedures.
Command for version check
W
ith the MR: QSE
Command for version check with the display: QSB
Содержание krp-m01
Страница 8: ...8 KRP M01 1 2 3 4 A B C D E F 1 2 3 4 2 3 PANEL FACILITIES ...
Страница 9: ...9 KRP M01 5 6 7 8 5 6 7 8 A B C D E F Remote Control Unit ...
Страница 14: ...14 KRP M01 1 2 3 4 A B C D E F 1 2 3 4 4 BLOCK DIAGRAM 4 1 OVERALL WIRING DIAGRAM ...
Страница 121: ...121 KRP M01 5 6 7 8 5 6 7 8 A B C D E F ...


