


VHS playback and recording
08
71
En
Chapter 8
VHS playback and recording
About VHS tape
Recording and playback is possible with VHS and HQ
VHS tape.
Please use only video tapes that bear the following logo:
NTSC and SECAM tape playback
PAL, NTSC, SECAM and MESECAM tape playback is
possible; however, please note the following:
You can specify the color standard as
Auto
,
PAL
or
SECAM
. Generally, the color standard should be set to
Auto
(see
Input Colour System
on page 111 and
Colour
system settings for VHS
on page 116).
When using a pre-recorded NTSC video tape, the
connected TV set must be compatible with 60 Hz vertical
frequency (sometimes this feature is known as
‘PAL 60 Hz’), otherwise the picture will appear to roll
vertically. NTSC tapes recorded in EP mode will not play
on this unit.
Note that tapes recorded with a mix of PAL, NTSC and
SECAM programs will not play correctly on this unit.
Recording modes and maximum recording
times
We recommend using E180 tapes or shorter.
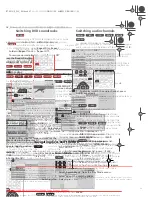
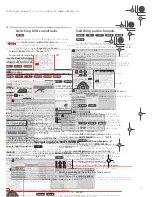
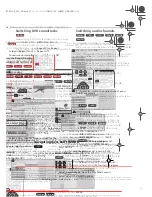
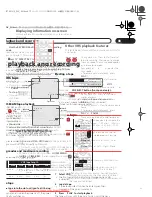
Loading a tape
•
Push the tape into the slot until you feel it being
pulled in.
• If you push a tape in when the power is off, the power
automatically switches on.
Ejecting a tape
•
Press the
VHS EJECT button (front panel only).
Once the tape has been ejected, remove it from the tape
loading slot.
• If the tape should get caught in the mechanism and
fail to eject, please take the unit to your nearest
Pioneer authorized service center.
Playing a tape
1
Select VHS.
• The front panel VHS indicator lights green when VHS
is selected.
2
Load a tape.
• If the erase-protect tab has been removed then
playback will begin automatically.
3
Press
PLAY to start playback.
The tape will play until the end, at which point the deck
will automatically rewind the tape back to the beginning
and eject the tape.
• To pause playback, press
PAUSE
.
• To stop playback before the end of the tape, press
STOP
.
Recording
mode
VHS tape length
E240
E180
E90
E60
E30
SP (Standard)
4 hrs.
3 hrs.
1 hr.
30 mins.
1 hr.
30 mins.
LP (2x)
8 hrs.
6 hrs.
3 hrs.
2 hrs.
1 hr.
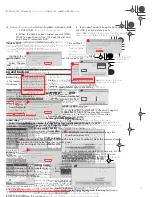
Label towards you
Erase-protect tab
on the left
TRK
STOP
PAUSE
PLAY
VHS
DVRRT601HS_WV_EN.book 71 ページ 2005年8月3日 水曜日 午後3時31分
Downloaded From DvDPlayer-Manual.com Pioneer Manuals
73
En
1
If necessary, load tape for recording.
2
Use the REC MODE button to select the recording
mode.
See page
Recording modes and maximum recording
times
on page 71 for more on this.
3
Press TV DIRECT REC to start recording.
If you want to set a recording time, press the
REC
button repeatedly. The recording time increases in 30
minute increments, up to a maximum of six hours. You
can see the recording time on-screen and in the front
panel display. When the recording ends, the recorder
automatically switches into standby if no other operation
is being performed.
• To cancel the set recording time, press
REC
.
• If you want to pause recording at any time, press
PAUSE
. Press again to restart the recording.
4
To stop the recording, press
STOP REC.
• If you set the recording time in step
3
, you can still
stop the recording anytime by pressing
STOP REC
.
• Recording will stop automatically at the end of the
tape.
Tip
• You can press
TV DIRECT REC
while the recorder is
in standby to switch on and immediately start
recording.
• Please note that you can’t record from another
component (VCR, etc.) that is connected by a SCART
cable to the
AV2/(INPUT 1/DECODER)
connector
using the TV Direct Recording feature.
Other VHS playback features
The table below shows additional playback controls for
VHS tapes.
Note
• There is no sound when scanning or during slow
motion playback.
• You may notice picture noise when scanning or
during slow motion playback. This is normal.
• After about 5 min. of scanning, paused playback,
slow motion playback or frame advance, normal
playback will resume in order to avoid undue wear on
the tape and tape head.
During playback –
Press to start reverse/
forward scanning. Press again to change
the scan speed. The scan speed depends
on the recording mode.
Each press of
or
alternates the
scan speeds.
• To resume normal playback, press
PLAY
.
While stopped –
Press to start reverse/
forward winding.
• To stop winding, press
STOP
.
• To start scanning, press and hold
or
.
During playback –
Press to start slow
motion playback.
• To resume normal playback, press
PLAY
or
.
While play-paused
– Press to advance one
frame.
• To resume normal playback, press
PLAY
or
PAUSE
.
Press during playback to skip forward on
the tape. Press repeatedly to increase the
skip time: 30 sec. – 1:00 min. – 1:30 min. –
2:00 min. – 3:00 min. – 5:00 min. – 10:00
min.
Press to switch the audio channel for
bilingual and stereo programs during
playback.
Bilingual
: Main & Sub – Main – Sub –
Main
Stereo
: Stereo – Left – Right – Mono
REV SCAN
FWD SCAN
STEP/SLOW
SKIP
AUDIO
DVRRT601HS_WV_EN.book 73 ページ 2005年8月3日 水曜日 午後3時31分
Downloaded From DvDPlayer-Manual.com Pioneer Manuals
75
En
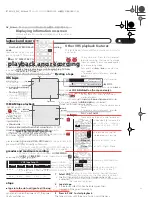
Displaying information on-screen
Various information can be displayed on-screen when in
VHS mode.
•
Press DISPLAY to display information on-screen
while a tape is playing, or while watching TV from
the built-in TV tuner.
Notes on playback/recording
• You can't record to VHS while playing from HDD or
DVD.
• It is not possible to set timer recordings to record to
VHS.
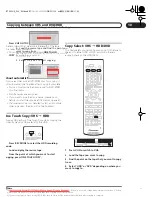
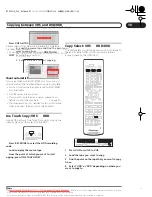
• For how to copy from HDD or DVD to VHS see page
Copying between VHS and DVD/HDD
on page 86.
• While in VHS mode, if you press
HOME MENU
,
GUIDE
or
TIMER REC
, the recorder will automatically
switch to HDD.
• To protect a recording on tape from accidental
erasure, use a screwdriver or similar to break off the
erase-protect tab. If you want to record over the tape
at a later date, cover the hole with Scotch tape.
DISPLAY
Pr 1
8:47 MON
00 : 00 : 00 SP
NICAM ST
Tape counter
Time
Day
Audio type
(Stereo/Bilingual)
Recording mode
(SP/LP)
Channel preset
8:30 MON
00 : 15 : 12 SP
HI-FI
Audio type
(HI-FI/Stereo)
Tape
Playback
operation
DVRRT601HS_WV_EN.book 75 ページ 2005年8月3日 水曜日 午後3時31分
Downloaded From DvDPlayer-Manual.com Pioneer Manuals
Содержание DVR-RT604H-S
Страница 6: ......
Страница 8: ......
Страница 10: ......
Страница 12: ......
Страница 14: ......
Страница 16: ......
Страница 18: ......
Страница 20: ......
Страница 22: ......
Страница 24: ......
Страница 26: ......
Страница 28: ......
Страница 30: ......
Страница 32: ......
Страница 34: ......
Страница 36: ......
Страница 38: ......
Страница 40: ......
Страница 42: ......
Страница 44: ......
Страница 48: ......
Страница 50: ......
Страница 52: ......
Страница 54: ......
Страница 56: ......
Страница 58: ......
Страница 60: ......
Страница 62: ......
Страница 64: ......
Страница 66: ......
Страница 68: ......
Страница 70: ......
Страница 72: ......
Страница 74: ......
Страница 76: ......
Страница 78: ......
Страница 80: ......
Страница 82: ......
Страница 84: ......
Страница 86: ......
Страница 88: ......
Страница 90: ......
Страница 92: ......
Страница 94: ......
Страница 96: ......
Страница 98: ......
Страница 100: ......
Страница 102: ......
Страница 104: ......
Страница 106: ......
Страница 108: ......
Страница 110: ......
Страница 112: ......
Страница 114: ......
Страница 116: ......
Страница 118: ......
Страница 120: ......
Страница 122: ......
Страница 124: ......
Страница 126: ......
Страница 128: ......
Страница 130: ......
Страница 132: ......