


En
10
Operation
Wait until all connections between devices have been completed
before connecting the AC adapter.
Be sure to turn off the power and unplug the AC adapter from the
power outlet before making or changing connections between
devices.
Refer to the operating instructions for the component to be
connected.
Only use the AC adapter included with this unit.
Power is supplied to this unit by the AC adapter.
Connect this unit and the computer directly using the included USB
cable.
A USB hub cannot be used.
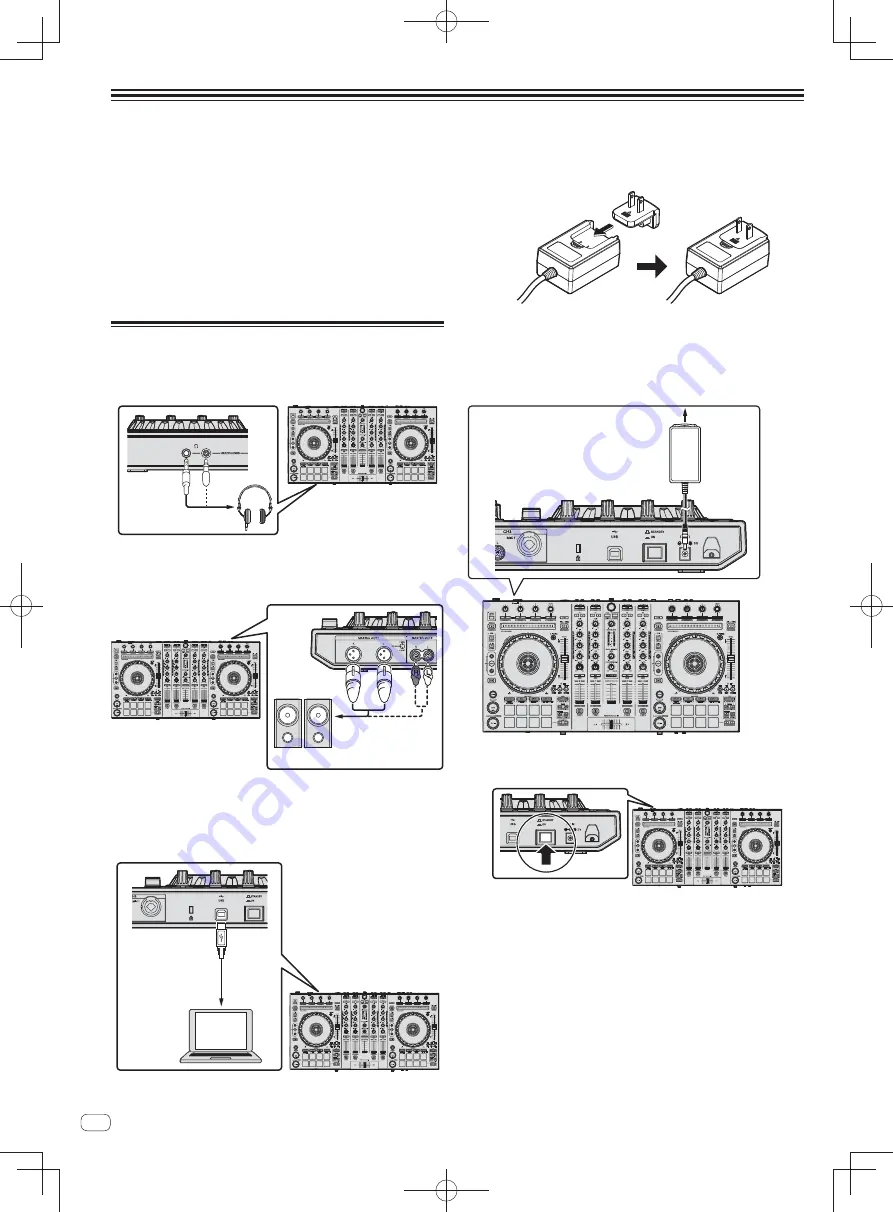
Connections
1 Connect headphones to one of the [PHONES]
terminals.
CUE LOOP
SAVED LOOP
SLICER LOOP
VELOCITY SAMPLER
SLOT
SAVE
START
FLIP
REC
LOOP
ON/OFF
4 BEAT
CUE LOOP
SAVED LOOP
SLICER LOOP
VELOCITY SAMPLER
4 BEAT
SLOT
SAVE
START
FLIP
REC
LOOP
ON/OFF
INST. DOUBLES
INST. DOUBLES
INST. DOUBLES
INST. DOUBLES
SYNC OFF
SYNC OFF
2 Connect powered speakers, a power amplifier,
components, etc., to the [MASTER OUT 1] or [MASTER
OUT 2] terminals.
CUE LOOP
SAVED LOOP
SLICER LOOP
VELOCITY SAMPLER
SLOT
SAVE
START
FLIP
REC
LOOP
ON/OFF
4 BEAT
CUE LOOP
SAVED LOOP
SLICER LOOP
VELOCITY SAMPLER
4 BEAT
SLOT
SAVE
START
FLIP
REC
LOOP
ON/OFF
INST. DOUBLES
INST. DOUBLES
INST. DOUBLES
INST. DOUBLES
SYNC OFF
SYNC OFF
Powered speakers, etc.
To output the sound from the [
BOOTH OUT
] terminals, connect
speakers or other devices to the [
BOOTH OUT
] terminals.
For details on connecting the input/output terminals, see the
Operating Instructions.
3 Connect this unit to your computer via a USB cable.
CUE LOOP
SAVED LOOP
SLICER LOOP
VELOCITY SAMPLER
SLOT
SAVE
START
FLIP
REC
LOOP
ON/OFF
4 BEAT
CUE LOOP
SAVED LOOP
SLICER LOOP
VELOCITY SAMPLER
4 BEAT
SLOT
SAVE
START
FLIP
REC
LOOP
ON/OFF
INST. DOUBLES
INST. DOUBLES
INST. DOUBLES
INST. DOUBLES
SYNC OFF
SYNC OFF
USB cable
(included)
4 Turn on the computer’s power.
5 Connect the power plug to the AC adapter.
Slide the power plug into the AC adapter’s guide rails as shown on the
diagram and press in until a click is heard.
For detailed cautions on the AC adapter, see “
About the AC
adapter
” (p. 13 ).
The shape of the plug differs according to the region in which the
unit is sold.
6 Connect the AC adapter.
CUE LOOP
SAVED LOOP
SLICER LOOP
VELOCITY SAMPLER
SLOT
SAVE
START
FLIP
REC
LOOP
ON/OFF
4 BEAT
CUE LOOP
SAVED LOOP
SLICER LOOP
VELOCITY SAMPLER
4 BEAT
SLOT
SAVE
START
FLIP
REC
LOOP
ON/OFF
INST. DOUBLES
INST. DOUBLES
INST. DOUBLES
INST. DOUBLES
SYNC OFF
SYNC OFF
AC adapter
(included)
To power outlet
7 Press the [STANDBY/ON] switch on this unit’s rear
panel to turn this unit’s power on.
CUE LOOP
SAVED LOOP
SLICER LOOP
VELOCITY SAMPLER
SLOT
SAVE
START
FLIP
REC
LOOP
ON/OFF
4 BEAT
CUE LOOP
SAVED LOOP
SLICER LOOP
VELOCITY SAMPLER
4 BEAT
SLOT
SAVE
START
FLIP
REC
LOOP
ON/OFF
INST. DOUBLES
INST. DOUBLES
INST. DOUBLES
INST. DOUBLES
SYNC OFF
SYNC OFF
Turn on the power of this unit.
For Windows users
The message [
Installing device driver software
] may appear
when this unit is first connected to the computer or when it is
connected to a different USB port on the computer. Wait a while
until the message [
Your devices are ready for use
] appears.
8 Turn on the power of the devices connected to the
output terminals (powered speakers, power amplifier,
components, etc.).
When a microphone, DJ player or other external device is con-
nected to input terminals, the power of that device also turns on.


