116
C-AX10
!
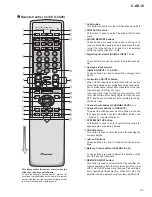
All Tone Control button (ALL)
This button is used to perform total tone control at the
same settings for the front, centre, and surround chan-
nels.
@
Front Tone Control button (FRONT)
This button is used to perform tone control for the front
channels.
#
MIDNIGHT button
This button turns the Midnight function on and off.
$
DIRECT button
This button is used to select the Direct function mode.
%
Memory button (MEMO)
This button is used when saving the sound memory
settings.
^
Brightness Selection button (DIMMER)
The display brightness can be adjusted to four levels
including Display Off.
&
Master Volume buttons (, –)
These buttons are used to adjust the volume.
*
Muting button (MUTING)
This button is used to temporarily turn off the sound.
(
NETWORK SET UP button
This button is used to enter Network Setup mode when
the Output mode is set to Digital Network (IIR or FIR).
)
TEST TONE button
This button is used to adjust the level using the test
tone.
_
ENTER button
This button is used to enter selections and make set-
tings.
+
INPUT GAIN button
This button is used to enter the mode for adjusting the
analogue input and digital input gain.
¡
Surround Tone Control button (SURR.)
This button is used to perform tone control for the sur-
round channels.
™
Centre Tone Control button (CENTER)
This button is used to perform tone control for the cen-
tre channel.
Operating Range of the Remote Control
When using the remote control to operate the amplifier, point
the remote control towards the remote control sensor on the
front panel.
•
The remote control may not operate when there are ob-
jects between the remote control and amplifier or when
the remote control is used at a wide angle from the sen-
sor.
•
The amplifier may malfunction if sunlight, fluorescent
lights, or other strong lighting shines directly on the re-
mote control sensor.
•
The amplifier may malfunction if it is used near devices
that emit infrared beams or when other remote control
devices that use infrared beams are used. Conversely,
this remote control can also cause other similar devices
to malfunction when used in the same area.
Remote control
sensor
Содержание C-AX10
Страница 9: ...9 C AX10 ...
Страница 13: ...C AX10 13 A B C D 1 2 3 4 1 2 3 4 E FRAD ASSY F CRAD ASSY 24 576MHz 24 576MHz 3 1 3 A D BLOCK ...
Страница 14: ...C AX10 14 A B C D 1 2 3 4 1 2 3 4 H AUDIO A ASSY 3 1 4 D A BLOCK AUDIO A ASSY ...
Страница 15: ...C AX10 15 A B C D 1 2 3 4 1 2 3 4 I AUDIO B ASSY 3 1 5 D A BLOCK AUDIO B ASSY ...
Страница 16: ...C AX10 16 A B C D 1 2 3 4 1 2 3 4 A DIGITAL I O ASSY B DSP ASSY 3 1 6 DIGITAL SIGNAL BLOCK ...
Страница 17: ...C AX10 17 A B C D 5 6 7 8 5 6 7 8 to D A SECTION Hi bit Hi bit Hi bit ...
Страница 18: ...C AX10 18 A B C D 1 2 3 4 1 2 3 4 A E F Hi bit Hi bit Hi bit FRONT 3 1 7 µ COM PORT BLOCK ...
Страница 19: ...C AX10 19 A B C D 5 6 7 8 5 6 7 8 I AUDIO B ASSY H AUDIO A ASSY K M N L VOLUME ASSY J DISPLAY ASSY G DSP ASSY ...
Страница 35: ...C AX10 35 A B C D 5 6 7 8 5 6 7 8 AUDIO SIGNAL ROUTE 9 3 3V 3 3V x2 1 10W 3 6 G ...
Страница 37: ...C AX10 37 A B C D 5 6 7 8 5 6 7 8 AUDIO SIGNAL ROUTE G1 6 11 11 4 6 G ...
Страница 39: ...C AX10 39 A B C D 5 6 7 8 5 6 7 8 G1 6 5 6 G ...
Страница 45: ...C AX10 45 A B C D 5 6 7 8 5 6 7 8 PCB BINDER VEF1040 The power supply is shown with the marked box I ...
Страница 56: ...C AX10 56 A B C D 1 2 3 4 1 2 3 4 SG ASSY D FRAD ASSY E Q406 Q405 Q408 Q419 Q420 Q404 Q403 Q409 Q421 Q422 D E ...
Страница 59: ...C AX10 59 A B C D 1 2 3 4 1 2 3 4 CRAD ASSY F ANP7292 B IC2804 IC2704 Q2801 Q2802 Q2702 Q2701 SIDE B F ...
Страница 66: ...C AX10 66 A B C D 1 2 3 4 1 2 3 4 AUDIO A ASSY H SIDE B Q910 Q912 Q908 Q902 Q901 Q907 Q903 H ...
Страница 67: ...C AX10 67 A B C D 5 6 7 8 5 6 7 8 Q901 Q905 Q906 Q904 907 Q903 ANP7291 D H ...
Страница 70: ...C AX10 70 A B C D 1 2 3 4 1 2 3 4 AUDIO B ASSY I SIDE B Q1013 Q1003 Q1007 Q1002 Q100 Q1008 Q1015 Q1011 I ...
Страница 71: ...C AX10 71 A B C D 5 6 7 8 5 6 7 8 Q1003 Q1007 Q1001 Q1005 Q1006 Q1004 Q1009 ANP7291 D I ...


