English
02
Chapter
7
En
Use and care of the remote
control
■
Installing the battery
Slide the tray on the back of the remote con-
trol out and insert the battery with the plus
(+) and minus (–) poles aligned properly.
When using for the first time, pull out the
film protruding from the tray.
WARNING
Keep the battery out of the reach of chil-
dren. Should the battery be swallowed,
consult a doctor immediately.
Batteries (battery pack or batteries
installed) must not be exposed to exces-
sive heat such as sunshine, fire or the
like.
CAUTION
Remove the battery if the remote control
is not used for a month or longer.
There is a danger of explosion if the bat-
tery is incorrectly replaced. Replace only
with the same or equivalent type.
Do not handle the battery with metallic
tools.
Do not store the battery with metallic
objects.
If the battery leaks, wipe the remote
control completely clean and install a
new battery.
When disposing of used batteries, com-
ply with governmental regulations or
environmental public institutions’ rules
that apply in your country/area.
■
Using the remote control
Point the remote control in the direction of
the front panel to operate.
The remote control may not function
properly in direct sunlight.
Important
Do not store the remote control in high
temperatures or direct sunlight.
Do not let the remote control fall onto
the floor, where it may become jammed
under the brake or accelerator pedal.
Basic operation
Checking part names and
functions
This chapter gives information about the
names of the parts and the main features
using the buttons.
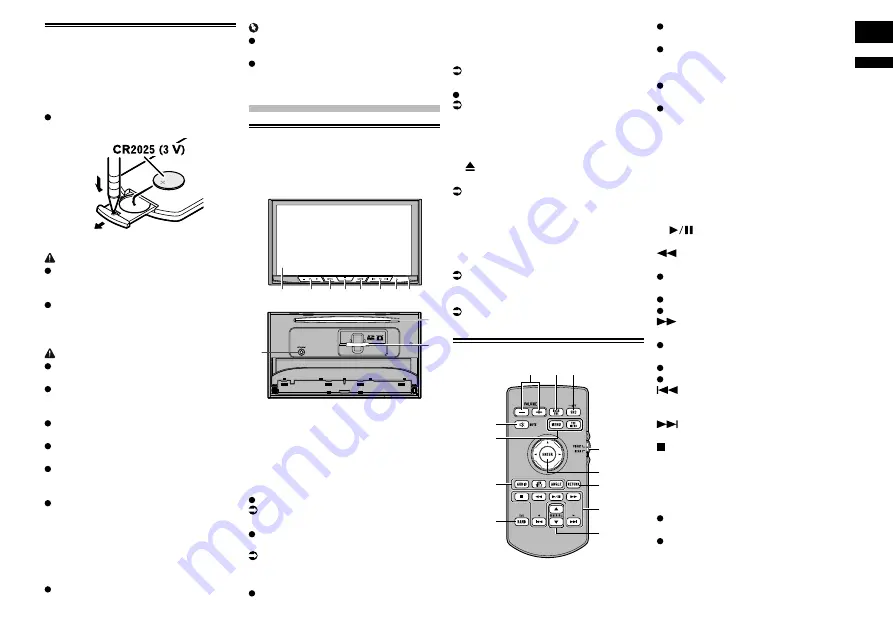
1
2
3 4 5
6 7 8
a
b
9
1
LCD screen
2
VOL (+/–) button
Press to adjust the AV (Audio and Video)
source volume.
3
MUTE button
Press to mute. Press again to unmute.
4
HOME button
Press to display the Top menu screen.
For details of the operations, refer to How
to use the screens on page 10.
Press and hold the
HOME
button to
activate the voice recognition function.
For details, refer to Using the voice recog-
nition function (for iPhone) on page 17.
5
MODE button
Press to switch between the Application
screen and the AV operation screen.
p
If the display cannot switch from the
AV operation screen to the Application
screen when the
MODE
button is
pressed, the display will turn off.
For details of the operations, refer to How
to use the screens on page 10.
Press and hold to turn the display off.
For details, refer to Turning off the display
on page 9.
6
TRK button
Press to perform manual seek tuning, fast
forward, reverse and track search controls.
7
button
8
RESET button
For details of the operations, refer to
Resetting the microprocessor on page 6.
9
Auto EQ microphone input jack
Use to connect a microphone for acoustical
measurement (sold separately).
a
Disc-loading slot
Insert a disc to play.
For details, refer to Inserting and ejecting
a disc on page 8.
b
SD card slot
For details, refer to Inserting and ejecting
an SD memory card on page 9.
Remote control
3
4
2
1
5
6
7
9
8
b
a
c
1
VOLUME (+/–)
2
REAR SRC
Press to cycle through all the available
rear sources.
Press and hold to turn the rear source
off.
3
SRC/OFF
Press to cycle through all the available
front sources.
Press and hold to turn the front source
off.
4
Source mode select switch
Use to switch the source mode between the
front source and the rear source.
5
Thumb pad
Use to select a menu on the DVD menu.
6
RETURN
Returns to the specified point and begins
playback from there.
7
Press to pause or resume playback.
For audio
Press and hold to perform fast reverse.
For video
Press to perform fast reverse.
Press to change the fast reverse speed.
For audio
Press and hold to perform fast forward.
For video
Press to perform fast forward.
Press to change the fast forward speed.
Press to return to the previous track
(chapter).
Press to go to the next track (chapter).
Press to stop playback.
If you resume playback, playback will start
from the point where you stopped. Touch the
key again to stop playback completely.
8
FOLDER/P.CH
Press to select the next or previous disc
or folder.
Press to recall radio station frequencies
assigned to preset channel keys.
9
MUTE
Press to mute. Press again to unmute.
a
MENU


