09
Chapter
26
En
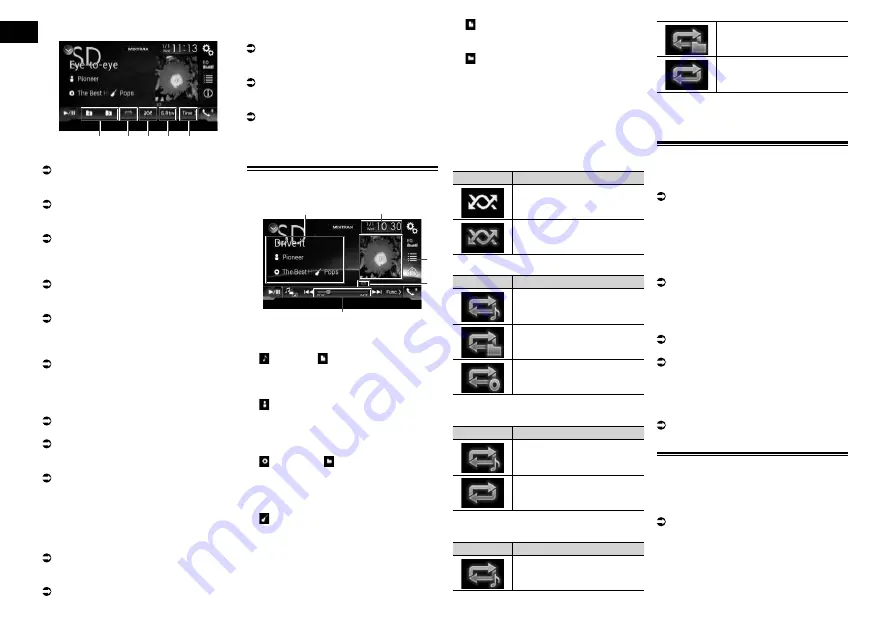
Playback screen (page 2)
9
e
f
g
h
1
Displays the source list.
For details, refer to Selecting a front
source on the source list on page 11.
2
Displays the MIXTRAX screen.
For details, refer to Chapter 18.
3
Displays the Time and date setting
screen.
For details, refer to Setting the time and
date on page 54.
4
Displays the Setting menu screen.
5
Recalls equalizer curves.
For details, refer to Using the equalizer on
page 48.
6
Selects a file from the list.
For details, refer to Selecting files from
the file name list on page 27.
Displays a list related to the song cur-
rently playing (link search).
For details, refer to Selecting a file from
the list related to the song currently play-
ing (link search) on page 27.
7
Switches the text display between tag
information and file/folder information.
For details, refer to Reading the screen on
page 26.
For details, refer to Switching the browse
mode on page 27.
8
Displays the Phone menu screen.
For details, refer to Displaying the phone
menu on page 14.
9
Switches to the next or previous page of
touch panel keys.
a
Skips files forward or backward.
b
Changes the playback point by dragging
the key.
For details, refer to Operating the time bar
on page 11.
c
Switches the media file type.
For details, refer to Switching the media
file type on page 27.
d
Switches between playback and pause.
e
Uses “
Sound Retriever
” function.
For details, refer to Setting the “Sound
Retriever” function on page 55.
f
Plays files in random order.
For details, refer to Playing files in ran-
dom order on page 27.
g
Sets a repeat play range.
For details, refer to Setting a repeat play
range on page 27.
h
Selects the previous folder or the next
folder.
Reading the screen
Example: SD
5
2
4
3
1
1
Current file information
Music Browse mode
—
: Song title/ : File name
Shows the title of the song currently play-
ing (when available). If the title of a song
is not available, the file name appears.
—
: Artist name
Shows the artist name for the song
currently playing (when available). “
No
Name
” is displayed if there is no corre-
sponding information.
—
: Album title/ : Folder name
Shows the title of the album of the cur-
rent file (when available). If the title of the
album is not available, the folder name
appears.
—
: Genre
Shows the genre of the current file (when
available). “
No Genre
” is displayed if
there is no corresponding information.
p
Nothing is displayed if the song currently
playing is in a format which does not sup-
port these functions.
Folder Browse mode
—
: File name
Shows the name of the file currently
playing.
—
: Folder name
Shows the name of the folder containing
the file currently playing.
2
Current time and date
3
Album artwork
Album art of the current song is displayed
if it is available.
4
Playback condition indicator
Indicates the current playback condition.
Playing files in random order
Indicator
Meaning
Does not play files in random
order.
Plays all files within the
repeat range in random order.
Setting a repeat play range (for Disc)
Indicator
Meaning
Repeats just the current file.
Repeats just the current
folder.
Repeats all compressed
audio files.
Setting a repeat play range (for Music
Browse mode)
Indicator
Meaning
Repeats just the current file.
Repeats all compressed
audio files.
Setting a repeat play range (for Folder
Browse mode)
Indicator
Meaning
Repeats just the current file.
Repeats just the current
folder.
Repeats all compressed
audio files.
5
Play time indicator
Shows the elapsed playing time within
the current file.
Starting procedure (for Disc)
1 Display the AV source selection
screen.
For details of the operations, refer to
Displaying the AV operation screen on
page 10.
2 Insert the disc you want to play
into the disc-loading slot.
The source changes and then playback will
start.
For details, refer to Inserting and ejecting
a disc on page 8.
p
If the disc is already set, touch [
Disc
] on
the source list or on the AV source selec-
tion screen.
For details, refer to Selecting a front
source on the source list on page 11.
For details, refer to Selecting a front
source on the AV source selection screen
on page 10.
3 Use the touch panel keys on the
screen to control the disc.
For details, refer to Using the touch panel
keys on page 25.
Starting procedure (for USB/
SD)
1 Display the AV source selection
screen.
For details of the operations, refer to
Displaying the AV operation screen on
page 10.


