background image

02

Section

Navigation

23

En

English

Entering the destination 
information

Display the destination menu, select a meth-
od of choosing a destination, then proceed to 
the next stage.

Displaying the destination 
menu

1

On the main navigation menu, select 

“DESTINATION” and press NAVI/OK.

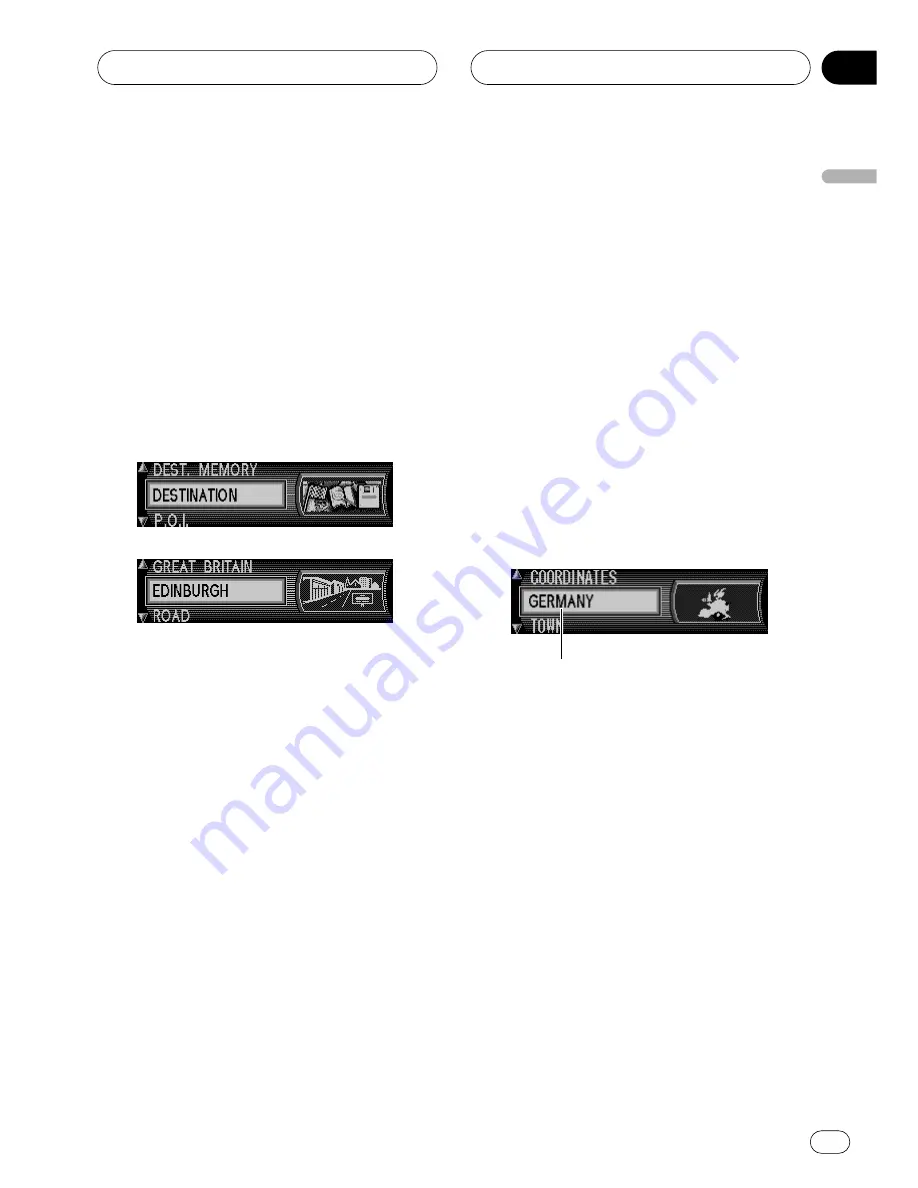
On the destination menu, you can select fol-
lowing options.

(Country name; ex. GERMANY):

 choose 

the country where your destination is located. 
Refer to 

Selecting a country

 on this page.

(Place-name):

 enter the place-name to nar-

row down the search. Refer to 

Entering the place-

name for your destination

 on page 24. When this 

screen appears for the first time after purchase, 
the place-name shows “

TOWN

”. The place-name 

you have previously set as your destination will 
appear unless you change the country setting.

POST CODE

enter a post code to narrow 

down the destination. Refer to 

Entering post code 

for the destination

 on page 27.

COORDINATES

:

 enter the longitude and lati-

tude of your destination. Refer to 

Entering longi-

tude and latitude of the destination

 on page 27.

The following items will become selectable af-
ter entering a place-name for the first time af-
ter purchase.

ROAD

:

 enter the name of the road which 

passes by the currently selected location to nar-
row down the destination. Refer to 

Entering the 

road name

 on page 24.

CENTRE

:

 select your destination from the city 

or town centres situated in the currently selected 
location. Refer to 

Selecting the city or town centre 

as the destination

 on page 25.

Selecting a country

The country name you have searched recently 
is listed on the destination menu. If neces-
sary, select a country and search for your des-
tination.

1

On the destination menu, select the 

country name currently displayed and 
press NAVI/OK. 

A list of country names appears.

2

Select the country and then press 

NAVI/OK.

The programme returns to the destination 
menu.
For the following operation, refer to 

Entering 

the place-name for your destination

 on 

page 24, 

Entering the road name

 on page 24, 

or 

Selecting the city or town centre as the desti-

nation

 on page 25. 

≠≠≠≠

Country currently set

Содержание ANH-P10MP

Страница 1: ...Operation Manual Navigation CD Tuner with MP3 ANH P10MP English Before using navigation Before using the navigation perform calibration and language definition referring to the Installation Manual ...

Страница 2: ...n 19 Navigation Safety instructions 20 Digitised area 20 Basic operation for navigation 20 Displaying the Navigation screen 20 Main navigation menu 21 Entering texts 21 When a list appears 22 Entering the destination information 23 Displaying the destination menu 23 Selecting a country 23 Entering the place name for your destination 24 Entering the road name 24 Selecting the city or town centre as...

Страница 3: ...ted time of arrival on off 42 Average speed 43 Displaying the speed limits 43 Using Audio Source Turning source on or off and selecting a source 44 Example of multi function button operation 44 Key guidance indicator 45 Switching the function of the multi function buttons 45 The difference between the BAND ESC button and the BACK button 46 Display example e g Audio menu 46 Tuner Listening to the r...

Страница 4: ...9 Selecting a disc directly 70 50 disc multi CD player 70 Advanced multi CD player operation 70 Multi CD player function menu 70 Repeating play 71 Playing tracks in a random order 71 Scanning CDs and tracks 71 Selecting tracks from the track title list 72 Selecting discs from the disc title list 72 Pausing CD playback 73 Using disc title functions 73 Entering disc titles 73 Switching and scrolling...

Страница 5: ...lume 90 Adjusting ASL for guidance volume 90 Initial Settings Adjusting initial settings 91 Initial settings menu operation 91 Using the reverse mode 91 Using the feature demo 92 Switching the auxiliary setting 92 Switching the guide animation setting 92 Switching the muting attenuation setting 92 Selecting the display language 93 Setting the FM tuning step 93 Setting the Guide Select 93 Switching...

Страница 6: ...100 CD player and care 100 CD R CD RW discs 101 MP3 WMA and WAV files 101 MP3 additional information 102 WMA additional information 102 WAV additional information 102 About folders and MP3 WMA WAV files 103 Terms 104 About traffic information RDS TMC 105 Copyright 106 Specifications 107 ...

Страница 7: ...gineering disassembly decompilation or any other means You shall not use the Soft ware to operate a service bureau or for any other use involving the processing of data for other persons or entities Pioneer and its licencor s shall retain all cop yright trade secret patent and other proprie tary ownership rights in the Software The Software is copyrighted and may not be cop ied even if modified or...

Страница 8: ...he extent that any provision of this warranty is prohibited by any federal state or local law which cannot be preempted 4 EXPORT LAW ASSURANCES You agree and certify that neither the Soft ware nor any other technical data received from Pioneer nor the direct product thereof will be exported outside the country or district the Country governed by the government having jurisdiction over you the Gove...

Страница 9: ... the local time may result in the product providing improper routing and guidance instructions Never set the volume of your Navigation System so high that you cannot hear outside traffic and emergency vehicles To promote safety certain functions are dis abled unless the handbrake is on The data encoded in the disc for this product is the intellectual property of the provider and the provider is re...

Страница 10: ...pecially important that you read and observe precautions on this page and in other sections Precautions A CLASS 1 LASER PRODUCT label is af fixed to the bottom of this product The Pioneer CarStereo Pass is for use only in Germany Protect this product from moisture If the battery is disconnected or dis charged the preset memory will be erased and must be reprogrammed Handbrake interlock Certain fun...

Страница 11: ...l 1 Level 2 standard recordings WAV file playback You can play back WAV files recorded on CD ROM CD R CD RW Linear PCM LPCM MS ADPCM recordings About WMA The Windows MediaTM logo printed on the box indicates that this product can play back WMA data WMA is short for Windows Media Audio and refers to an audio compression technology that is developed by Microsoft Corporation WMA data can be encoded b...

Страница 12: ...t se curely into the mounting hooks About the demo mode This product features two demonstration modes One is the reverse mode the other is the feature demo mode You cannot cancel a demo mode when the front panel is open Important The red lead ACC of this product should be connected to a terminal coupled with ignition switch on off operations If this is not done the vehicle battery may be drained R...

Страница 13: ... in the following cases Prior to using this product for the first time after installation If this product fails to operate properly If there appear to be problems with the op eration of the system When changing the combination of the equipment When adding removing additional prod ucts that attach to this product 1 Turn the ignition switch OFF 2 Remove the front panel Refer to Removing the front pa...

Страница 14: ...ard reverse and turns on off each function Push Switches to the main navigation dis play OPEN button Press to open the front panel BAND ESC button With the NAVIGATION function Not used With the AUDIO function Press to select among three FM or MW LW bands and cancel the control mode of func tions NEXT button With the NAVIGATION function Displays the status of the audio source on the lower part of t...

Страница 15: ...h the exception of ATT which is explained below ATT button Press to quickly lower the volume level by about 90 Press once more to return to the original volume level BAND button button FUNCTION button Press to select functions SOURCE button AUDIO button Press to select various sound quality con trols VOLUME button Press to increase or decrease the volume Note Navigation operations of the ANH P10MP...

Страница 16: ...navigation system has not yet been cali brated a calibration journey is prompted refer to Installation manual 4 When the Audio screen is shown press NAVI OK to enter the Navigation mode The main navigation menu appears after a while Refer to Main navigation menu on page 21 5 Select DESTINATION by moving the rotary stick Clockwise or right Next Counter clockwise or left Back Note You can also selec...

Страница 17: ... page 31 Notes During the calculation flashes on the dis play Once the calculation has been complet ed extinguishes you can remove the navigation CD and insert an audio CD After setting your destination wait for calculation in progress to disappear before starting the vehicle Playing an audio CD This section describes how to use the built in CD player For details or audio related func tions refer ...

Страница 18: ...t Back Note You can also select items by moving the rotary stick up or down The moving operations of the rotary stick are shown as follows in this manual Moving up 5 5 5 5 Moving down Moving to the left 2 Moving to the right 3 3 3 3 Ex To skip back or forward to another track press 2 or 3 3 3 3 7 Rotate VOLUME to increase or de crease the volume Clockwise Increasing the volume Counter clockwise De...

Страница 19: ...creen automatically returns to the audio screen On the navigation screen If NEXT is pressed during navigation the navi gation screen and the audio source status are displayed simultaneously SOFT KEY operation SOFT KEY operation means that the function of a button changes as indicated on the dis play The multi function buttons provide SOFT KEY operation the functions performed by the buttons change...

Страница 20: ... traffic regulations If you specify a location that does not exist on the navigation CD in the CD loading slot a message appears on the screen prompting you to replace it with another navigation CD After inserting the relevant navigation CD enter the road and if re quired the house number or the town cen tre The required map data is loaded and stored internally after route calculation has started ...

Страница 21: ...n of special local and in terregional destinations and points of interest nearby Points of interest are e g petrol sta tions airports or hospitals Refer to Selecting a special destination as destination on page 25 LAST DESTINATIONS A list of the last 50 destinations is displayed Refer to Selecting a destination from the mem ory on page 26 Entering texts When the text input display appears while op...

Страница 22: ...riefly If the entry is unequivocal or complete name was previously entered or was automatically completed the programme automatically switches to the next display If an incomplete location entry was con firmed a list is displayed Refer to When a list ap pears on this page You can also operate by pressing multifunc tion button or by pressing and holding NAVI OK for more than 2 seconds When a list a...

Страница 23: ...ti tude of your destination Refer to Entering longi tude and latitude of the destination on page 27 The following items will become selectable af ter entering a place name for the first time af ter purchase ROAD enter the name of the road which passes by the currently selected location to nar row down the destination Refer to Entering the road name on page 24 CENTRE select your destination from th...

Страница 24: ... list appears on page 22 The destination menu ap pears after you have selected the location 3 Select ROAD or CENTRE from the menu and then press NAVI OK ROAD you can specify your destination by a road name CENTRE you can set the town or city centre situated within the specified location as your destination For the following operation refer to Entering the road name on this page or Selecting the ci...

Страница 25: ...from a specified list Points of inter est are e g petrol stations airports or hospi tals 1 Specify the country you want to search Refer to Selecting a country on page 23 2 From the main navigation menu select P O I and press NAVI OK P O I menu appears 3 Make a selection and press NAVI OK LOCAL AREA points of interest in the cur rent surrounding area of your vehicle are listed according to proximit...

Страница 26: ...ospital If you press NAVI OK for more than 2 sec onds on the text input display a list of possi ble points of interest is displayed without having selected any letters Selecting a destination from the memory Select the location where you want to go from the locations stored in the destination memo ry DEST MEMORY or from the list of last destinations LAST DESTINATIONS About destination memory refer...

Страница 27: ...of the destination Entries the latitude in degrees minutes sec onds and a direction e g 51 31 9 4__N Refer to Entering texts on page 21 3 Enter the longitude of the destination Entries the longitude as described above 4 Enter the name for the destination The name you entered appears on the display If you select and press NAVI OK the specified location will be registered in the des tination memory ...

Страница 28: ...route menu vary de pending on the operations performed up to that time HOUSE NUMBER and CROSSING are only available if information is stored on the navi gation CD On the route menu you can select following options SAVE DESTINATION You can name the currently specified destina tion and store it in the destination memory Refer to Storing a specified destination in the destination memory on page 39 NE...

Страница 29: ...hes to the route menu again Refer to Setting the route on page 28 Note Due to the system characteristics route guid ance continues only in the area of the house number specified Selecting the intersection for the destination 1 On the route menu select CROSSING and press NAVI OK A list of roads that intersect with the currently specified road appears 2 Select the intersection for the destina tion a...

Страница 30: ...stances up to 200 km routes without motorways can only be calculated Specifying the types of road 1 On the route menu select ROUTE SETTINGS and press NAVI OK Route settings menu appears 2 On the route settings menu select RESTRICTIONS and press NAVI OK 3 Select a desired option and then press NAVI OK MOTORWAY selects whether using motor ways or not FERRIES selects whether using ferries or not TOLL...

Страница 31: ...ion announces Ready to drive off Refer to Screen during route guidance on page 32 Note Once the calculation has been completed you can remove the navigation CD and insert an au dio CD Refer to Using navigation and audio sources simultaneously on page 19 When a route is calculated the route and voice guidance for the route is automatically set Also for day or time traffic regulations only informati...

Страница 32: ...On this display you can use following multi function buttons Calculates a bypass on the route in order to avoid traffic jams or road blocks Refer to Avoiding a traffic jam on page 38 Specifies the location you want to stop over on the way Refer to Entering a stopover on page 38 Displays traffic information for the route cur rently being driven Refer to Using traffic infor mation on page 37 Display...

Страница 33: ...tion Note The buttons hidden under the distance indica tion can also be used Please follow the road This display tells you that you should follow the course of the road Prepare to turn left or Please move into the left hand lane This recommendation prepares you for the next turning However move into the left hand lane does not mean that you should do so immediately Note At junctions and intersecti...

Страница 34: ...ns are made with active dynamic route guidance the naviga tion system may request the navigation CD if the navigation CD is not already inserted Your navigation system can receive TMC in formation whether a TMC station is selected or not However in order to guarantee opti mal reception of TMC information we recom mend the selection of a TMC station Traffic announcements are transmitted by ra dio s...

Страница 35: ...ments are switched on again Displaying the direction of travel If the route to be travelled is not clear e g at an intersection where a change in direction is not specified press NAVI OK Adjusting the sound level of navigation announcement Rotating the VOLUME while naviga tion announcements are being made Refer to Using navigation on page 16 If a driving recommendation contradicts the applicable R...

Страница 36: ...n about your destination the current time appears you can confirm the route calculation conditions that are currently set If the information does not fit on one screen you can scroll the screen with the rotary stick Requesting current position During route guidance you can check the current position 1 Press The current position with road name if availa ble degrees of longitude and latitude and the...

Страница 37: ...arks at the left edge of the list indi cate that additional traffic information is availa ble When the route is not set does not appear a list of all currently available traffic information is displayed Refer to When a list ap pears on page 22 2 To see more detailed information se lect a desired item from the list and then press NAVI OK A typical traffic announcement consists of a motorway or road...

Страница 38: ... is active Entering a stopover 1 Press 2 Select the way to enter a stopover LAST DESTINATIONS and DEST MEMO RY appears only when information is stored LAST DESTINATIONS specifies the location you have visited as a stopover Refer to Selecting a destination from the memory on page 26 DESTINATION enter the stopover informa tion from the start Refer to Entering the destina tion information on page 23 ...

Страница 39: ...h a stopover press BACK Storing a specified destination in the destination memory Destination memory saves repeated manual entry if the destination is required at a later date Refer to Selecting a destination from the memory on page 26 Storing in the destination memory 1 Specifying the location you want to store by performing the same operation as for the destination Refer to Entering the destinat...

Страница 40: ... you want to change the various settings for the items displayed in the navigation screen or for performing navigation use the system settings menu Displaying system settings menu 1 On the main navigation menu press BACK The system settings menu appears TIME the internal system clock can be set to local time Refer to Setting the time on page 41 SAVE POSITION the current position can be saved and s...

Страница 41: ...he time display press 24H The multi function button changes to 12H and the time display changes from the 24 hour to the 12 hour display You can return to the 24 hour display by pressing 12H 3 To change the time every half an hour press or 4 Press OK The time set is accepted and the programme returns to the system settings menu You can also operate by pressing NAVI OK Saving the position 1 In the s...

Страница 42: ...ge set here is for the navigation screen If you want to change the language displayed for the Audio screen refer to Select ing the display language on page 93 Selecting the measuring unit 1 In the system settings menu select MEASURING UNIT and press NAVI OK 2 Select the desired option and then press NAVI OK The measuring unit is accepted and the sys tem returns to the system settings menu METRIC i...

Страница 43: ...tem may be incorrect At all times the driver must decide whether or not to heed the speed limit indicated We do not accept liability for erroneous data provided by the navigation system 1 In the system settings menu select SPEEDLIMITS and press NAVI OK 2 To select between SPEEDLIMITS ON and OFF press NAVI OK briefly 3 Press and hold NAVI OK The setting is accepted and the system re turns to the sy...

Страница 44: ...although External is displayed whether you select external unit 1 or external unit 2 When two external units are connect ed the allocation of them to external unit 1 or external unit 2 is automatically set by this product In the following cases the sound source will not change When no product corresponding to the source is connected to this product No audio disc is set in this product No magazine ...

Страница 45: ...y to see which of the rotary stick you can use to switch functions on off switch repeat selections and perform other operations Note In this manual operation for each mode is given mainly in terms of the multi function buttons However in each mode when the key guidance indicators are lit it is also possible to use to operate the mode Switching the function of the multi function buttons The indicat...

Страница 46: ...ancels the current menu or mode and returns to the ba sic displays BACK button Pressing BACK cancels the current menu or mode and returns to the previously selected menu or mode Note When the source is the Tuner TV tuner or DAB tuner and no menu or mode is selected pressing BAND ESC has the effect of switching bands Display example e g Audio menu ...

Страница 47: ... to increase or decrease the volume 3 Press BAND ESC to select a band Press BAND ESC until the desired band is displayed FM 1 FM 2 FM 3 for FM or MW LW 4 To perform manual tuning press or with quick presses The frequencies move up or down step by step 5 To perform seek tuning press and hold or for about one second and release The tuner will scan the frequencies until a broadcast strong enough for ...

Страница 48: ... recalling broadcast frequencies You can easily store up to six broadcast fre quencies for later recall with the touch of a button 1 Find a frequency that you want to store in memory 2 Press NEXT until 1 6 appears 3 Press a preset tuning button 1 6 and hold until the preset number stops flash ing The number you have pressed will flash in the preset number indicator and then remain lit The selected...

Страница 49: ...receive progressively weaker stations Storing the strongest broadcast frequencies BSM best stations memory lets you auto matically store the six strongest broadcast fre quencies under preset tuning buttons 1 6 and once stored there you can tune in to those frequencies with the touch of a button 1 Press FUNC to select BSM mode 2 Press BSM to turn BSM on Searching appears The six strongest broad cas...

Страница 50: ...f programme NEWS N indicator Shows when the set news programme is received RDS tuner function menu The RDS tuner function menu has the follow ing functions BSM best stations memory LOC local seek tuning AF alternative frequencies search PTY programme type selection REG regional 1 Press FUNC to display the function names 2 To return to the frequency display press BAND ESC Notes If you do not operat...

Страница 51: ...nger signal AF is on as a default 1 Press FUNC and then press AF to select the AF mode 2 Press AF to turn the AF function on The light illuminates Press AF again to turn the AF function off Notes Only RDS stations are tuned in during seek tuning or BSM when AF is on When you recall a preset station the tuner may update the preset station with a new fre quency from the station s AF list This is onl...

Страница 52: ...ets you re ceive traffic announcements automatically no matter what source you are listening to TA can be activated for both a TP station a sta tion that broadcasts traffic information or an enhanced other network s TP station a sta tion carrying information which cross refer ences TP stations 1 Tune in a TP or enhanced other net work s TP station When you are tuned into a TP or enhanced other net...

Страница 53: ...seconds and then the tuner returns to the original station Using news programme inter ruption When a news programme is broadcast from a PTY code news station the unit can switch from any station to the news broadcast sta tion When the news programme ends recep tion of the previous programme resumes 1 Press NEXT until NEWS appears 2 Press NEWS to turn the news interrup tion on The NEWS or N indicat...

Страница 54: ... is displayed You can cancel radio text display by pressing BAND ESC When no radio text is received No text is displayed 3 Press or to recall the three most recent radio text Pressing or switches between the cur rent and the three radio text data displays If there is no radio text data in memory the display will not change Storing and recalling radio text You can store data from up to six radio te...

Страница 55: ...c Jazz Jazz Country Country music Nat Mus National music Oldies Oldies music golden oldies Folk mus Folk music Classics L Class Light classical music Classic Serious classical music Others Educate Educational programmes Drama All radio plays and serials Culture National or regional culture Science Nature science and technology Varied Light entertainment Children Children s Social Social affairs Re...

Страница 56: ...n has been completed the prompt CD ex tinguishes the navigation CD can be removed and an audio CD can be inserted Do not use with the front panel left open If the front panel is left open it may result in injury in the event of an accident 2 Insert a CD into the CD loading slot Playback will automatically start You can eject a CD by pressing To avoid a malfunction make sure that no metal object co...

Страница 57: ...e disc and track titles automatically begin to scroll in the display When Ever scroll is set to ON at the initial setting the disc and track titles scroll continuously About Ever scroll refer to Switching the Ever scroll on page 96 After choosing your destination press INFO and you can listen to the guide voice during navigation guidance Advanced built in CD player operation Function menu The buil...

Страница 58: ... 2 Press RDM to turn random play on The light illuminates Tracks will play in a ran dom order Press RDM again to turn random play off Note When the random mode is exited while random play is on RDM appears on the basic dis play Scanning tracks of a CD Scan play lets you hear the first 10 seconds of each track on the CD 1 Press FUNC and then press SCAN to se lect the scan mode 2 Press SCAN to turn ...

Страница 59: ...CD 1 Press FUNC and then press PAUSE to select the pause mode 2 Press PAUSE to turn the pause on The light illuminates Play of the current track pauses To turn the pause off press PAUSE again Notes You can also turn pause on or off by pressing PAUSE in the following display When the pause mode is exited while pause is on PAUSE is displayed in the basic dis play Using compression and BMX Using the ...

Страница 60: ...10 track in a disc If a disc contains less than 10 tracks press ing and holding recalls the last track of a disc Also if the remaining number of tracks after searching every 10 tracks are less than 10 press ing and holding recalls the last track of a disc If a disc contains less than 10 tracks press ing and holding recalls the first track of a disc Also if the remaining number of tracks after sear...

Страница 61: ...new disc will overwrite the old est one Switching and scrolling the title When playing a CD TEXT disc you can switch text display such as artist name and track ti tle You can also scroll the text 1 Press TITLE to switch the title mode 2 Press the corresponding button to dis play the desired title Notes A CD TEXT disc is a CD featuring recorded text information such as disc title artist name and tr...

Страница 62: ...eted the prompt CD ex tinguishes the navigation CD can be removed and an audio CD can be inserted Do not use with the front panel left open If the front panel is left open it may result in injury in the event of an accident 2 Insert a CD into the CD loading slot Playback will automatically start You can eject a CD by pressing To avoid a malfunction make sure that no metal object comes into contact...

Страница 63: ...t rate files the play time will not be correctly displayed if fast forward or re verse operations are used If the inserted disc contains WMA files that are protected by digital rights management DRM TRACK SKIPPED is displayed while the protected file is skipped If all the files on the inserted disc are secured by DRM PROTECT is displayed There is no sound on fast forward or reverse When the front ...

Страница 64: ...e repeat play ranges Folder repeat folder re peat Track repeat one track repeat and Disc repeat repeat all tracks 1 Press FUNC to select the repeat mode 2 Press RPT to select the repeat range Press RPT until the desired repeat range ap pears in the display Folder repeat Repeat the current folder Track repeat Repeat just the current track Disc repeat Repeat all tracks Notes If you select another fo...

Страница 65: ... then SCAN to select the scan mode 3 Press SCAN to turn scan play on The light illuminates 4 When you find the desired track or folder press SCAN to turn scan play off The light goes off The track or folder will continue to play If the scan mode is automatically cancelled select the scan mode again Notes After track or folder scanning is finished nor mal playback of the tracks will begin again Whe...

Страница 66: ...BMX Using the COMP compression and BMX functions let you adjust the sound playback quality of the CD player Each of the functions has a two step adjustment The COMP func tion balances the output of louder and softer sounds at higher volumes BMX controls sound reverberations to give playback a fuller sound Listen to each of the effects as you se lect through them and use the one that best enhances ...

Страница 67: ... bit rate value is not displayed even after switching to bit rate VBR will be displayed When playing back WMA files recorded as VBR variable bit rate files the average bit rate value is displayed In the case of MP3 file turning off the tag dis play disables to read the text information Therefore the Track Title the Artist Name and the Album Title fields show No xxxx With some applications used to ...

Страница 68: ...splay off time to play back will be shorter than when this func tion is turned on This function is available for MP3 tag ID3 tag only 1 Press FUNC and then press NEXT 2 Press T READ to turn tag display on The light illuminates To turn the tag display off press T READ again Note When you turn the tag display on this product returns to the beginning of the current track in order to read the text inf...

Страница 69: ...and hold or 5 To skip back or forward to another track press or Pressing skips to the start of the next track Pressing once skips to the start of the cur rent track Pressing again will skip to the pre vious track Notes When the multi CD player performs the pre paratory operations Ready is displayed If the multi CD player does not operate prop erly an error message such as ERROR 11 may be displayed...

Страница 70: ...iscs from the disc title list on page 72 Advanced multi CD player operation Multi CD player function menu The multi CD player function menu has the following functions RPT repeat play RDM random play SCAN scan play T LIST track title list D LIST disc title list PAUSE pause TTLin disc title input COMP compression and DBE ITS P ITS play ITS M ITS programming 1 Press FUNC to display the function name...

Страница 71: ...epeat is selected Playing tracks in a random order Random play lets you play back tracks in a random order within the repeat range Disc repeat and Magazine repeat 1 Select the repeat range Refer to Repeating play on this page 2 Press FUNC and then press RDM to se lect the random mode 3 Press RDM to turn random play on The light illuminates Tracks will play in a ran dom order within the previously ...

Страница 72: ... That selection will begin to play Notes You can also use or NAVI OK to se lect and play the desired track title Only when playing a CD TEXT disc on a CD TEXT compatible multi CD player you can switch to this mode Selecting discs from the disc title list The disc title list lets you see the list of disc ti tles and select one of them for playback Dis played disc titles are those which have been en...

Страница 73: ...player if you switch to this mode Can t input is displayed and you cannot input the title The disc tittle will have already been recorded on a CD TEXT disc 4 Press ABC to select the desired charac ter type Press ABC repeatedly to switch between the following character type Alphabet upper case Alphabet lower case European letters such as those with accents e g á à ä ç You can select to input number...

Страница 74: ... be shown in the display To switch off Ever scroll completely set Ever scroll to OFF at the initial setting To turn Ever scroll setting on or off refer to Switching the Ever scroll on page 96 Using compression and bass emphasis You can use these functions only with a multi CD player that supports them Using the COMP compression and DBE dy namic bass emphasis functions let you ad just the sound pla...

Страница 75: ... back display Note After data for 100 discs has been stored in mem ory data for a new disc will overwrite the oldest one Playback from your ITS playlist ITS play lets you listen to the tracks that you have entered into your ITS playlist When you turn on ITS play tracks from your ITS playlist in the multi CD player will begin to play 1 Select the repeat range Refer to Repeating play on page 71 2 Pr...

Страница 76: ...rasing a CD from your ITS playlist When you want to delete all tracks of a CD from your ITS playlist you can if ITS play is off 1 Play a CD that you want to delete Press or to select the CD 2 Press FUNC and then press NEXT 3 Press ITS M to select the ITS program ming mode 4 Press CLEAR to erase all tracks on the currently playing CD from your ITS playl ist All tracks on the currently playing CD ar...

Страница 77: ... DAB indicator Shows when DAB reception is possible Band indicator Shows which band the DAB tuner is tuned to WTHR indicator Shows when area weather flash is received Service label indicator Shows the service the DAB tuner is tuned to Service component label indicator Shows the service component the DAB tuner is tuned to NEWS indicator Shows when news announcement is received Notes When the initia...

Страница 78: ...e service currently re ceived With a service component that has no service component label or dynamic label the dis play will be blank when you switch to service component label and dynamic label Receiving the road traffic flash and transport flash Press TA to turn road traffic flash and transport flash on TRFC or T appears on the display To turn the road traffic flash and transport flash off pres...

Страница 79: ...EMO1 MEMO6 1 Display the dynamic label you want to store in memory Refer to Displaying dynamic label on this page 2 To store the desired dynamic label press and hold any of the buttons MEMO1 MEMO6 until DAB memo appears The next time you press the same MEMO1 MEMO6 button in the dynamic label display the stored text is recalled from memory Advanced DAB tuner operation DAB tuner function menu The DA...

Страница 80: ...NC and then press P 2ND 2 Press P 2ND repeatedly until the de sired service component appears in the display Searching for service by available PTY information Available PTY search lets you see the list of available PTYs that is in the current ensemble and select one of them to receive If there is no available PTY in the current ensemble you cannot switch to the availa ble PTY search mode Availabl...

Страница 81: ...ss FUNC and then press ch LIST to select the preset service list mode 2 Press any of the buttons 1 6 to recall the desired service Note You can also use and to select and re call the desired service Selecting services from the available service list The available service list lets you see the list of available services and select one of them to receive if the currently received ensemble has multip...

Страница 82: ...een the following bands TV 1 TV 2 4 To perform manual tuning press or briefly 5 To perform seek tuning press and hold or for about one second and release You can cancel seek tuning by pressing either or briefly Storing and recalling broadcast stations If you press any of the buttons 1 6 or 7 12 you can easily store up to 12 broadcast stations for later recall 1 Press NEXT until 1 6 or 7 12 appear ...

Страница 83: ... will be stored under the buttons 1 12 and in order from the lowest channel up When finished Searching disappears To cancel the storage process press BSSM again while Searching appears Note Storing broadcast stations with BSSM may re place broadcasting stations you have saved us ing the buttons 1 12 Selecting channels from the preset channel list The preset channel list lets you see the list of pr...

Страница 84: ...ing alternatively between FLAT and a set equaliser curve Note You can also use and to select the desired equaliser curve Introduction of audio adjustments Audio menu The audio menu has the following functions F B balance adjustment EQ equaliser curve adjustment BASS bass level adjustment TREBLE treble level adjustment LOUD loudness ASL automatic sound leveliser SW 1 subwoofer on off setting or NoF...

Страница 85: ... to turn EQ EX on EQ EX ON appears in the display EQ EX is now on To turn EQ EX off press EQ EX again Setting the sound focus equal iser SFEQ Clarifying the sound image of vocals and in struments allows the simple staging of a natu ral pleasant sound environment Even greater listening enjoyment will be obtained if seating positions are chosen carefully FRT1 boosts the treble on the front output an...

Страница 86: ...play Low 40 80 100 160 Hz Mid 200 500 1k 2k Hz High 3 15k 8k 10k 12 5k Hz 4 Press LEVEL and then press or to adjust the level of the equaliser band Each press of or increases or decreases the level of the equalisation band 6 6 is displayed as the level is in creased or decreased 5 Press Q and then press or to select the desired Q factor Press or until the desired Q factor ap pears in the display 2...

Страница 87: ...uency and the bass lev el 1 Press AUDIO and then press BASS to select the bass adjustment mode 2 Select the desired frequency with or Press or until the desired frequency ap pears in the display 40 63 100 160 Hz 3 Press or to adjust the bass level Each press of or increases or decreases the bass level 6 6 is displayed as the level is increased or decreased Note The level adjustment is valid only f...

Страница 88: ...mal phase and the speaker appears facing upward Adjusting subwoofer settings When the subwoofer output is on you can ad just the cut off frequency and the output level of the subwoofer 1 Press AUDIO and then press NEXT 2 Press SW 2 to select the subwoofer setting mode When the subwoofer output is on you can se lect SW 2 3 Press or to select cut off frequen cy Each press of or selects cut off frequ...

Страница 89: ...PF to select high pass filter mode 3 Press HPF to turn high pass filter on HPF ON appears in the display Press HPF again to turn high pass filter off 4 Press or to select cut off frequen cy Each press of or selects cut off frequen cies in the following order 50 80 125 Hz Only frequencies higher than those in the se lected range are outputted from the front or rear speakers Note If you switch the S...

Страница 90: ...oice of navigation Adjusting ASL for audio vol ume You can adjust the automatic sound leveliser for audio source volume The sensitivity varia tion of volume level to noise level of ASL can be set to one of five levels 1 Press AUDIO and then press ASL to se lect the ASL mode 2 Press AUDIO to select the ASL setting mode for audio volume 3 Press to turn ASL on ASL ON and LEVEL Mid appears in the disp...

Страница 91: ...g Initial settings menu operation You can operate the initial settings menu only when the source is off 1 Press and hold SOURCE to turn the source off 2 Press and hold 1 to enter the initial settings menu When the source is off you can check the lo cation of 1 by turning on the feature demo Note Press BAND ESC to cancel the initial settings mode Using the reverse mode If you do not carry out an op...

Страница 92: ...he AUX mode 3 Press AUX to turn AUX on ON appears in the display Press AUX again to turn AUX off Switching the guide animation setting Navigation guide animation can be switched on and off You can also display a still picture 1 With the source turned off press and hold 1 2 Press G ANI to select the G ANI mode 3 Press 2 2 2 2 or 3 3 3 3 to select the desired dis play Press G ANI repeatedly to switc...

Страница 93: ...ning step automatically changes to 100 kHz It may be preferable to set the tuning step to 50 kHz when AF is on 1 With the source turned off press and hold 1 2 Press NEXT and then press FM step to select the FM tuning step mode 3 Press the corresponding button to se lect the desired tuning step Pressing 50K or 100K will switch the FM tun ing step between 50 kHz and 100 kHz while AF or TA is on The ...

Страница 94: ... in FULL Pre out SUB W or the auxiliary FULL Preout FULL 1 With the source turned off press and hold 1 2 Press NEXT and then press REAR to se lect the rear output setting mode 3 Press SW or FULL to select the desired output setting Pressing SW or FULL will switch between FULL full range speaker and SUB W subwoofer and that status will be displayed When no subwoofer is connected to the rear speaker...

Страница 95: ...nd then press A PI to se lect the auto PI seek mode 3 Press A PI to turn the auto PI seek on ON appears in the display Press A PI again to turn the auto PI seek off Switching the hands free telephoning You can turn the hands free telephoning on or off in accordance with the connection of the cellular telephone you use When using the hands free telephone unit sold separately turn the hands free tel...

Страница 96: ...Press TEL 2 to select the telephone standby setting mode 4 Press TEL 2 to turn the telephone standby on ON appears in the display Press TEL 2 again to turn the telephone standby off Switching the Ever scroll When Ever scroll is set to ON text informa tion of the CD scrolls continuously in the dis play Set to OFF if you prefer the information to scroll just once 1 With the source turned off press a...

Страница 97: ...uring route guidance on page 32 Note If you do not operate the function within about 30 seconds the display is automatically returned Off clock display When the time display is turned on the calen dar display appears with the time display when sources and the feature demo are off Adjusting the brightness Display brightness adjustment lets you adjust the display for easier viewing when lighting con...

Страница 98: ...lay If the auxiliary setting is not turned on AUX cannot be selected For more details see Switch ing the auxiliary setting on page 92 Setting the AUX title The title displayed for the AUX source can be changed 1 After you have selected AUX as the source press FUNC 2 Press TTLin to select the AUX title in put mode Refer to Entering disc titles on page 60 and perform procedures 4 to 7 in the same wa...

Страница 99: ...ge 95 The sound is turned off MUTE is dis played and no audio adjustments are pos sible The sound is attenuated ATT is dis played and no audio adjustments except volume control are possible Operation returns to normal when the phone connection is ended The guidance voice of navigation isn t mut ed or attenuated when a call is made or re ceived Hands free telephoning func tion When a call is made o...

Страница 100: ...hen handling the disc Store discs in their cases when not in use Keep discs out of direct sunlight and do not expose the discs to high temperatures Do not attach labels write on or apply chemicals to the surface of the discs To clean dirt from a CD wipe the disc with a soft cloth outward from the centre of the disc If the heater is used in cold weather mois ture may form on components inside the C...

Страница 101: ...dio compression tech nology that is developed by Microsoft Cor poration WMA data can be encoded by using Windows Media Player version 7 or later WAV is short for waveform It is a standard audio file format for Windows With some applications used to encode WMA files this product may not operate correctly With some applications used to encode WMA files album names and other text in formation may not...

Страница 102: ...e This product can play recordings with bit rates from 8 kbps to 320 kbps but in order to be able to enjoy sound of a certain quali ty we recommend using only discs record ed with a bit rate of at least 128 kbps WMA additional information This product plays back WMA files encod ed by Windows Media Player version 7 7 1 8 and 9 You can only play back WMA files in the frequencies 32 44 1 and 48 kHz T...

Страница 103: ...ssign folder numbers It is not possible to check folders that do not include MP3 WMA WAV files These folders will be skipped without displaying the folder number MP3 WMA WAV files in up to 8 tiers of fold ers can be played back However there is a delay in the start of playback on discs with numerous tiers For this reason we recom mend creating discs with no more than 2 tiers It is possible to play...

Страница 104: ...erarchies Extended formats Joliet File names can have up to 64 characters Romeo File names can have up to 128 characters Linear PCM LPCM Pulse code mod ulation This stands for linear pulse code modulation which is the signal recording system used for music CDs and DVDs m3u Playlists created using the WINAMP soft ware have a playlist file extension m3u MP3 MP3 is short for MPEG Audio Layer 3 It is ...

Страница 105: ...he Windows logo are trademarks or registered trademarks of Microsoft Corporation in the United States and or other countries About traffic information RDS TMC Because the information is updated only periodically it may take time to collect all the information Not all RDS stations provide traffic infor mation Traffic Information is not taken into ac count in calculating estimated time of ar rival o...

Страница 106: ...ller of Her Majesty s Stationary Office Crown Copyright 1995 Italy La Banca Dati Italiana é stata prodotta usan do quale riferimento anche cartographia nu merica ed al tratto prodotta e fornita dalla Regione Toscana Portugal Source IgeoE Portugal Spain Información geográfica propiedad del CNIG Sweden Based upon electronic data National Land Survey Sweden Switzerland Topografische Grundlage Bundesa...

Страница 107: ... kΩ Equaliser 3 Band Parametric Equaliser Low Frequency 40 80 100 160 Hz Q Factor 0 35 0 59 0 95 1 15 6 dB when boosted Gain 12dB Mid Frequency 200 500 1k 2k Hz Q Factor 0 35 0 59 0 95 1 15 6 dB when boosted Gain 12dB High Frequency 3 15k 8k 10k 12 5k Hz Q Factor 0 35 0 59 0 95 1 15 6 dB when boosted Gain 12dB Loudness contour Low 3 5 dB 100 Hz 3 dB 10 kHz Mid 10 dB 100 Hz 6 5 dB 10 kHz High 11 dB...

Страница 108: ...00 Hz 3 dB Stereo separation 45 dB at 65 dBf 1 kHz Selectivity 80 dB 200 kHz MW tuner Frequency range 531 1 602 kHz 9 kHz Usable sensitivity 18 µV S N 20 dB Signal to noise ratio 65 dB IEC A network LW tuner Frequency range 153 281 kHz Usable sensitivity 30 µV S N 20 dB Signal to noise ratio 65 dB IEC A network Note Specifications and the design are subject to pos sible modifications without notic...

Страница 109: ...OPE NV Haven 1087 Keetberglaan 1 B 9120 Melsele Belgium TEL 0 3 570 05 11 PIONEER ELECTRONICS ASIACENTRE PTE LTD 253 Alexandra Road 04 01 Singapore 159936 TEL 65 6472 7555 PIONEER ELECTRONICS AUSTRALIA PTY LTD 178 184 Boundary Road Braeside Victoria 3195 Australia TEL 03 9586 6300 PIONEER ELECTRONICS OF CANADA INC 300 Allstate Parkway Markham Ontario L3R OP2 Canada TEL 1 877 283 5901 PIONEER ELECT...

Отзывы: