background image

43

5

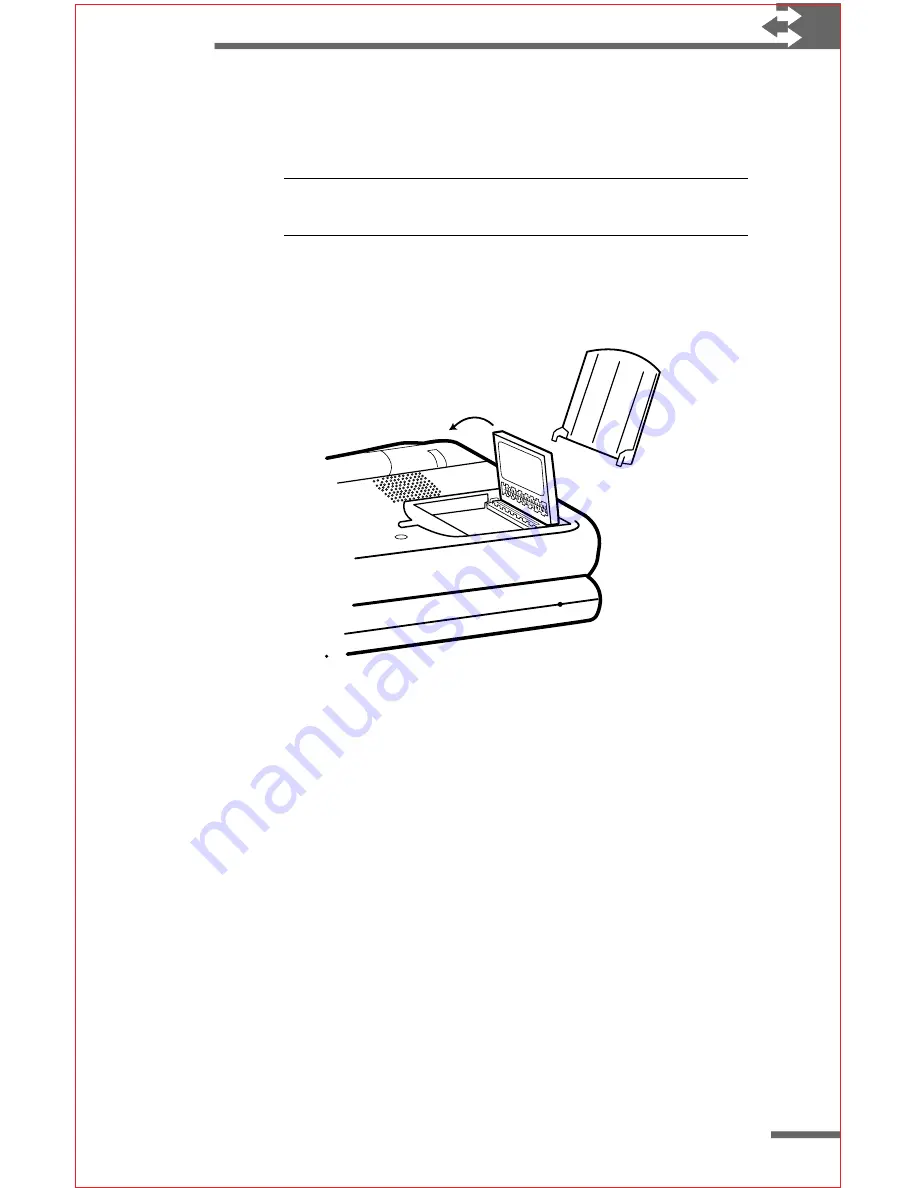
Quit all programs, and turn off your Velo 500.

6

Slide back the switch to open the door to the Flash/ROM
slot, and remove the door and the dummy card.

Note Save the dummy card so you can reinsert it if you
remove the flash memory Miniature Card.

7

Insert the flash memory Miniature Card and replace
the door.

8

Turn on your Velo 500.

Figur

Figur

Figur

Figur

Figure 8:

e 8:

e 8:

e 8:

e 8: Inser

 Inser

 Inser

 Inser

 Inserting a flash memor

ting a flash memor

ting a flash memor

ting a flash memor

ting a flash memory Minia

y Minia

y Minia

y Minia

y Miniatur

tur

tur

tur

ture Car

e Car

e Car

e Car

e Card

d

d

d

d

You can open files and folders in the PC Card folder as you would
in any other folder on your Velo 500.

To remove a flash memory Miniature Card

1

Quit all programs and turn off your Velo 500.

2

Slide back the switch to open the door to the Flash/ROM
slot, and remove the door.

3

Remove the flash memory Miniature Card.

4

Replace the dummy card and the door.

5

Turn on your Velo 500.

Содержание VELO 500

Страница 1: ...ing battery power 11 The AC adapter 12 Using your Velo 500 for the first time 13 The H PC Setup Wizard 13 Windows CE basics 14 Using the stylus 14 The Windows CE taskbar 15 Software programs 16 Preinstalled programs 16 Accessories 16 Communications 17 Microsoft Pocket Office 17 Microsoft Pocket Outlook 18 Velo Applications 19 Microsoft Pocket Internet Explorer 20 Installing additional programs 20 ...

Страница 2: ...3 Modem connection 34 Transferring files between H PCs by infrared 34 Tips for infrared communication 35 Resetting your Velo 500 36 Expanding your Velo 500 37 DRAM Miniature Cards 37 Flash memory Miniature Cards 40 Using PC Card accessories 42 Physical specifications 44 Physical description of the Velo 500 44 Power 44 Processor and basic input output 44 Other input output 44 Expansion 45 Regulator...

Страница 3: ...etting help and information tion tion tion tion There are many sources of help and information about your Velo 500 the Windows CE operating system and programs and Windows CE Services for your desktop computer This book the Philips Velo 500 User s Manual Handheld PC Companion another manual included with your Velo 500 Windows CE Services Help on your desktop computer To access Help click Windows C...

Страница 4: ...lp tap Help on the Start menu or tap on the title bar or toolbar When you open Help you ll see topics for the application or system component you are using To see a list of all the Help contents tap Other Help Velo 500 programs also provide shortcuts and tips for simple operations Keyboard shortcuts for menu commands are listed on the menus to the right of the commands To display keyboard shortcut...

Страница 5: ...I e I Vie Vie Vie Vie View of w of w of w of w of V V V V Velo 500 with lid open elo 500 with lid open elo 500 with lid open elo 500 with lid open elo 500 with lid open RJ 11 phone jack Record button Figur Figur Figur Figur Figure 2 e 2 e 2 e 2 e 2 T T T T Top vie op vie op vie op vie op view of w of w of w of w of V V V V Velo 500 with lid closed elo 500 with lid closed elo 500 with lid closed el...

Страница 6: ...nning Windows CE Services and a software connection has been established The yellow alarm indicator light blinks to indicate an alarm you have set This light stops blinking when you tap to close the alarm s dialog box or when you double tap the alarm icon in the status area of the taskbar Flash ROM Miniature Card slot Backup battery compartment Main battery compartment Connector to V Module DRAM M...

Страница 7: ...y ering y ering your our our our our V V V V Velo 500 elo 500 elo 500 elo 500 elo 500 The Velo 500 has two kinds of batteries The main batteries power your Velo 500 during normal mobile use or when you are not using an external power source The backup battery is a coin sized lithium battery that protects your saved data when the main batteries are depleted or are temporarily removed for example wh...

Страница 8: ...uded with your Velo 500 Rechargeable AA NiCd batteries are not recommended Note Battery life will vary depending on how you use yourVelo 500 To install the main batteries 1 Slide the battery door lock switch down to release the battery door 2 Swing the battery door open until it detaches completely 3 Insert the Philips Velo Rechargeable Battery Pack into the battery compartment A tab on the Philip...

Страница 9: ...er Do not use battery power when using PC Card accessories PC Cards require considerable power to operate and can quickly drain your Velo 500 s batteries Always use external power when making dial up connections with a PC Card modem The internal modem has very low power consumption compared to PC Card modems It is not necessary to use external power with the internal modem Shorten auto suspend tim...

Страница 10: ...V AC power only If you travel frequently or need to power your Velo 500 at other AC voltages you can purchase an optional Philips Traveling AC Adapter For information about the availability of AC adapters and other accessories check the Philips Web site http www mobile philips com Warning Use only Philips power adapters designed specifically for use with theVelo 500 otherwise you may damage yourVe...

Страница 11: ...ple setup procedures Calibrate the touch screen Calibration establishes the alignment of the background image with the touch sensitive portion of the screen and ensures the accuracy of your stylus taps Set your time zone Select your home city Windows CE stores area codes airport information sunrise sunset times and relative distances for hundreds of cities all over the world Set the date and time ...

Страница 12: ...you use a mouse with your desktop computer Instead of clicking with the mouse tap the stylus on the screen to select objects or activate menus You should use the supplied stylus to touch the screen There s no harm in using your fingertip but many features require the stylus for finer pointing Warning Don t use sharp objects such as keys or pens to touch the screen These objects can damage the scre...

Страница 13: ...y to accept the settings or press the ESC key to cancel the settings and start over If you make a mistake when calibrating the touch screen or if over a period of time the accuracy of the touch screen diminishes you may not be able to navigate with the stylus To open the stylus calibration screen without using the stylus simultaneously press CTRL ALT or press ÿ I The Windows CE taskbar The Windows...

Страница 14: ...nstalled programs The programs included on your Velo 500 are described below Start these programs by double tapping the desktop shortcut or tapping the icon in the appropriate folder on the Start menu Detailed procedures for common tasks are available in Help To access Help for a specific program start the program and then tap Help on the Start menu or tap in the toolbar Accessories Accessories Ac...

Страница 15: ...mote Networking can use either PPP point to point protocol or SLIP serial line Internet protocol to communicate with a host computer Terminal Use Terminal to connect to online services that require TTY or VT 100 terminal emulation For example you can view and download files from a bulletin board or send and receive e mail using your Velo 500 Terminal application Micr Micr Micr Micr Microsoft P oso...

Страница 16: ...et service provider you can use Inbox to send and receive Internet e mail messages via a dial up connection If you have Microsoft Exchange or Microsoft Outlook installed on your desktop computer you can also transfer messages between Inbox and your desktop computer V V V V Velo elo elo elo elo Applica Applica Applica Applica Applications tions tions tions tions Alarm With Alarm you can use your Ve...

Страница 17: ... of the fields The information in the database is always saved in the Database folder on your Velo 500 FindIt FindIt enables you to search for files on your Velo 500 You can search for a file by file name or refine your search to look only in a certain folder to locate files based on size date or type and to search for files that contain a specific text string Reset The Reset program Reset exe pro...

Страница 18: ...use Pocket Internet Explorer you must have an account with an Internet service provider and create a dial up connection to this account using Remote Networking Installing additional programs Programs can be purchased from many third party vendors such as MobileSoft http www mobilesoft com Check the Philips and Microsoft Web sites for links to other companies developing software for Windows CE Prog...

Страница 19: ...t remove the pre installed programs that came with your Velo 500 and are stored in ROM To remove software from your Velo 500 1 On the Start menu point to Settings and tap Control Panel 2 Double tap the Remove Programs icon 3 Select the program you want to remove from the list 4 Tap Remove Quick Start keys Velo 500 Quick Start keys enable you to start your favorite programs at the touch of a button...

Страница 20: ...nce Fine tuning performance This section explains how to change or set several properties of the Velo 500 to suit your personal preferences and working style and provides tips on how to get the most from your Velo 500 The Power control panel Use the Power control panel to check the status of the batteries in your Velo 500 and to set options for Auto Suspend By default your Velo 500 automatically s...

Страница 21: ...ntil the display is at the desired contrast Change the Gray Scale settings to improve performance or display images with higher quality Graphics and Web pages will look better at 16 shades of gray however overall performance is faster when the display is set to 4 shades of gray To change the screen resolution 1 On the Start menu point to Settings and tap Control Panel 2 Double tap the Gray Scale i...

Страница 22: ...tion 1 Delete any unnecessary files and empty the Recycle Bin see the following procedure 2 Exit all programs 3 On the Start menu point to Settings and tap Control Panel 4 Double tap the System icon 5 On the Memory tab adjust the memory slider as appropriate Note In some cases resetting your Velo 500 can free up additional storage and or program memory If you experience memory problems quit all pr...

Страница 23: ...cting to a desktop computer The Microsoft compact disk that came with your Velo 500 includes Windows CE Services 2 0 with ActiveSync a program that enables you to transfer files between your desktop computer and Velo 500 to synchronize data from the Pocket Outlook programs on your Velo 500 with Outlook or Schedule on your desktop computer transfer e mail messages from Inbox on your Velo 500 to eit...

Страница 24: ... vary based on selection of features and current system configuration Available 9 or 25 pin communications port for a 25 pin port use the adapter included with your Velo 500 CD ROM drive VGA or higher resolution graphics card Super VGA 256 color recommended Keyboard Microsoft Mouse or compatible pointing device In addition the following optional system components will allow you to use certain feat...

Страница 25: ...ot begin automatically click Run on the Start menu and then type d setup and press ENTER where d is the letter of the drive containing the Microsoft Windows CE Services compact disc 3 Follow the instructions on your screen to complete installation You can install optional items from the Windows CE Services compact disc as the final step of the installation process Optional items on the Windows CE ...

Страница 26: ...the Velo Dock to a serial port on your desktop computer 3 Place your Velo 500 in the Velo Dock and slide the Velo 500 to the left until it snaps into place Note If you are having trouble connecting to your desktop computer be sure yourVelo is securely docked 4 Never exert pressure on the cover to insert into or remove your Velo from the Dock Always grip the bottom of the device Note You can also c...

Страница 27: ...ector of the Velo Dock into the serial port of your desktop computer which you selected during Windows CE Services 2 0 setup 2 Place your Velo 500 in the Velo Dock Your Velo 500 will turn on automatically and the red serial connection indicator light will blink After a few moments Windows CE Services 2 0 should recognize the connection Note If you have enabled password protection on your Velo 500 ...

Страница 28: ...munications port Select the port to which yourVelo Dock or serial cable is connected and make sure the port speed is set to 19 200 2 In My Computer browse to the Mobile Devices folder and double click the Velo 500 icon Synchronizing data and files Synchronizing data and files Synchronizing data and files Synchronizing data and files Synchronizing data and files Windows CE Services 2 0 with ActiveS...

Страница 29: ...o 500 manually by updating the backup file when you ve made important changes or you can set Windows CE Services to automatically back up any changes each time you connect your Velo 500 to your desktop computer For more information on backing up your Velo 500 and setting backup options refer to Windows CE Services Help on your desktop computer The first time you back up your Velo 500 you are asked...

Страница 30: ...et Windows CE Services to convert selected file types automatically while they are transferred using conversions you specify or the defaults provided for the most common types of files Caution When a file is transferred it may be converted into a different file type and some formatting may be changed or removed for efficiency For more information about file conversions see Windows CE Services Help...

Страница 31: ...uble click the Velo 500 icon in the Mobile Devices folder and select the file you want to print 3 On the File menu click Print Connecting to a r Connecting to a r Connecting to a r Connecting to a r Connecting to a remote computer emote computer emote computer emote computer emote computer The Velo 500 includes a built in modem for connecting to a telephone line and an infrared port for connecting...

Страница 32: ...Communications help topic on yourVelo 500 Warning Do not connect yourVelo 500 to a digital telephone line The internal modem is designed for use only with analog telephone lines connecting to a digital telephone line may damage the device Before connecting verify that the line is analog or check with the professional who maintains your telephone lines To connect to a telephone line Open the RJ 11 ...

Страница 33: ...send more than one contact card at a time by selecting multiple cards in the contact list before you tap Send 2 Line up the infrared ports on the H PCs Make sure that the receiving H PC is turned on and is within a few feet of the sending H PC 3 On the receiving H PC open Contacts and then tap Receive on the File menu Tips for infrar Tips for infrar Tips for infrar Tips for infrar Tips for infrare...

Страница 34: ...am 1 On the Start menu tap Programs tap Velo Applications and then tap Reset 2 In the Reset Velo 500 dialog box tap Yes Only when the Reset program fails to correct a problem should you press the Reset button with the stylus Pressing the Reset button once should retain the data stored on your Velo 500 Caution Pressing the reset button multiple times will cause your Velo 500 to do a full restart Th...

Страница 35: ...can add cellular modems pagers and other devices on PC Cards also called PCMCIA cards Check the Velo 500 Web site http www mobile philips com for announcements of other types of V Modules that add more functionality to your Velo 500 Figur Figur Figur Figur Figure 6 e 6 e 6 e 6 e 6 T T T T Type II PC Car ype II PC Car ype II PC Car ype II PC Car ype II PC Card d d d d V V V V V Module Module Module...

Страница 36: ...l batteries 3 Remove all batteries including the backup battery 4 Remove the screw from the DRAM Miniature Card slot and remove the door to the slot and the dummy card Note Save the dummy card so you can reinsert it if you remove the DRAM Miniature Card 5 Insert the connector side of the DRAM Miniature Card into the connector slot on the Velo 500 and push down on the DRAM Miniature Card until it s...

Страница 37: ...omputer however the information will be only as current as the most recent backup Make sure you back up your Velo 500 immediately before removing all batteries 3 Remove all batteries including the backup battery 4 Remove the screw from the DRAM Miniature Card slot and remove the door to the slot 5 Push the tip of the stylus between the DRAM Miniature Card and the white latch See Figure 7 The DRAM ...

Страница 38: ...red on the card when you remove the flash memory Miniature Card Note You cannot add a flash memory Miniature Card if you already installed an operating system upgrade ROM Miniature Card in the Flash ROM slot Caution After you install or remove a flash memory Miniature Card your Velo 500 will reset automatically Any unsaved information will be lost To install a flash memory Miniature Card 1 Connect...

Страница 39: ...Inser Inser Inser Inserting a flash memor ting a flash memor ting a flash memor ting a flash memor ting a flash memory Minia y Minia y Minia y Minia y Miniatur tur tur tur ture Car e Car e Car e Car e Card d d d d You can open files and folders in the PC Card folder as you would in any other folder on your Velo 500 To remove a flash memory Miniature Card 1 Quit all programs and turn off your Velo ...

Страница 40: ... Card accessories By using the optional Type II PC Card V Module you can add cellular modems pagers and other PC Card based accessories to your Velo 500 Warning Not following the instructions for installing and removing theV Module can seriously damage yourVelo 500 To attach the V Module 1 Be sure the V Module latch on the bottom of the V Module is in the unlock position 2 Be sure your Velo 500 is...

Страница 41: ...y damage yourVelo 500 To remove the V Module 1 Be sure your Velo 500 is turned off 2 Slide the latch on the bottom of the V Module into the unlock position 3 Push back the V Module release button and remove the V Module 4 Close the connector door on your Velo 500 To install a PC Card in the V Module Slide the PC Card into the V Module s card slot until it locks in place You can use Type I or Type ...

Страница 42: ...s CR2032 lithium coin cell DC jack 12V 500mA Processor and basic input output Keyboard 61 key QWERTY layout Quick Start keys to start applications Display Backlit nonglare touch screen display grayscale LCD 640 x 240 pixels 23mm dot pitch with controllable contrast and on demand backlighting CPU 3 3V 32 bit MIPS based PR31700 RISC processor 75 MHz Memory 16 MB EDO DRAM 16 MB Fast Page Mode ROM Oth...

Страница 43: ... standard wav files with sample rates 8 kHz 8 or 16 bit mono 11 kHz 8 or 16 bit mono 11 025 kHz 8 or 16 bit mono 22 kHz 8 or 16 bit mono 22 050 kHz 8 or 16 bit mono Modem 28 8 kbps data 9600 bps fax send receive Expansion Velo Dock Provides connection to desktop computer and external power supply Begins synchronization if software is running on desktop computer Recharges batteries with Philips rec...

Страница 44: ...generates uses and can radiate radio frequency energy If not installed and used in accordance with the instructions it can cause harmful interference to radio communications However there is no guarantee that interference will not occur in a particular installation Determine if the equipment does cause interference to radio or television reception by turning the equipment off and on The user is en...

Страница 45: ...ion the FCC registration number and ringer equivalence number REN for this equipment If requested this information must be provided to the telephone company The telephone company may make changes in its facilities equipment operations or procedures that could affect the operation of the equipment If this happens the telephone company will provide advance notice in order for you to make the necessa...

Страница 46: ...y the user to this equipment or equipment malfunctions may give the telecommunications company cause to request the user to disconnect the equipment Users should ensure for their own protection that the electrical ground connections of the power utility telephone lines and internal metallic water pipe system if present are connected together This precaution may be particularly important in rural a...

Отзывы: