background image

29

CONNECTING RS-232C PORT

When the RS-232C port on the projector is connected to a
computer with an RS-232C cable (cross type, sold separately),
the computer can be used to control the projector and check
the status of the projector.

1.

Connect the supplied DIN-D-sub RS-232C cable to the RS-
232C port on the projector.

2.

Connect a RS-232C cable (sold separately) to the other end
of DIN-D-sub RS-232C cable and to the serial port on the
computer. See page 14 for details.

CAUTION!

– Do not connect or remove RS-232C cable to or from the

computer while it is on. This may damage your computer.

– The wireless mouse or RS-232C function may not operate if

your computer port is not correctly set up. Please refer to
the operation manual of the computer for details on setting
up/installing the correct mouse driver.

– A Macintosh adapter may be required for use with some

Macintosh computers. Contact your nearest Philips
Authorised LCD Projector Dealer or Service Centre.

– For more details on specification of the use of the RS-232C

please contact your nearest Philips Authorised LCD projector
Dealer or Service Centre.

AIR FILTER MAINTENANCE

• This projector is equipped with two air filters to ensure the

optimal operating condition of the projector.

• The air filters should be cleaned every 100 hours of use.

Clean the filters more often when the projector is used in a
dusty or smoky location.

• Have your nearest Philips Authorised LCD Projector Dealer

or Service Centre exchange the filter when it is no longer
possible to clean it.

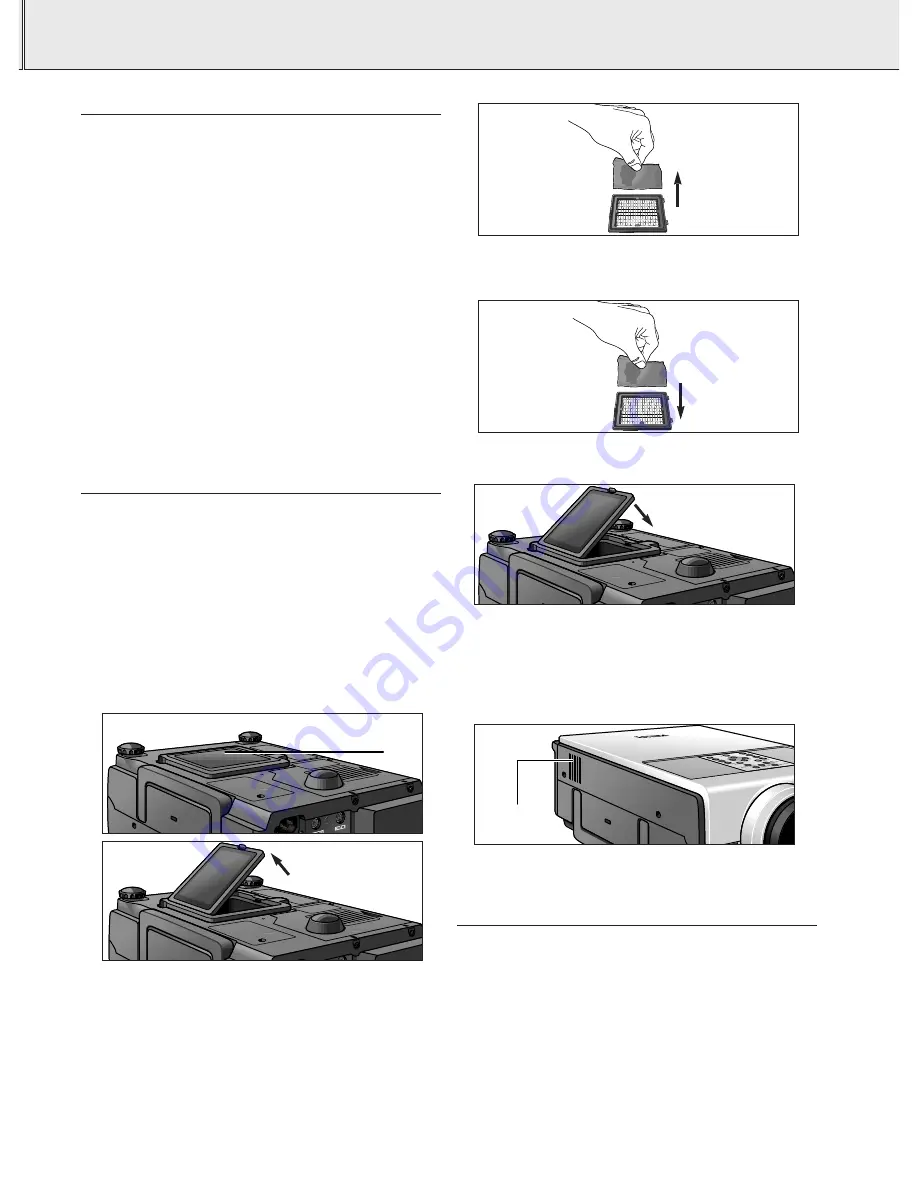
Cleaning and replacing the bottom air filter
1.

Unplug the powercord.

2.

Remove the bottom filter cover.

Turn over the projector. Press the tab and lift open the filter
cover in the direction of the arrow.

3.

Remove the air filter.

Grasp the air filter between your fingers and lift it out of the
filter cover.

4.

Clean the air filter. Clean the dust off the air filter and cover
with a vacuum cleaner extension hose.

5.

Replace the air filter. Place the air filter underneath the tabs
on the filter frame.

6.

Replace the filter cover. Insert the tab on the end of the
filter cover into the filter cover opening and press the filter
cover into position.

Note:

Be sure the filter cover is securely installed. The power will not
turn on unless it is correctly installed. 

Cleaning the side air filter (not removable)

If dust or dirt has collected inside the air filter, clean the filter
with a vacuum cleaner extension hose.

Note:

The side air filter cannot be removed.

LAMP MAINTENANCE

Lamp/Maintenance Indicators

• The warning lights on the projector indicate problems inside

the projector.

• There are two warning lights: a temperature warning

indicator (Temp.) which warns that the projector is too hot,
and a Lamp indicator (Lamp) which lets you know when to
change the lamp.

• If a problem occurs, either the Temperature warning

indicator or the Lamp indicator will light up red. After turning
off the power, follow the procedures given in the next table.

)

)

11. ADDITIONAL INFORMATION

Air
filter

Air filter
(not removable)

Connecting RS-232C port/Maintenance

Содержание LC1241

Страница 1: ...Philips Creative Display Solutions User guide ProScreen PXG20 Multimedia projector A V Mute A V Mute Auto sync Auto sync Input Input OK OK Lens Lens D Zoom D Zoom Menu Menu ...

Страница 2: ...ulated material within your unit that may cause an electric shock For the safety of everyone in your household please do not remove product covering The exclamation point calls attention to features for which you should read the enclosed literature closely to prevent operating and maintenance problems CAUTION DO NOT REMOVE SCREWS EXCEPT SPECIFIED USER SERVICE SCREW CAUTION TO REDUCE THE RISK OF EL...

Страница 3: ... As a safety feature this projector is equipped with powercord with a 3 pin grounded plug for USA versions only or a 2 pin grounded plug for European versions only The 3 pin 2 pin grounded plug will fit only into a grounding type power outlet If the plug does not fit use an adapter that is properly grounded or have an electrician install a grounded type outlet Do not attempt to modify this AC plug...

Страница 4: ... 23 24 AV Mute function 23 Turning off the On Screen Display 24 On Screen Display override function 25 Economy mode 25 Monitor out RS232C off function 25 Automatic power shutoff function 25 Password 25 Selecting the keylock level 26 Checking the lamp usage time 26 Checking the input signal 26 Setting a background image 26 Selecting a startup image 27 Status function 27 10 MENU TREE 28 11 ADDITIONA...

Страница 5: ...e in which case the user will be required to correct the interference at his own expense If this equipment does cause harmful interference to radio or television reception which can be determined by turning the equipment off and on the user is encouraged to try to correct the interference by one or more of the following measures Reorientate or relocate the receiving antenna Increase the distance b...

Страница 6: ... in RS 232C 110 120V 220 240V Audio in Video in Audio out Data out Computer RGB Component inputs S Video in RS 232C 110 120V 220 240V Audio in Video in Audio out Data out Computer RGB Component inputs M G F D J K E C B I L H A 4 3 2 1 9 5 0 6 7 8 A V Mute A V Mute Auto sync Auto sync Input Input OK OK Lens Lens D Zoom D Zoom Menu Menu fig 1 fig 2 fig 3 Lamp Temp A V Mute OK Lens Menu Power ON Stan...

Страница 7: ...n size Page 10 7 ANTI ALIASING DIGITAL KEYSTONE CORRECTION Digitally adjusts an image that is projected at an angle while maintaining image quality and brightness Page 10 8 DIGITAL IMAGE SHIFT FUNCTION Allows digital adjustment of 16 9 wide screen images up or down for easier viewing Page 10 9 EASY TO USE GRAPHICAL USER INTERFACE GUI A multi colour icon based menu system allows for simple image ad...

Страница 8: ...or powercord from the wall outlet and wait at least 10 minutes Then turn on the power by plugging the powercord back in This will return the projector to the normal operating condition TEMPERATURE MONITOR FUNCTION If the projector starts to overheat due to setup problems or a dirty air filter TEMP and will flash in the lower left corner of the picture If the temperature continues to rise the lamp ...

Страница 9: ...ressing the D Zoom function The button toggles between the digital magnification factors x1 x2 x3 x4 x6 and x8 0 D Freeze button Digital Freeze function to instantly freeze a moving image V Effect button Digital Video Effect correction to enhance image quality V Format button Allows to modify or customise the picture display mode Menu For activating and de activating the On Screen Display Menu Vol...

Страница 10: ...mation in the menu when the menu is on the screen activated 0 D Zoom For addressing the D Zoom function The button toggles between the digital magnification factors x1 x2 x3 x4 x6 and x8 Menu For activating and de activating the On Screen Display Menu Back light For switching on the button illumination The back light will switch off automatically after 5 seconds CONNECTIONS fig 3 A Data 1 in 15 pi...

Страница 11: ... 5 08 200 8 10 319 10 50 413 24 90 9 80 7 62 300 12 0 472 15 60 614 37 40 14 72 Notes Tolerances 3 in above mentioned values Values with a minus sign indicate the distance of the lens centre below the bottom of the screen POWER SUPPLY 1 Insert the powercord into the projectors AC socket and connect it to the wall socket Note The Power indicator lights up red the projector is now in the Power Stand...

Страница 12: ...tor before making any other connections see Installation MOVING THE PROJECTOR 1 Press the Standby OFF button to switch off the projector The standby indicator lights up red 2 Wait until the cooling fan has stopped about 2 minutes after the projector has been switched off and disconnect the powercord and all other cables 3 Put the lens cap back in place to prevent dust dirt or other contamination f...

Страница 13: ... 8670 953 1109 No CONNECTIONS Computer AV products side Projector side Computer VGA Cable CABLE ADAPTER Mini D Sub 15P male RCA pin male x 3 Mini D Sub 15P male RCA pin male x 3 3 5 mm stereo minijack 4 5 Computer Audio Cable 3 S Video Cable 6 USB mouse receiver RCA Audio Video Cable BNC RCA adapters 3x DIN D sub RS 232C cable 1 2 Scart RCA AV Adapter 7 8 Mini Din 4P male Mini Din 4P male Mini Din...

Страница 14: ...d computer last The DDC Plug and Play function of this projector operates only when used in conjunction with a VESA DDC compatible computer Connecting to an external RGB switcher or other compatible computers using the BNC input connectors Data 1 When connecting this projector to a computer select Computer RGB for Signal Type on the GUI Picture menu See page 20 1 To use the 5 BNC connectors slide ...

Страница 15: ...nding terminals of a DVD player or DTV decoder 3 To use the built in audio system connect one end of the computer audio cable optional to Audio Input 1 terminal B on the projector Connect the other end to the Audio output terminal on the video source When connecting the projector to a DVD player or a DTV decoder equipped with Component video outputs select Component for Signal Type in the GUI Pict...

Страница 16: ...nimum system requirements for the USB mouse receiver are Windows 98 and or Windows 2000 or higher Audio out Data out Mouse Audio out Data out Mouse Computer USB USB Data 1 in 15pin 15pin BNC R Pr L R APPARATEN SKALL ANSLUTAS TILL JODAT UTTAG B Pb VD G G sync Y HD C sync Data 1 in BNC Data 2 in Audio1 Audio2 Data 1 in 15pin 15pin BNC R Pr L R APPARATEN SKALL ANSLUTAS TILL JODAT UTTAG B Pb VD G G sy...

Страница 17: ...A V Mute again to turn the sound and picture back on 6 Press Standby OFF for switching off the projector Notes Wait until the cooling fan stops about 2 minutes after the projector has been switched off before disconnecting the powercord The power can be turned on again by pressing Power ON When the power is turned on the Power indicator and the Lamp indicator light green USING THE REMOTE CONTROL f...

Страница 18: ...o adjust the item 6 Press Menu to exit from the GUI GRAPHICAL USER INTERFACE Using the GUI Graphical User Interface Menu Screens This projector has two sets of menu screens Data Video that allow you to adjust the image and various projector settings These menu screens can be operated from the projector or the remote control with the following buttons Note The On Screen Displays will automatically ...

Страница 19: ...it can be changed to a specific system mode if the selected system mode is not compatible with the connected audiovisual equipment 1 Press Menu 2 Press 1 2 to select Options 3 Press 3 4 to select Video System 4 Press OK to move into the Video System mode 5 Press 4 to select the desired video system mode 6 Press OK to save the setting 7 To exit from the GUI press Menu 8 OPERATION PICTURE CONTROL Th...

Страница 20: ...se Phase Adjusts horizontal noise similar to tracking on VCR H Pos Centers the on screen image by moving it to the left or right V Pos Centers the on screen image by moving it up or down Auto Sync Adjustment Used to automatically adjust a computer image Auto Sync adjustment can be made manually by pressing Auto sync either on local keyboard and remote control or automatically by setting Auto Sync ...

Страница 21: ...appear for Computer RGB input in Data mode 1 Press Menu Menu bar and Picture menu screen appear GUI operation guide is also displayed 2 Press 3 4 to select a specific adjustment item 3 Press 1 2 to move the mark of the selected adjustment item to the desired setting 4 To exit from the GUI press Menu Notes To reset all adjustment items select Reset on the Picture menu screen and press OK The adjust...

Страница 22: ...cting moving images Progressive mode Progressive mode creates a single image using all available scanning lines Use this mode when projecting still images to avoid flicker and stripes that result from interlaced source still images AUDIO CONTROL This projector s audio is factory preset to standard settings However you can adjust it to suit your own preferences by adjusting the following audio sett...

Страница 23: ...he desired memory location of the setting 5 Press OK to save the setting 6 To exit from the GUI press Menu Selecting a saved setting 1 Press Menu 2 Press 1 2 to select Fine Sync 3 Press 3 4 to select Select Setting and then press 2 4 Press 3 4 to select the desired memory setting 5 Press OK to select the setting 6 To exit from the GUI press Menu Notes If the memory position has not been set the re...

Страница 24: ... the mirror so the light does not shine into the eyes of the audience Ceiling mount Setup It is recommended that you use the optional ceiling mount bracket for this installation Before mounting the projector contact your nearest Authorised LCD Projector Dealer or Service Centre to obtain the recommended ceiling mount bracket sold separately When the projector is in the inverted position use the up...

Страница 25: ...reater depth in the image V Effect Modes Selected Mode V Effect V Effect off Standard picture without Video Effect correction V Effect on Gives greater depth to darker portions of image Press V Effect Each time V Effect is pressed the V Effect level toggles as shown below PICTURE DISPLAY MODE V FORMAT on projector keyboard only This function allows you to modify or customise the picture display mo...

Страница 26: ...1024 x 768 960 x 768 FIT TO SCREEN 1024 x 768 DOT BY DOT 800 x 600 1024 x 768 1600 x 1200 1280 x 1024 VIDEO MODE 4 3 aspect ratio 480I P NTSC PAL SECAM 16 9 aspect ratio 720P 1080i 4 3 Letterbox Squeeze 480I P 720P 1080i NORMAL 1024 x 768 1024 x 768 WIDE 1024 x 576 1024 x 576 1024 x 576 1024 x 576 NORMAL WIDE 768 X 576 768 X 576 768 X 576 The digital image shift function can be used with these pic...

Страница 27: ...Standby power for Monitor Out RS 232C connection turned off Monitor Out RS 232C on 1 Press Menu 2 Press 1 2 to select Options 3 Press 3 4 to select MNTR Out RS232C and then press 2 4 Press 3 4 to select or 5 To exit from the GUI press Menu AUTOMATIC POWER SHUTOFF FUNCTION When no input signal is detected for more than 15 minutes the projector will automatically shut off The on screen message on th...

Страница 28: ... operation buttons on the projector do not function 1 Press Menu 2 Press 1 2 to select Options 3 Press 3 4 to select Keylock Level and then press 2 4 Press 3 4 to select the desired level 5 To exit from the GUI press Menu Notes To cancel the keylock level perform the above procedure using the remote control If a password has been set and the keylock level selected the password must be entered befo...

Страница 29: ...rtup Images Selected item Background image Philips PHILIPS default image None Black screen 1 Press Menu 2 Press 1 2 to select Options 3 Press 3 4 to select Startup Image and then press 2 4 Press 3 4 to select the startup image you want to display on the screen 5 Press OK to save the setting 6 To exit from the GUI press Menu STATUS FUNCTION This function can be used to display all the adjusted sett...

Страница 30: ...150 60 60 1024 x 864 1152 x 864 1152 x 870 1152 x 882 Resolution 640x480 Hor Freq Vert Freq ON OFF ON OFF 30 30 30 30 30 30 ON OFF ON OFF Philips Blue None Philips None ON OFF ON OFF Normal Level A Level B Old Password New Password Reconfirm DATA MODE MAIN MENU Picture Audio Options Language PRJ Mode Status Contrast Bright Color Tint Sharp Red Blue Reset I P Conversion Volume Balance Treble Bass R...

Страница 31: ... Projector Dealer or Service Centre exchange the filter when it is no longer possible to clean it Cleaning and replacing the bottom air filter 1 Unplug the powercord 2 Remove the bottom filter cover Turn over the projector Press the tab and lift open the filter cover in the direction of the arrow 3 Remove the air filter Grasp the air filter between your fingers and lift it out of the filter cover ...

Страница 32: ...jector and unfasten the user service screw that secures the lamp cage cover Then slide the cover in the direction of the arrow 4 Remove the lamp cage Remove the securing screws from the lamp cage Hold the lamp cage by the handle and pull it towards you 5 Replace the lamp cage Press the lamp cage firmly into the lamp cage compartment Fasten the securing screws Securing screws Maintenance Indicator ...

Страница 33: ...f the lamp cage or the inside of the projector CAUTION To avoid injury to yourself and damage to the lamp be sure to carefully follow each steps under Replacing the lamp Before or after replacing the lamp be sure to clean the air filters See page 29 for cleaning the air filters Resetting the lamp timer 1 Connect the powercord Plug the powercord into the AC socket of the projector 2 While pressing ...

Страница 34: ...STORTED EXCEPT FOR VIDEO MODE Change the input signal type See page 15 PICTURE IS BLURRED Adjust the focus See page 10 Projection distance is too long or too short to allow for proper focus See page 9 PICTURE NOISE APPEARS Adjust the phase setting See page 18 Noise may appear when used with certain computers 480P IMAGES DO NOT APPEAR Set the resolution mode to 480P See page 17 AN UNUSUAL SOUND IS ...

Отзывы: