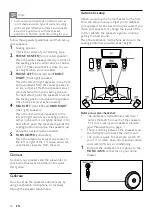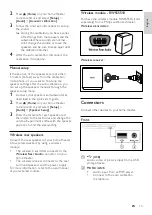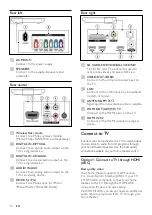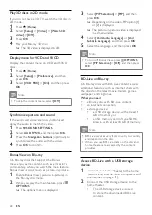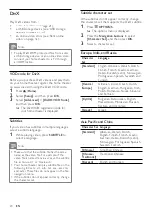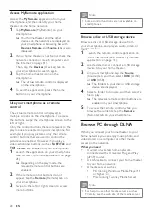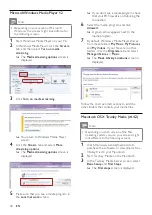
background image

15

English


2

  On your TV, turn on HDMI-CEC. For 

details, see the TV user manual.


»

When you play a disc on your home 

theater, the video is automatically 

displayed on TV and the audio is 

automatically played on the home theater. 

3

  To play audio from TV programs through 

your home theater, connect an additional 

audio cable (see ‘Connect audio from TV 

and other devices’ on page 17). 

4

  If audio from the TV does not play 

automatically on your home theater, set up 

the audio manually (see ‘Set up audio for 

connected devices’ on page 17).

Note


If your TV has a DVI connector, you can use an 

HDMI/DVI adapter to connect to TV.

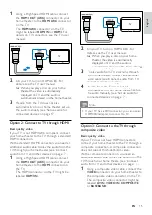
Option 3: Connect to the TV through 

composite video

Basic quality video

If your TV does not have HDMI connectors, 

connect your home theater to the TV through a 

composite connection. A composite connection 

does not support high-definition video.

With a composite connection, you need an 

additional audio cable to play the audio from the 

TV through your home theater (see ‘Connect 

audio from TV and other devices’ on page 17).

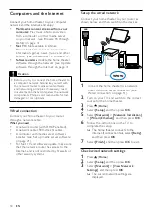
1

  Using a composite video cable, connect the 

VIDEO

 connector on your home theater to 

the composite video connector on the TV.

The composite video connector might be 

labeled 

AV IN

VIDEO IN

COMPOSITE

or 

BASEBAND

.

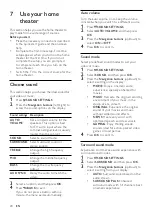
TV

1

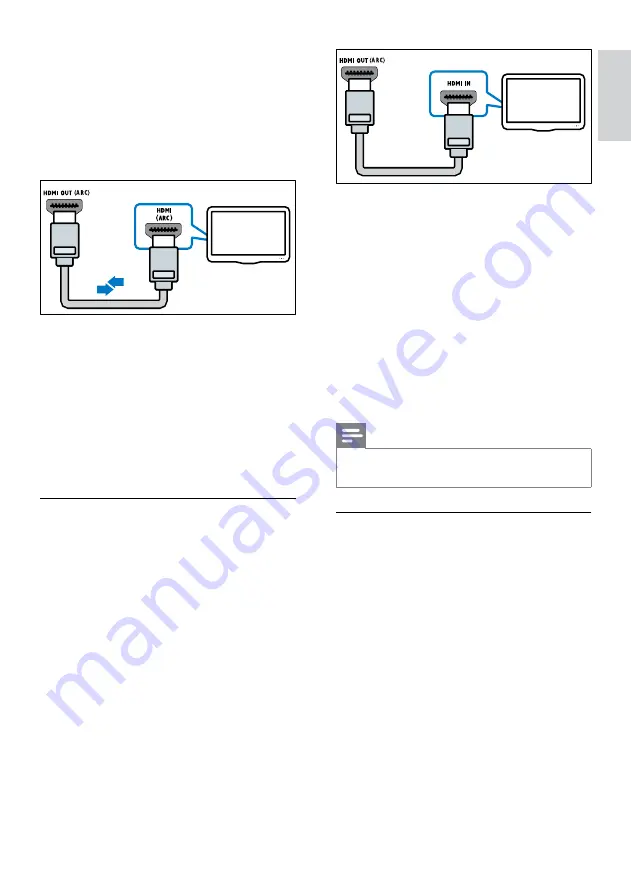
  Using a High Speed HDMI cable, connect 

the 

HDMI OUT (ARC)

 connector on your 

home theater to the 

HDMI ARC

 connector 

on the TV. 

The 

HDMI ARC

 connector on the TV 

might be labeled 

HDMI IN

 or 

HDMI

. For 

details on TV connectors, see the TV user 

manual.


2

  On your TV, turn on HDMI-CEC. For 

details, see the TV user manual.


»

When you play a disc on your home 

theater, the video is automatically 

displayed on TV and the audio is 

automatically played on the home theater.

3

  If audio from the TV does not play 

automatically on your home theater, set up 

the audio manually (see ‘Set up audio for 

connected devices’ on page 17).

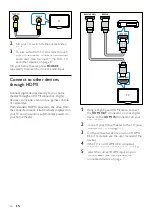
Option 2: Connect to TV through HDMI

Best quality video

If your TV is not HDMI ARC compliant, connect 

your home theater to the TV through a standard 

HDMI connection.

With a standard HDMI connection, you need an 

additional audio cable to play the audio from the 

TV through your home theater (see ‘Connect 

audio from TV and other devices’ on page 17).

1

  Using a High Speed HDMI cable, connect 

the 

HDMI OUT (ARC)

 connector on your 

home theater to the 

HDMI

 connector on 

the TV.

The HDMI connector on the TV might be 

labeled 

HDMI IN

TV

EN

Содержание HTS8562/12

Страница 1: ... com welcome EN User manual DA Brugervejledning DE Benutzerhandbuch EL Εγχειρίδιο χρήσης ES Manual del usuario FI Käyttöopas FR Mode d emploi IT Manuale utente NL Gebruiksaanwijzing NO Brukerhåndbok PT Manual do utilizador SV Användarhandbok TR Kullanım kılavuzu ...

Страница 2: ......

Страница 3: ...ate software through the Internet 38 Update software through USB 38 10 Product specifications 39 11 Troubleshooting 42 12 Index 45 Contents 1 Using help 4 Navigate the onscreen help 4 2 Help and support 5 Update your onscreen help 5 Tutorials 6 FAQs 6 Contact Philips 6 3 Notice 6 Open source software 6 Trademarks 6 4 Important 8 Safety 8 Care for your product 8 Care of the environment 8 3D health ...

Страница 4: ...o develop products that contribute to a greener environment To save paper and the environment access the help on your home theater through the onscreen interface The onscreen help contains all the information that you need to set up your home theater However if you prefer to print the user manual download the PDF version from www philips com support Follow the instructions on the website to select...

Страница 5: ... update 5 Disconnect the USB flash drive from the home theater 2 Help and support Watch video tutorials download a software update and find answers to many frequently answered questions FAQs on your product at www philips com Update your onscreen help Philips continually tries to improve its products To make sure that your onscreen help is up to date with the latest information update your home th...

Страница 6: ...lu ray 3D logo are trademarks of Blu ray Disc Association BONUSVIEW BD LIVE and BONUSVIEW are trademarks of Blu ray Disc Association AVCHD and AVCHD logo are trademarks of Matsushita Electric Industrial Co Ltd and Sony Corporation Warning If power fails during the update do not remove the USB flash drive from the home theater If an error occurs during the update retry the procedure If the error re...

Страница 7: ... or registered trademarks of HDMI licensing LLC in the United States and other countries SDHC Logo is a trademark of SD 3C LLC CLASS 1 LASER PRODUCT DVD Video is a trademark of DVD Format Logo Licensing Corporation Java and all other Java trademarks and logos are trademarks or registered trademarks of Sun Microsystems Inc in the United States and or other countries x v Colour is a trademark of Son...

Страница 8: ...cycled and reused 4 Important Read and understand all instructions before you use your home theater If damage is caused by failure to follow instructions the warranty does not apply Safety Risk of electric shock or fire Never expose the product and accessories to rain or water Never place liquid containers such as vases near the product If liquids are spilt on or into the product disconnect it fro...

Страница 9: ...revent potential negative consequences for the environment and human health Your product contains batteries covered by the European Directive 2006 66 EC which cannot be disposed with normal household waste Please inform yourself about the local rules on separate collection of batteries because correct disposal helps to prevent negative consequences for the environmental and human health 3D health ...

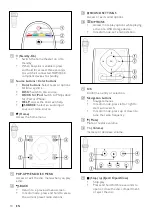
Страница 10: ...lose the disc compartment or eject the disc a Standby On Switch the home theater on or to standby When EasyLink is enabled press and hold for at least three seconds to switch all connected HDMI CEC compliant devices to standby b Source buttons Color buttons Color buttons Select tasks or options for Blu ray discs DISC Switch to disc source DOCK for iPod Switch to Philips dock for iPod or iPhone HEL...

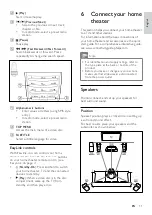
Страница 11: ...results place your speakers and the subwoofer as shown below b Play Start or resume play c Previous Next Skip to the previous or next track chapter or file In radio mode select a preset radio station d Pause Pause play e Fast Backward Fast Forward Search backwards or forward Press repeatedly to change the search speed a Alphanumeric buttons Enter values or letters using SMS style entry In radio mo...

Страница 12: ...kers 1 Seating position This is the center of your listening area 2 FRONT CENTER front center speaker Place the center speaker directly in front of the seating position either above or below your TV Make sure that it is close to your ear height when you are seated 3 FRONT LEFT front left and FRONT RIGHT front right speakers Place the left and right speakers in the front and equidistant from the ce...

Страница 13: ...ect the calibration microphone Manual setup If the position of the speakers are more than 5 meters 16 feet away from the calibration microphone or you want to fine tune the speaker settings after the auto calibration you can set up the speakers manually through the speaker setup menu 1 Connect your speakers and subwoofer as described in the Quick start guide 2 Press Home on your home theater remot...

Страница 14: ... ARC Best quality video Your home theater supports HDMI version 1 4 Audio Return Channel ARC If your TV is HDMI ARC compliant connect your home theater to the TV through the HDMI ARC connection for easy and quick setup With HDMI ARC you do not need an additional audio cable to play audio from TV through your home theater Rear left a AC MAINS Connect to the power supply b SPEAKERS Connect to the su...

Страница 15: ...nector on your home theater to the composite video connector on the TV The composite video connector might be labeled AV IN VIDEO IN COMPOSITE or BASEBAND TV 1 Using a High Speed HDMI cable connect the HDMI OUT ARC connector on your home theater to the HDMI ARC connector on the TV The HDMI ARC connector on the TV might be labeled HDMI IN or HDMI For details on TV connectors see the TV user manual ...

Страница 16: ...ted devices on page 17 TV 2 On your TV switch to the correct video input 3 To play audio from TV programs through your home theater connect an additional audio cable see Connect audio from TV and other devices on page 17 On your home theater press SOURCE repeatedly to select the correct audio input Connect to other devices through HDMI Connect digital devices directly to your home theater through ...

Страница 17: ...eater to select the correct audio input VCR Connect audio from TV and other devices Play audio from TV or other devices through your home theater Use the best quality connection available on your TV home theater and other devices Note The audio connections in this user manual are only recommendations You can use other connections too When your home theater and TV are connected through HDMI ARC an ...

Страница 18: ... from your computer Play music photo and video from a computer or other media server on your network see Browse PC through DLNA on page 28 Net TV Not available in China Browse Net TV services to access online information games news music and other services see Browse Net TV on page 31 Software update Update the home theater software through the network see Update software through the Internet on p...

Страница 19: ...one and then press OK to exit Wireless connection Connect your home theater to your router through a wireless connection What you need A network router with DHCP enabled A computer with media server software installed see Set up media server software on page 29 For Net TV and software update make sure that the network router has access to the Internet and is not restricted by firewalls or other se...

Страница 20: ... the audio stream SURROUND PLUS Enhanced surround mode with 5 1 channels best cinematic experience 7 Use your home theater This section helps you use the home theater to play media from a wide range of sources Before you start Make the necessary connections described in the quick start guide and the onscreen help Complete the first time setup First time setup appears when you turn on the home thea...

Страница 21: ...K MULTI CH Immersive multi channel sound for an enhanced movie experience STEREO Two channel stereo sound Ideal for listening to music 4 Press OK to confirm Equalizer Change the high frequency treble mid frequency mid and low frequency bass settings of the home theater 1 Press SOUND SETTINGS 2 Select TREBLE MID or BASS and then press OK 3 Press the Navigation buttons up down to change the frequenc...

Страница 22: ...and internet see Computers and the Internet on page 18 2 Connect the USB storage device to the home theater The USB storage device is used to store the downloaded BD Live content Play 3D discs in 2D mode If you do not have a 3D TV watch the 3D disc in 2D mode 1 Press Home 2 Select Setup Video Watch 3D video Off 3 Press OK 4 Play your Blu ray 3D disc The 3D video is displayed in 2D Display menu for...

Страница 23: ...ress OK 5 Select Advanced Local Storage USB and then press OK 6 Select the BD Live icon in the disc menu and then press OK BD Live starts to load The loading time depends on the disc and your internet connection 7 Press the Navigation buttons to navigate BD Live and then press OK to select an item Access BD Live with an SD card 1 Connect your home theater to the home network and internet see Compu...

Страница 24: ...vX videos from a disc see Discs on page 21 a USB storage device see USB storage devices on page 23 or an online video store see Rent online video on page 32 Note To play DivX DRM protected files from a disc a USB storage device or an online video store connect your home theater to a TV through an HDMI cable VOD code for DivX Before you purchase DivX videos and play them on your home theater regist...

Страница 25: ...ows View a slideshow of your pictures stored in your disc or a USB storage device 1 Select a picture from a disc or USB storage device and then press Play 2 Press OPTIONS Audio video and picture options Use advanced features when you play audio video or media files from a disc or a USB storage device Audio options While playing audio repeat an audio track a disc or a folder 1 Press OPTIONS repeate...

Страница 26: ...pears on the display panel 3 Press Navigation buttons and OK to select the following settings Slide Animation Select an animation for the slideshow Duration per slide Select a display speed for each picture in a slideshow 4 Press to stop the slideshow Musical slideshows Create a musical slideshow to play music and pictures at the same time 1 Select a music track and then press OK 2 Press BACK and ...

Страница 27: ...for Philips MyRemote application 3 Follow the instructions on your smartphone to download the application The MyRemote MyRemote icon is added to the home screen of your smartphone 3 Press the buttons on the MP3 player to select and play audio files or music iPod or iPhone When you connect a Philips dock for iPod iPhone you can use the home theater to play music movies and photos from your iPod or ...

Страница 28: ... MyRemote application Access the MyRemote application from your smartphone and then identify your home theater on the home network 1 Tap MyRemote MyRemote on your smartphone Your home theater and the other devices on the network are displayed on your smartphone A browsing bar with Devices Remote and Source tabs is also displayed 2 If your home theater is not found check the network connection see ...

Страница 29: ...files Set up media server software To enable media sharing set up the media server software Before you start Connect your home theater to your home network see Computers and the Internet on page 18 Connect your computer to the same home network Make sure that your PC firewall allows you to run Windows Media Player programs Switch on your computer and the router Microsoft Windows Media Player 11 No...

Страница 30: ... to the following screens 1 Visit http www twonkymedia com to purchase the software or download a free 30 day trial to your Macintosh 2 Start Twonky Media on the Macintosh 3 In the Twonky Media Server screen select Basic Setup and First Steps The First steps screen is displayed Microsoft Windows Media Player 12 Note Depending on your version of Microsoft Windows the screens might look different to...

Страница 31: ...ilips 4 Press the Navigation buttons to select App Gallery App Gallery or Internet Internet and then press OK Access App Gallery App Gallery to add more Apps to your screen Access Internet Internet to browse the Internet 5 Press BACK to return to the previous page or press Home to exit 4 Type a name for your media server and then click Save changes 5 Back in the Twonky Media screen select Basic Se...

Страница 32: ...period Browse internet 1 Press the Navigation buttons to select Internet Internet from the Net TV home page and then press OK 2 Select the address bar and then press the Alphanumeric buttons to enter the URL of the website To clear the text in the address bar press BACK To display the onscreen keyboard follow the instructions on the screen 3 After you enter the URL press the Navigation buttons to ...

Страница 33: ... press OK To play the audio from the TV speakers select Off and skip the following steps 4 Select EasyLink Audio Input Mapping and then press OK 5 Follow the instructions on the TV to map the audio of the connected device to the audio inputs on your home theater When you have downloaded a video to your card you can watch it only on your home theater You can t move the card and watch it on another ...

Страница 34: ...ess Home Picture Change the picture settings to suit your preferences Note The best setting is automatically selected for the TV If you change the setting make sure that the TV supports the new settings Picture settings and format 1 Press Home 2 Select Setup and then press OK 3 Select Video and then press OK 4 Change the following settings and then press OK TV Display Picture format Picture Settin...

Страница 35: ...ght Mode On and then press OK Picture color Deep Color recreates the natural world on your TV screen and displays vivid images in over a billion of colors If your TV supports Deep Color and is connected to your home theater through an HDMI cable you can change the Deep Color 1 Press Home 2 Select Setup and then press OK 3 Select Video HDMI Deep Color and then press OK 4 Select the following option...

Страница 36: ...d If you do not have a password or you have forgotten enter 0000 5 Press OK Restore sound mode settings Restore the equalizer settings of all the sound modes to the default values 1 Press Home 2 Select Setup and then press OK 3 Select Audio Default sound settings and then press OK Language Select a language for the home menu audio and subtitles Home menu 1 Press Home 2 Select Setup and then press ...

Страница 37: ...er than your child s age 1 Press Home 2 Select Setup and then press OK 3 Select Preference Parental Control and then press OK A message prompts you to enter the password 4 Enter the password with the Numeric buttons 5 Select an age rating and then press OK To play all discs irrespective of the rating select level 8 or Off Energy saving Save energy by changing the following settings Auto standby Wh...

Страница 38: ...rive to your home theater 2 Switch your TV to the correct source for your home theater 3 Press Home and then select Setup 4 Select Advanced Software Update USB 9 Update software To continue to get the best features and support for your home theater update the software regularly Compare the version of your current software with the latest version on www philips com support Check software version 1 ...

Страница 39: ...e files MP3 media WMA media DivX Plus HD media USB storage device Country DVD BD Europe United Kingdom Korea Latin America Australia New Zealand Russia India China A A A A C C C C Asia Pacific Taiwan 5 Follow the instructions on the TV to confirm the update When the software update is complete the home theater automatically switches off and restarts If it does not disconnect the power cord for a f...

Страница 40: ...0 Mbps MPEG 4 ASP 10 Mbps max H 264 AVC HP 4 1 4 0 MP 3 2 3 1 3 0 20 Mbps peak 40 Mbps File formats Audio aac mka mp3 wma wav mp4 m4a Video avi divx mp4 mkv asf wmv mpg mpeg Picture jpg jpeg gif png Audio formats Your home theater supports the following audio files Extension Container Audio codec Bit rate mp3 MP3 MP3 32 kbps 320 kbps wma ASF WMA 64 kbps 160 kbps aac AAC AAC HE AAC 192 kbps wav WAV...

Страница 41: ...Hz Latin America Asia Pacific 110 127 V 220 240 V 50 60 Hz Power consumption 105 W Standby power consumption 0 5 W Dimensions WxHxD 435 x 63 5 x 342 5 mm Weight 4 0 kg mkv files in MKV container Audio codec Video codec Bit rate PCM Dolby Digital DTS core MPEG MP3 WMA AAC HE AAC MPEG 1 MPEG 2 20 Mbps peak 40 Mbps MPEG 4 ASP 10 Mbps max H 264 AVC HP 4 1 4 0 MP 3 2 3 1 3 0 20 Mbps peak 40 Mbps WMV9 2...

Страница 42: ... Change the HDMI video setting or wait for 10 seconds for auto recovery see Picture resolution on page 35 Disc does not play high definition video Make sure that the disc contains high definition video Make sure that the TV supports high definition video Use an HDMI cable to connect to the TV Subwoofer Output power 230W Impedance 3 ohm Speaker drivers 165 mm 6 5 woofer Dimensions WxHxD 196 x 395 x...

Страница 43: ...s EasyLink HDMI CEC To make the home theater work independently switch off EasyLink Sound No sound from home theater speakers Connect the audio cable from your home theater to your TV or other devices You do not need a separate audio connection when the home theater and TV are connected through an HDMI ARC connection or a device is connected to the HDMI IN connector on your home theater Set up the...

Страница 44: ...s set up Use a wired network installation see Set up the wired network on page 18 or wireless network installation see Wireless connection on page 19 Make sure that the Blu ray disc supports BD Live Clear memory storage see Clear memory on page 23 Cannot play video or photos from an iPod or iPhone on the TV Browse and select videos and photos from the iPod or iPhone screen and play them on your TV...

Страница 45: ...ol 36 radio 26 D disable audio post processing 35 BD Live 23 HDMI CEC 33 discs 3D disc in 2D mode 22 audio 25 audio language 36 BD Live 22 Bonus View 22 control buttons 21 DivX 24 menu language 36 options 25 12 Index 2 2D video 22 3 3D 3D disc in 2D mode 22 3D safety 9 A advanced BD Live security 23 enhanced audio 35 restore default settings 37 software update 38 software version 38 amplifier 41 a...

Страница 46: ...13 play 26 multimedia content from disc 21 from online stores 32 from PC 28 from USB storage device 23 multiview 33 picture 25 picture in picture 22 play 21 subtitle 36 synchronize picture and sound 22 time search 25 titles 25 display panel 9 DivX character set 24 subtitles 24 VOD code 24 DLNA 28 dock your iPod or iPhone 27 E EasyLink HDMI CEC audio input mapping 33 control buttons 11 one touch pl...

Страница 47: ...37 subtitle 36 product specifications 39 R radio control buttons 26 FM antenna 14 listen to radio 26 specifications 41 tune stations 26 N Net TV access 31 clear browsing history 32 online video stores 32 watch Net TV page 31 network home network 18 name a device 19 settings 18 troubleshooting 44 update home theater software 38 Wi Fi 19 wired connection 18 wireless connection 19 night mode 35 O one...

Страница 48: ... 38 electronic user manual 5 from a USB storage device 38 from network 38 USB format 41 ratings 37 recycling 8 region codes 39 remote control batteries 42 overview 9 virtual 27 rent video format SD card 32 online video stores 32 repeat 25 S safety disposal 8 use of the product 8 watching 3D 9 screen saver 37 SD card 32 settings 3D video 35 audio 35 auto standby 37 auto subtitle shift 35 default 37...

Страница 49: ... 32 picture resolution 35 picture settings 34 synchronize picture and sound 22 video and slideshow 27 VOD code for DivX 24 watch 3D 22 video formats 41 video on demand format SD card 32 online video stores 32 video options 25 VOD code for DivX 24 W wired network settings 18 wired connection 18 wireless network settings 19 Wi Fi 19 Wi Fi dongle 19 wireless connection 19 wireless speakers 13 EN ...

Страница 50: ...001 A1 2003 A2 2006 EN55020 2007 EN55022 2006 A1 2007 _ EN55024 1998 A1 2001 A2 2003 EN61000 3 2 2006 A1 2009 A2 2009 EN61000 3 3 2008 EN62311 2008 _ IEC62087 2008 IEC62301 2005 EN300 328 V1 7 1 2006 EN301 489 1 V1 8 1 2008 EN301 489 17 V2 1 1 2009 Following the provisions of Conformément aux exigences essentielles et autres dispositions pertinentes de 2006 95 EC Low Voltage Directive Directive Ba...

Страница 51: ...Language Code ...

Страница 52: ... 2011 Koninklijke Philips Electronics N V All rights reserved sgpjp_1128 12_v1a ...

Отзывы: