background image

English

EN


 29

Pl

ay

Play music

 Note

For some commercial audio disc, playback may 
resume from the point where it was last stopped. To 
start playback from 

fi

 rst track, press 

í

.

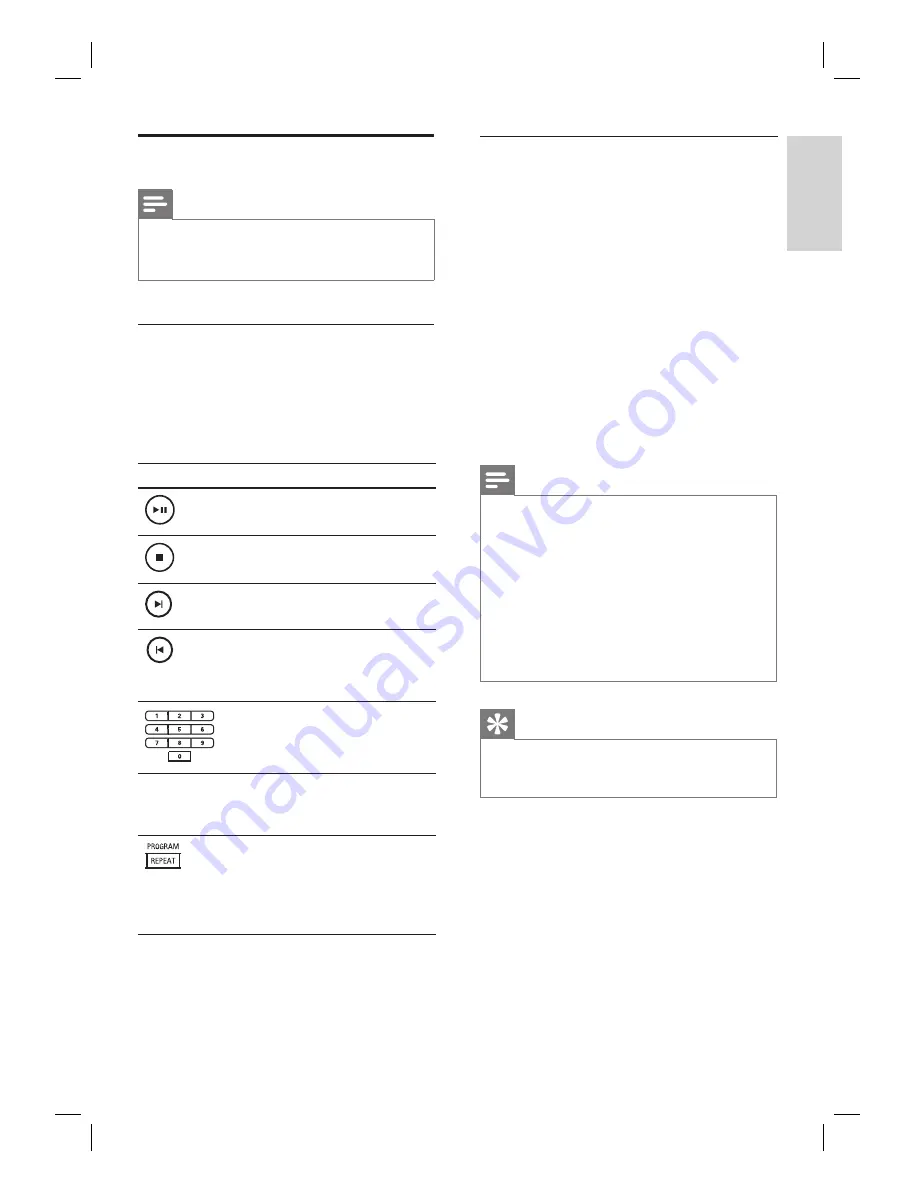
Control a track

Play a track.

Use the remote control to control the 
track. 

Button

Action

Pause/ resume play.

Stop play.

Jump to the next track.

Return to the beginning of the 
current track or jump to the 
previous track.

Direct enter the track number.

m  M

Search backward/ forward.

To change search speed, 
press this button repeatedly.

Toggle through various repeat/
shuf

fl

 e play mode; or turn off 

repeat mode.

Repeat options vary 
depending on the disc type.  

Play MP3/WMA music 

MP3/WMA is a type of highly compressed 
audio 

fi

 le (

fi

 les with .mp3 or .wma extensions).

Insert a disc or USB that contains the MP3/
WMA music.

Press 

DISC

 or 

USB

.

  A contents menu is displayed.

Select a folder, then press 

OK

.

Select a track to play, then press 

u

.

To return to the main menu, press 

v


until ‘Previous’ folder is selected, then 
press 

OK

.

 Note

For CDs recorded in multiple sessions, only the 

fi

 rst 

session is played.
This unit does not support MP3PRO audio format.
If any special characters are present in the MP3 track 
name (ID3) or album name, it might not be displayed 
correctly on the screen because these characters are 
not supported.  
Some WMA is protected by Digital Rights 
Management (DRM), it cannot be played on this unit.
Folders/

fi

 les exceed the supported 

fi

 le limit of this 

unit will not be displayed or played.


Tips

To display the data disc contents without folders, see 
chapter ‘Adjust settings’ - 

[ Preference Setup ]

 > 

[ MP3/JPEG Nav ] 

for details.

Содержание HTS8140

Страница 1: ...TS8150 EN DVD Home Theatre System 5 FR Home Cinéma DVD 53 ES Cine en casa con DVD 101 DE DVD Home Entertainment System 149 NL DVD home theatre 197 Register your product and get support at www philips com welcome ...

Страница 2: ...ug proceed as follows Connect the blue wire to the terminal marked N or coloured black Connect the brown wire to the terminal marked L or coloured red Do not connect either wire to the earth terminal in the plug marked E or e or coloured green or green and yellow Before replacing the plug cover make certain that the cord grip is clamped over the sheath of the lead not simply over the two wires Cop...

Страница 3: ...rlaite Varoitus Laitteen käyttäminen muulla kuin tässä käyttöohjeessa mainitulla tavalla saattaa altistaa käyttäjän turvallisuusluokan 1 ylittävälle näkymättömälle lasersäteilylle Oikeus muutoksiin varataan Laite ei saa olla alttiina tippu ja roiskevedelle Huom Toiminnanvalitsin on kytketty toisiopuolelle eikä se kytke laitetta irti sähköverkosta Sisäänrakennettu verkko osa on kytkettynä sähköverk...

Страница 4: ...ociated logos are trademarks of DivX Inc and are used under license Official DivX Ultra Certified product Plays all versions of DivX video including DivX 6 with enhanced playback of DivX media files and the DivX Media Format Windows Media and the Windows logo are trademarks or registered trademarks of Microsoft Corporation in the United States and or other countries HDMI and HDMI logo and High Def...

Страница 5: ...isound setup 20 Turn on Progressive Scan 22 Activate EasyLink control 23 Select a play source 24 5 Play 25 Play from disc 25 Play video 26 Play music 29 Play photo 30 Play from USB device 31 Play from portable media player 32 Play from iPod 32 Play from radio 34 6 Adjust sound 36 Control the volume 36 Adjust Bass Treble 36 Select Ambisound 36 Select a preset sound effect 37 7 Adjust settings 38 Ge...

Страница 6: ...vision Corporation Reverse engineering or disassembly is prohibited 1 Important Safety and important notice Warning Risk of fire or electric shock Ensure that air can circulate freely through the ventilation holes on this unit Allow at least 5 10 cm clearance around the unit Never expose this unit to direct sunlight naked flames or heat Never place this unit on other electrical equipment Keep away...

Страница 7: ... to share functionality with all HDMI CEC compliant devices over HDMI It enables the connected devices to control each other with a single remote control Note Philips does not guarantee 100 interoperability with all HDMI CEC devices Ambisound Philips Ambisound technology reproduces multi channel surround sound with fewer speakers to give an embracing surround experience without the hassle of setti...

Страница 8: ...NK switch to AUX SCART AUX1 INPUT AUX2 INPUT AUX3 INPUT OPTICAL INPUT DIGITAL INPUT or MP3 LINK that corresponds to the socket you used to connect the external device DOCK switch to the iPod that is connected to the docking station d INFO Display the current status or disc information Display photo files in 12 thumbnails view e OPTIONS Access or exit Options menu this menu provides various setting...

Страница 9: ...ess left or right for fast backward or forward search RADIO press up or down to tune the radio frequency RADIO press left or right to start auto search n BACK TITLE Return to the previous display menu For DVD go to title menu For VCD version 2 0 or SVCD with PBC turned on return to the menu during playback o í ë Previous Next Skip to the previous or next title chapter track RADIO select a preset r...

Страница 10: ...e Start or pause disc play RADIO start auto radio installation only available for first time setup e Volume control Adjust the volume level f x Stop Stop disc play RADIO erase the current preset radio station g SOURCE Select a play media DISC USB DOCK RADIO FM OPTICAL INPUT DIGITAL INPUT AUX SCART AUX1 INPUT AUX2 INPUT AUX3 INPUT or MP3 LINK h Z Open Close Open or close the disc compartment i Disc...

Страница 11: ... any connections ensure that all the devices are disconnected from the power outlet Place the unit Place this unit on top of a table or mount it on the wall see chapter Mount the DVD Home Theatre unit Never place this unit in an enclosed cabinet Install this unit near the AC outlet where the AC power plug can be easily reached 1 Place this DVD Home Theatre unit near to the TV Place it at a height ...

Страница 12: ...Connect to scart socket for a standard TV Option 3 Connect to component video socket for a standard TV or Progressive Scan TV Note You must connect this unit directly to a TV Before you connect 1 Pull up the catch to remove the rear cover 2 Connect the cables to the corresponding sockets and direct the cables to the CABLE OUT point 3 Once complete close the rear cover Note All the cables must be p...

Страница 13: ...Use a HDMI DVI adaptor in case your TV has only a DVI connection An extra audio connection is needed to complete this connection To route the audio from your TV to this DVD Home Theatre unit connect an audio cable from the audio input on this unit to the audio output on your TV This type of connections provide best picture quality Option 2 Connect to Scart socket SCART OUT AUX SCART SCART 1 Connec...

Страница 14: ...ils Tips The component video input socket on your TV may be labelled as Y Pb Cb Pr Cr or YUV This type of connections provide good picture quality Connect subwoofer LOUDSPEAKERS TO SUBWOOFER 1 3 4 2 5 1 Unwind the subwoofer s interconnect cable at TO MAIN UNIT 2 Connect the white end of the interconnect cable to the LOUDSPEAKERS socket on this unit 3 Connect the grey end of the interconnect cable ...

Страница 15: ...V Note To listen to the audio output from this connection press AUX DI MP3 LINK repeatedly until AUX1 INPUT is displayed on the display panel Connect audio from cable box recorder game console You can choose to connect to analogue or digital socket depending on the device capabilities Connect to analogue sockets AUX 2 AUX 3 R L 1 Connect an audio cable not supplied from the AUDIO IN AUX2 or AUX3 s...

Страница 16: ...e To listen to the audio output from this connection press AUX DI MP3 LINK repeatedly until OPTICAL INPUT is displayed on the display panel Connect portable media player MP3 1 Connect a 3 5mm stereo audio cable supplied from the MP3 LINK socket on this unit to the phone socket on your portable media player such as MP3 player Note To listen to the audio output from this connection press AUX DI MP3 ...

Страница 17: ...he audio output from this connection press DOCK Mount the DVD Home Theatre unit Caution Risk of personal injury and damage to the unit Allow only qualified persons to mount the unit 1 Ensure all the required cables are connected to this unit 2 Remove the screws and detach the DVD Home Theatre stand then close the rear cover 3 Attach the supplied knobs to the rear of this unit 4 Position the suppli...

Страница 18: ...V leave at least 10cm 4 inches of space between the TV and the bracket 5 Secure the bracket onto the wall with the screws not supplied 6 Hook the DVD Home Theatre unit firmly onto the mounted bracket Slide the knobs through the key holes and lock into position ...

Страница 19: ...he batteries Control a play source 1 Select the source you wish to control by pressing the DISC USB RADIO or AUX DI MP3 LINK or DOCK button 2 Then select the desired function for example í ë Navigate through the menu 1 Point the remote control directly at the remote sensor on this unit and select the desired function 2 Use the following buttons on the remote control to navigate through the on scre...

Страница 20: ...t the correct input on your TV Start Ambisound setup When you turn on this unit for the first time follow the instructions on the TV to complete the Ambisound setup in order to obtain the best possible surround sound effect Note Before you start ensure that you have made all the required connections Complete the Ambisound setup for this unit before you insert a disc to play 1 Press DISC to switch ...

Страница 21: ... placed Select Height Back Change High 1 2m 47in Low 0 8m 32in Default 0 8 1 2m 32 47in 8 Select the height of which the DVD Home Theatre unit SoundBar is placed then press B Listening Position menu is displayed Select the distance between your listening position and the SoundBar system Select Listening Position Back Change Near 2m 78in Far 3m 118in Default 2 3m 78 118in 9 Select the distance betw...

Страница 22: ...isplay TV Type Progressive Component Video Video Setup Closed Caption 6 Select Progressive On then press OK A warning message is displayed 7 To proceed select OK in the menu and press OK The progressive setup is complete Note If a blank distorted screen is displayed wait for 15 seconds for the auto recover If no picture displayed turn off the progressive scan mode as follows 1 Press Z to open the ...

Страница 23: ...le to render the audio signals from the active source It switches automatically to the corresponding audio input and output the sound from its speaker system Before you can enjoy this function you have to map the audio inputs to the connected devices You can use any HDMI CEC TV device remote control to adjust the volume Note To enable one touch play function a video disc must be placed in the disc...

Страница 24: ...steps 8 9 to map other connected devices 10 To exit the menu press OPTIONS Select a play source On the main unit SOURCE AMBISOUND 1 Press SOURCE repeatedly to select DISC USB DOCK RADIO FM OPTICAL INPUT DIGITAL INPUT AUX SCART AUX1 INPUT AUX2 INPUT AUX3 INPUT MP3 LINK DISC On the remote control Press DISC to switch to DISC mode Press USB to switch to USB mode Press RADIO to switch to FM band Press...

Страница 25: ...ed video files are not supported Play a disc Caution Never place any objects other than discs into the disc compartment Never touch the disc optical lens inside the disc compartment 1 Press Z to open the disc compartment 2 Insert a disc with its label facing up For double sided disc load the side to play faces up 3 Press Z to close the disc compartment and start disc play To view disc play turn on...

Страница 26: ...y forward play is possible Change video play 1 Play a title 2 Use the remote control to change the video play Button Action Change audio language Only applicable to discs with multiple audio language or channel Change subtitle language Only applicable to discs with multiple subtitle language Toggle through various repeat shuffle play mode or turn off repeat mode Repeat options vary depending on th...

Страница 27: ...arts play from the first title During playback you can press BACK to return to the menu if the PBC mode is on Tips The default setting for PBC is on To change the default setting see chapter Adjust settings Preference Setup PBC for details Sync audio output with video play If the video play is slower than the audio output sound does not match with the pictures you can delay the audio output to mat...

Страница 28: ...ss DISC or USB A contents menu is displayed 3 Select a title to play then press u 4 Use the remote control to control the title Button Action Change subtitle language Change audio language track Stop play For DivX Ultra video press this button again to display the contents menu Display DivX Ultra video information Note Only those DivX videos that were rented or purchased using the DivX registratio...

Страница 29: ...files with mp3 or wma extensions 1 Insert a disc or USB that contains the MP3 WMA music 2 Press DISC or USB A contents menu is displayed 3 Select a folder then press OK 4 Select a track to play then press u To return to the main menu press v until Previous folder is selected then press OK Note For CDs recorded in multiple sessions only the first session is played This unit does not support MP3PRO ...

Страница 30: ... due to the large number of songs photos compiled onto one disc If the JPEG photo is not recorded with an exif type file the actual thumbnail picture will not be shown on the display It will be replaced with a blue mountain thumbnail picture This unit can only display digital camera pictures according to the JPEG EXIF format typically used by almost all digital cameras It cannot display Motion JPE...

Страница 31: ... WMA WMV DivX Ultra or JPEG files that are stored on such devices 1 Connect a USB flash drive or USB memory card reader to the USB socket on this unit 2 Press USB A contents menu is displayed 3 Select a file to play then press u For more information see chapters Play music Play photo Play video for details 4 To stop play press x or remove the USB device Tips If the device does not fit into the USB...

Страница 32: ...ur portable media player Note Control playback is only possible on your portable media player Stop play on the portable media player before you switch to other play media source Play from iPod Simply connect your iPod to the Philips universal docking station supplied to enjoy your iPod play through this DVD Home Theatre unit List of supported iPod range iPod mini iPod nano 1st gen iPod touch iPod ...

Страница 33: ... During playback you can use the remote control to control the music play Button Action Change the volume level Select a predefined sound effect Select an Ambisound effect Go to the previous next track m M Search backward forward Pause resume play Switch to Extended Control mode to enable control of your iPod play through the contents displayed on TV Control buttons on iPod have no function in thi...

Страница 34: ...ions are stored Once complete it tunes to the first preset radio station To stop auto tuning press x Note This unit can store up to a maximum of 40 radio stations If auto installation is not activated or less than 5 radio stations are stored AUTO INSTALL will be displayed again the next time you turn on to radio mode If the FM radio station transmits RDS Radio Data System data the name of the radi...

Страница 35: ...ANTENNA is displayed Search and store radio stations individually 1 Press RADIO 2 Press m M The radio frequency indication starts to change until a radio station is detected 3 Repeat step 2 until you tune to the radio station you wish to store To finetune the radio frequency press vV 4 Press PROGRAM If no action is carried out within 20 seconds after the above step it exits the preset mode 5 Press...

Страница 36: ...to set the level for low BASS or high TREBLE tone Note If the volume control is not used within 10 seconds it resumes normal volume control function Select Ambisound 1 Press AMBISOUND repeatedly to select a best Ambisound output that most suits the video or music you play Options Descriptions AUTO The surround output will be selected based on the audio stream of the played content MULTI CHANNEL Mu...

Страница 37: ... JAZZ Clear mid and high range Recreates the atmosphere of a live club with the artist just in front of you Good for Jazz music and watching dramas CONCERT CLASSIC Flat and pure sound mode Ideal for listening to classical music and watching live concert DVDs GAMING PARTY Slightly enhanced low range and strong mid range ideal for party music and video gaming SPORTS Moderate mid range and surround e...

Страница 38: ...ture is only applicable if this unit is connected to HDMI CEC compliant TV device It enables all the linked devices response or react to certain commands simultaneously with one touch control Options Descriptions Auto Wake up TV It wake ups your TV automatically when you press PLAY to power up this unit and start disc play if a video disc is found in the disc compartment To disable this feature se...

Страница 39: ...urrent disc The next time you want to play this disc or unlock it you need to enter the password Unlock all discs can be played Tips To set or change your password go to Preference Setup Password Display Dim Change the brightness level of the display panel to suit the lighting in your room 100 normal brightness 70 medium brightness 40 dimmest display OSD Language Select the default on screen menu ...

Страница 40: ...hrough the DivX VOD Video On Demand service can be played only on the device to which it is registered Audio setup 1 Press OPTIONS General Setup menu is displayed 2 Press V to select Audio Setup then press B 3 Select an option then press OK Audio Setup Ambisound Setup HDMI Audio Night Mode 4 Select a setting then press OK To return to the previous menu press BACK To exit the menu press OPTIONS ...

Страница 41: ...ed Start Ambisound setup for detailed information HDMI Audio When you connect this unit and TV with HDMI cable select the audio output setting for this connection On the sound is output through both your TV and this speaker system If the audio format on the disc is not supported it will be downmixed to two channel sound linear PCM Off disable audio output from your TV The sound is only output thro...

Страница 42: ... PAL system TV NTSC for NTSC system TV Multi for TV that is compatible with both PAL and NTSC TV Display Select the screen format according to how you want the picture to appear on your TV 4 3 Letter Box LB 4 3 Pan Scan PS 16 9 Wide Screen 4 3 Pan Scan for standard TV a full height screen display with the sides trimmed 4 3 Letter Box for standard TV a wide screen display with black bars on the top...

Страница 43: ...ight to change the value level setting and press OK to confirm Wide Screen Format define the wide screen format for disc play Options Descriptions Superwide Centre position of the screen is stretched less than the side This setting is only applicable if the video resolution is set to 720p or 1080i p 4 3 Pillar Box No stretching of the picture Black bars are displayed on both sides of the screen Of...

Страница 44: ...ting to YUV Tips See chapter Get Started Turn on Progressive Scan for detailed information Component Video Select the video output format that matches the video connection between this unit and your TV RGB for scart connection YUV for component video connection Preference Setup 1 Press OPTIONS General Setup menu is displayed 2 Press V to select Preference Setup then press B 3 Select an option then...

Страница 45: ...nt To allow all discs to play select 8 Some DVDs have ratings printed on them but are not recorded with ratings This function has no effect on such DVDs Tips To set or change your password go to Preference Setup Password PBC For VCDs SVCDs recorded with PBC playback control you can access the disc contents through an interactive menu On an index menu is displayed when you load a disc for play Off ...

Страница 46: ... name as the movie file If for example the filename of the movie is Movie avi then you will need to name the text file Movie sub or Movie srt Greek and Hebrew languages can be download from Philips website see chapter Update software However it overrides the Cyrillic language from the list Version Info Display the software version of this unit Tips This information is required when you want to fin...

Страница 47: ...latest software version is higher than the software version of this unit download it and store onto a CD R or USB flash drive 6 Insert the CD R or USB flash drive to this unit 7 Press DISC or USB then follow the instruction on the TV to confirm update operation Note Do not remove the CD R or USB when software updating is in progress 8 Once software update is complete this unit turns off to standby...

Страница 48: ... DTS IEC60958 IEC61937 Radio Tuning range FM 87 5 108 MHz 50 kHz 26dB quieting sensitivity FM 20 dBf IF rejection ratio FM 60 dB Signal to noise ratio FM 60 dB Harmonic distortion FM 3 Frequency response FM 180 Hz 10 kHz 6dB Stereo separation FM 26 dB 1 kHz Stereo Threshold FM 23 5 dB USB Compatibility Hi Speed USB 2 0 Class support UMS USB Mass Storage Class iPod docking station Dimensions WxHxD ...

Страница 49: ... TV type setting you have to switch to its default mode Press Z to open the disc compartment Press B for progressive scan or b for TV type Press SUBTITLE 1 2 3 No picture on HDMI connection Check if the HDMI cable is faulty Replace a new HDMI cable If this happens when you change the HDMI video resolution press HDMI repeatedly until the picture appears Warning Risk of electric shock Never remove t...

Страница 50: ...files cannot be played Ensure that the DivX file is encoded according to the Home Theatre Profile with the DivX encoder Ensure that the DivX video file is complete The aspect ratio of the screen is not aligned with the TV display setting The aspect ratio is fixed on the DVD DivX subtitle are not displayed correctly Ensure that the subtitle file name is the same as the movie file name Select the co...

Страница 51: ...ooting The video movies photos video clips etc contents of the iPod does not display in Extended Control mode Video browsing is not supported in Extended Control mode you can only browse the video contents on the iPod itself ...

Страница 52: ...ication that provides a secure transmission of digital contents between different devices to prevent unauthorised copyright JPEG A very common digital still picture format A still picture data compression system proposed by the Joint Photographic Expert Group which features small decrease in image quality in spite of its high compression ratio Files are recognised by their file extension JPG or JP...

Отзывы: