background image

24

EN


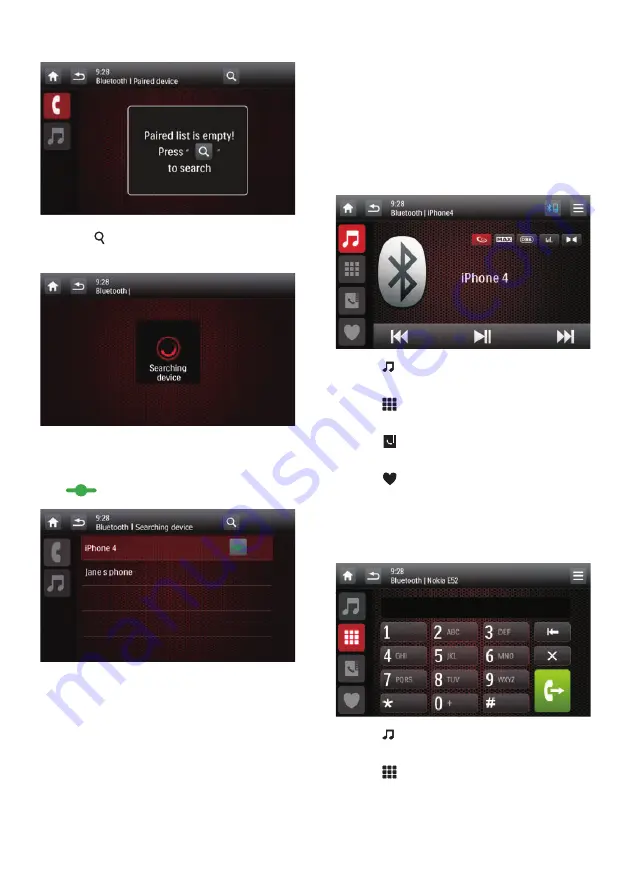
Tap   on this system to search for 
other Bluetooth devices.


In the device list, tap the name of 
your Bluetooth device, and then tap 

 behind the name.


»

The paring starts, and then a 
pairing request from CED1910BT 
is displayed on your device.

On your device, accept the pairing 
request from CED1910BT, enter the 
default password '

0000

', and then 

confirm the password entry.


»

[Paired OK!]

 flashes, and then 

[Connecting] 

is displayed on this 

system.

On your device, enable or permit 
the connection with CED1910BT.

• 

If a player is connected, the 
music playback interface is 
displayed on this system.


 : Tap it to return to the music 

playback interface. 

 : Tap it to display the list of 

paired mobile phones.

 : Tap it to display the list of 

paired mobile phones.

 : Tap it to display the list of 

paired mobile phones.

• 

If a mobile phone is connected, 
the keypad is displayed on this 
system.


 : Tap it to display the list of 

paired players.

 : Tap it to display the on-

screen keypad for phone calls.

Содержание CED1910BT

Страница 1: ...Register your product and get support at www philips com support User manual ...

Страница 2: ...devices 23 Activate the Bluetooth function 23 Pair a device 23 Play audio from a connected device 26 Make a call 26 9 Play from an iPod iPhone 29 Compatible iPod iPhone models 29 Connect your iPod iPhone 29 Control play 30 Charge your iPod iPhone 30 10 Smart Connect Link 31 11 Universal USB Charging 31 12 Adjust sound 32 Adjust the volume level 32 Mute sound 32 Enable the MAX Sound effect 32 Enabl...

Страница 3: ...ve ground earth 12 V DC operation only To reduce the risk of traffic accidents do not watch video when driving To ensure safe driving adjust the volume to a safe and comfortable level Improper fuses can cause damage or fire When you need to change the fuse consult a professional Use only the supplied mounting hardware for a safe and secure installation To avoid short circuits do not expose the dev...

Страница 4: ...ar entertainment system you can listen to music watch videos view pictures listen to FM RDS included and AM MW radio make phone calls via Bluetooth and navigate your road trip What s in the box Check and identify the contents of the package 1 Main unit 2 Remote control 3 ISO male connector X 2 4 Trim plate 5 Rubber cushion 6 Hexagon head screw 7 Remote control battery 8 Screw X 4 M5x8mm 9 User man...

Страница 5: ...n off the unit Press to mute the speakers or release them from mute status d RESET Press to reset the system e Insert an SD SDHC card i j h a b c e f g d l k f Insert a microSD card that stores the digital map data g iR sensor The sensor that receives infra red signals from the remote control h AV IN Connect to the audio and video output sockets of an external player by a composite AV cable i Conn...

Страница 6: ... an audio language or audio channel j DBB Enable or disable the DBB Dynamic Bass Boost sound effect k EQ Select a preset sound equalizer l MUSIC ZONE Select a music listening zone m Turn on or off the screen n Switch to the control interface for front source or rear source o TOP MENU Return to top menu p DVD MENU Access the DVD menu q Switch to music playback mode r Switch to picture slideshow mod...

Страница 7: ...her locations can be dangerous as the rear of the system heats up during use To avoid short circuit before you connect make sure that the ignition is off Make sure that you connect the yellow and red power supply leads after all other leads are connected Make sure that all loose leads are insulated with electrical tape Make sure that the leads do not get caught under screws iron parts that will mo...

Страница 8: ...a relay control lead ISO male connectors Connect to g Blue strip white strip Amplifier relay control lead h Black strip Ground i Yellow strip The 12V car battery which is energized at all times 2 Connect other wires if necessary Caution To avoid an accident the driver must not watch video while driving By design this system disallows watching video during drive Park your car in a safe place and en...

Страница 9: ...Brown wire OE SWC remote in 15 OE SWC IR REMOTE IN Black wire Ground 16 OE SWC AD LEARN White wire OE SWC AD Learn line 1 17 OE SWC AD LEARN White wire OE SWC AD Learn line 2 18 OE SWC AD LEARN Black wire Ground 19 Smart Connect Link Connector Black connector Compatible external accessory box Refer to Chapter 10 20 External Mic Black connector External microphone 21 GPS AERIAL Black connector GPS ...

Страница 10: ...9 EN Not Supplied m n o p q r s t u v w x y z a b c d e f g h i j k l ...

Страница 11: ...car battery in a car that has an on board drive or navigation computer the computer may lose its memory If the car battery is not disconnected to avoid short circuit make sure that bare wires do not touch each other 2 Make sure that the car dashboard opening is within these measurements 182 mm 112 mm 5 mm Since the unit cannot be used if the dashboard opening s slant angle is above 20 degrees make...

Страница 12: ...is not to be used for a long time Batteries contain chemical substances they should be disposed of properly Perchlorate Material special handling may apply See www dtsc ca gov hazardouswaste perchlorate 1 Pull out the battery tray 2 Insert one CR2025 battery with correct polarity as indicated 3 Insert the battery tray Turn on Press PHILIPS logo and a progress bar are displayed while boot up To tur...

Страница 13: ... the source to FM AM radio Disc Switch the source to disc USB Switch the source to USB storage device SDHC Switch the source to SD SDHC card Once your iPod iPhone is connected and recognized this icon is displayed in the bar of favorite icons Tap it to switch the source back to iPod iPhone Navigation Access the navigation system Bluetooth Use the Bluetooth feature AV In 1 AV In 2 Switch the source...

Страница 14: ...ger when the icon s name disappears 3 Tap to return to the home menu The bar for popular icons is refreshed Set the date and time 1 Tap to access the full menu with all feature icons displayed 2 Tap Settings The General menu is displayed 3 Tap Clock mode to select a time format 24hr 24 hour time format 12hr 12 hour time format 4 Tap Date to display the interface for setting the date 5 Tap to set t...

Страница 15: ...rom hard media You can use this system to listen to audio watch videos and view photos that are stored on a disc USB storage device or SD SDHC card Note Before use check for compatible media Load a disc Caution Never insert any object other than a disc of 12 cm diameter into the disc slot 1 Insert the disc into the disc slot with the label side facing up Play starts automatically If play does not ...

Страница 16: ...SB storage device to the USB socket Play starts automatically To remove the USB storage device switch the system to another source first Insert an SD SDHC card Note Make sure that the SD SDHC card contains compatible files NTFS New Technology File System file system is not supported 1 Flip up the protective cover 2 Insert the SD SDHC card into the slot until you hear a click Play starts automatica...

Страница 17: ...econd page Select a repeat mode DVD Repeat chapter repeat the current chapter Repeat title repeat the current title Repeat all repeat all chapters and titles or Repeat off cancel repeat play VCD SVCD Repeat one repeat the current track or Repeat all repeat all tracks Recorded files Repeat one repeat the current video file Repeat folder repeat all video files in the current folder or Repeat all rep...

Страница 18: ...er highlighted Repeat all tracks Select random play highlighted or sequential play in gray Pictures Return to the home menu Zoom in or out of the picture Rotate the picture clockwise or anti clockwise by 90 degrees Return to the list of files or folders see Browse recorded files on page 18 Select the previous or next picture Pause or resume the slideshow Display control icons on the second page 16...

Страница 19: ...your computer and a free DivX Account Find the DivX VOD code on your product 1 Tap to access the full menu with all feature icons displayed 2 Tap Settings to access the system setup menus 3 Tap Info to access the Info menu 4 Tap DivX R VOD to display the registration code Note If no DivX Player is installed on your computer download it from www divx com for free If you have no DivX Account create ...

Страница 20: ...he filename of the DivX video the file extension excluded The DivX video file and its subtitle file must be saved under the same directory This product supports subtitle files in the following formats srt and sub 6 Listen to radio Switch to radio mode After the boot up at the first time the system switches to radio mode automatically To switch the source back to radio afterwards tap Radio on the h...

Страница 21: ...he RDS feature tap RDS Off Tune to a radio station 1 Tap FM or AM to select a band FM bands FM1 FM2 FM3 AM bands AM1 AM2 2 Tap or repeatedly until the frequency of target radio station is displayed To tune to a radio station automatically tap and hold or until the frequency digits start change Tip You can also press BAND on the remote control repeatedly to select a band Store radio stations in mem...

Страница 22: ...can use RDS related features Search for RDS programs of a specific type 1 Tap PTY list to display the list of program types 2 Tap the name of a program type to start search Once an RDS station that transmits programs of the selected type is found the RDS station is broadcast automatically To save the RDS station tap and hold one of the preset channels To search for another RDS station repeat steps...

Страница 23: ...s Music 28 FOLK M Folk Music 29 DOCUMENT Documentary 30 TEST Alarm Test 31 ALARM Alarm Use alternate frequencies If the signal of an RDS station is poor enable the AF Alternate Frequency function The system searches for a strong station that broadcasts the same program Tap AF to enable or disable the AF function AF highlighted The function is enabled AF in gray The function is disabled 7 Use the n...

Страница 24: ...unction On the home menu tap In any other mode tap on top of the screen Pair a device Note Gibson Innovations does not guarantee the compatibility with all Bluetooth devices Before pairing a device with this system read its user manual for Bluetooth compatibility Make sure that Bluetooth function is enabled on your device and your device is set as visible to all other Bluetooth devices The operati...

Страница 25: ...OK flashes and then Connecting is displayed on this system 5 On your device enable or permit the connection with CED1910BT If a player is connected the music playback interface is displayed on this system Tap it to return to the music playback interface Tap it to display the list of paired mobile phones Tap it to display the list of paired mobile phones Tap it to display the list of paired mobile ...

Страница 26: ... New pairing to start searching for Bluetooth devices 4 Repeat steps 3 to 5 that are indicated in the above section Pair the first device see Pair the first device on page 24 to complete the connection Note You can connect a music player and a mobile phone simultaneously Manage paired devices 1 Activate the Bluetooth function 2 Tap or To manage paired players tap To manage paired mobile phones tap...

Страница 27: ... the device through the system If the device also supports Audio Video Remote Control Profile AVRCP profile you can control play on the system or with its remote control 1 Play a track on the connected device 2 On this system tap to display the music playback interface 3 Tap icons on the interface to control play Pause or resume play Select the previous or next track Note If the connected device d...

Страница 28: ...To return to the previous screen tap 3 Tap to send the call To end the call tap To enter numbers during the call tap to display the keypad first Redial the last called number 1 Tap The last called number is displayed 2 Tap again to send the call Answer a call Note By default all incoming calls are picked up automatically You can disable the function of automatic answer see Adjust Bluetooth setting...

Страница 29: ...a contact from the list 2 Tap The following options are displayed Delete one Delete the selected contact Delete all Delete all contacts Cancel Return to the phone book interface 3 Tap one of the options and confirm Search for a contact Tap the alphanumeric icons to enter the keyword To enter the first letter displayed on the icon tap it once To switch between letters and the digit tap an icon brie...

Страница 30: ... Note During play no audio signals are transferred through the headphone socket of your iPod iPhone Compatible iPod iPhone models This system supports the following iPod and iPhone models iPhone 5 iPhone 4S iPhone 4 iPhone 3GS iPhone 3G and iPhone iPod touch 1st 2nd 3rd and 4th generations iPod nano 1st 2nd 3rd 4th 5th and 6th generations iPod classic Connect your iPod iPhone Connect an Apple 30 p...

Страница 31: ... Repeat the current track highlighted Repeat all tracks in gray Cancel repeat play Tap to select a play mode highlighted Play tracks randomly in gray Play tracks in sequence Tap to switch to the iPod control mode and then you can control play on your iPod iPhone Tap to switch back to the on screen control mode and then you can control play on this system Tap to access the music menu Search for a t...

Страница 32: ...nment system and utilizes Bluetooth HID profile protocol standard to communicate user input back to the peripheral Contact your dealer for the Smart Connect Link compatible devices to enrich your entertainment experience 11 Universal USB Charging Philips enhanced the USB interface which was normally used for music playback from pen drive to now being able to supply current for charging smart devic...

Страница 33: ... DBB sound effect is enabled in gray DBB sound effect is disabled Enable the FullSound effect Note This feature is unavailable when you listen to radio Philips FullSound restores the audio details that are lost due to compression It enriches the music signals so that what you hear is the full sound with every nuance of emotion and every detail of musical genius Philips FullSound can bring out CD s...

Страница 34: ...5 kHz Tap and hold to restore the settings 4 Tap to exit Others Tap on the playback interface The setup interface is displayed Tap to display the Music zone interface for selecting a listening zone Tap to display the Fader Balance interface for adjusting the fader and balance Tap to display the SubWoofer interface for setting the sub woofer Adjust the fader and balance Tap or to adjust fader or ba...

Страница 35: ...best speaker sound settings in car Tap a gray point to switch the listening zone The highlighted area indicates the current listening zone 13 Adjust settings Access system setup menus 1 Tap to display all feature icons 2 Tap Settings The General menu is displayed 3 Tap an icon on the left Access the General menu to adjust general settings Access the Info menu to view system information Access the ...

Страница 36: ... display language Calibration Follow the on screen instructions to calibrate the touch screen Settings Options Description Clock mode 12Hr 24Hr Select a time format Date Set the date Time Set the time Demo Auto start after power off On Off Enable it to demonstrate features after the system is power off Dimmer 1 2 3 Adjust the screen brightness View system information Settings Options ARM version V...

Страница 37: ...vigation Voice interface All Front left Front right Select a zone for navigation voice Off Mute the navigation voice Voice Level Tap to adjust the volume of navigation voice Adjust Bluetooth settings Bluetooth settings Options Description New Pairing Search for new devices Auto Connect On When a paired device is within effective range the system reconnects with the device automatically Off Reconne...

Страница 38: ...can connect an external audio video player to this system 1 Connect a composite AV cable to the AV IN socket on the front panel and the audio and video output sockets of the external player 2 Tap to access the full menu with all feature icons displayed 3 Tap AV IN1 to display the playback interface 4 Operate on the external player to start play see the user manual of the external device Tip If you...

Страница 39: ...C card USB storage device or iPod iPhone connected through the USB socket 1 Tap to access the full menu with all feature icons displayed 2 Tap R The Rear Zone menu is displayed 3 Tap Mode to enable or disable the signal transferring to rear monitors On Enable the signal transferring to rear monitors Off Disable the signal transferring to rear monitors When it is enabled the following interface is ...

Страница 40: ...u want to assign the function to a button on the steering wheel To cancel the assignment tap Cancel 4 Press and hold the button on the steering wheel for one second The following interface is displayed 5 Repeat steps 3 and 4 to assign more functions to buttons on the steering wheel To clear the assignment tap Clear All Reset the system If the system hangs up reset it 1 Flip up the protective cover...

Страница 41: ...0BTBT 98 as the keyword 5 Click the link of search result to access the Web page for registering your product 6 Fill in necessary information about this product to complete the registration With the registration you can get information about software update and product support at this Web page or via your mailbox that is registered as the account for Club Philips Perform the upgrade 1 Check the cu...

Страница 42: ...c player System DVD CD audio MP3 system Disc diameter 12 cm Frequency response 20 Hz 20 kHz Signal noise ratio 75 dB Total harmonic distortion Less than 0 3 Channel separation 55 dB Video signal format NTSC PAL Video output 1 0 2 V p p Radio Frequency range FM 87 5 108 0 MHz 50 kHz per step Frequency range AM MW 522 1620 kHz 9 kHz per step Usable sensitivity FM 2 uV Usable sensitivity AM MW 25 uV ...

Страница 43: ... data rate 32 320 Kbps and variable bit rate WMA v9 or earlier Directory nesting up to a maximum of 8 levels Number of albums folders maximum 99 Number of tracks titles maximum 999 ID3 tag v2 0 or later File name in Unicode UTF8 maximum length 128 bytes Supported MP3 disc format ISO9660 Joliet Maximum title number 512 depending on file name length Maximum album number 255 Supported sampling freque...

Страница 44: ...source The function is not applicable to the current media Replace the remote control battery The disc does not play The disc is upside down Make sure that the printed side is upwards The disc is dirty Clean the disc with a clean soft lint free cloth Wipe the disc outwards from the center The disc is defective Try another disc The disc is incompatible Try another disc The recordable disc is not fi...

Страница 45: ... The device does not support the profiles required for the system The Bluetooth function of the device is not enabled Refer to the user manual of the device to find out how to enable the function The system is not in the pairing mode The system is already connected with another Bluetooth enabled device Disconnect that device or all other connected devices and then try again The paired mobile phone...

Страница 46: ...fety and regulatory standards Please note that the use of this accessory with iPod or iPhone may affect wireless performance iPod and iPhone are trademarks of Apple Inc registered in the U S and other countries 17 Notice Any changes or modifications made to this device that are not expressly approved by Gibson Innovations may void the user s authority to operate the equipment Compliance This appar...

Страница 47: ...rks of Rovi Corporation or its subsidiaries and are used under license ABOUT DIVX VIDEO DivX is a digital video format created by DivX LLC a subsidiary of Rovi Corporation This is an official DivX Certified device that plays DivX video Visit divx com for more information and software tools to convert your files into DivX videos ABOUT DIVX VIDEO ON DEMAND This DivX Certified device must be register...

Страница 48: ... not maintained in accordance with the manufacturer s instructions 3 Even when we do not have to repair or replace the Goods we may decide to do so anyway In some cases we may decide to substitute the Goods with a similar alternative product of our choosing All such decisions are at our absolute discretion 4 All such repaired replaced or substituted Goods continue to receive the benefit of this Ad...

Страница 49: ...tured by and is sold under the responsibility of Gibson Innovations Ltd and Gibson Innovations Ltd is the warrantor in relation to this product Philips and the Philips Shield Emblem are registered trademarks of Koninklijke Philips N V and are used under license CED1910BT_98_UM_V6 0 ...

Отзывы: