background image

7

English

EN

3  Install the car 

audio

These instructions are for a typical installation. 

However, if your car has different requirements, 

make the corresponding adjustment. If you have 

any questions regarding installation kits, consult 

your Philips car audio dealer.

Caution


This unit is designed for negative ground (earth) 12 V 

DC operation only.


Always install this unit in the car dashboard. Other 

locations can be dangerous as the rear of the unit heats 

up during use.


To avoid short-circuit: before you connect, ensure that 

the ignition is off.


Ensure that you connect the yellow and red power 

supply leads after all other leads are connected.


Ensure that all loose leads are insulated with electrical tape.


Ensure that the leads do not get caught under screws 

orin parts that will move (e.g. seat rail).


Ensure that all ground (earth) leads are run to a 

common ground (earth) point.


Use only the supplied mounting hardware for a safe 

and secure installation.


Improper fuses can cause damage or fire. When you 

need to change the fuse, consult a professional.

Note on the power supply lead (yellow)

• 

When you connect other devices to this 

apparatus, ensure that the rating of the car 

circuit is higher than the total fuse value of 

all the connected devices.

Notes on speaker connection

• 

Never connect speaker wires to the metal 

body or chassis of the car.

• 

Never connect speaker wires with stripes 

to one another.

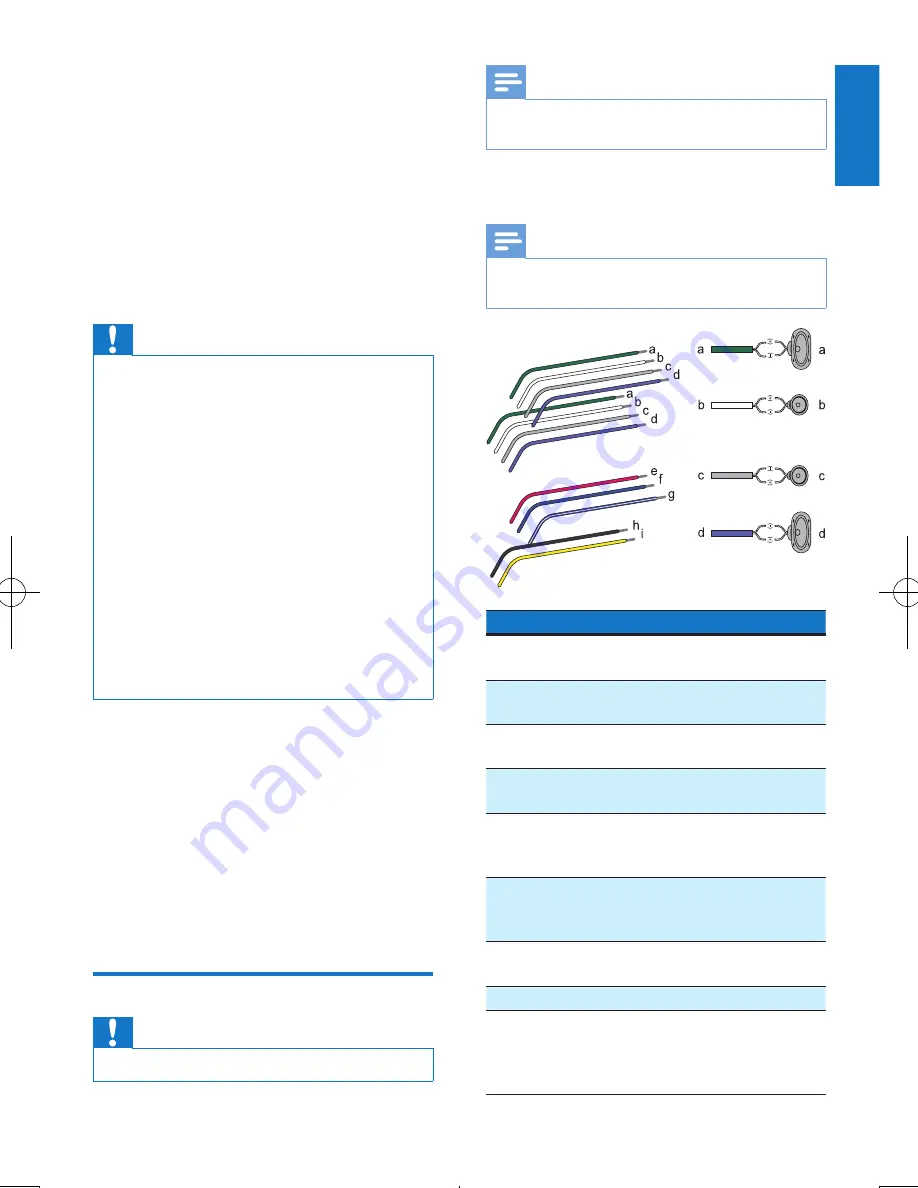
Connect wires

Caution


Ensure that all loose leads are insulated with electrical tape.

Note


Consult a professional to connect CEM2250 as 

instructed below.

Check the car's wiring carefully and connect 

them to the the supplied male connector.

Note


Risk of danger! Please consult a professional to perform 

the below steps!


ISO male connectors

Connect to

1 Green strip, black-edged 

green strip

Left speaker  

(Rear)

2 White strip, black-edged 

white strip

Left speaker  

(Front)

3 Gray strip, black-edged 

gray strip

Right speaker  

(Front)

4 Purple strip, black-edged 

purple strip

Right speaker  

(Rear)

e Red

Ignition key +12V 

DC when ON/

ACC

f

Blue

Motor/electric 

antenna relay 

control lead

g White edged blue strip

Amplifier relay 

control lead

h Black

Ground

i

Yellow

To the +12V car 

battery which is 

energized at all 

times

Содержание CarStudio CEM2250

Страница 1: ...er your product and get support at www philips com welcome Always there to help you Manuale utente 75 Gebruiksaanwijzing 101 User manual 1 Benutzerhandbuch 23 Mode d emploi 49 CEM2250 Question Contact Philips ...

Страница 2: ...sten to radio 11 Select a tuner region 11 Select tuner sensitivity 11 Select radio band 12 Search for a radio station 12 Store radio stations in memory 12 Play with RDS 12 6 Play from hard media 14 Play from a Disc 14 Play from USB storage device 15 Control play 15 Switch tracks 15 7 Play from iPod iPhone 16 Compatible iPod iPhone 16 Connect your iPod iPhone 16 Control play 16 Charge your iPod iPh...

Страница 3: ...edures other than herein may result in hazardous radiation exposure or other unsafe operation The apparatus shall not be exposed to dripping or splashing Do not place any sources of danger on the apparatus e g liquid filled objects lighted candles Notice Any changes or modifications made to this device that are not expressly approved by Philips Consumer Lifestyle may void the user s authority to o...

Страница 4: ...espectively and has been certified by the developer to meet Apple performance standards Apple is not responsible for the operation of this device or its compliance with safety and regulatory standards Please note that the use of this accessory with iPod or iPhone may affect wireless performance iPod and iPhone are trademarks of Apple Inc registered in the U S and other countries This apparatus inc...

Страница 5: ...oy your drive while listening to FM or AM MW radio Audio from CD or MP3 disc Audio from USB devices Audio from iPod iPhone Audio from other external devices The unit supports the following media format What s in the box Check and identify the contents of your package a Main unit with a sleeve b Front panel c Trim plate d Carrying case for front panel e Rubber cushion f Screw x 1 pc g Disassembly t...

Страница 6: ... or off Press to confirm selection n p o h r q f g a d c b t s m l k i j e Press to mute or unmute sound Rotate to adjust volume Rotate to switch between menu options e ZONE In radio mode press to select tuner band For mp3 and wma tracks on a storage device press to select MP3 WMA folder Press and hold to switch music listening zone For iPod iPhone press repeatedly to select a control mode ...

Страница 7: ... to store the current radio station at station No 3 4 For wma and mp3 tracks press to access to repeat play or shuffle play m In radio mode press to select preset radio station No 1 2 In radio mode press and hold to store the current radio station at station No 1 2 For wma and mp3 tracks on a storage device press to access track folder list n In radio mode press to tune for radio station Press to ...

Страница 8: ...you need to change the fuse consult a professional Note on the power supply lead yellow When you connect other devices to this apparatus ensure that the rating of the car circuit is higher than the total fuse value of all the connected devices Notes on speaker connection Never connect speaker wires to the metal body or chassis of the car Never connect speaker wires with stripes to one another Conn...

Страница 9: ...ive Be sure to make proper connections to prevent damage to the unit Mount into the dashboard If the car does not have an on board drive or navigation computer disconnect the negative terminal of the car battery If the car battery is not disconnected to avoid short circuit make sure that the bare wires do not touch each other 1 Ensure that car dashboard opening is within these measurements 2 Remov...

Страница 10: ...ative terminal of the car battery Attach the front panel 1 Insert the notch on the front panel to the chassis on the main unit 2 Press the left end of the front panel inwards until it is securely locked with a click Detach the front panel Note Before you detach the front panel make sure that the system is turned off 1 Press to release the front panel 2 Pull the front panel outwards to remove it ...

Страница 11: ...ay the clock In any mode press and hold 6281 until the clock is displayed Press any key to cancel the clock display Select a source Press SOURCE repeatedly to select a source RADIO Listen to FM AM radio MP3 LINK Listen to the audio input through the MP3 LINK socket iPod USB When a USB storage device or compatible iPod iPhone is connected and recognized you can select this source to play audio file...

Страница 12: ... select radio mode 2 Press MENU repeatedly until AREA is displayed 3 Rotate to select USA United States LATIN Latin America EUROPE Western Europe RUSSIA Russia MID EAST Middle East ASIA Asia Pacific JAPAN Japan AUSTRALIA Australia 4 Press to confirm Select tuner sensitivity To receive more radio stations or only stations with strong signal you can adjust the tuner sensitivity 1 Press MENU repeated...

Страница 13: ... are saved in preset channel automatically To select a stored radio station press the numeric button directly Store stations manually 1 Press repeatedly to select a tuner band 2 Tune to a radio station that you want to store 3 Press a numeric button for 3 seconds The station is saved in the selected channel To select a stored radio station press the numeric button directly Play with RDS The RDS Ra...

Страница 14: ...AlarmTest 31 ALARM Alarm Use alternate frequencies If the radio signal is poor turn on AF Alternate Frequency to search for another station with stronger signal 1 Press MENU 2 Press or repeatedly until AF is displayed 3 Rotate to select a setting AF ON turn AF mode on AF OFF turn AF mode off Set region for AF tuning You can define AF tuning region REG ON Only stations in current region can be tune...

Страница 15: ...nizes with that on the RDS station CT OFF turn off the RDS clock Tip The accuracy of the transmitted time depends on the RDS station that transmits the time signal 6 Play from hard media You can use this system to listen to audios that are stored on a compatible disc or USB storage device Play from a Disc Note You cannot play CDs encoded with copyright protection technologies You can play commerci...

Страница 16: ...peatedly to select a repeat mode REP TRK repeat one track play current track repeatedly REP FLD repeat a folder play all tracks in the current folder repeatedly REP ALL repeat all tracks play all tracks repeatedly SHUF Press repeatedly to select a play mode SHUF FLD start random play for all tracks in the current folder SHUF ALL start random play for all tracks SHUF OFF cancel shuffle play Switch ...

Страница 17: ...e iPod USB is displayed The system starts playing tracks that are stored on your iPod iPhone Note Before you disconnect the iPod iPhone switch the system to another source Control play Button Function Press repeatedly to select a control mode control play on your iPod iPhone or on the system Press to pause or resume play Press to play the previous or next track Press and hold to rewind a track or ...

Страница 18: ...tate to select song in current album 7 Press to start play Note You cannot control the music via iPod iPhone under audio control mode Charge your iPod iPhone Once the iPod iPhone is docked and recognized the charging starts 8 Connect external sound source 1 Connect the external sound source to MP3 LINK socket with a 3 5 mm cable 2 Press SOURCE repeatedly until MP3 LINK is displayed 3 Operate the e...

Страница 19: ...bass range 7 to 7 TREBLE treble range 7 to 7 3 Rotate to adjust the setting 10 Adjust system settings 1 Press MENU to access system settings 2 Press or repeatedly until one of the following settings scrolls BEEP DIMMER DEMO BLACK OUT or DANCE 3 Rotate to change the setting BEEP BEEP ON Enable the beep sound of buttons BEEP OFF Disable the beep sound of buttons DIMMER DIMMER HIGH Increase the brigh...

Страница 20: ...nt pen or toothpick All settings are reset to factory default Replace fuse If there is no power check the fuse and replace if it is damaged 1 Check the electric connection 2 Remove the damaged fuse from the rear panel 3 Insert a new fuse with the same specification 15A Note If the new fuse gets damaged again there may be an internal malfunction Consult your Philips dealer ...

Страница 21: ...orted formats USB or memory file format FAT12 FAT16 FAT32 For USB storage devices MP3 bit rate data rate 32 320 Kbps and variable bit rate WMAV4 V7 V8 V9 L1 L2 MP3 sampling frequencies 8 48 kHz For Disc MP3 Bit rates 8 320 kbps variable bit rates WMA sampling frequencies 32 kHz 44 1 kHz 48 kHz WMA Bit rates 32 192 kbps variable bit rates Directory nesting up to a maximum of 8 levels Number of albu...

Страница 22: ...utton Ensure that the track played is of a compatible format Noise in broadcasts Signals are too weak Select other stations with stronger signals Check the connection of the car antenna Change broadcast from Stereo to mono Cannot play disc Ensure that the disc label is inserted with the printed side facing up Wipe the disc with fibre cleaning cloth from the centre to the edge in a straight line Th...

Страница 23: ...even graphics usually call letters and format information that many FM stations include on a sub carrier signal within their normal broadcast signal Some RDS equipped tuners can even override with traffic alerts or emergency broadcasts during playback of other media CD MD or cassette There are other useful features too many of which are offered by the growing number of RDS stations W WMA Windows M...

Страница 24: ...Specifications are subject to change without notice 2013 Koninklijke Philips Electronics N V All rights reserved CEM2250_12_UM_V1 3 ...

Отзывы: