background image

E
N

20

Additional information

A

A

utoma

utoma

tic Power Sa

tic Power Sa

ving &

ving &

Preset R

Preset R

esol

esol

ution Modes

ution Modes

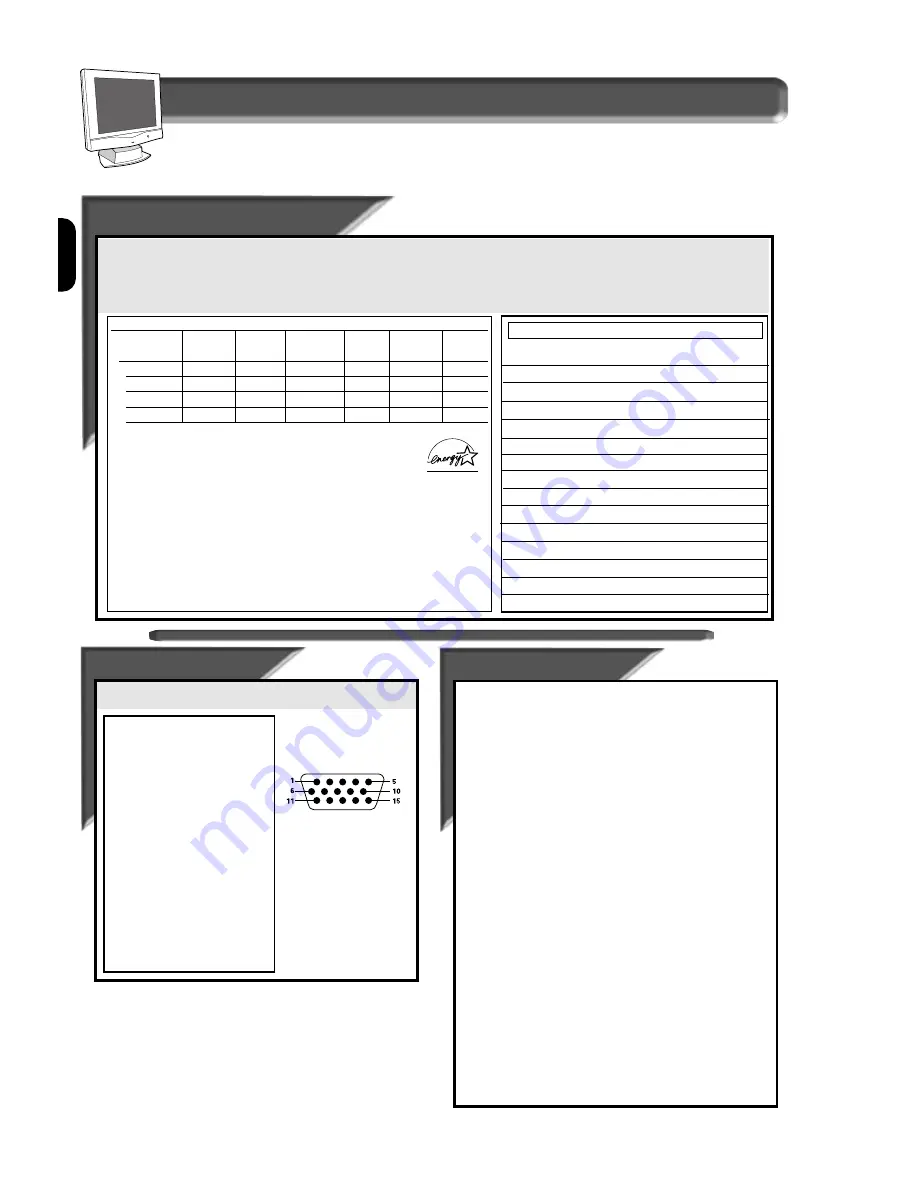
If you have VESA's DPMS compliance display card or software installed in your PC, the monitor can automatically reduce its power
consumption when not in use. If input from a keyboard, mouse, or other device is detected, the PC & monitor automatically “wakes up.” The
table below shows the power consumption and signalling of this automatic power-saving feature. To turn this feature on and off, see page
17. The table below shows the 14 factory preset video modes.

M

ODE

R

ESOLUTION

H. F

REQ

V. F

REQ

S

TANDARD

(K

HZ

)

(H

Z

)

1

640 x 350

31.5

70           IBM VGA  

2

720 x 400

31.5

70    

IBM VGA

3

640 x 480

31.5

60           IBM VGA

4

640 x 480

35.0

67

MAC

5

640 x 480

37.9

73

VESA

6

640 x 480

37.5

75

VESA

7

800 x 600

35.2

56

VESA

8

800 x 600

37.9

60

VESA

9

800 x 600

48.1

72

VESA

10

800 x 600

46.9

75

VESA

11

832 x 624

49.7

75

MAC

12

1024 x 768

48.4

60

VESA

13

1024 x 768

56.5

70

VESA

14

1024 x 768

60.0

75

VESA

Factory Preset Resolution Modes

Pin As

Pin As

signment

signment

The 15-pin D-sub connector (male) of the signal cable:

1

Red video input

2

Green video input

3

Blue video input

4

Identical output
- connected to pin 10

5

Self test

6

Red video ground

7

Green video ground

8

Blue video ground

9

No pin

10

Logic ground

11

Identical output
- connected to pin 10

12

Serial data line (SDA)

13

H. Sync / H+V

14

V. Sync (VCLK for DDC)

15

Data clock line (SCL)

Pin No.

Assignment

Specific

Specific

a

a

tions

tions

D

ISPLAY

:15.1-inch

(38.5 cm)

Type

:Flat panel active matrix-TFT LCD

V

IEWABLE

I

MAGE

S

IZE

(VIS)

:15.1-inch diagonal      (38.35 cm)

S

URFACE TREATMENT

:Anti-glare coating

W

EIGHT

(

UNPACKED

)

:5.5kgs

M

AXIMUM

D

IMENSIONS

Height

:418 mm 

Depth

:176 mm

Width

:402 mm

M

AXIMUM

G

RAPHICS

R

ESOLUTION

:1024 x 768 at 75 Hz Refresh Rate

T

EXT

M

ODE

:720 x 400

D

OT

P

ITCH

:0.30 mm

H

ORIZONTAL

F

REQUENCY

:30 to 61 kHz

V

ERTICAL

F

REQUENCY

:56 to 75 Hz

E

NVIRONMENTAL

R

EQUIREMENTS

T

EMPERATURE

Operating Temperature

: 41 to 95°F

5 to 35°C

Storage Temperature

:-43 to 140°F

-20 to 60°C

H

UMIDITY

(

NON

-

CONDENSING

)

Operating

:20 to 80%

Non-operating

:5 to 95%

P

OWER

S

OURCE

:100-240VAC±10%,60-50Hz(90-

264VAC)

P

OWER

C

ONSUMPTION

:< 38 watt (excluding USB)

I

NPUT

T

ERMINAL

:15-pin D-type connector with cable

Mains Cord

:Non-shield

Power Management Definition

VESA mode

Video

H-sync

V-sync    

Power      Power

LED 

used      saving(%)

color

ON

Active

Yes

Yes       

< 38W

0%

Green

Stand-by

Blanked

No

Yes

<   5 W

86.8%

Amber

Suspend

Blanked

Yes

No

<   5 W

86.8%

Amber

OFF

Blanked

No               No               <   5 W

86.8%

Amber

• Above power consumptions exclude USB watts.

• This monitor is 

E

NERGY 

S

TAR® compliant and power 

management compatible.

A

s an 

E

NERGY 

S

TAR®

P

artner, 

PHILIPS

has determined that this

product meets the 

E

NERGY 

S

TAR® guidelines for energy efficiency.

The proper operation of the function requires a computer with VESA
DPMS power management capabilities. 

Содержание Brilliance 151AX

Страница 1: ...ITION 12 HORIZONTAL POSITION 12 PHASE ADJUSTMENT 13 CLOCK ADJUSTMENT 13 COLOR TEMPERATURE WINDOW 9300 K CAD CAM 14 6500 K DTP 14 USER PRESETS 15 SPECIAL CONTROLS WINDOW LANGUAGE 16 OSD CONTROLS 16 POWER SAVING 17 ROTARY DEFAULT 17 EXIT OR RESET 18 ADDITIONAL INFORMATION OSD WARNING SIGNAL 19 POWER SAVING PRESET RESOLUTION MODE 20 PIN ASSIGNMENT 20 SPECIFICATIONS 20 WHAT TO DO IF SOMETHING ISN T WO...

Страница 2: ...1AX Flat Panel Monitor satisfies the need of high end corporate and professional users This monitor is for those who are seeking advanced design a small footprint high quality picture and ergonomic features in a monitor that takes minimal desk space Its innovative technology delivers outstanding brightness and contrast zero emissions and low energy consumption Features EXCELLENT DISPLAY QUALITY 15...

Страница 3: ...ther knocking or dropping during operation or transportation Do not store or use the LCD monitor in locations exposed to high humidity or dusty environment Also do not allow water or other liquids to spill on or into the LCD monitor Installation Locations Accessories Correct handling of the monitor 1 When handling the monitor grip the bottom firmly with both hands and ensure that the front panel f...

Страница 4: ...nitor By using the USB you will be able to connect your keyboard mouse printer and other peripherals to your monitor instead of having to connect them to your computer This will give you greater flexibility in setting up your system Plus you will have true plug and play capability Philips provides for the optional USB Hub so you will be ready to take advantage of this advancement in computer devel...

Страница 5: ...Then click on ADVANCED PROPERTIES dialog box 4 Click on MONITOR tab 5a If you have an old computer click on CHANGE dialog box Next SELECT DEVICE screen appears Now click on HAVE DISK dialog box and select A drive Or 5b If you have a new computer SELECT DEVICE screen automatically appears Click on HAVE DISK dialog box and select A drive 6 Select OK in the INSTALL FROM DISK dialog box If model name ...

Страница 6: ...o adjust the volume See page 11 USB Bay Slot for plugging in USB Hub Optional hardware that allows true Plug and Play See page 4 for installation details DC Jack Plug the monitor s DC power cord here Power Plug Plug the AC power cord in here See Setting up foldout for details Built in Microphone Allows you to speak to your computer LED Light Emitting Diode turns green when the monitor is on Auto R...

Страница 7: ... Brightness Button To adjust the screen s brightness first press the Brightness Button Next turn the Rotary Knob to adjust the brightness To exit brightness completely press the brightness button again For another way to adjust the brightness using the OSD refer to Page10 Using the Side Panel Mute Button To turn the mute On or Off press the mute button Using rotary knob for AUDIO Turn rotary knob ...

Страница 8: ... brief description of the four windows on the On Screen Display function Main Controls The first window highlighted after the OSD has been selected It has three features Brightness Contrast and Volume To adjust the three features turn to page 10 11 Screen Position Quality This is the second window highlighted after the OSD has been selected The four features are Vertical Position Horizontal Positi...

Страница 9: ...9 E N How to Use the On Screen Display OSD OSD Menu control level structure ...

Страница 10: ...he difference between the brightest and darkest areas on the screen Smart Help After returning to Exit to continue to Volume turn the ROTARY knob until MAIN CONTROLS WINDOW is highlighted Next follow steps 2 5 under VOLUME on the next page to exit completely press the OSD button and choose either SAVE or NO SAVE in setting mode then push OSD button to exit OSD See page 18 for other exit options CO...

Страница 11: ... press the OSD button and choose either SAVE or NO SAVE in setting mode then push OSD button to exit OSD See page 18 for other exit options 80 VOLUME 2 2 Press the OSD button 3 Press the OSD button to bring up VOLUME screen 4 Turn the ROTARY knob to adjust the volume Press the OSD button Next turn the ROTARY knob until the VOLUME icon is highlighted 1 Main Controls window mai n r e en s c o l o r ...

Страница 12: ...on and choose either SAVE or NO SAVE in setting mode then push OSD button to exit OSD See page 18 for other exit options Press the OSD button I ZONT HOR AL POS I T I ON 50 4 Turn the ROTARY knob until the image is horizontally balanced 1 2 2 Turn the ROTARY knob until the SCREEN POSITION QUALITY window is highlighted Next press the OSD button to highlight Vertical position Icon Screen Position Qua...

Страница 13: ...to Exit to continue to the Color Temperature window turn the ROTARY knob until EXIT is highlighted Next press the OSD button Then follow steps 2 4 under COLOR TEMPERATURE WINDOW on the next page to exit completely press the OSD button and choose either SAVE or NO SAVE in setting mode then push OSD button to exit OSD See page 18 for other exit options 3 Press the OSD button to bring up the PHASE AD...

Страница 14: ...W is highlighted Next follow steps 2 8 under USER PRESETS on the next page to exit completely press the OSD button and choose either SAVE or NO SAVE in setting mode then push OSD button to exit OSD See page 18 for other exit options Press the OSD button After each preset setting is saved the on screen display automatically returns to the EXIT window 1 2 2 Turn the ROTARY knob until the COLOR windo...

Страница 15: ... COLOR window is highlighted Next press the OSD button Then turn the ROTARY knob until USER PRESETS icon is highlighted Color Temperature window mai n r e en s c o l o r c c i a l s pe 768 1024 x 75HZ 60K RESET EXIT S ER P U RESE T S S ER P U RESE T 1 7 8 7 8 7 8 E E N G R L U E B R E D 4 If necessary turn the ROTARY knob until of the USER PRESETS is highlighted Next press the ON SCREEN DISPLAY bu...

Страница 16: ...n Turn the ROTARY knob to until desired language is selected mai n r e en s c o l o r c c i a l s pe 768 1024 x 75HZ 60K RESET EXIT OSD CONTROL 3 3 TIMER SECONDS 05 10 25 OFF Press the OSD button to bring up OSD CONTROLS screen Press the OSD button to add your change and return to OSD CONTROLS screen Turn the ROTARY knob to select VERTICAL or HORIZONTAL POSITION and repeat steps 3 6 7 7 Press the ...

Страница 17: ... the OSD button to return to EXIT window 5 5 3 3 Turn the ROTARY knob until POWER SAVING is highlighted Then press the OSD button Turn the ROTARY knob to select POWER SAVING ON or OFF 4 4 Press the OSD button to return to EXIT window 5 5 After returning to EXIT to continue to ROTARY DEFAULT turn the ROTARY knob until SPECIAL CONTROL is highlighted Next press the OSD button Follow steps 2 5 under R...

Страница 18: ...s highlighted Next press the OSD button 2 2 S AV E NO YE S The settings mode is now highlighted You can choose to either YES or NO Then press the OSD button to EXIT 3 3 Turn the rotary knob to select RESET ALL SETTINGS YES or NO Press the OSD button to EXIT 3 3 Make sure you have exited from all icons in a window See TO EXIT FROM AN INDIVIDUAL WINDOW For example MAIN CONTROLS will be highlighted 1...

Страница 19: ...quency from the computer is not standard video mode or out of the monitor s scanning range Please change the display mode of the operating software in the computer i e Windows to1024 x 768 60 Hz for best display results ENTERING SLEEP MODE This screen warns when the monitor is about to enter the sleep mode Please press any key on the keyboard or click the mouse for waking the monitor and computer ...

Страница 20: ...round 11 Identical output connected to pin 10 12 Serial data line SDA 13 H Sync H V 14 V Sync VCLK for DDC 15 Data clock line SCL Pin No Assignment Specific Specifica ations tions DISPLAY 15 1 inch 38 5 cm Type Flat panel active matrix TFT LCD VIEWABLE IMAGE SIZE VIS 15 1 inch diagonal 38 35 cm SURFACE TREATMENT Anti glare coating WEIGHT UNPACKED 5 5kgs MAXIMUM DIMENSIONS Height 418 mm Depth 176 m...

Страница 21: ...osition is Push the AUTO button incorrect Adjust the image position using the HORIZONTAL POSITION or VERTICAL POSITION in the SCREEN POSITION AND QUALITY WINDOW Image vibrates on the Check that the signal cable is properly connected to the graphics board or PC screen Vertical flicker Push the AUTO button appears Eliminate the vertical bars using the CLOCK ADJUSTMENT in the SCREEN POSITION QUALITY ...

Страница 22: ...SD Warning Signals 19 Pedestal 7 Phase Adjustment 13 Pin Assignment 20 Power button Set Up Guide 2 Power plug Set Up Guide 2 Power Saving 17 Reset 18 Resolution Modes 20 Rotary Default 17 Rotary knob 6 7 Safety precautions 2 Screen Size Quality 12 13 Speakers 6 Special Controls 8 17 18 Specifications 20 Troubleshooting 21 Set Up Guide USB hub 6 USB connections 4 User Presets 15 Vertical Position 1...

Отзывы: