User Manual BDL6531E
RETURN TO THE CONTENTS
5. Press the
PLUS
button to highlight the
OFF
item. Press the
SET
button, and then press the
UP
/
DOWN
button to set the power off hour to “22”.
6. Press the
PLUS
button to move to the minute slot. Press the
UP
/
DOWN
button to set the power off
minute to “30”, then press the
EXIT
button.
7. Press the
PLUS
button to highlight the
INPUT
item, and then press the
UP
/
DOWN
button to select
HDMI
.
8. Press the
PLUS
button to select
TUE
and then press the
SET
button. A check mark will appear in the
box indicating that it has been selected.
9. Press the
PLUS
button to select
WED
and then press the
SET
button. A check mark will appear in
the box indicating that it has been selected.
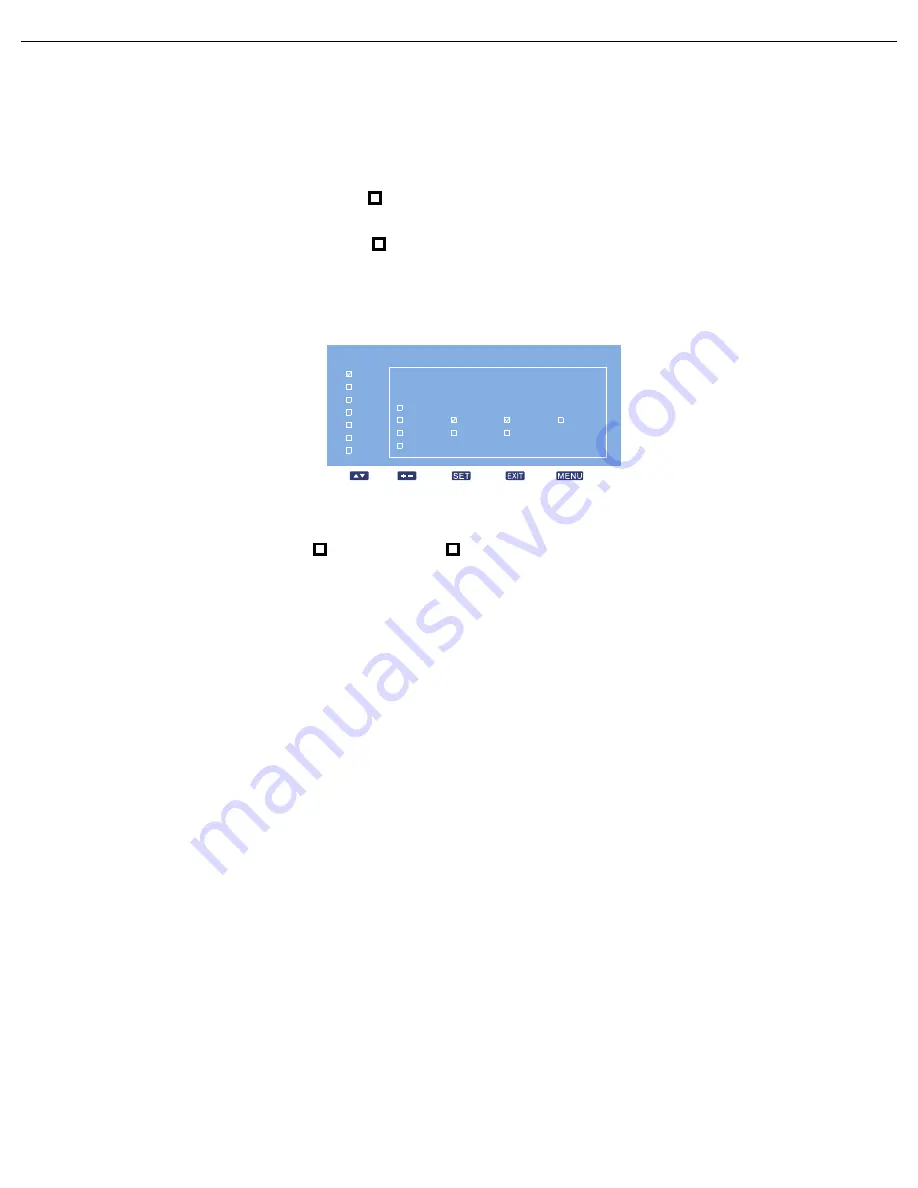
10. Now you have completed the schedule settings. The on-screen display should look like the illustration
below:
11. Press the
EXIT
button and the menu will close and the schedule settings will take effect.
To set up more schedule items, repeat the steps above except that a different schedule item should be
selected (schedule item #2 ( 2) through #7 ( 7)) in step 2.
Note:
• Seven scheduling options are available so that you can choose between different video input modes for different
schedules during the week. For example, VGA input on a Monday, HDMI on Tuesday to Friday, S-VIDEO for
weekends.
• If you do not want to use a power on time, select "--" for the power on hour slot, and "00" for the minute slot. The
display will only turn off at the time you set.
• If you do not want to use a power off time, select "--" for the power off hour slot, and "00" for the minute slot. The
display will only turn on at the time you set.
• If no input source is selected, the default input source (VIDEO) will be used.
• If EVERY DAY is selected, the display will turn on everyday regardless of other day settings (e.g MON, TUE, WED...,
etc.).
• When schedule periods overlap, the power on time has priority over power off time. For example, if schedule item #1
sets the display to power on at 10:00 AM and off at 5:00 PM, and schedule item #2 sets the display to power on
at 4:00 PM and off at 9:00 PM on the same day, then the display will power on at 10:00 AM and off at 9:00 PM.
• If there are multiple schedule items programmed for the same time period, then the highest numbered schedule item
has priority. For example, if schedule items #1 and #2 both set the display to power on at 7:00 AM and off at 5:00
PM, then only schedule item # 1 will take effect.
MONITOR ID
Set the ID number for controlling the display via the RS232C connection. Each display must have a unique ID
number when multiple BDL6531E displays are connected.
See table under "Tiling" for more information. Use the
PLUS
/
MINUS
button to select a monitor ID.
DDC/CI
Choose to turn
ON
or
OFF
the DDC/CI communication function. Select ON for normal use.
Use the
PLUS
/
MINUS
button to make selection.
TODAY
1
2
3
4
5
6
7
Sel
Ad just
Ent er
Back
Quit
SCHEDUL E
2001 . 3 . 5 F RI 18 : 52 : 16
ON
INPUT
OFF
07 : 30
22 : 30
HDMI
EVERY DAY
MON
FRI
EVERY WEEK
THU
TUE
SAT
WED
SUN
Содержание BDL6531E
Страница 1: ...BDL6531E www philips com welcome EN User manual Cleaning and troubleshooting ...
Страница 50: ......

