10
220V3 LCD
Lock/Unlock,Aging,Factory Mode
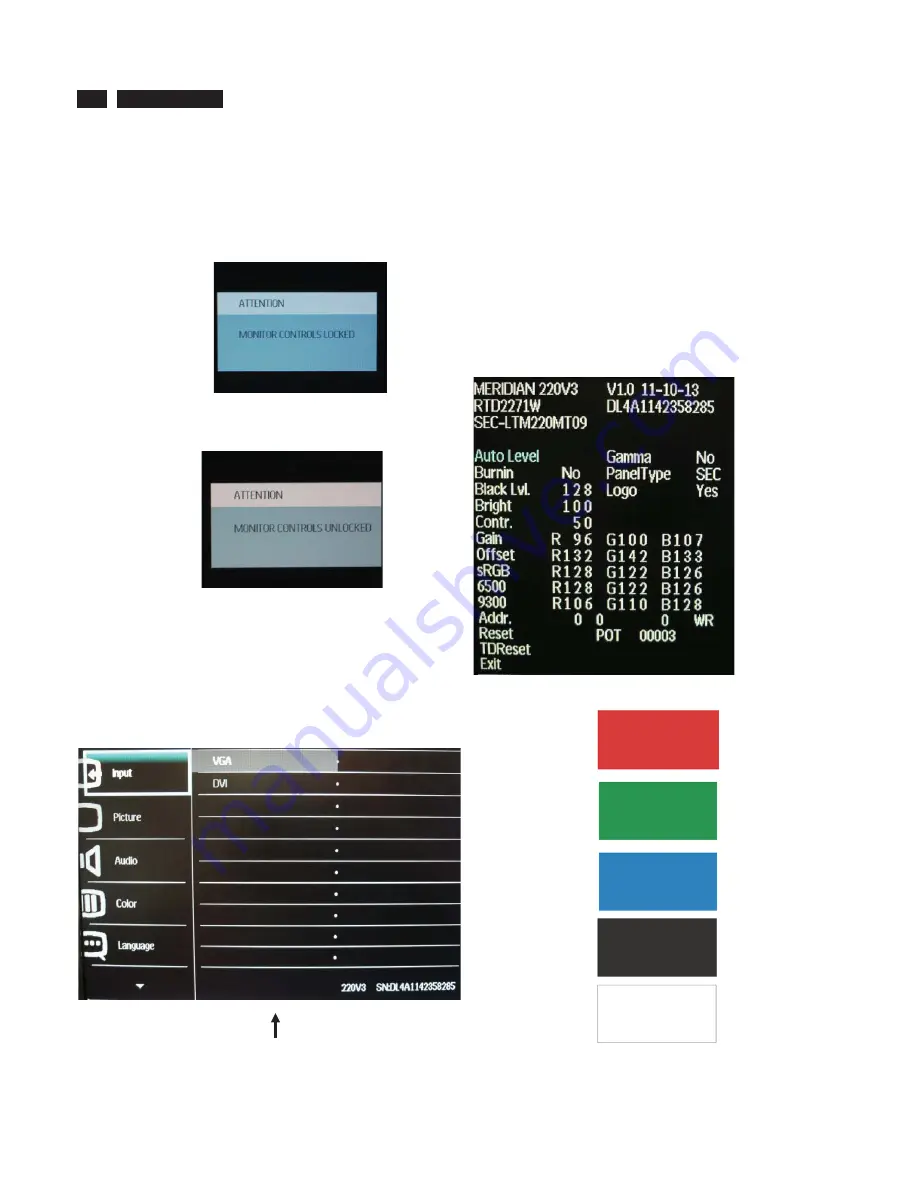
To lock/unlock OSD FUNCTION(User Mode)
The OSD function can be locked by pressing"OK"button(1) for more than 10
seconds, the screen shows following windows for 4 seconds. Every time
when you press"OK" button, this message appears on the screen
automatically .
Unlock OSD function
Unlocked OSD function can be released by pressing "OK" button for more
than 10 seconds again.
Access Factory Mode
1). Turn off monitor.
2). [Push "EXIT" & "MENU" buttons at the same time and hold them]+[Press
"power" button until comes out "Windows screen" ] => then release all
buttons
3).Press "MENU" button, wait until the OSD menu with Characters "
MERIDIAN 220V3 V1.0 11-10-13” (below OSD menu) come on the Screen
of the monitor.
Factory Mode indicator
Factory Menu
Cursor can move on gray color area
Hot key function: by pressing " UP " and " DOWN " key Simultaneously at
User Mode (or Factory Mode) (PS: The Of fset R G B function can be used
on reduce or eliminate snowy noise on the background when the resolution
of video signal is 1680*1050vertical 60Hz. Slightly increase or decrease the
value until snowy noise completely disappear .
Access Aging Mode
Step 1 : Access Factory Mode then enter Factory Menu.
Step 2 : By pressing " UP" and "
DOWN
" key to Burning Icon.
Press "MENU then press " UP" and "
DOWN
" key to turn on Aging
Mode.
Step 3 : Disconnect interface cable between Monitor and PC.
After 3 seconds,
bring up:
repeatly
Connect Signal cable again=> go back to normal display
Содержание 220V3AB/00
Страница 6: ...6 220V3 LCD Troubleshooting ...
Страница 7: ...220V3 LCD 7 Troubleshooting ...
Страница 16: ...16 220V3 LCD 11 Take PCBA out from SHD Unlock power BD wire from IF BD unlock LVDS FFC wire from IF BD ...
Страница 18: ......
Страница 19: ...18 220V3 LCD FAQs Frequently Asked Questions ...
Страница 20: ...220V3 LCD 19 FAQs Frequently Asked Questions ...
Страница 24: ...220V3 LCD 23 Service tool Software FW writing tool RTD_Customer_Tool_V2 1_Beta3_Install_20110701 exe ...
Страница 37: ...36 220V3 LCD Step 6 Press button to upgrade FW In Progress Step 7 When finish it will show PASS ...
Страница 39: ...38 220V3 LCD Wiring Diagram ...
Страница 40: ...220V3 LCD 39 Block Diagram ...
Страница 44: ...220V3 LCD 43 S calar Diagram C B A ...
Страница 47: ...220V3 LCD 46 Power Diagram C B A 220V3A 220V3 ...
Страница 49: ...Control Diagram C B A 48 220V3 LCD ...
Страница 75: ...Exp lode d View 74 220V3 LCD ...


