


Using the Spectrometer . 43
Scanning samples
When you connect to your spectrometer the instrument settings will default to appropriate
values for your instrument type and accessory.
The configurable Scan toolbars at the top of the workspace include the tools you need to
collect a sample spectrum. The default Instrument Settings toolbar contains settings that are
appropriate for the Frontier Optical FT-IR (Figure 12).
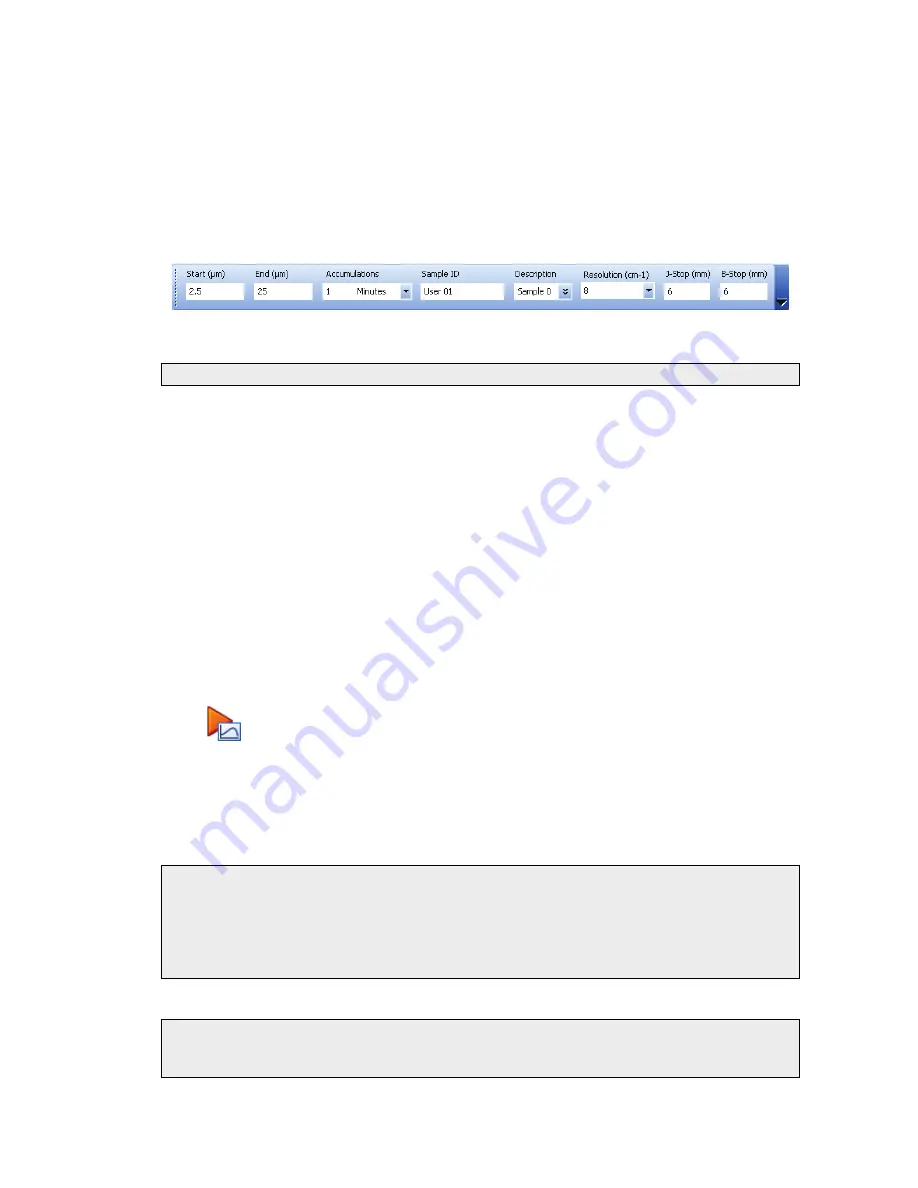
Figure 12 Instrument Settings toolbar
NOTE:
The Scan toolbars are not displayed if you have chosen to work offline.
To scan a sample:
1.
Check and set the instrument parameters.
Here you set the
Start
and
End
points of the scan range (by default in microns, but the
abscissa units can also be set to nanometers or wavenumbers on the Setup Instrument
Basic tab) and the
Accumulations
required, either as a number of scans, or as a
length of time. You can enter a unique
Sample ID
and
Description
for the sample. You
can also set the
Resolution
(in cm
−1
). This will set the
J-Stop
size (in mm) to the
default for that resolution, which you can then edit.
By default, sensible values for the scan and instrument parameters are entered in the
Instrument Settings toolbar. The values applied depend on your instrument and
accessory. To amend any value, select the parameter and then enter your new value, or
select a value from the drop-down list.
2.
If a background scan is required, the
Scan
button includes a small background flag.
Clear the instrument beampath, or insert a suitable background material, and then click
to collect a background spectrum.
The background spectrum is displayed briefly, and then the Viewing Area is prepared
for data collection from your sample.
By default, the Measurement bar includes
Scan
,
Halt
,
Background
and
Monitor
buttons. You can also select these commands from the Measurement menu.
We recommended that you run a background scan before every sample.
NOTE:
You can use the Sample Shuttle Accessory (L1200302) to set up an interleaved cycle
scan so that you do not have to open the sample compartment between the
background and sample scans. This helps to reduce changes in the concentration of
carbon dioxide and water vapor in the sample compartment. Set the
Scan Type
to
Interleaved
on the Setup Instrument Basic tab. See the Spectrum on-screen Help for
more information.
NOTE:
If you wish to run a background scan with a filter in place, you must set the
Scan
Type
to
Background
on the Setup Instrument Basic tab, rather than using the
toolbar button. See the Spectrum on-screen Help for more information.
Содержание Frontier Optica FT-IR
Страница 1: ...FRONTIER OPTICA FT IR User s Guide MOLECULAR SPECTROSCOPY ...
Страница 5: ...Introduction ...
Страница 10: ...10 Frontier Optica FT IR User s Guide ...
Страница 11: ...Warnings and Safety Information ...
Страница 23: ...An Overview of the Frontier Optica FT IR Spectrometer ...
Страница 29: ...Unpacking and Installation ...
Страница 40: ...40 Frontier Optica FT IR User s Guide ...
Страница 41: ...Using the Spectrometer ...
Страница 50: ...50 Frontier Optica FT IR User s Guide ...
Страница 51: ...Measuring Optical Components ...
Страница 58: ...58 Frontier Optica FT IR User s Guide ...
Страница 59: ...Routine Maintenance ...
Страница 71: ...Advanced Maintenance ...
Страница 85: ...Appendices ...


