background image

178

5

Se
ttings

1

Use the four-way controller (

23

) to select [Folder 

Name] in the [

W

 Setting 2] menu, and press the four-way 

controller (

5

).

A pull-down menu appears.

2

Use the four-way controller (

23

) to select the rule for 

naming folders.

Select [Date], [PENTX], or [ _USER].

3

Press the 

4

 button.

The setting is saved.

You can name the folder in which to save images.
You can enter up to five numbers and letters.
The 5-digit name is displayed after the 3-digit folder number.

• Up to 900 folders can be created.
• Up to 9999 images can be saved in a folder.

To Select a Rule for Naming Folders

To Name the Folder Yourself
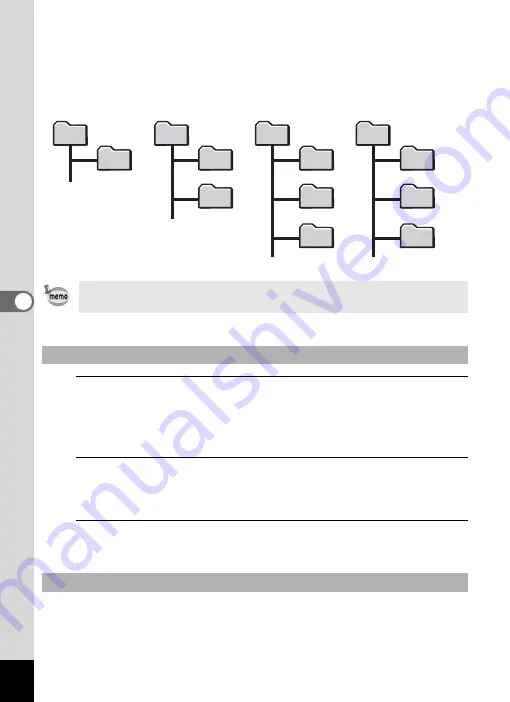
DCIM

100_0401

101_0408

102PENTX

DCIM

100_0401

101_0408

DCIM

100_0401

100

100

101

100

101

102

DCIM

100_0401

101_0408

102PENTX

100

101

102

Image taken on April 1 

with the folder name 

setting set to [Date] 

created.
A folder with the name 

“100_0401” is created.
The images are saved in 

the “100_0401” folder.

Image taken on April 8 

with the folder name 

setting set to [Date] 

created.
A folder with the name 

“101_0408” is created.
The images are saved in 

the “101_0408” folder.

Image taken on April 10 

with the folder name 

setting set to [PENTX] 

created.
A folder with the name 

“102PENTX” is created.
The images are saved in 

the “102PENTX” folder.

Image taken on April 15 

with the folder name 

setting set to [PENTX] 

created.
A new folder is not 

created.
The images are saved in 

the “102PENTX” folder.

Содержание MX-1

Страница 1: ...teuil Cedex FRANCE HQ http www pentax eu France http www pentax fr PENTAX RICOH IMAGING DEUTSCHLAND GmbH Julius Vosseler Strasse 104 22527 Hamburg GERMANY http www pentax de PENTAX RICOH IMAGING UK LTD PENTAX House Heron Drive Langley Slough Berks SL3 8PN U K http www pentax co uk PENTAX RICOH IMAGING AMERICAS CORPORATION 633 17th Street Suite 2600 Denver Colorado 80202 U S A http www pentaximagin...

Страница 2: ... Systems Incorporated in the United States and or other countries Microsoft Windows and Windows Vista are registered trademarks of Microsoft Corporation in the United States of America and other countries Macintosh Mac OS and QuickTime are trademarks of Apple Inc registered in the U S and other countries Intel Intel Core and Pentium are trademarks of Intel Corporation in the U S and or other count...

Страница 3: ...he actual ones In this manual SD Memory Cards SDHC Memory Cards and SDXC Memory Cards are referred to as SD Memory Cards In this manual the generic term computer s refers to either a Windows PC or a Macintosh In this manual the term battery ies refers to any type of batteries used for this camera and its accessories We have paid close attention to the safety of this camera When using this camera w...

Страница 4: ...ng the flash Discoloration may occur Some portions of the camera heat up during use There is a risk of low temperature burns when holding such portions for long periods Should the display be damaged be careful of glass fragments Also be careful not to allow the liquid crystal to get on your skin in your eyes or mouth Depending on your individual factors or physical condition the use of the camera ...

Страница 5: ...or forcefully bend the AC plug cord Doing so may damage the cord Should the cord be damaged consult a PENTAX Service Center Do not touch or short circuit the terminal area of the AC plug cord while the cord is plugged in Do not handle the power plug with wet hands This can cause an electric shock Do not drop the products or subject them to violent impact This can cause them to breakdown Do not use...

Страница 6: ...s hairpins and other metal objects away from the and contacts of the battery Do not short the battery or dispose of the battery in fire This can cause an explosion or fire If any leakage from the battery should come in contact with skin or clothing it may cause irritation to the skin Wash the affected areas thoroughly with water Precautions for D LI106 Battery Usage USE SPECIFIED CHARGER ONLY RISK...

Страница 7: ...angeable The lens is not removable To keep the battery in optimum condition avoid storing it in a fully charged state or in high temperatures If the battery is left inserted and the camera is not used for a long time the battery will over discharge and shorten the battery s life Charging the battery a day before use or on the day of use is recommended The AC plug cord provided with this camera is ...

Страница 8: ... force This could cause it to break or malfunction Be careful not to overtighten the tripod screw when using a tripod Do not clean the camera with organic solvents such as thinner alcohol or benzine Use a lens brush to remove dust accumulated on the lens Never use a spray blower for cleaning as it may damage the lens Do not store the camera with preservatives or chemicals Storage in high temperatu...

Страница 9: ...ng formatting as this may damage the card and render it unusable The data on the SD Memory Card may be lost in the following circumstances We do not accept any liability for data that is deleted 1 when the SD Memory Card is mishandled by the user 2 when the SD Memory Card is exposed to static electricity or electrical interference 3 when the SD Memory Card has not been used for a long time 4 when ...

Страница 10: ... Display 22 How to Change Function Settings 32 Using the Direct Keys 32 Using the Menus 33 Using the Control Panel 35 Getting Started 37 Attaching the Lens Cap and Strap 37 Powering the Camera 38 Charging the Battery 38 Installing the Battery 39 Using the AC Adapter 42 Installing an SD Memory Card 44 Turning the Camera On and Off 46 Starting up in Playback Mode 47 Initial Settings 48 Setting the D...

Страница 11: ...odes e b c a 71 Taking a Picture in Wide Dynamic Range p Mode 75 Using Mode 76 Various Shooting Methods 78 Using the Digital Wide Function Digital Wide Mode 78 Taking Panoramic Pictures Digital Panorama Mode 80 Taking Pictures of Your Pet Pet Mode 82 Setting the Shooting Functions 84 Selecting the Flash Mode 84 Selecting the Drive Mode 87 Selecting the Focus Mode 89 Selecting the Autofocus Setting...

Страница 12: ...e Movie Settings 117 Saving the Settings Memory 121 Playing Back and Deleting Images 123 Playing Back Images 123 Playing Back Still Pictures 123 Playing Back Movies 124 Displaying Multiple Images 125 Using the Playback Functions 127 Slideshow 129 Rotating the Image 131 Zoom Playback 131 Deleting Images 133 Deleting a Single Image 133 Deleting Selected Images 133 Deleting All Images 135 Protecting ...

Страница 13: ...Red eye Effect 153 Overlaying Your Original Frame on Still Pictures 154 Developing Images 158 Editing Movies 161 Copying Images 164 Setting the Printing Service DPOF 166 Printing a Single Image 166 Printing All Images 168 Settings 169 Camera Settings 169 Setting Menu Items 169 Formatting the Memory 171 Changing the Sound Settings 172 Changing the Date and Time 173 Setting the World Time 174 Settin...

Страница 14: ... Initial Menu Tab Displayed 188 Changing the Start up Screen 189 Correcting Defective Pixels in the Image Sensor Pixel Mapping 190 Setting the Startup Shortcut 191 Displaying the Clock Display 192 Resetting to Default Settings Reset 192 Connecting to a Computer 194 Connecting to a Computer 194 Setting the USB Connection Mode 195 Connecting the Camera and the Computer 196 Using the Provided Softwar...

Страница 15: ...13 Appendix 204 Functions Available for Each Shooting Mode 204 Messages 212 Troubleshooting 214 Default Settings 216 List of World Time Cities 223 Main Specifications 224 WARRANTY POLICY 230 Index 235 ...

Страница 16: ...Memo 14 ...

Страница 17: ...and Deleting Images This chapter explains how to view still pictures and movies on the camera or on a TV screen and how to delete them from the camera 4 Editing and Printing Images This chapter explains how to edit still pictures on the camera and how to print them 5 Settings This chapter explains how to set the camera related functions 6 Connecting to a Computer This chapter explains how to conne...

Страница 18: ...nal accessories Checking the Contents of the Package Camera PENTAX MX 1 Strap O ST130 Lens cap O LC130 Software CD ROM S SW130 Rechargeable lithium ion battery D LI106 Battery charger D BC106 AC plug cord USB cable I USB7 Operating Manual this manual Quick Guide ...

Страница 19: ...pensation dial Shutter release button Flash retracted Movie button Strap lug Power button Power lamp HDMI terminal Type D Remotecontrol receiver Terminal cover Microphone Speaker Display Flash pop up lever Remote control receiver DC coupler outlet cover Tripod socket Battery card cover lock lever Battery card cover ...

Страница 20: ... the flash up 4 Zoom lever Changes the captured area p 60 5 Shutter release button Captures images p 55 6 Movie button Starts movie recording when the mode dial is set to a position other than C p 116 7 EV compensation dial Sets the EV compensation value p 95 Functions in Shooting a c d 6 5 1 2 3 4 0 9 8 7 e b ...

Страница 21: ... and sensitivity are adjusted according to the program line so that the optimum exposure is obtained a Four way controller 2 Changes the drive mode p 87 3 Changes the sensitivity p 94 4 Changes the flash mode p 84 5 Changes the focus mode p 89 When the control panel or a menu screen is displayed use the controller to change the cursor position or item selection b 4 button When the control panel or...

Страница 22: ... 3 Shutter release button Switches to A mode p 21 4 E dial Enlarges the playback image p 131 or activates the multi image display p 125 Adjusts the sound volume in movie playback p 124 5 d i Green Delete button Press to delete images or reset the set value If the button is pressed when an image is enlarged the center of the image is displayed Functions in Playback 6 8 7 9 3 1 2 5 4 ...

Страница 23: ... as follows In this manual the capture mode such as for taking still pictures and recording movies is referred to as A mode capture mode or shooting mode The mode for taking still pictures is specified as still picture capture mode and that for recording movies as movie mode The playback mode such as for displaying captured images on the display is referred to as Q mode or playback mode In Q mode ...

Страница 24: ...purposes The actual display may differ Displaying the data stored in the built in memory When an SD Memory Card is inserted in the camera images and movies on the SD Memory Card are displayed If you want to display images and movies in the built in memory turn the camera off and remove the SD Memory Card Indications on the Display The brightness and the tone of colors of the display can be adjuste...

Страница 25: ...9 AE Lock p 96 7 Focus Mode p 89 20 Shutter speed p 71 8 AE Metering p 97 21 Aperture value p 71 9 Battery level p 41 22 EV compensation value p 95 10 Digital Zoom Intelligent Zoom icon p 60 23 Sensitivity p 94 11 Face Detection icon p 58 24 Memory status p 47 12 Focusing Area p 91 25 Remaining image storage capacity 13 Grid Display p 188 1 7EV 1 7EV 1 2000 1 2000 F2 8 F2 8 1600 1600 37 37 1 19 20...

Страница 26: ... movie recording and playback Control Panel Display 1 Function name 12 Histogram p 188 2 Setting 13 Aspect Ratio p 98 3 Custom Image p 110 Scene Mode p 69 14 JPEG Recorded Pixels p 99 4 White Balance p 100 15 File Format p 99 5 AE Metering p 97 16 JPEG Quality p 100 6 Highlight Correction p 104 17 Shake Reduction p 106 7 Shadow Correction p 104 18 Current date and time p 51 8 ND Filter p 105 19 Me...

Страница 27: ...91 16 Memory status p 47 8 Highlight Correction p 104 17 Remaining image storage capacity 9 Shadow Correction p 104 Settings that cannot be changed due to the current camera setup cannot be selected If no operations are made on the control panel for one minute the standard display will be resumed For more information about the display in capture mode refer to Setting the Display in Capture Mode LC...

Страница 28: ...when the image was taken and copyright information p 29 on captured image are displayed Use the four way controller 23 to switch between the detailed information and copyright information No Info display Only the captured image is displayed Information first displayed in playback is that displayed last in the previous operation When you set DISPLAY to P Off with Memory p 121 in the A Rec Mode 3 me...

Страница 29: ...tandard 7 File format 2 Protect setting 8 Shutter speed 3 Memory status 9 Aperture value 4 Folder number File number 10 ISO sensitivity 5 Battery level 11 Histogram R 6 RGB histogram Standard histogram switch 12 Histogram G 13 Histogram B Extremely bright overexposed portions in the playback image blink red except when RGB histogram Detailed information or Copyright information display mode 100 00...

Страница 30: ...d Pixels p 118 8 Focus Mode p 89 9 AE Metering p 97 10 Flash Mode p 84 24 JPEG Quality p 100 11 Flash Output Compensation p 86 25 Lens focal length 26 Custom Image mode p 110 12 Shutter speed p 71 27 Custom Image parameters p 111 13 Aperture value p 71 14 Sensitivity p 94 28 Shooting date and time 15 EV compensation value p 95 29 Movie recording duration 16 White Balance p 100 17 White Balance fin...

Страница 31: ...nd after shooting tell you whether the exposure level and contrast are correct or not and let you decide if you need to adjust the exposure and take a picture again Copyright Information Display 1 Captured image 5 Battery level p 41 2 Protect setting p 135 6 Photographer s icon 3 Memory status p 47 7 Photographer p 181 4 Folder number File number p 177 8 Copyright Holder s icon 9 Copyright Holder ...

Страница 32: ... for bright portions by red flashing in shooting and in playback Understanding Color Balance Distribution of color intensity is displayed for each color in RGB histogram display If a color is partially cut off on one side it indicates that the color is under or overexposed that the light is very weak or strong in that color or that the white balance is incorrect To Adjust the Exposure 1p 95 Compen...

Страница 33: ...r graphs Examples A guide indication for each available button key operation appears as follows on the display during operation Electronic Level Indication The electronic level indication is provided as a guide It does not guarantee the precise level Guide Indications 2 Four way controller 2 4 button 3 Four way controller 3 Shutter release button 4 Four way controller 4 M button 5 Four way control...

Страница 34: ... set Drive Mode Sensitivity Flash Mode and Focus Mode by pressing the four way controller 2345 p 63 Below how to set Focus Mode is explained as an example 1 Press the four way controller 5 in capture mode The Focus Mode setting screen appears 2 Use the four way controller 45 to select a focus mode 3 Press the 4 button The camera is ready to take a picture Using the Direct Keys Cancel Cancel Standa...

Страница 35: ... When you turn the zoom lever the tab changes in the sequence of A Rec Mode C Movie R Setting and A Custom 3 Use the four way controller 23 to select an item Using the Menus When the mode dial is set to C C Movie 1 menu When the mode dial is set to 9 Green Mode R Setting 1 menu In playback mode R Setting 1 menu 1 2 3 AWB AWB MENU Exit Exit Custom Image Custom Image Capture Settings Capture Setting...

Страница 36: ...lose the menu screen your settings will not be saved if the camera is turned off improperly such as by removing the battery while the camera is on 1 2 3 MENU Exit Exit Sensor Shift Sensor Shift On On D Range Setting D Range Setting Distortion Corr Distortion Corr Shake Reduction Shake Reduction Face Detection Face Detection Blink Detection Blink Detection HDR Capture HDR Capture Standard Standard ...

Страница 37: ...ng for You cannot select items that cannot be changed as a result of current camera settings 3 Press the 4 button The setup screen of the selected item appears You can select whether to display the menu tab selected the last time first or to always display the A Rec Mode 1 menu first p 188 Refer to the following pages for details on each menu A Rec Mode menus 1 p 63 C Movie menu 1p 66 R Setting me...

Страница 38: ... control panel 6 Press the M button The camera is ready to take a picture You can also change the setting by turning the e dial after selecting the item you want to change in Step 2 Detailed settings such as parameters can be changed after pressing the 4 button OK OK Cancel Cancel Focusing Area Focusing Area Auto Auto ...

Страница 39: ...a 1 Attach the string provided to the lens cap 2 Pass the end of the strap through the strap lug then secure it on the inside of the clasp As shown in the illustration passing the strap through the lens cap s string prevents the lens cap from being lost 3 Attach the other end of the strap in the same manner as described above ...

Страница 40: ... cord rated 125 V 7A minimum 6 ft 1 8 m 1 Connect the AC plug cord to the battery charger 2 Plug the AC plug cord into the power outlet 3 Place the battery in the battery charger so that the PENTAX logo is facing up The charging indicator lights while the battery is charging and turns off when charging is finished 4 Remove the battery from the battery charger when charging is finished Charging the...

Страница 41: ...the battery charger may overheat or be damaged The battery has reached the end of its service life when it starts to run down soon after being charged Replace it with a new battery If the battery is inserted correctly but the charging indicator fails to light the battery may be faulty Replace it with a new battery The time required to fully charge the battery is about 140 minutes max The charging ...

Страница 42: ...f 3 The battery will be ejected Take care not to drop the battery when removing it To Remove the Battery This camera uses a rechargeable lithium ion battery D LI106 Use of any other type of battery may damage the camera and cause a malfunction Do not remove the battery while the camera is turned on When storing the battery for more than 6 months charge the battery for 30 minutes using the battery ...

Страница 43: ...conditions Battery Level Indicator You can check the battery level by the indicator on the display Image Storage Capacity 1 flash used for 50 of shots Movie Recording Time 2 Playback Time 2 Approx 290 pictures Approx 90 min Approx 280 min In general battery performance may temporarily deteriorate as the temperature decreases Be sure to take a spare battery with you when traveling abroad or to a co...

Страница 44: ...p 40 on how to open close the battery card cover and remove the battery 3 Insert the DC coupler while holding down the battery lock lever Confirm the DC coupler is locked in place 4 Extract the DC coupler cord Pull up the DC coupler outlet cover at the joint of the camera and the battery card cover so that the DC coupler cord can be extracted from there 5 Close the battery card cover Using the AC ...

Страница 45: ...e sure that the AC plug cord and the DC terminal connecting the AC adapter to the camera are inserted securely Data may be lost if either becomes disconnected while data is being recorded on the SD Memory Card or the built in memory Use the AC adapter with due care to avoid fire or electric shock Be sure to read About the Battery Charger and AC Adapter p 2 before using the AC adapter Be sure to re...

Страница 46: ...the movie recordable time vary depending on the capacity of the SD Memory Card the selected number of recorded pixels and the quality level as well as the frame rate for movies Choose the appropriate number of recorded pixels for still pictures in the A Rec Mode 1 menu Refer to Setting the Recording File Format p 97 for details Choose the appropriate number of recorded pixels and frame rate for mo...

Страница 47: ...so that the label is facing the display side of the camera Push the card in until it clicks Data may not be recorded correctly if the card is not inserted all the way To remove the SD Memory Card push it in once and then pull it out 3 Close the battery card cover Close the battery card cover and slide the battery card cover lock lever in the opposite direction of 1 to lock SD Memory Card Battery c...

Страница 48: ...nds The lens will not extend if the initial settings have not been configured If the Language u screen or Date Adjustment screen appears when you turn the camera on follow the procedure on p 48 to set the display language and or current date and time 3 Press the power button again The display turns off the lens closes and the camera turns off Taking Still Pictures 1p 53 Power button ...

Страница 49: ...e saved on the SD Memory Card The SD Memory Card is not inserted Images will be saved in the built in memory r The write protect switch on the SD Memory Card is in the LOCK position p 7 Images cannot be recorded Starting up in Playback Mode To switch from playback mode to capture mode be sure to remove the lens cap and press the Q button or press the shutter release button halfway In order to set ...

Страница 50: ... desired settings for Hometown and DST Daylight Saving Time appear proceed to Step 9 Proceed to Step 3 if the desired settings do not appear The language date and time can be changed later Refer to the pages below for instructions To change the language follow the steps in Changing the Display Language 1p 177 To change the date and time follow the steps in Changing the Date and Time 1p 173 Setting...

Страница 51: ...en is canceled and the camera is set to still picture capture mode 2 Press the 3 button The A Rec Mode 1 menu appears 3 Press the four way controller 5 four times The W Setting 1 menu appears 4 Use the four way controller 23 to select Language u 5 Press the four way controller 5 The Language u screen appears 6 Use the four way controller 2345 to select the desired language 7 Press the 4 button The...

Страница 52: ... Settings complete 10 Press the 4 button The Date Adjustment screen appears Next set the date and time The video output format NTSC PAL is set to the format of the city selected in Hometown on the Initial Setting screen Refer to List of World Time Cities p 223 for the video output format of each city that will be set at the time of initial setting and Changing the Video Output Format p 183 for cha...

Страница 53: ... 3 The frame moves to Date 7 Press the four way controller 5 The frame moves to the month 8 Use the four way controller 23 to change the month Change the day and year in the same manner Next change the time If you selected 12h in Step 4 the camera automatically switches the display between am and pm corresponding to the time 9 Press the four way controller 5 and then use the four way controller 3 ...

Страница 54: ... and switch to capture mode by pressing the 3 button In this case the Initial Setting screen will appear again the next time you turn the camera on The language date time Hometown city and DST setting can be changed Refer to the pages below for instructions To change the language follow the steps in Changing the Display Language 1p 177 To change the date and time follow the steps in Changing the D...

Страница 55: ...above your head Adjusting the Position of the Display Be careful not to apply excessive force to the display when adjusting its position The display cannot be moved horizontally Put the display back in the original position when using in ordinary situations 1 Pull out the top of the display in the direction of the arrow 2 Move the display in the direction of the arrow according to your desired sho...

Страница 56: ... most appropriate capture mode depending on the situations and subjects 1 Remove the lens cap 2 Press the power button The camera turns on and enters Capture Mode 3 Set the mode dial to B The camera will select the optimal capture mode for the subject 4 Confirm the subject and shooting information on the display The focus frame in the middle of the display indicates the zone of automatic focusing ...

Страница 57: ...he display turns green when the camera focuses on the subject at the correct distance To use the flash slide the b lever to pop up the flash p 86 6 Press the shutter release button fully The picture is taken The flash discharges automatically depending on the light conditions The captured image appears on the display Instant Review1p 57 and is saved to the SD Memory Card or the built in memory Sta...

Страница 58: ...cture The following restrictions apply in b mode You cannot set the Face Detection function to Off The focusing area setting is fixed at J Auto The b Flower mode cannot be selected when using Digital Zoom or Intelligent Zoom If A Night Scene mode is selected when the flash mode is C Auto or D Auto Red eye the flash mode is fixed to a Flash Off When the drive mode is set to j Continuous Shooting A ...

Страница 59: ...a at your subject and press the shutter release button fully Objects that lack contrast such as a blue sky or white wall Dark places or objects or conditions that prevent light being reflected back Intricate patterns Fast moving objects When there is an object in the foreground and an object in the background in the captured area Strongly reflected light or strong backlighting bright background In...

Страница 60: ...ra displays a yellow frame over the main face and white frame s over the other face s It can display up to a total of 31 frames including a main frame and white frame s The default setting is On You can switch to the Smile Capture function that automatically releases the shutter when the subject smiles Refer to Setting the Face Detection Function p 107 for details In 9 Green mode you can enjoy eas...

Страница 61: ...WB fine tuning AB 0 AWB fine tuning GM 0 AF Setting Focusing Area Auto AF Mode l Focus Assist O On AE Metering L Multi segment ND Filter Auto p Capture Standard D Range Setting Highlight Correction Auto Shadow Correction P Off Distortion Corr O On Shake Reduction Sensor Shift Face Detection On Blink Detection O On Digital Zoom O On Instant Review Display Time 1 sec Zoom Instant Review O On Histogr...

Страница 62: ...isplay turns green when the camera focuses on the subject at the correct distance 3 Press the shutter release button fully The picture is taken You can use the zoom to change the area to be captured LCD View Options Grid Display X Off Histogram P Off Highlight Alert P Off Electronic Level P Off Date Imprint Off In 9 mode you cannot change the information on the display by pressing the 4 button If ...

Страница 63: ... 1 You can zoom in to a maximum of 4 0 optically 6 0 mm 24 0 mm Approx 28 mm 112 mm in 35 mm equivalent focal length 2 The Intelligent Zoom range differs depending on the number of recorded pixels See the following table Recorded pixels and the maximum zoom ratio Recorded Pixels Intelligent Zoom Digital Zoom E I H J Not available 4 0x optical zoom only Approx 7 8x a L K M Approx 5 2x Approx 7 8x 6...

Страница 64: ...ilable It is recommended to use a tripod or other support to prevent camera shake when taking pictures at high zoom When the focus mode is set to I 1cm Macro the zoom position is fixed Pictures taken in the Digital Zoom range appear grainier than pictures taken in the optical zoom range Intelligent Zoom is not available when the number of recorded pixels is set to E I H J 4 0 optical zoom and Digi...

Страница 65: ...erformed in the A Rec Mode 1 3 menus Press the 3 button in capture mode to display the A Rec Mode 1 menu For details on how to use the menus refer to Using the Menus p 33 Direct Keys Setting Items Key Item Function Page 2 Drive Mode Selects Continuous Shooting Burst Shooting Self timer Remote Control or Auto Bracketing p 87 3 Sensitivity Sets the ISO sensitivity p 94 4 Flash Mode Sets the method o...

Страница 66: ... focusing p 92 Focus Assist Activates the Focus Assist light when the subject is too dark to activate the autofocus system p 92 AE Metering 1 Selects the part of the sensor to use for measuring brightness and determining exposure p 97 ND Filter 1 Sets whether to use the ND filter built in to the lens p 105 A2 p Capture Enables capturing images with high dynamic range p 104 D Range Setting Highligh...

Страница 67: ... the date time when taking still pictures p 112 Menu Item Function Page 1 2 3 AWB AWB MENU Exit Exit Custom Image Custom Image Capture Settings Capture Settings White Balance White Balance AF Setting AF Setting AE Metering AE Metering ND Filter ND Filter Auto Auto 1 2 3 MENU Exit Exit Sensor Shift Sensor Shift On On D Range Setting D Range Setting Distortion Corr Distortion Corr Shake Reduction Sh...

Страница 68: ...er of recorded pixels or size of the movie p 118 Movie SR Activates the Movie SR function p 119 Wind Suppression 1 Reduces the wind noise in recording p 119 Enable Autofocus 1 Determines whether to activate the autofocus system in movie recording p 120 Enable Optical Zoom Determines whether to activate the optical zoom in movie recording p 120 1 MENU Full HD Exit Exit Custom Image Custom Image Rec...

Страница 69: ...er to enable the electronic shutter to be used in combination 8 Sensitivity Steps Switches the ISO Sensitivity step p 94 9 Save Rotation Info Determines whether to record rotation information in capture mode p 131 10 Auto Image Rotation Determines whether to activate the automatic image rotation in playback p 131 Reset Custom Functions Resets all the settings in the A Custom 1 2 menus to the defau...

Страница 70: ...to Picture mode The camera will automatically select the optimal capture mode for the subject p 54 Scene mode You can choose the capture mode from various scene styles p 69 p mode For generating a single image of wide dynamic range from 3 images captured with different exposure settings p 75 mode For capturing with the settings specified by a user as desired p 76 Exposure modes e b c a Changes the...

Страница 71: ... a tripod or other support is advised When the flash mode is set to C Auto and the camera detects a person s face the flash mode automatically changes to F Flash On Red eye U Candlelight For capturing scenes in candlelight S Fireworks For capturing fireworks Use of a tripod or other support is suggested The shutter speed is fixed at 4 seconds and the sensitivity is fixed at the minimum value K Foo...

Страница 72: ... for discreet image capture X Digital Wide Stitches two pictures together to create a wider image 1p 78 F Digital Panorama Stitches images taken with the camera to create a panoramic photograph 1p 80 o Miniature For capturing an image with the subject looks like miniature objects Some functions may not be available or may not work fully depending on the selected shooting mode For details refer to ...

Страница 73: ...ng in Various Exposure Modes e b c a Exposure Mode Description e Program Automatically sets the shutter speed and aperture value to obtain a proper exposure according to the program line b Shutter Priority Lets you set the desired shutter speed for expressing subject movement c Aperture Priority Lets you set the desired aperture value for controlling the depth of field a Manual Exposure Lets you s...

Страница 74: ... to adjust the value 5 appears on the display before the value that can be changed The following parameters can be changed depending on the selected exposure mode To Select the Exposure Mode Exposure Mode EV Compensation Change Shutter Speed Change Aperture Value Change Sensitivity e Program z z b Shutter Priority z z z c Aperture Priority z z z a Manual Exposure z z Other than AUTO 1 1000 1 1000 ...

Страница 75: ...pears if there is a large difference between the current exposure and the proper exposure If the difference is greater than 2 0EV only the exposure warning icon is displayed If the difference is 2 0EV or less the exposure warning icon is displayed and the difference between the current exposure and the proper exposure is shown in increments of 1 3EV When the shutter speed is set to a speed slower ...

Страница 76: ...g In Bulb shooting the following functions are not available EV Compensation Auto Bracketing AE Lock j Continuous Shooting A Burst Shooting L and C Burst Shooting H p Capture Shake Reduction Bulb shooting ends compulsorily once the exposure time exceeds 30 seconds Use a sturdy tripod to prevent camera shake during Bulb shooting The upper sensitivity limit for Bulb shooting is ISO 1600 We recommend...

Страница 77: ... composite image is displayed Instant Review and stored on an SD Memory Card or in the built in memory Taking a Picture in Wide Dynamic Range p Mode The exposure is adjusted according to the shutter speed while retaining the aperture value Only the composite picture is stored The File Format V cannot be selected j Continuous Shooting A Burst Shooting L C Burst Shooting H and l Auto Bracketing of d...

Страница 78: ...ng AF Point Sensitivity Type of information display 1 Set the mode dial to e b c or a 2 Set the functions to be saved 3 Use the four way controller 23 to select Save as in the W Setting 1 menu and press the four way controller 5 The Save as screen appears 4 Press the four way controller 2 to select Save Using Mode To Save the Settings in Mode You can save settings in mode only when the mode dial i...

Страница 79: ... Change the settings already saved in mode if necessary 3 To use the flash slide the b lever The flash pops up p 86 4 Take a picture To Take Pictures in Mode The settings changed in mode are valid only when the mode dial is set to Changing the capture mode or turning off the power returns the camera to the settings saved with Save as To change the settings of mode perform the operations in Save as...

Страница 80: ...45 to select X from the Scene Mode Palette with the procedure on p 70 2 Press the 4 button and then press the M button The camera enters X mode Hold the camera vertically and compose the first image left half of picture When the camera detects a person s face the Face Detection function is activated and the face detection frame appears p 58 Using the Digital Wide Function Digital Wide Mode 37 37 1...

Страница 81: ...ller 3 A confirmation dialog appears 2 Use the four way controller 23 to select an option and press the 4 button To minimize distortion when taking the second image turn the camera so that it pivots around the right edge of the preview guide on the screen Some distortion may result from moving objects repeating patterns or if nothing exists when overlapping the first and second image on the previe...

Страница 82: ...he first frame is displayed When the camera detects a person s face the Face Detection function is activated and the face detection frame appears p 58 4 Press the shutter release button to take a shot The screen for taking the second frame is displayed after you take the first frame If you select right 5 in Step 3 The right edge of the first frame appears in semi transparent form on the left edge ...

Страница 83: ... press the 4 button Some distortion may result from moving objects repeating patterns or if nothing exists when overlapping the first and second frames or the second and third frames on the preview guide When the Face Detection function p 107 is set to On it works only when taking the first shot To Cancel after Taking the First or Second Frame Save Saves the captured image s and you can retake the...

Страница 84: ...en in e mode The pet selection screen appears 2 Press the M button The pet registration screen appears Aiming the camera at the pet s full face automatically releases the shutter and the pet registration confirmation dialog appears When you select Registry using four way controller 23 and press the 4 button the picture of the registered pet is indicated on the upper left corner of the display and ...

Страница 85: ...t registration screen the registration will be canceled and the camera returns to capture status Only dogs and cats can be registered in e mode Other animals or human faces cannot be registered You may not be able to register the pet s face if for example the pet s face is too small The camera may not detect the registered pet s face depending on the shooting situation Focusing Area is set to W Tr...

Страница 86: ...ect s eyes The flash discharges regardless of the light conditions A pre flash discharges before the main flash G Slow speed Sync For taking bright pictures of both people and background indoors and outdoors at night The flash discharges automatically H Slow speed Sync Red eye Discharges a pre flash to reduce the phenomenon of red eyes before discharging the flash with Slow speed Sync I Trailing C...

Страница 87: ...istance a shadow of the lens may appear in the picture taken About the red eye phenomenon Taking pictures using the flash may cause the subject s eyes to appear red in the resulting picture This phenomenon occurs when the light from the flash is reflected in the subject s eyes It can be reduced by increasing the illumination in the area around the subject and or decreasing the subject distance and...

Страница 88: ...ges and the picture is taken 5 Push the flash down to retract You can change the flash output in a range of 2 0 to 1 0 in increments of 1 3 EV 1 Press the four way controller 3 in Step 2 on p 85 2 Press the four way controller 45 or turn the e dial The flash compensation value is displayed Press the d i button to reset the value to 0 0 To Use the Flash To Compensate Flash Output When the flash out...

Страница 89: ...aken continuously at shorter intervals than that with Continuous Shooting The interval between shots becomes shorter in the following sequence A and C C Burst Shooting H Shooting with Self timer g Self timer The picture is taken approximately ten seconds after the shutter release button is pressed Use this mode when you want to be included in a group picture Z 2 sec Self timer The picture is taken...

Страница 90: ...lect the current mode press the four way controller 3 then use the four way controller 45 to select the new mode The camera is ready to take a picture using the selected drive mode To Shoot while Automatically Changing the Exposure lAuto Bracketing You can change the order of three shots using 2 Bracketing Order in the A Custom 1 menu p 67 To Select the Drive Mode Focusing may be compromised if yo...

Страница 91: ...ures are taken consecutively in shooting mode selected for the first shot When Instant Review is activated in l mode p 109 the third picture taken is shown in Instant Review after shooting p 57 When you set 5 AF with Remote Control p 67 in the A Custom 1 menu to On the Autofocus function is activated in Remote Control shooting Selecting the Focus Mode Standard This mode is used when the distance t...

Страница 92: ...play to indicate the approximate distance to the subject Adjust the focus using the indicator as a guide 2 for distant focus 3 for closer focus In 9 Green mode you can only select or q The focus mode is fixed at s in S Fireworks mode When shooting with q selected if the subject is further than 50 cm away the camera automatically focuses to Infinity When shooting with selected if the subject is clo...

Страница 93: ...the 4 button The shooting mode and drive mode cannot be changed while the indicator is displayed To switch from to another focus mode press the four way controller 5 while the indicator is displayed Selecting the Autofocus Settings To Set the Autofocus Area Focusing Area J Auto The camera focuses on the nearest subject in the 9 focusing areas K Spot The camera focuses on the subject in a specific ...

Страница 94: ...f timer lamp part 3 Use the four way controller 23 to select Focus Assist In C Movie c Time Lapse Movie and d High Speed Movie modes the focusing area cannot be set to W In 9 Green and S Fireworks modes the focusing area is fixed at J The Focusing Area setting can also be changed using the control panel To Set the Autofocus Mode AF Mode AF S Activates the autofocus system when the shutter release ...

Страница 95: ... Mode screen is displayed Looking at the light directly does not pose a safety but you may feel dazzled Do not look directly into the emitter from a very short distance The camera does not emit the Focus Assist light under the following conditions when the capture mode is set to c Time Lapse Movie C Movie or d High Speed Movie mode when s Infinity 3 Pan Focus or Manual Focus is selected as the foc...

Страница 96: ... value and press the 4 button The camera is ready to take a picture Setting the Exposure To Set the Sensitivity ISO AUTO Sets the range to be adjusted automatically ISO Sets the fixed value When the capture mode is set to p the sensitivity is fixed to AUTO and cannot be changed When the mode dial is set to a Manual Exposure ISO AUTO is not displayed When the sensitivity is set to AUTO and the mode...

Страница 97: ...e ratio that indicates the light level expressed by the CMOS sensor pixels from bright areas to dark areas The larger it is the better the whole range from dark to bright areas will appear in the picture By expanding the dynamic range you can expand the light level expressed by the CMOS sensor pixels making it more difficult for bright areas or dark areas to occur in the image To expand the dynami...

Страница 98: ...re mode To Lock the Exposure Before Shooting AE Lock You will hear a beep when AE Lock is activated The beep sound can be turned off p 172 When any of the following operations are performed AE Lock is canceled the A button is pressed again the Q button 3 button M button or power button is pressed the mode dial is turned the Flash Mode Focus Mode Drive Mode or Sensitivity setting is displayed using...

Страница 99: ... level of brightness is in which portion and automatically adjusts exposure M Center weighted metering Metering is weighted at the center of the sensor The sensitivity increases at the center and no automatic adjustment is performed even during backlit scenes N Spot metering The brightness is measured only within a limited area at the center of the sensor You can use this in combination with the A...

Страница 100: ...d before selecting the menu appears again Select the horizontal and vertical ratio of images from D default setting E F or G The aspect ratio of the camera display is F so if a different aspect ratio is selected the display changes to match the set aspect ratio The Aspect Ratio File Format JPEG Recorded Pixels and JPEG Quality settings can also be changed using the control panel When the File Form...

Страница 101: ...e format designed by Adobe Systems Effects of White Balance and Custom Image are not applied to the captured images but they are saved as actual original information When you perform the development process by using the RAW Development function p 158 or using the provided software SILKYPIX Developer Studio 3 0 LE p 198 you can create JPEG images with these effects RAW Captures images in both RAW a...

Страница 102: ...2656 default setting P 3072 2048 g 2592 1728 i 2016 1344 G k 2992 2992 default setting f 2304 2304 h 1936 1936 i 1536 1536 The more pixels there are the bigger the file size The file size will also vary according to the JPEG Quality setting The quality of a captured image depends on the exposure control resolution of the printer and a variety of other factors The aspect ratio is fixed to 4 3 when ...

Страница 103: ...000K Cloudy For use when taking pictures on cloudy days Approx 6 000K J Fluorescent Light For use when taking pictures under fluorescent lighting Select the type of fluorescent light D Fluorescent Daylight Color N Fluorescent Daylight White W Fluorescent Cool White L Fluorescent Warm White Approx 6 500K Approx 5 000K Approx 4 200K Approx 3 000K I Tungsten Light For use when taking pictures under l...

Страница 104: ...es provided in the camera This provides the optimum white balance for your surroundings 1 Select K in Step 2 on p 102 Because the light source changes when a flash discharges you can set the white balance for when the flash discharges Select Auto White Balance Unchanged or Flash for 3 WB When Using Flash p 67 in the A Custom 1 menu When Tungsten Light is selected the color tone can be compensated ...

Страница 105: ...n p 102 2 Press the d i button The fine tuning screen appears 3 Fine tune the white balance Available operations No image is recorded when the shutter release button is pressed to adjust the white balance The message Cannot process correctly appears when measuring is unsuccessful Press the 4 button while displayed to remeasure the white balance If a picture is extremely overexposed or underexposed...

Страница 106: ...1 or Strong 2 and press the 4 button The setting is saved You can expand the dynamic range and prevent bright and dark areas from occurring Highlight Correction adjusts the bright areas when the image is too bright and Shadow Correction adjusts the dark areas when the image is too dark Four way controller 45 Adjusts the tone of the colors between blue B and amber A d i button Resets the adjustment...

Страница 107: ...between On and Off automatically For Shadow Correction Use the four way controller 45 to switch between O On and P Off You can set whether to use the ND filter 1 Select ND Filter in the A Rec Mode 1 menu and press the four way controller 5 When Highlight Correction is set to On the minimum sensitivity is doubled The Highlight Correction and Shadow Correction settings can also be changed using the ...

Страница 108: ...is Sensor Shift When you switch the camera to a Manual Exposure or C Movie mode with Auto selected the setting is automatically changed to Off The setting is fixed to Auto in b Auto Picture mode or is fixed to Off in S Fireworks mode The ND Filter setting can also be changed using the control panel Correcting Lens Distortion Distortion Correction The effects of the Distortion Correction function m...

Страница 109: ...s When Dual has been selected the setting is changed to Sensor Shift when Fireworks X Digital Wide F Digital Panorama or p mode is selected as the capture mode when the sensitivity is set to 3200 or higher when g Self timer j Continuous Shooting A Burst Shooting L or C Burst Shooting H is selected as the drive mode when the flash mode is set to b Flash On G Slow speed Sync F Flash On Red eye H Slo...

Страница 110: ...t s face the camera focuses using the setting currently selected in Focusing Area When Face Detection is set to Smile the shutter may not be released automatically because the Smile Capture function may not work in some situations such as when the detected face is too small If this happens press the shutter release button to release the shutter Face Detection cannot be set to Off in b Auto Picture...

Страница 111: ...e the four way controller 23 to select Zoom Instant Review Histogram or Highlight Alert and use the four way controller 45 to switch between O On and P Off If the Blink Detection function worked when shooting the message Closed eyes have been detected appears for 3 seconds during Instant Review The Blink Detection function cannot be set in p X Digital Wide F Digital Panorama c Time Lapse Movie C M...

Страница 112: ...s distribution of an image p 27 Highlight Alert Bright overexposed portions blink red p 29 Instant Review 1p 57 Setting the Finishing Image Tone Custom Image Image Tone Image Bright Saturation hue and contrast will be rather high to create a bright sharp image Default setting Natural Creates a natural look that is close to the actual color Vibrant Changes the color slightly to create an antique lo...

Страница 113: ...change the settings The background image changes according to the settings You can check the saturation hue contrast and sharpness with the radar chart 5 Press the 4 button The screen that was displayed in Step 2 appears again Image Tone Parameter Bright Natural Vibrant Saturation 2 to 2 Hue 2 to 2 Contrast 1 to 1 Sharpness 1 to 1 Reversal Film Sharpness 1 to 1 Monochrome Filter Effect None Green ...

Страница 114: ...t value of the selected parameter to the default value The Custom Image setting can also be changed using the control panel Setting the Date Imprint Function The date and or time imprinted with the Date Imprint function cannot be deleted Note that if the printer or the image editing software is set to print the date and the images to be printed already have the date and or time imprinted the impri...

Страница 115: ...to choose a movie mode When an icon is selected in the Movie Mode Palette the guide for the selected movie mode appears 4 Press the 4 button The movie mode is selected and the camera is ready for recording movies The selected movie mode is saved and retrieved when the mode dial is set to C Selecting the Movie Mode Modes Characteristics C Movie For recording movies c Time Lapse Movie Captures frame...

Страница 116: ...justed manually before recording starts if the focus mode is set to Manual Focus The focus cannot be adjusted during recording When the mode dial is set to C the Face Detection function is automatically set to On If you want to set it to Smile or Off change the setting in the A Rec Mode 2 menu before movie recording starts p 107 When the Face Detection function is set to Smile and the focus mode i...

Страница 117: ...n fully Recording starts In C Movie or c Time Lapse Movie mode you can record continuously up to 25 minutes In d High Speed Movie mode you can record continuously up to 15 seconds Saving a still picture during movie recording If you press the 4 button during movie recording a still picture is captured at the moment you pressed the button up to three still pictures per each continuous movie recordi...

Страница 118: ...Movies 1p 124 When you set Enable Autofocus or Enable Optical Zoom in the C Movie 1 menu to O On the autofocus system or the optical zoom can be used during movie recording Note that the working sound may be recorded with the movie In c Time Lapse Movie and d High Speed Movie modes the number of recorded pixels is fixed to 640 480 In c Time Lapse Movie mode no sound is recorded To Keep the Shutter...

Страница 119: ...d the camera returns to capture status When recording starts using the Movie button the number of recorded pixels is fixed to 1920 1080 and the frame rate 30 fps Movie SR Movie Shake Reduction is fixed to O On The recorded area of a movie becomes smaller both horizontally and vertically than the image shown on the display before recording Changing the Movie Settings Movie button 1 MENU Full HD Exi...

Страница 120: ... 23 to choose a parameter you want to change and the four way controller 45 or the e dial to change the setting 4 Press the 4 button In Movie mode you can choose the number of recorded pixels and frame rate for movies The more pixels there are the clearer the details and the bigger the file size The more frames per second the better the quality of the movie but the file size becomes larger The Cus...

Страница 121: ...uction function 1 Use the four way controller 23 to select Movie SR in the C Movie 1 menu 2 Use the four way controller 45 to select O or P O Automatically corrects camera shake default setting P Does not correct camera shake You can reduce wind noises during movie recording 1 Use the four way controller 23 to select Wind Suppression in the C Movie 1 menu V 1280 720 60 fps Records images in HDTV f...

Страница 122: ... O and P O Activates the autofocus system during movie recording P Does not activate the autofocus system default setting You can use the optical zoom during movie recording 1 Use the four way controller 23 to select Enable Optical Zoom in the C Movie 1 menu 2 Use the four way controller 45 to switch between O and P O Enables the optical zoom during movie recording P Does not enable the optical zo...

Страница 123: ...lts when the camera is turned off The table below also shows whether the Memory default setting for each item is O or P Item Description Default Settings Page Flash Mode The flash mode set with the four way controller 4 O p 84 Drive Mode The drive mode set with the four way controller 2 O p 87 Focus Mode The focus mode set with the four way controller 5 O p 89 Zoom Position The zoom position set w...

Страница 124: ...the four way controller 23 to choose an item 3 Use the four way controller 45 to switch between O and P To switch between the Memory 1 screen and the Memory 2 screen press the four way controller 45 or turn the e dial File No If a new SD Memory Card is inserted when O On has been selected file numbers are assigned sequentially O Item Description Default Settings Page ...

Страница 125: ...ontroller 45 The previous or next image appears Press the d i button while the image is displayed to display the Delete screen Press the four way controller 2 to select Delete and press the 4 button Select a file format to delete for images saved in RAW format Playing Back Still Pictures To Delete the Displayed Image Four way controller Q button 1 1000 1 1000 F8 5 F8 5 800 800 100 0001 100 0001 Fi...

Страница 126: ...rts Available operations during playback Delete JPEG Deletes only the JPEG image Delete RAW Deletes only the RAW image Delete RAW JPEG Deletes images in both file formats For information on other deletion procedures 1p 133 Playing Back Movies Zoom lever to the right 5 E dial to the right y Increases the volume Zoom lever to the left 6 E dial to the left f Reduces the volume Four way controller Q b...

Страница 127: ...he e dial to the left f in playback mode The multi image display screen appears Up to nine thumbnail images will be displayed at once default setting indicates that the previous or next image has been stored in another folder Available operations Four way controller 2 Pauses playback Four way controller 5 held down Fast forwards playback while the button is held down Four way controller 4 held dow...

Страница 128: ...he list of folders with recorded images appears M button Displays the Multi image Display screen Use the four way controller 45 or the e dial to select the display type 4 9 or 25 The display type cannot be selected when developing multiple RAW images p 160 d i button Selects and deletes multiple images p 133 Folder Display Calendar Display Four waycontroller 2345 Moves the frame Zoom lever to the ...

Страница 129: ... 4 button Displays the first image recorded on the selected date in single image display 3 button Returns to multi image display M button Switches to folder display Using the Playback Functions Playback Mode Description Page u Slideshow For continuously playing back images Screen or sound effects can be set p 129 s Image Rotation Rotates captured images Useful when viewing vertical images on a TV ...

Страница 130: ... Movie Edit Save as Still Image For saving one frame from a movie as a still picture p 161 Divide Movies For dividing a movie into two Adding title picture For adding a title picture to your movie Z Red eye Edit Attempts to edit out the red eye effect in image Success may vary p 153 n Resize Changes Recorded Pixels and Quality Level to make the file size smaller p 141 o Cropping For cropping image...

Страница 131: ...ow starts Pressing the 4 button during the slideshow pauses the slideshow To resume the slideshow press the 4 button again 6 Press any button other than the 4 button The slideshow stops You can set the playback interval and also a screen effect and sound effect for when one image changes to the next 1 Use the four way controller 23 to select Interval in Step 4 on p 129 2 Press the four way control...

Страница 132: ... 4 button The slideshow starts using the selected interval and effect Wipe The next image slides over the previous one from left to right Checker The next image appears in small square mosaic blocks Fade The current image gradually fades out and the next image fades in Random Various effects are used randomly Off No effect The slideshow will continue until you press any button other than the 4 but...

Страница 133: ... ten times 1 In playback mode use the four way controller 45 to choose the image you want to magnify 2 Turn the e dial to the right y or turn the zoom lever to the right 5 The image is magnified 1 1 to 10 Continuing to turn the e dial to the right y changes the magnification continuously Rotating the Image Images taken at F Digital Panorama mode and movies cannot be rotated Protected images can be...

Страница 134: ...mage is magnified Available operations while an image is magnified 3 Press the 4 or 3 button The image returns to single image display Four waycontroller 2345 Moves the position to be magnified E dial to the right y Zoom lever to the right 5 Makes the image larger max 10 E dial to the left f Zoom lever to the left 6 Makes the image smaller min 1 1 d i button Displays the center of the image Movies...

Страница 135: ...nfirmation screen appears 3 Press the four way controller 2 to select Delete 4 Press the 4 button The image is deleted You can delete several images selected from the multi image display at once 1 In playback mode turn the e dial to the left f Multi image display appears Deleting a Single Image Protected images cannot be deleted p 135 Deleting Selected Images Protected images cannot be deleted p 1...

Страница 136: ...single image screen and check whether you want to delete it or not Turning the e dial to the left resumes the multi image display However protected images cannot be selected 4 Press the d i button A confirmation dialog appears 5 Press the four way controller 2 to select Select Delete 6 Press the 4 button The selected images are deleted MENU OK Cancel Cancel Delete Delete Cancel Cancel Delete Delet...

Страница 137: ...g accidentally deleted 1 In playback mode use the four way controller 45 to choose the image you want to protect 2 Use the four way controller 2345 to select Z Protect from the Playback Mode Palette 3 Press the 4 button The screen for selecting Single Image or All Images appears 4 Use the four way controller 23 to select Single Image 5 Press the 4 button The message Protects this image appears Del...

Страница 138: ...4 on p 135 2 Press the 4 button 3 Use the four way controller 23 to select Protect To cancel the protection of the image select Unprotect in Step 6 Y appears on the protected images during playback The maximum number of images you can protect in succession with Single Image is 99 To Protect All Images 100 0017 100 0017 OK OK Protect Protect Protects this image Protects this image Unprotect Unprote...

Страница 139: ... shown in Step 1 reappears 5 Use the four way controller 23 to select Cancel and press the 4 button The Playback Mode Palette reappears Protected images will be deleted when the SD Memory Card or the built in memory is formatted p 171 To cancel the protection of all your images select Unprotect in Step 3 ...

Страница 140: ...d connect the cable to the PC AV terminal If you intend to use the camera continuously for a long period use of the AC adapter kit K AC130 optional is recommended p 42 For AV equipment with multiple video input terminals check the operating manual of the AV equipment and select the video input terminal to which the camera is connected You cannot output a composite and HDMI video signal at the same...

Страница 141: ...camera on The video output format differs depending on the region When you set Select Time in the World Time setting p 174 to X Destination the video output setting changes to the video output format for that city Depending on the country or region images and sounds may fail to be played back if the video output format is set differently from the one in use there If this happens change the video o...

Страница 142: ...rminal The camera has a Type D Micro HDMI terminal Use a commercially available HDMI cable that matches your AV equipment Nothing is displayed on the camera display during HDMI output The HDMI output format is set to Auto by default With this setting the image is displayed in the largest resolution that the connected AV equipment or camera supports You can change setting according to the output fo...

Страница 143: ...ette 3 Press the 4 button The screen for choosing the number of recorded pixels appears 4 Select JPEG Recorded Pixels or JPEG Quality Use the four way controller 45 to choose the recorded pixels and quality level Use the four way controller 23 to switch between JPEG Recorded Pixels and JPEG Quality 5 Press the 4 button The save confirmation screen appears If the selected image is protected the pro...

Страница 144: ...screen The cropped image cannot be larger than this cropping frame size 4 Choose the cropping area Change the size and or position of the cropping frame by the following operations 5 Press the 4 button The cropped image is saved with a new file name The number of recorded pixels is selected automatically according to the size of the cropped image Cropping Images Images taken with the recorded pixe...

Страница 145: ...the four way controller 45 to move the position for stretching 5 Turn the zoom lever left or right to adjust the area of effect for stretching 6 Press the OK button The save confirmation screen appears Stretching a User Selected Area of an Image Stretch Filter Four way controller 4 Moves the position for stretching left Four way controller 5 Moves the position for stretching right Zoom lever to th...

Страница 146: ...7 when taking pictures so that the face looks smaller 1 In playback mode use the four way controller 45 to choose the image you want to edit 2 Use the four way controller 2345 to select N Small Face Filter from the Playback Mode Palette 3 Press the 4 button Face detection frames appear on the faces that can be processed Proceed to Step 6 when there is only one detection frame 4 Use the four way co...

Страница 147: ...ssed image is saved as a new image and the confirmation dialog does not appear 8 Use the four way controller 23 to select Save as and press the 4 button The camera returns to playback mode and the processed image is displayed You may not be able to process images in the following situations When the size of face taken in relation to an image is too large or too small When a face is not in the cent...

Страница 148: ...and white You can choose from three filters red green and blue Color Emphasis There are four filters Blue Green Pink and Red High Contrast Adjusts the contrast of the captured images Starburst Emphasizes a twinkling atmosphere by adding highlight spots to the shining areas in a night scene or on the surface of water You can choose the shape of spots from among Cross Heart Star Musical Note and Sno...

Страница 149: ...ay controller 23 to select Apply digital filter and press the 4 button The screen to select a filter appears 4 Use the four way controller 2345 to select a filter After selecting a filter you can check the effect on the screen For a filter for which you can select adjust parameters the available parameters are displayed in the lower part of the filter Proceed to Step 6 if you do not need to change...

Страница 150: ...nd press the 4 button 3 Use the four way controller 23 to select Recreate filter effects and press the 4 button The filter effects used for the selected image appear 4 To check the parameter details press the M button and select the filter to be checked with the four way controller 2345 You can check the filter parameters Up to 20 filters can be combined to the same image To Recreate Filter Effect...

Страница 151: ...ge prior to digital filter application 1 Select Find original image in Step 3 on p 148 and press the 4 button The original image prior to digital filter application is retrieved Adjusts parts of the image that are too bright or too dark and processes images to simulate an HDR effect 1 In playback mode use the four way controller 45 to choose the image you want to edit To Search for the Original Im...

Страница 152: ... select Save as and press the 4 button The image processed with the filter is saved Make a collage image by placing captured images on a selected pattern 1 Use the four way controller 2345 to select Collage from the Playback Mode Palette 2 Press the 4 button The item selection screen appears 3 Use the four way controller 23 to choose Recorded Pixels 4 Press the 4 button or the four way controller ...

Страница 153: ... can choose from 3 patterns of layout 7 9 8 10 Press the 3 button The setting is saved and the item selection screen reappears 11 Use the four way controller 23 to choose Backgnd 12 Press the 4 button or the four way controller 5 A pull down menu appears To Select the Layout Pattern To Select the Background OK OK Cancel Cancel Create an image Create an image Recorded Pixels Recorded Pixels Layout ...

Страница 154: ...d in the highlighted area in the guide The guide appears on the top left of the display 18 Repeat Step 17 to lay out the rest images 19 Press the 3 button The camera returns to the item selection screen To Lay Out the Image Only images recorded with h or higher in 4 3 or with i or higher in 16 9 can be selected You cannot select any image of lower sizes Movies and images taken with other cameras d...

Страница 155: ... Playback Mode Palette 3 Press the 4 button The save confirmation screen appears If the selected image is protected the processed image is saved as a new image and the confirmation dialog does not appear To Save the Edited Image The quality level of the image is fixed at Fine Compensating for a Red eye Effect The Red eye Edit function can only be used with still pictures taken with this camera The...

Страница 156: ... Press the 4 button The original frame type selecting screen appears Overlaying Your Original Frame on Still Pictures Type of original frame Blur Edge Composite Frame Type i All sides j Upper and lower sides k Right and left sides l Upper side m Lower side n Left side o Right side Color White Gray Black Pink Pumpkin Dark red Dark green Available characters A Z a z 0 9 Symbols Space Display Positio...

Страница 157: ... the four way controller 23 to select Text Stamp and press the four way controller 5 The Text Stamp screen appears When you do not want to enter characters proceed to Step 11 10 Set up the text stamp For details refer to To Set Up Text Stamp p 156 11 Press the 4 button The save confirmation screen appears If the selected image is protected the processed image is saved as a new image and the confir...

Страница 158: ... character is input Up to 52 characters can be input To Adjust the Position of the Frame and an Image Four way controller 2345 Press to adjust the position of the frame Zoom lever to the right 5 Press to make the frame larger Zoom lever to the left 6 Press to make the frame smaller Four way controller 2345 Press to adjust the position of the image Zoom lever to the right 5 Press to make the image ...

Страница 159: ...roller 5 6 Use the four way controller 23 to select the color and press the 4 button twice Proceed to Step 11 on p 155 1 Press the d i button The preview screen appears A button Press to switch between upper and lower case Zoom lever to the right 5 Press to move the cursor to the right Zoom lever to the left 6 Press to move the cursor to the left d i button Press to delete the character To View th...

Страница 160: ...W Development and press the 4 button The screen to select a development method is displayed 3 Use the four way controller 23 to select Develop single image and press the 4 button The parameters recorded in the image file appear Proceed to Step 6 if you do not need to change the parameters Developing Images Only RAW images captured with this camera can be edited RAW images and JPEG images captured ...

Страница 161: ...ave as and press the 4 button The RAW image is developed and saved as a new image 8 Use the four way controller 23 to select Continue or Exit and press the 4 button Select Continue to edit other images The screen for selecting the parameter in Step 4 appears again Parameter Value Page Aspect Ratio D E F G p 98 JPEG Recorded Pixels JPEG recorded pixels corresponding to the aspect ratio p 99 JPEG Qu...

Страница 162: ...and press the 4 button To change parameters select Develop images with modified settings 5 Use the four way controller 2345 to set Aspect Ratio JPEG Recorded Pixels and JPEG Quality When Develop images with modified settings is selected in Step 4 refer to p 159 to change other parameters 6 Press the 4 button The save confirmation screen appears 7 Use the four way controller 23 to select Save as an...

Страница 163: ...frame to be saved as a still picture appears 6 Use the four way controller 2345 to choose the frame you want to save 2 Plays or pauses the movie 3 Stops the movie and returns to the first frame 4 Reverses the movie frame by frame 1 5 Forwards the movie frame by frame 1 Every 30 frame is the first frame for reversing frame For example when you reverse frame at 1 to 31 the frame reverses to the firs...

Страница 164: ... frame by frame 7 Press the 4 button A confirmation dialog appears 8 Use the four way controller 23 to select Divide 9 Press the 4 button The movie is divided at the specified position each segment is saved as a new file and the original movie is deleted To Divide a Movie Protected movies cannot be divided Only a movie of more than 2 seconds 31 frames can be divided For dividing every 30 frames 31...

Страница 165: ...of the title picture appears 8 Use the four way controller 23 to select the position e Adds the title picture to the beginning of the movie f Adds the title picture to the end of the movie 9 Press the 4 button The selected picture is saved as the title picture To Add a Title Picture to a Movie Protected movies cannot be added a title picture If a movie is more than 26 minutes long after adding tit...

Страница 166: ...the beginning of a movie When the movie is played back the title picture is played back for three seconds and then the movie is played back The still picture set as title picture is used as the thumbnail of the movie When a title picture is added to the end of a movie When the movie is played back the movie is played back first then the title picture is played back for three seconds The thumbnail ...

Страница 167: ... four way controller 45 to select the image you want to copy 6 Press the 4 button The selected image is copied to the built in memory To copy other images repeat Steps 3 to 6 Select Cancel to exit the copy operation To Copy Files from the SD Memory Card to the Built in Memory When a file is copied from the SD Memory Card to the built in memory it is assigned a new file name OK OK Cancel Cancel OK ...

Страница 168: ...he DPOF setting method selection screen appears About printing The following options are available for printing images taken with this camera 1 Use a printing service 2 Use your printer with an SD Memory Card slot to print directly from the SD Memory Card 3 Use your computer s software to print images The DPOF settings can be applied only to still pictures Movies cannot be processed with the DPOF ...

Страница 169: ... settings to other image s repeat Steps 5 to 7 8 Press the 4 button The settings are saved and the screen shown in Step 3 is resumed Depending on the printer or printing equipment at the photo processing lab the date may not be imprinted on the pictures even if O is selected for Date in DPOF setting To cancel DPOF settings set the number of copies to 00 in Step 6 and press the 4 button OK OK Singl...

Страница 170: ...or details on how to make the settings 4 Press the 4 button The settings specified for all the images are saved and the DPOF setting method selection screen is resumed Printing All Images The number of copies specified in the All Images setting applies to all the images Before printing check that the number is correct DPOF settings specified for single images are canceled when settings are made wi...

Страница 171: ...te format and time p 173 World Time Sets the display of the local date and time of the specified city so they can be shown on the display in addition to the present location p 174 Text Size Sets the text size of menus p 176 Language u Changes the language in which menus and messages appear p 177 R2 Folder Name Sets the naming system for folders of storing images p 177 File Name Sets the naming sys...

Страница 172: ...play Sets whether to display the clock while the camera is turned off p 192 Format Formats an SD Memory Card p 171 Menu Item Function Page 01 01 2013 01 01 2013 1 2 3 4 MENU Exit Exit Save as USER Save as USER Sound Sound Date Adjustment Date Adjustment World Time World Time Text Size Text Size Standard Standard English English IMGP IMGP Date Date MSC MSC NTSC NTSC Auto Auto 1 2 3 4 MENU Exit Exit...

Страница 173: ...urns to capture mode Formatting the Memory Do not open the battery card cover during formatting as this may damage the card and render it unusable Formatting deletes all the data on the card including protected images and images recorded with a computer or camera other than this camera SD Memory Cards formatted on a computer or device other than this camera cannot be used Be sure to format the car...

Страница 174: ...er sound 4 Change Playback Volume in the same way as in Steps 2 and 3 5 Press the 3 button twice The screen that was displayed before selecting the menu appears again 2 Use the four way controller 23 to select Startup Sound and press the four way controller 5 A pull down menu appears 3 Use the four way controller 23 to select the sound type Choose 1 2 3 or Off 4 Press the 4 button Changing the Sou...

Страница 175: ...our way controller 5 The frame moves to mm dd yy Depending on the initial setting or previous setting dd mm yy or yy mm dd may be displayed 3 Use the four way controller 23 to choose the date format Choose mm dd yy dd mm yy or yy mm dd 4 Press the four way controller 5 The frame moves to 24h 5 Use the four way controller 23 to select 24h 24 hour display or 12h 12 hour display and press the four wa...

Страница 176: ...e in the same way as in Steps 6 to 8 If you select 12h in Step 5 the camera automatically switches the display between am and pm corresponding to the time 10 Press the four way controller 3 to select Settings complete 11 Press the 4 button The date and time settings are saved The date and time selected in Setting the Date and Time p 51 and Changing the Date and Time p 173 serve as the Hometown dat...

Страница 177: ...e four way controller 23 to select DST 6 Use the four way controller 45 to switch between O On and P Off Select O if the Destination city uses daylight saving time 7 Press the 4 button The settings are saved and the World Time screen reappears 8 Press the 3 button twice The screen that was displayed before selecting the menu appears again To Set the Destination Select W Hometown in Step 2 to set t...

Страница 178: ...ing the menu appears again When X Destination is selected the X icon appears on the guide display to indicate that the Destination date and time are displayed You can set the text size of the item selected with the cursor on the menu to Standard normal display or Large magnified display 1 Use the four way controller 23 to select Text Size in the W Setting 1 menu and press the four way controller 5...

Страница 179: ...ng images When the naming system is set to Date pictures are saved in separate folders by the date they were taken Changing the Display Language Changing the Naming System for Folders Choice The name of the folder Date default xxx_mmdd 3 digit folder number_month day xxx_ddmm 3 digit folder number_day month when the date format is set to dd mm yy A folder is made by day and the images of the day a...

Страница 180: ...older Yourself DCIM 100_0401 101_0408 102PENTX DCIM 100_0401 101_0408 DCIM 100_0401 100 100 101 100 101 102 DCIM 100_0401 101_0408 102PENTX 100 101 102 Image taken on April 1 with the folder name setting set to Date created A folder with the name 100_0401 is created The images are saved in the 100_0401 folder Image taken on April 8 with the folder name setting set to Date created A folder with the...

Страница 181: ...s fixed and returns to the W Setting 2 menu You can change the naming system for files of storing images You can move the cursor for selecting letters by using the e dial The folder name you have set is displayed in the R Setting 2 menu Changing the Naming System for Files Choice The name of the file IMGP Default setting IMGPxxxx xxxx is the automatically assigned 4 digit file number The file numb...

Страница 182: ...t a Rule for Naming Files and press the four way controller 5 The file naming screen appears USER has already been entered 2 Use the four way controller 2345 to select the letter to enter and press the 4 button The first letter is fixed and the cursor moves to the second letter 3 Repeat Step 2 and enter the remaining letters 4 Press the four way controller 4 while A is selected or press 35 while _...

Страница 183: ...g a name appears 3 Use the four way controller 2345 to select a character to be entered and press the 4 button The first character is registered and displayed in the character entry box and the cursor moves to the second character You can move the cursor for selecting letters by using the e dial The file name you have set is not changed even if you reset the camera Setting the Copyright Informatio...

Страница 184: ... is displayed on the screen When the name is longer than 28 characters the 28 characters from the beginning are displayed 7 Press the 3 button twice The screen that was displayed before selecting the menu appears again Determine whether to embed the copyright information in a captured image 1 Use the four way controller 23 to select Copyright Info in the R Setting 2 menu and press the four way con...

Страница 185: ...e the four way controller 23 to select Video Out in the W Setting 2 menu and press the four way controller 5 A pull down menu appears 2 Use the four way controller 23 to select a video output format Choose NTSC or PAL to match the format of the connected AV equipment 3 Press the 4 button The setting is saved Changing the Video Output Format Depending on the country or region images and sounds may ...

Страница 186: ...MI output format to match the format of the connected AV equipment 3 Press the 4 button The setting is saved Selecting the HDMI Output Format The items on the pull down menu vary depending on the selected Video output format To change the display set the Video output format before setting the HDMI output format The table below shows the combinations of the Video output format and HDMI output Video...

Страница 187: ...aved Adjusts the brightness and the tone of colors of the display 1 Use the four way controller 23 to select LCD Settings in the R Setting 3 menu and press the four way controller 5 The LCD Settings screen appears 2 Use the four way controller 23 to select Brightness Level Adjust Blue Amber or Adjust Green Magenta Setting Eye Fi Communication To establish Eye Fi communication you first have to spe...

Страница 188: ...e ordinary brightness if any button is pressed 1 Use the four way controller 23 to select Power Saving in the W Setting 3 menu and press the four way controller 5 A pull down menu appears 2 Use the four way controller 23 to select the time until the camera enters power saving mode Choose 2min 1min 30sec 15sec 5sec default setting or Off 3 Press the 4 button The setting is saved Brightness Level Ch...

Страница 189: ...Continuous Shooting A Burst Shooting L or C Burst Shooting H mode When the AC adapter is connected In playback mode While recording a movie While the camera is connected to a computer When a menu is being displayed When no operation is performed after the camera is turned on the Power Saving function is activated only after 15 seconds elapse even if 5sec is set Setting the Auto Power Off Function ...

Страница 190: ...ress the 3 button twice The screen that was displayed before selecting the menu appears again Set the initial menu tab shown on the display when the 3 button is pressed Setting the Display in Capture Mode LCD View Options Histogram Shows the brightness distribution of an image p 27 Highlight Alert Bright overexposed portions blink red p 29 Electronic Level Displays the electronic level indication ...

Страница 191: ...You can choose any of the following images as the start up screen The pre installed screen The Guide Display Start up Screen showing a guide for the shooting modes and buttons One of the captured images compatible images only 1 Use the four way controller 2345 to select x Start up Screen from the Playback Mode Palette 2 Press the 4 button The image selection screen appears 1 Reset Menu Location Th...

Страница 192: ...4 menu 2 Use the four way controller 23 to select Pixel Mapping and press the four way controller 5 The Pixel Mapping screen appears Once the start up screen has been set it will not be deleted even if the original image is deleted or the SD Memory Card built in memory is formatted The start up screen is not displayed when set to Off The start up screen is not displayed when the camera starts up i...

Страница 193: ...ttery power remaining to activate Pixel Mapping appears on the display Use the AC adapter kit K AC130 optional or replace the battery with one having sufficient power Setting the Startup Shortcut Playback Mode When Playback Mode is O On you can turn on the camera by holding the Q button pressed Clock Display When Clock Display is O On you can display the clock on the display by holding the 4 butto...

Страница 194: ...ally after approximately 10 seconds Pressing the power button turns the camera off immediately You can reset the camera settings to their defaults Refer to Default Settings p 216 for the reset settings 1 Use the four way controller 23 to select Reset in the W Setting 3 menu and press the four way controller 5 The Reset screen appears The default settings are all O Displaying the Clock Display To d...

Страница 195: ...tings 2 Use the four way controller 23 to select Reset 3 Press the 4 button The settings return to the defaults Reset Reset Reset Reset Cancel Cancel Returns to default settings Returns to default settings OK OK ...

Страница 196: ...plication on any 64 bit Edition of Windows CPU Intel Pentium compatible processor Pentium 4 Athlon XP or higher recommended Supports multi core processors Intel Core i5 i7 Core 2 Quad Duo AMD Phenom II X4 X6 Athlon II X2 X4 and other RAM 1 GB minimum 2 GB or more recommended HDD For installing and starting up the program 100 MB minimum of free space For saving image files Approx 10 MB file Monitor...

Страница 197: ...onnecting a device that supports USB Mass Storage Class you can copy read and write files from a computer without installing a dedicated driver PTP Picture Transfer Protocol A protocol that allows transfer of digital images and control of digital cameras via USB standardized as ISO 15740 You can transfer image data between devices that support PTP without installing a device driver QuickTime is re...

Страница 198: ...n the camera and connect the cable to the PC AV terminal 4 Turn your camera on The camera is recognized by the computer Connecting the Camera and the Computer If the battery runs out of power while images are being transferred to the computer the image data may be lost or damaged When connecting your camera to the computer use of the AC adapter kit K AC130 optional is recommended p 42 The power la...

Страница 199: ...ch as SILKYPIX Developer Studio first quit the application then disconnect the USB cable from the camera and the computer To Disconnect the Camera from the Computer The camera will automatically switch to playback mode when the USB cable is disconnected from the camera or the computer ...

Страница 200: ...administrative rights before installing the software 1 Turn the computer on Make sure no other software is running 2 Place the CD ROM into the CD DVD drive on the computer The PENTAX Software Installer screen appears 3 Click SILKYPIX Developer Studio 3 0 LE For Macintosh follow the instructions on the screen to perform subsequent steps Installing the Software If the PENTAX Software Installer scree...

Страница 201: ...the InstallShield Wizard screen appears in the selected language click Next Follow the instructions on the screen to perform subsequent steps When SILKYPIX Developer Studio 3 0 LE is launched the screen on the right appears Screen of the SILKYPIX Developer Studio Refer to Help for details on using the software program ...

Страница 202: ...e Click User Registration on the screen in Step 3 on p 198 A world map for Internet Product Registration is displayed If a computer is connected to the Internet click the displayed country or region and then follow the instructions to register your software Note that you can only register online if your country or area is shown ...

Страница 203: ... for Eye Fi in the W Setting 3 menu The images are transferred automatically For details on how to set up the camera refer to Setting Eye Fi Communication p 185 One of the following icons will appear on the display M N Communicating When Eye Fi is set to O and the camera is connected to an access point or is searching for an access point M O Waiting for communication When Eye Fi is set to O and is...

Страница 204: ...t function while transferring images The camera may be turned off automatically to protect the internal components when the inside of the camera reaches a high temperature caused by transferring a large file such as a movie Use of a wireless access point Internet and suitable Internet settings are required to transfer images via wireless LAN For more information refer to the website http www eye f...

Страница 205: ...Memo ...

Страница 206: ... z z G Slow speed Sync H Slow speed Sync Red eye I Trailing Curtain Sync z z z z z z z Drive Mode 9 Standard z z z z z z z z j Continuous Shooting z z z z z z z AC Burst Shooting L H z z z z z z z g Self timer Z 2 sec Self timer z z z z z z z C 3 Shot Self timer z z z z z z z i Remote Control h 0 sec Remote Control z z z z z z z l Auto Bracketing z z z z z z z Focus Mode Standard q Macro z z z z z...

Страница 207: ...ye z z z z z z z G Slow speed Sync H Slow speed Sync Red eye I Trailing Curtain Sync z z z z z z z z 9 Standard Drive Mode z z z z z z z j Continuous Shooting z z z z z z z AC Burst Shooting L H z z z z z z z z g Self timer Z 2 sec Self timer z z z z z z z C 3 Shot Self timer z z z z z z z z i Remote Control h 0 sec Remote Control z z z z z z z l Auto Bracketing z z z z z z z Standard q Macro Focu...

Страница 208: ... z z z z z Focus Assist z z z z z z z z AE Metering 11 11 11 11 11 11 z z ND Filter 12 z z z z z z z p Capture D Range Setting Highlight Correction 13 z z z z z z 14 Shadow Correction 15 z z z z z z z Distortion Corr z z z z z z z z Shake Reduction z z z z z z z 16 Face Detection z 18 z 18 z z z z z z Blink Detection z z z z z z z z Digital Zoom z z z z z z z z Instant Review z z z z z z z z Memor...

Страница 209: ... z Shake Reduction z 18 z z z z z z 18 z Face Detection z z z z z z z z Blink Detection z z z z z z z z Digital Zoom z z z z z z z z Instant Review z z z z z z z z Memory z z z z z z z z LCD View Options z z z z z z z z Date Imprint 1 Fixed at Bright 2 Fixed at JPEG 3 Fixed at AWB 4 Fixed at Auto White Balance AWB shown on the display 5 Fixed at Daylight AWB shown on the display 6 Fixed at Shade A...

Страница 210: ...d Sync H Slow speed Sync Red eye I Trailing Curtain Sync z z z z z z z Drive Mode 9 Standard z z z z z z z z j Continuous Shooting z z z z AC Burst Shooting L H z z z z g Self timer Z 2 sec Self timer z z z z z z z z C 3 Shot Self timer z z z z i Remote Control h 0 sec Remote Control z z z z z z z z l Auto Bracketing z z z z z Focus Mode Standard q Macro z z z z z z z z I 1cm Macro z z z z z z z 3...

Страница 211: ...ye z z z G Slow speed Sync H Slow speed Sync Red eye I Trailing Curtain Sync z z z z z z z 9 Standard Drive Mode z z z j Continuous Shooting z z z AC Burst Shooting L H z z z z z z z g Self timer Z 2 sec Self timer z z z z C 3 Shot Self timer z z z z z z i Remote Control h 0 sec Remote Control z z z l Auto Bracketing z z z z z z z Standard q Macro Focus Mode z z z z z z I 1cm Macro z z z z z z z 3...

Страница 212: ...ode z z z z z z z z Focus Assist z z z z z z z z AE Metering z 34 z z z z z z ND Filter z z z z z z z z p Capture D Range Setting Highlight Correction z z z z z z 38 z Shadow Correction z z z z z z 39 z Distortion Corr z z z z z z z z Shake Reduction z 41 z z z 41 z 41 z z 41 z Face Detection z z z z z z z z Blink Detection z z z z z z Digital Zoom z z z z z z z z Instant Review z z z z z z z z Me...

Страница 213: ...lected 23 Fixed at h for the first shot fixed at f for a composite image 24 Fixed at h for the first shot 25 Fixed at 640 480 15 fps 26 Fixed at 640 480 120 fps 27 Fixed at the maximum size E 28 Fixed at Fine 29 Fixed at AWB 30 W Tracking cannot be selected 31 Fixed at J Auto 32 Fixed at AF S 33 Focus Assist fixed at O On 34 Fixed at L Multi segment 35 Auto cannot be selected for ND Filter 36 ND F...

Страница 214: ...amera p 171 Card is locked The SD Memory Card is write protected p 7 Compression error Displayed when the camera fails to compress an image Change the quality level or recorded pixels of the image and try shooting or saving it again Movie recording stopped Displayed when the internal temperature of the camera has exceeded normal operating limits while recording a movie The camera will turn off to ...

Страница 215: ...splayed when no SD Memory Card is inserted Available memory on card is insufficient to copy the images Displayed when there is insufficient memory on the SD Memory Card to perform copying Available built in memory is insufficient to copy the images Displayed when there is insufficient built in memory to perform copying Cannot process correctly Displayed when Red eye Edit processing fails Please po...

Страница 216: ...185 Power Saving function is activated When the Power Saving function is activated the display automatically darkens after a certain amount of time Press any button to return to the normal brightness level Select Off in Power Saving in the W Setting 3 menu to turn the Power Saving function off p 186 The shutter will not release The flash is charging Pictures cannot be taken while the flash is char...

Страница 217: ...and then move the camera to recompose Or use the Z Select mode to take a picture with the focusing area set on the subject you wish to focus on p 93 The flash does not discharge The flash is not popped up Pop up the flash The flash mode is set to a Set to C Auto or b Flash On p 84 The drive mode is set to j A C or l The focus mode is set to s The shooting mode is set to S c C or d The flash does n...

Страница 218: ...ault setting with the reset function p 192 No The setting is saved even after reset N A A Rec Mode Menu Items Item Default Setting Last Memory Setting Reset Setting Page Custom Image Bright Yes Yes p 110 Scene Mode 1 F Portrait Yes Yes p 69 Capture Settings Aspect Ratio D Yes Yes p 98 File Format JPEG Yes Yes p 99 JPEG Recorded Pixels E 4000 3000 Yes Yes p 99 JPEG Quality Fine Yes Yes p 100 White ...

Страница 219: ...eview O On Yes Yes Histogram P Off Yes Yes Highlight Alert P Off Yes Yes Memory Flash Mode O On Yes Yes p 121 Drive Mode O On Yes Yes Focus Mode O On Yes Yes Zoom Position P Off Yes Yes MF Position O On Yes Yes White Balance O On Yes Yes Sensitivity O On Yes Yes AE Metering O On Yes Yes Face Detection O On Yes Yes Digital Zoom O On Yes Yes DISPLAY O On Yes Yes File No O On Yes Yes LCD View Options...

Страница 220: ...Operation Volume 3 Yes Yes p 172 Playback Volume 3 Yes Yes Startup Sound Off Yes Yes Shutter Sound 1 Yes Yes Operation Sound 1 Yes Yes Self timer Sound 1 Yes Yes Date Adjustment Date Format date Depending on the initial setting Yes No p 173 Date Format time 24h Yes No Date 01 01 2013 Yes No Time Depending on the initial setting Yes No World Time Select Time W Hometown Yes Yes p 174 Destination Cit...

Страница 221: ...3 min Yes Yes p 187 Reset Cancel p 192 Delete All Cancel p 135 Pixel Mapping Cancel p 190 Startup Shortcut Playback Mode O On Yes Yes p 191 Clock Display O On Yes Yes p 192 Format Cancel p 171 Item Default Setting Last Memory Setting Reset Setting Page 1 AE L with AF Locked 1 On Yes No 1 p 96 2 Bracketing Order 1 0 Yes No 1 p 88 3 WB When Using Flash 1 Auto White Balance Yes No 1 p 102 4 AWB in Tu...

Страница 222: ... Yes Yes Sound Effect O On Yes Yes Image Rotation Depending on the tilt of the camera p 131 Stretch Filter Center 8 No No p 143 Small Face Filter No No p 144 Collage Recorded Pixels h 2048 1536 Yes Yes p 150 Layout 7 Yes Yes p 151 Backgnd White Yes Yes p 151 Select image s p 152 Digital Filter Apply digital filter B W No p 147 Recreate filter effects p 148 Find original image p 149 HDR Filter p 14...

Страница 223: ...lt Start up Screen Yes Yes p 189 Item Function Default Setting Last Memory Setting Reset Setting Page Q button Operation Mode Q Mode Movie button Operation Mode Recording starts p 116 Zoom lever Zoom Position Full wide angle No p 60 Four way controller 2 Drive Mode 9 Standard Yes p 87 4 Flash Mode C Auto Yes p 84 5 Focus Mode Standard Yes p 89 3 Sensitivity AUTO Yes p 94 3 button Menu Display A Re...

Страница 224: ...222 7 Appendix A button AE Lock p 96 Item Function Default Setting Last Memory Setting Reset Setting Page ...

Страница 225: ...ale PAL New York NTSC Delhi PAL Halifax NTSC Colombo PAL Central and South America Mexico City NTSC Kathmandu PAL Lima NTSC Dacca PAL Santiago NTSC East Asia Yangon NTSC Caracas NTSC Bangkok PAL Buenos Aires PAL Kuala Lumpur PAL Sao Paulo PAL Vientiane PAL Rio de Janeiro NTSC Singapore PAL Europe Lisbon PAL Phnom Penh PAL Madrid PAL Ho Chi Minh PAL London PAL Jakarta PAL Paris PAL Hong Kong PAL Am...

Страница 226: ...ma mode Movie T 1920 1080 30fps V 1280 720 60fps U 1280 720 30fps Sensitivity With 1EV Sensitivity Step AUTO Manual ISO 100 200 400 800 1600 3200 6400 12800 With 1 3EV Sensitivity Steps AUTO Manual 100 125 160 200 250 320 400 500 640 800 1000 1250 1600 2000 2500 3200 4000 5000 6400 8000 10000 12800 The sensitivity is fixed at AUTO 100 12800 in Digital SR mode File Format Still RAW DNG JPEG Exif 2 ...

Страница 227: ...88 L 3072 1728 653 1499 O 2560 1440 975 1921 Q 2048 1152 1921 3235 F H 3984 2656 391 778 86 K 3072 2048 653 1205 N 2592 1728 778 1921 R 2016 1344 1205 3235 G J 2992 2992 435 865 88 M 2304 2304 653 1499 P 1936 1936 975 1921 S 1536 1536 1921 3235 Aspect Ratio JPEG Recorded Pixels JPEG Quality RAW 1 Fine Normal D E 4000 3000 12 25 3 6 3072 2304 20 47 f 2592 1944 30 58 h 2048 1536 47 94 E I 3968 2232 ...

Страница 228: ...0 fps 44 sec 25 min 58 sec White Balance Auto White Balance Daylight Shade Cloudy Fluorescent Light Daylight Color Daylight White Cool White Warm White Tungsten Light Flash Manual White Balance Lens Focal Length 6 0 mm 24 0 mm Approx 28 mm 112 mm in 35 mm equivalent focal length Aperture F1 8 W F2 5 T Lens Composition 11 elements in 8 groups 4 aspherical elements Zoom Type Electrically driven Opti...

Страница 229: ...he subject s face Focus Lock By half pressing the shutter release button Exposure Control Metering system TTL image sensor metering Multi segment Center weighted Spot EV Compensation 2 EV can be set in 1 3 EV steps Face Detection Detection of up to 32 people s faces up to 31 face detection frames on the display Smile Capture Blink Detection Face Detection AE is available only while the camera dete...

Страница 230: ... Wide angle Approx 0 4 m 12 2 m Approx 1 31 ft 40 ft Sensitivity in AUTO condition Telephoto Approx 0 4 m 8 8 m Approx 1 31 ft 29 ft Sensitivity in AUTO condition Drive Modes Single frame Continuous Shooting Burst Shooting L H Self timer Approx 10 sec 2 sec 3 shot Remote Control Approx 3 sec 0 sec Auto Bracketing Self timer Electronic control type control time Approx 10 sec 2 sec Time Function Wor...

Страница 231: ...g or protruding parts Weight Approx 363 g excluding batteries and SD Memory Card Approx 391 g including batteries and SD Memory Card Accessories Rechargeable Lithium ion Battery Battery Charger AC Plug Cord USB Cable Software CD ROM Lens Cap Strap Operating Manual Quick Guide ...

Страница 232: ...ufacturer If there is no representative of the manufacturer in your country send the equipment to the manufacturer with postage prepaid In this case it will take a considerable length of time before the equipment can be returned to you owing to the complicated customs procedures required If the equipment is covered by warranty repairs will be made and parts replaced free of charge and the equipmen...

Страница 233: ...ors in some countries can supersede this warranty policy Therefore we recommend that you review the warranty card supplied with your product at the time of purchase or contact the PENTAX distributor in your country for more information and to receive a copy of the warranty policy The CE Mark is a Directive conformity mark of the European Union ...

Страница 234: ...l interference to radio communications However there is no guarantee that interference will not occur in a particular installation If this equipment does cause harmful interference to radio or television reception which can be determined by turning the equipment off and on the user is encouraged to try to correct the interference by one or more of the following measures Reorient or relocate the re...

Страница 235: ...liant with the standards Records maintained continue to reflect the equipment being produced can be expected to be within the variation accepted due to quantity production and testing on the statistical basis as required by 47CFR 2 909 Operation is subject to the following two conditions 1 This device may not cause harmful interference and 2 This device must accept any interference received includ...

Страница 236: ...to inappropriate waste handling If a chemical symbol is added beneath the symbol shown above in accordance with the Battery Directive this indicates that a heavy metal Hg Mercury Cd Cadmium Pb Lead is present in the battery at a concentration above an applicable threshold specified in the Battery Directive For more information about collection and recycling of used products please contact your loc...

Страница 237: ...Sunset 69 A Night Scene 69 N Handheld Night Snap 69 B Night Scene Portrait 69 U Candlelight 69 S Fireworks 69 K Food 69 Q Surf Snow 69 e Pet 82 R Kids 69 Sport 69 c Digital SR 69 c Text 69 Y Candid Capture 70 X Digital Wide 78 F Digital Panorama 80 o Miniature 70 9 Green Mode 58 Numerics 0 sec Remote Control h 87 1cm MacroI 89 2 sec Self timer r 87 3 Shot Self timer C 87 A AC adapter 42 AE Lock 96...

Страница 238: ... City 223 Clock Display 192 Cloudy White Balance 101 Collage 150 Color Emphasis filter 146 Color filter 146 Compensating for Brightness 104 Connecting to a TV 138 Connecting to AV Equipment 138 Continuous Shooting j 87 Contrast Custom Image 111 Control panel operation 35 Copy 164 Copyright Info 181 Cropping 142 Custom function menu 67 219 Custom Image 110 D Date and time setting 51 173 Date Imprin...

Страница 239: ...Balance 101 Flash Mode 84 Flash Off a 84 Flash On b 84 Flash On Red eye F 84 Flash Output Compensation 86 Flash pop up lever 18 85 Flower mode b 69 Fluorescent Light White Balance 101 Focus Assist light 92 Focus lock 115 Focus Mode 89 Focusing area 91 Folder display 126 Folder name 177 Food mode K 69 Formatting 171 Four way controller 2345 19 21 32 63 Frame rate fps 118 G Green button d 20 Green M...

Страница 240: ...6 M a Manual Exposure mode 71 Macintosh 194 Macro q 89 Magnify y 131 Manual Exposure mode a 71 Manual Focus 90 Manual White Balance 102 Memory 121 Memory Card 44 3 button 19 21 Menu operation 33 Microphone 17 Miniature filter 146 Miniature mode o 70 Mode dial 18 68 Monochrome Custom Image 110 Movie C 114 Movie button 18 116 Movie Edit 161 Movie menu 66 218 Movie Mode Palette 113 Movie SR 119 MSC 1...

Страница 241: ...Custom Functions 67 Resize 141 Retro filter 146 Reversal Film Custom Image 110 Rotating image 131 S Saturation Custom Image 111 Save Menu Location 189 Saving as Still Image movie 161 Saving pictures by date 177 Saving settings 121 Scene Mode 69 Scene Mode Palette 71 Mode 69 Screen Effect 130 SD Memory Card 44 Select 93 Select Delete 134 Select Time 176 Self timer gZC 87 Self timer lamp 17 Sensitiv...

Страница 242: ...ext Size 176 Time imprint 112 Time Lapse Movie c 113 Title picture of movie 163 Tone Adjustment 111 Toy Camera filter 146 Tracking 91 Trailing Curtain Sync I 84 Tripod socket 17 Tungsten Light White Balance 101 TV 138 b Shutter Priority mode 71 U USB Connection 195 Mode 76 V Vibrant Custom Image 110 Video input terminal 138 Video output format 183 223 Volume change 172 W WB When Using Flash 102 Wh...

Страница 243: ...Memo ...

Страница 244: ...teuil Cedex FRANCE HQ http www pentax eu France http www pentax fr PENTAX RICOH IMAGING DEUTSCHLAND GmbH Julius Vosseler Strasse 104 22527 Hamburg GERMANY http www pentax de PENTAX RICOH IMAGING UK LTD PENTAX House Heron Drive Langley Slough Berks SL3 8PN U K http www pentax co uk PENTAX RICOH IMAGING AMERICAS CORPORATION 633 17th Street Suite 2600 Denver Colorado 80202 U S A http www pentaximagin...

Отзывы: