9-1-2009
17
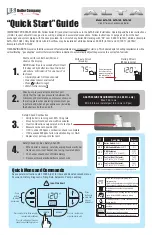
JOINT ASSEMBLY INSTRUCTIONS
Figures 12 and 13
below provide a visual representation of the joint assembly. Follow the
instructions below the figures.
-Loosen the gear clamps attached to the adapter sleeve and slide the adapter over the vent pipe.
-Pull the corrugated inner tube out of the vent pipe for easy access for adapter insertion.
-Apply sealant around the corrugated end of the adapter.
-Align the flat seams at the end of both corrugated tubes and insert the adapter into the vent tube.
Screw the adapter into the vent pipe with a counter clockwise motion. The adapter should be
fully inserted into the inner vent tube until it is tight. The seams of both tubes must be aligned for
ease of insertion. If the adapter does not completely screw into the vent pipe unscrew it and repeat
the same process.
-Seal around the edge of the vent pipe inner tube.
-Slide the adapter sleeve back onto the adapter and tighten the gear clamps to complete the
connection.
-If cutting to length for the vent is required, a fine toothed hacksaw can be used. Remove burrs and
flare out the end of the inner vent tube for easy installation of the adapter.
Apply Z Flex Sealant
Содержание DK2-3
Страница 5: ...9 1 2009 4 JACKET ASSEMBLY AND CONTROL INSTALLATION ...
Страница 8: ...9 1 2009 7 ...
Страница 9: ...9 1 2009 8 ...
Страница 12: ...9 1 2009 11 ...
Страница 27: ...9 1 2009 26 PARTS LIST AND BOILER DIAGRAM ...
Страница 29: ...9 1 2009 28 ...