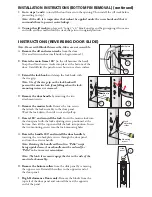
C.
Identify the keeper
in
the hardware package
and perform the keeper
attachment steps based
on which keeper is in the
package.
Determine the keeper
location
by opening the panel a few
inches, and extending the lock hook.
With a pencil, mark the location on
the jamb directly across from the top
of the shank.
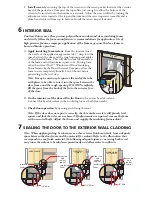
A.
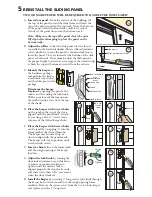
Insert door panel.
From the interior of the building, tilt
the top of the panel toward the door frame and insert the
top of the door panel into the top track. Move the bottom
of the panel toward the door frame until it is vertical.
Gently set the panel down into the bottom track.
Note: Make sure the top of the panel clears the anti-
lift clip before attempting to place the panel on the
bottom track.
5
REINSTALL THE SLIDING PANEL
TWO OR MORE PEOPLE WILL BE REQUIRED TO HANDLE THE PANEL SAFELY.
x
4JMM
3PMMFSBEKVTUNFOUTDSFX
*OUFSJPS7JFX
4MJEFQBOFM
x
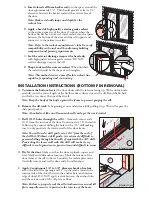
B.
Adjust the rollers
so that the slide panel runs freely and
is parallel to the fixed interlocker. Rotate roller adjustment
screws clockwise to raise the panel or counter-clockwise to
lower the panel. They are located at the bottom of the slide
panel at both ends. Once plumb, adjust the slide panel to
the proper height to attain even coverage of the weatherstrip
at both the top and bottom as viewed from the exterior.
Keeper
#6 x 1/2"
Starter
screw
Tighten
Loosen
5D
5E
5F
Shim
5F
5H
5H
5G
Lock hook
Interior handle
Shank
Handle latch
Lock
adjustment
screw
Mortise lock
Shim
Keeper
5C
D.
Place the keeper with 4 screw holes
on the jamb so the top of the slot is
aligned with the pencil mark. Attach
by inserting a #6 x ½” starter screw
into one of the slotted keeper holes.
E.
Place the keeper with 2 screw holes
on the jamb by “snapping” it into the
frame jamb at the desired location.
The keeper may be moved up or
down to align with the pencil mark.
The keeper will stay in position until
attached with screws.
F.
Insert a shim
between the frame jamb
and the rough opening at the keeper
location.
G.
Adjust the lock hook
by turning the
door lock adjustment screw clockwise
to loosen or counter-clockwise to
tighten until the mortise lock is
aligned properly, the door locks easily,
and there is less than 1/16" movement
when the door is locked.
H.
Install the keeper
by inserting 3" long screws (provided) through
the keeper holes, the shim and into the rough opening frame
members. Remove the starter screw from the 4 screw hole keeper
and replace it with a 3" long screw.


