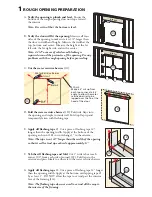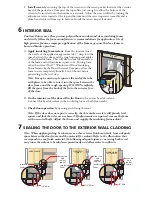
INSTALLATION INSTRUCTIONS (BOTTOM FIN REMOVAL)
A.
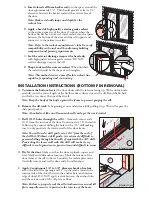
To remove the bottom fin,
lay the door down with the interior facing up. With a utility knife,
carefully score the entire length of the fin three times where it meets the sill. Bend the fin back
and forth a few times, then peel the fin off.
Note: Keep the body of the knife against the frame to prevent gouging the sill.
A.
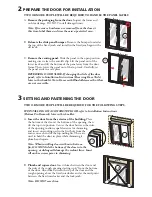
Insert closed cell foam backer rod
into the space around the
door approximately 1/2". This should provide at least a 1/2"
clearance between the backer rod and the exterior face of
the door.
Note: Backer rod adds shape and depth for the
sealant line.
Ç
Ç
B.
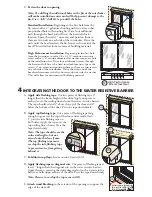
Apply a bead of high quality exterior grade sealant
to the entire perimeter of the door. On doors where the
bottom fin has been removed, insert sealant into the spaces
between the bottom of the door and the sill support and
connect it to the perimeter sealant.
Note: Refer to the sealant manufacturer's label to verify
compatibility with vinyl and the adjoining building
components and priming requirements.
C.
Seal the exterior drainage weeps at the head only
with high quality exterior grade sealant. DO NOT
seal the drainage weeps at the sill.
D.
Shape, tool and clean excess sealant.
When finished,
the sealant should be the shape of an hourglass.
Note: This method creates a more flexible sealant line
capable of expanding and contracting.
B.
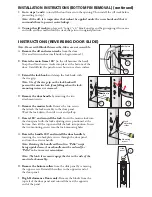
Remove the sill track
by beginning at one end and carefully pulling it up. This will expose the
slide panel pocket.
Note: A hooked tool like an allen wrench will easily get the track started.
C.
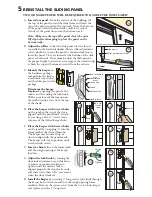
Drill 3/16" holes through the sill
18" from each corner and 1-
3/16" from the interior of the door. Continue every 18" thereafter.
Follow up by counter drilling the holes with a 3/8" drill making
sure to only penetrate the interior wall of the door frame.
Note: You will need a drill guide set at 1/4" from the end of
the drill bit. Without a drill guide, it is extremely difficult to
prevent drilling through both walls of vinyl with the 3/8" drill.
Penetrating the lower wall with this drill will make it very
difficult to seal against water penetration and difficult to secure.
*OUFSJPS7JFX
ESJMM
ESJMM
TMJEF
QBOFM
QPDLFU
*OUFSJPS7JFX
BODIPS
IPMF
D.
Dry fit the door.
Make sure that the door is plumb, square and
level. Mark and drill anchor locations. Mark the interior of the
door frame at the sill to show a boundary for sealant placement.
Carefully remove and set the door aside. Install anchors.
E.
Apply 2 continuous 1/4" to 3/8" diameter beads of sealant
across the sill of the opening and 12" up the jambs, towards the
interior side of the door (between the anchor holes and interior
edge of door). DO NOT apply sealant between the anchor holes
and the exterior side of the sill plate or floor.
Note: Failure to properly seal the sill attachment screws and sill
plate may allow water to penetrate the interior of the home.


