background image


User Guide v6.7.7GOV – © Parrot, April 29, 2022 


83


C

INESHOTS 

(

VISIBLE SPECTRUM ONLY


ANAFI USA

 features a series of automated shots, which enable you to capture scenes 

professionally. 


Cineshots menu


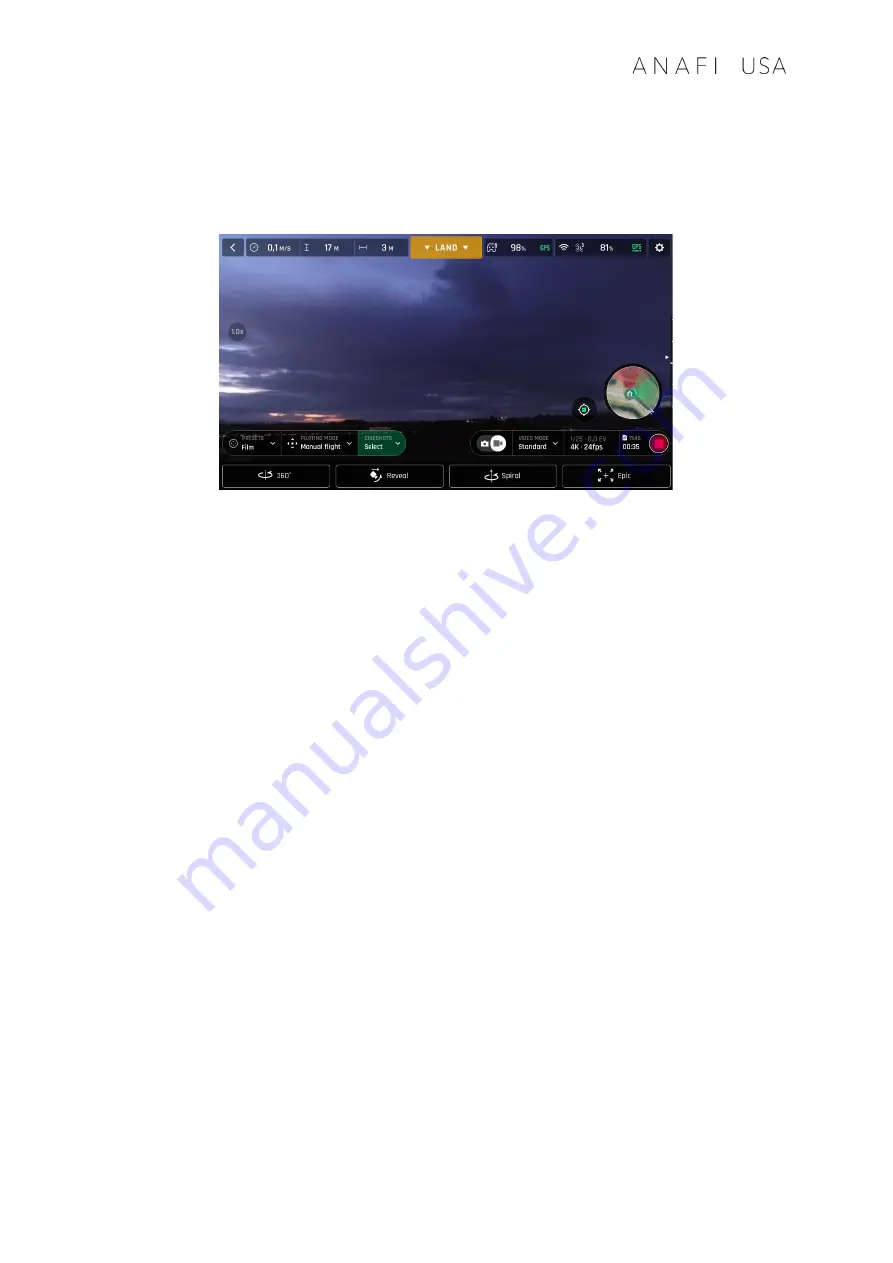
Make sure you have selected the video settings you require and tap “CINESHOTS” in the 
bottom bar of the HUD to access Cineshots. Tap a Cineshot to select it. For each, two options 
appear. ANAFI USA films all your Cineshots automatically – provided you have free space on 
your microSD card. 

360° 

The 360° Cineshot is self-explanatory: when it is activated, 

ANAFI USA

 maintains its position 

and altitude, and rotates slowly and completely around its axis to uncover a full panorama. 

Tap “Right” or “Left” to select the direction you want your drone to rotate, and to 
activate the 360°. After a countdown on the HUD, 

ANAFI USA

 starts its rotation. An 

animation flashes on your screen, and the “360°” box progressively fills with green as 
the Cineshot unfolds. 

Reveal 

The Reveal Cineshot is a classic motion picture opening shot: when it is activated, 

ANAFI USA


tilts its camera toward the ground and starts moving forward in a straight horizontal line. 
Slowly, over 30 or 60 meters, the camera gimbal tilts up, revealing the scenery in front of 

ANAFI USA

Before you activate the Reveal Cineshot, check the area in front of 

ANAFI USA

 is 

clear from obstacles, and safe. 

Tap “30m” (small-arrow icon) or “60m” (large-arrow icon) to select the range of your 
Reveal shot, and activate it. After a countdown on the HUD, 

ANAFI USA

 tilts its 

camera down and starts moving forward. An animation flashes on your screen, and 
the “Reveal” box progressively fills with green as the Cineshot unfolds. 

Содержание ANAFI USA

Страница 1: ...n ...

Страница 2: ......

Страница 3: ...lying ANAFI USA USING THIS GUIDE This guide is specific to a single drone configuration ANAFI USA coupled to the Parrot Skycontroller USA Read entirely at least once it answers most questions that most users encounter when they discover ANAFI USA Keep it for reference and stay alert for updates they will be advertised on all Parrot websites and social media The Table of contents on page 7 is activ...

Страница 4: ...rful Android tablet dedicated to your aerial missions or those of your team Thus like with any other tablet you can adapt the brightness of your screen to your flight conditions Parrot Skycontroller USA bottom panel Under the watertight cover Reset USB A RJ45 USB C Power 3 We recommend you connect your Parrot Skycontroller USA to a network by Wi Fi or through a RJ45 cable to carry out the required...

Страница 5: ...nd a progress circle on a screen labelled Preparing your controller When the update is finished the screen displays Your controller is ready Tap CONTINUE to access the update of ANAFI USA 8 ANAFI USA update tap the green CONTINUE box to proceed FreeFlight 6 displays an animation and a progress circle on a screen labelled Preparing your drone When the update is finished the screen displays Your dro...

Страница 6: ...ECIFICATIONS 13 PACKAGE CONTENTS 14 PRESENTATION OF ANAFI USA 15 Ready to store or carry 15 Ready to fly 15 PRESENTATION OF PARROT SKYCONTROLLER USA 16 Top panel 16 LED status indicator codes 17 Skycontroller USA Maintenance Mode 17 Pairing ANAFI USA to a Parrot Skycontroller USA 18 PRE FLIGHT CHECKLIST 19 Equipment 19 Regulations 19 Flight conditions 19 GETTING STARTED 20 TAKING OFF 21 Ground tak...

Страница 7: ...RTH settings 31 Pilot RTH 32 Custom RTH 32 LANDING 34 Hand landing 34 Recovery from a moving vehicle 35 REPLACING PROPELLER BLADES 36 SMART LIPO BATTERY 37 Battery removal 37 Battery installation 37 Battery charging 37 Battery software update 38 Battery care and safety 39 MICRO SDCARD AND MEDIA MANAGEMENT 40 Installing a microSD card 40 Retrieving photos and videos 40 Compatible microSD cards 40 D...

Страница 8: ...erting to the inbuilt antenna 55 VIDEOS AND PHOTOS 56 Making videos 56 Taking photos 57 Creating Panoramas 60 GIMBAL TILT AND ZOOM CONTROLS 65 Gimbal tilt control 65 Zoom control 65 Camera Calibration Correct horizon exceptional procedure 67 Camera Calibration Gimbal calibration 69 Camera Calibration Cameras alignment exceptional procedure 69 PRO IMAGING SETTINGS 71 Exposure value EV 71 Shutter sp...

Страница 9: ... Thermal mode 79 Spot Thermal mode 80 THERMAL ANALYZER MODE 81 CINESHOTS VISIBLE SPECTRUM ONLY 83 360 83 Reveal 83 Spiral 84 Epic 84 PILOTING MODES 85 Manual flight 85 Cameraman 85 Follow Me 86 Smartdronies 88 MAP BASED FLYING MODES 89 Flight Plan 89 Touch Fly Waypoint 95 Touch Fly POI 95 APPENDIX 1 GEOTIFF CONVERSION AND IMPORT 97 APPENDIX 2 TROUBLESHOOTING GUIDE 100 APPENDIX 3 OPERATIONAL CHECKL...

Страница 10: ...e satellites For this reason Parrot recommends ANAFI USA pilots to always set up start and finish their automated and assisted flights from wide open areas as a sports field About 4K video formats 4K video formats are professional grade media which may not be read natively by slower computers Furthermore for software reasons the stream broadcast by the Skycontroller USA is better defined in the 10...

Страница 11: ...meters and is set by default at 30 meters Refer to the Coordinates and advanced RTH settings and PREFERENCES Safety Advanced RTH settings section of this guide for further information on RTH About the screenshots in this guide For clarity and brevity size of interface on devices smaller than the Parrot Skycontroller USA some screenshots in this guide illustrating functions common to all the drones...

Страница 12: ...pplicable Regulations C REMEMBER that ANAFI USA may expose others and yourself to EQUIPMENT DAMAGE PERSONAL INJURY OR BOTH which could result in serious harm or death 3 Be aware that videos and photos that are promoted and advertised by Parrot Drones SAS and its affiliates have been made by and with experienced professionals and drone pilots IN CASE OF DOUBT RELATING TO THE USE OF YOUR ANAFI USA D...

Страница 13: ...scopes EO IMAGE CHAIN 2 Sensors 1 2 4 Digital zoom 32x Electronic shutter speed 1 s to 1 10000 s ISO range 100 3200 Video resolution 4k FHD HD Video format MP4 H264 Photo resolution Wide 21 MP 84 FOV Rectilinear up to 16 MP up to 75 5 FOV Photo formats JPEG DNG Digital NeGative RAW IR IMAGE CHAIN Sensor FLIR BOSON 320x256 resolution 40 C to 150 C temperature range Thermal sensitivity 60 mK Measure...

Страница 14: ...ains 1 ANAFI USA drone 3 smart batteries 2 1 preinstalled on ANAFI USA 1 Parrot Skycontroller USA 1 multi port fast USB charger 1 Skycontroller USA charger 1 additional set of propeller blades 3 USB A USB C cables 1 hard case 1 sunvisor 1 neck strap ...

Страница 15: ...pril 29 2022 15 PRESENTATION OF ANAFI USA Ready to store or carry Foldable arms and propellers Ready to fly Smart battery Battery extraction button Charge level LED indicators 180 tilt camera gimbal USB C charging port Power button ...

Страница 16: ...RTH Status LED Take off Landing Joysticks Visible EV Visible IR Hot spot Cold spot Visible Screenshot IR Hot spot Cold spot Video stream Map view toggle Top panel Shutter photo Optics reset or start stop recording back to no tilt and 1x zoom Zoom trigger Gimbal tilt trigger ...

Страница 17: ... access the tablet s data screenshots downloaded media and to install maps batches of PNG images compressed together in a ZIP archive Equipment required a laptop or tabletop computer equipped with an USB A port a USB A to USB C cable To activate the Maintenance Mode power the Skycontroller USA on and connect its USB C port to the computer s USB A port Press and hold the RTH button of the Skycontro...

Страница 18: ...edure is useful to pair a drone and a controller which have never been paired and to restore the lost pairing between a drone and a controller 1 Check a compatible microSD card is inserted into ANAFI USA 2 Power ANAFI USA on 3 Power the Parrot Skycontroller USA on 4 Plug the drone and the controller together with an USB A controller to USB C drone cable 5 The LED of the Parrot Skycontroller USA fl...

Страница 19: ...n the lenses and gently wipe the lenses with a microfiber cloth Regulations Make sure the use of ANAFI USA is allowed where you are intending to fly Check for potential restrictions regarding the use of Wi Fi frequencies in the area where you are intending to fly Flight conditions Check that your flying zone is safe and clear Do not fly ANAFI USA over urban areas or over restricted airspaces such ...

Страница 20: ...n a flat horizontal surface and press the power button 4 Power your Parrot Skycontroller USA on 5 Launch FreeFlight 6 which connects ANAFI USA to Parrot Skycontroller USA 6 Check for controller and drone software updates 7 Calibrate your ANAFI USA your Parrot Skycontroller USA or both if required following the instructions on the screen 8 Check that your flying zone is still safe and clear and tha...

Страница 21: ... drone in your hand concentrate on what you are doing but always stay aware of your surroundings Upon first opening of FreeFlight 6 a hand launch tutorial reminds you the following procedure You can activate hand launch from this tutorial page You can also activate the hand launch option from the Interface menu of FreeFlight 6 PREFERENCES refer to the PREFERENCES Interface section of this guide fo...

Страница 22: ...iented after a launch or a take off from a moving vehicle uncontrolled rotation quickly and firmly take back the commands of the drone in rotation and elevation left joystick laterally and upward in default mode to retrieve flight control Hand launch from a moving vehicle Be cautious when launching ANAFI USA from a moving vehicle This procedure is safe provided you are not distracted or startled b...

Страница 23: ... take off from a moving vehicle This procedure is safe provided you are not distracted or startled by an outside event with a live drone in your hand concentrate on what you are doing but always stay aware of your surroundings Deactivate the hand launch option from the Interface menu of FreeFlight 6 s PREFERENCES for further details refer to the PREFERENCES Interface section of this guide Power AN...

Страница 24: ...t Move to the left You can modify ANAFI USA s controls through the PREFERENCES menu of FreeFlight 6 Refer to the PREFERENCES Controls section of this guide for additional information As a safeguard measure ANAFI USA is programmed to instantly cut its motors in case of impact on one of its propeller blades always control your drone carefully ...

Страница 25: ...s the most efficient Wi Fi channel available In urban environments 5 GHz Wi Fi channels suffer typically less interference than 2 4 GHz channels Refer to the PREFERENCES Network section of this guide for additional information on Wi Fi channel management and allowing automatic switching to 5 GHz channels To maintain an optimal Wi Fi link between the remote control and the drone remember to keep a ...

Страница 26: ...26 Wi Fi link is perfect Wi Fi link is good ...

Страница 27: ...raded Wi Fi link is about to break up A Flight Plan has been set up in a controlled environment to illustrate all Wi Fi statuses for the purpose of this user guide never fly your drone out of your direct line of sight unless special authorization has been granted ...

Страница 28: ...ra In that case a pop up on the screen of FreeFlight 6 confirms a precise home has been set and the home icon of the minimap turns green Precise Home Set pop up SMART RTH ANAFI USA features a Smart RTH capability considering its altitude and its distance from its take off point the drone computes in real time the power it needs to return home or to the pilot or to a custom location refer to the PR...

Страница 29: ...H option which relies on managing coordinates Managing coordinates By default coordinates are displayed on the FreeFlight 6 app map They can be set as latitude and longitude LATLNG default value MGRS Military Grid Reference System NATO s geocoordinate standard UTM Universal Transverse Mercator or DMS degree minute second of arc Refer to the PREFERENCES Interface Coordinates system setting section ...

Страница 30: ... tap the coordinates box to activate coordinates options Coordinates options Tap to copy coordinates to clipboard and reuse as custom RTH point for instance Note the options at the bottom of the screen tap to select Reticle default value displays center of the map coordinates Drone displays drone coordinates when online or its last known position when offline Dynamic displays drone POI or WP coord...

Страница 31: ...he full screen map About advanced RTH settings Activate advanced RTH settings through the Safety Preferences of FreeFlight 6 refer to the PREFERENCES Safety section of this guide for further information There are two advanced RTH options Pilot Custom By activating advanced RTH features if you select return to Pilot or Custom position the drone might not be able to reach its destination in case of ...

Страница 32: ...anced RTH option the current position of the drone appears in the Custom point field There are two ways to change this custom point Paste the coordinates you have copied from the map of FreeFlight 6 refer to the earlier section of this guide If you have set up your drone for a flight apply the following simple procedure to move the Home icon directly on the map of FreeFlight 6 Initial home at flig...

Страница 33: ...dragged and dropped In our example we have set up for a flight at a corner of a park and planned an RTH over an open area close to the center of the same park Custom RTH point set Access Safety Preferences again and note the Custom point coordinates have been updated You are set ...

Страница 34: ...e especially careful when you hand land ANAFI USA This procedure is safe provided you are not distracted or startled by an outside event with a live drone approaching your hand concentrate on what you are doing but always stay aware of your surroundings Fly ANAFI USA at least 50 cm directly over your open hand then press the button or tap the orange LAND box on the screen ANAFI USA lands on your h...

Страница 35: ...e s speed as much as possible The pilot must present the rear of ANAFI USA on the side of the vehicle where the recovery operator is waiting for it To do so the pilot must synchronize the lateral speed of the drone with that of the vehicle and the altitude of the drone with that of the hand of the recovery operator When the drone is within the recovery operator s reach his hand open palm upward he...

Страница 36: ...peller blade follow this simple procedure 1 Unfold the arm that supports the blades which need to be replaced 2 Hold the motor round rotating part of the propeller between your left thumb and index 3 Unfold the blades and pinch the part which screws on the motor between the blades with your right thumb and index A blades unscrew damaged A blades left front right back counterclockwise and screw new...

Страница 37: ...I USA Battery installation To install the smart battery back on the drone unfold the back arms of ANAFI USA Set the drone on a flat and even surface such as a table and position the battery s three hooks into the drone s corresponding slots Place your middle finger on the Parrot logo of ANAFI USA and your thumb on the back of the smart battery Squeeze your fingers together until you feel and hear ...

Страница 38: ...battery is between 0 and 25 charged 2 steady LEDs light up battery is between 25 and 50 charged 3 steady LEDs light up battery is between 50 and 75 charged 4 steady LEDs light up battery is between 75 and 100 charged Finally the same logic applies when the smart LiPo battery is installed on the drone and when ANAFI USA is powered on The number of steady LEDs enables you to estimate your remaining ...

Страница 39: ... never leave a battery unattended while charging never expose a battery to extreme temperatures neither hot nor cold never charge a battery which is still warm from use wait for at least 20 minutes never use or recharge a damaged or swollen battery always store your battery in a dry ventilated place at a temperature close to 20 C always carry your battery in a fire retardant bag or case unless it ...

Страница 40: ...k icon and an arrow located on the right of the microSD slot confirm to you the way you must slide the lock to close it Retrieving photos and videos Use a microSD to SD card adapter to transfer videos and photos you have taken with ANAFI USA to your computer Slide the microSD card into the adapter and use the adapter how you would use any other SD card access your videos and photos through a card ...

Страница 41: ...format a microSD card encrypt a microSD card refer to the next sections of this guide for additional details To access the Gallery from the homepage of FreeFlight 6 either tap the microSD card box on the top bar of the interface or tap the Gallery box at the center of the interface If ANAFI USA is powered on and connected to the Parrot Skycontroller USA the FreeFlight 6 Gallery displays the microS...

Страница 42: ...p Generate Password Tap Encrypt SD Card to launch encryption The next screen confirms an Encryption profile has been applied to the SD card A MicroSD card encrypted by ANAFI USA is unreadable without the associated Encryption profile The Encryption profile is held by the version of FreeFlight 6 thus by the Skycontroller USA with which the encryption has been carried out Consequently if a drone has...

Страница 43: ... This section details the VLC stream sharing procedure which can be set up at any stage of a flight Power the Skycontroller USA on and connect it to a PC host with an RJ45 cable Launch VLC media player on the host PC From the Tools menu of VLC select Preferences From the Preferences interface of VLC select the Input Codecs tab Set the first item Hardware accelerated decoding to Disable as in the s...

Страница 44: ...ct Open network stream Enter rtsp 192 168 53 1 live in the Network URL field as in the following screenshot Enable the loop mode from VLC interface as in the screen capture below Click Play to launch the stream in the main window of VLC ...

Страница 45: ...batteries The HUD head up display interface of FreeFlight 6 is the ultimate companion to ANAFI USA It enables you to access all the outstanding features of ANAFI USA from the screen of your Parrot Skycontroller USA at the touch of your thumbs This section explores FreeFlight 6 functions starting with a presentation of the top and bottom bars of the HUD Access the HUD by taping FLY on the bottom ri...

Страница 46: ...x Video mode box ANAFI USA and FreeFlight 6 are packed with features which are accessible from the HUD Before we present the PREFERENCES menu of FreeFlight 6 here is an overview of your drone s current piloting Cineshots Dronies and video modes Piloting modes Manual flight Cineshots 360 left right Cameraman Reveal 30 60m Follow Me Spiral 30 60m Smartdronies Epic 30 60m FPV Flight Plan Smartdronies...

Страница 47: ...e Parrot Skycontroller USA and ANAFI USA are both synchronized to enough GPS Glonass and Galileo satellites to optimize the stability of the drone especially at higher altitudes Parrot therefore recommends you always check both your FreeFlight 6 HUD s GPS icons are green and not red before you make your ANAFI USA take off ...

Страница 48: ...Cineshots box Photo mode box ANAFI USA s photo modes include a Single shot mode a Burst mode a Bracketing mode a Timer mode a Timelapse mode a GPS Lapse mode and a five format Panorama mode Note that both GPS icons are green on both screen captures This means that the Skycontroller USA and ANAFI USA are both synchronized to enough GPS Glonass and Galileo satellites to optimize the stability of the...

Страница 49: ...cial OFF white ON green EV Trigger OFF white ON green Hand launch NO YES About EV Trigger this function is not useful for Parrot Skycontroller USA users as this remote control has two direct access buttons to control images exposition Tap RESET ALL CONTROL PREFERENCES on the bottom of the page to reset preferences Presets The Preset preferences allow you to adapt the flight behavior of ANAFI USA f...

Страница 50: ...EFERENCES in each Mode to revert all Modes to their default values Thermal The Thermal preferences deal with specific thermography settings Tap an item option use or and or to change values Color gradient Fusion Rainbow White Hot Black Hot Thermal post processing NO YES Thermal sensor calibration AUTO MANUAL Temperature range DEFAULT VERY HIGH TEMPERATURES About Thermal post processing NO is recom...

Страница 51: ...imap NEVER ALWAYS Display GPS position YES NO Coordinates system LATLNG MGRS UTM DMS Map type MAP SATELLITE HYBRID Show framing grid NO 3x3 6x6 Measurement system AUTO IMPERIAL METRIC FPV Goggles Tap CHANGE to access the following options Parrot CockpitGlasses 1 Homido Parrot CockpitGlasses 2 Merge VR Parrot CockpitGlasses 3 BNext Google DayDream View Skillkorp VR5 Homido V2 Zeiss VR One Homido Pr...

Страница 52: ...nd behavior HOVERING LANDING Hovering altitude 1m to 10 m DV 2m Advanced RTH settings NO YES Note By activating advanced RTH features if you select return to Pilot or Custom position the drone might not be able to reach its destination in case of low battery Parrot will not be held responsible in case the drone lands in a different location Return position TAKE OFF PILOT CUSTOM About End behavior ...

Страница 53: ...e and thermal cameras are misaligned Refer to the Camera calibration section of this guide for the detailed procedures About Overexposure display when this setting is activated the HUD of FreeFlight 6 shows all overexposed areas of the screen as hatched which enables you to fine tune your framing your EV settings or both About Anti flickering this setting and the associated technology aim at elimi...

Страница 54: ...DRI the DRI system makes your drone locally broadcast information about itself for regulatory compliance where applicable About Manual Wi Fi band setting activate the MANUAL box then touch a free band to select it as in the following screen capture In urban environments 5 GHz Wi Fi channels suffer typically less interference than 2 4 GHz channels To enable the automatic optimization of Wi Fi commu...

Страница 55: ... USA 2 Screw the external antennas male TNC connectors to the female TNC connectors of the Skycontroller USA Activating the external antennas 1 Power the Skycontroller USA on 2 Wait until FreeFlight 6 launches 3 Press and hold simultaneously the plus minus and Optics reset buttons of the Skycontroller USA 4 The status LED of the Skycontroller USA turns to turquoise 5 The external antennas are acti...

Страница 56: ... appear on your screen as they do on the screen capture below Tap a video mode to select it and tap the video mode box again to confirm your choice Second select a video resolution and a framerate fps frames per second value from the corresponding box of the HUD Tap the video settings box to call the individual video resolution and fps boxes Tap the video resolution box to access the available vid...

Страница 57: ...tton of the HUD again to end the recording The soft shutter button of the HUD comes back to steady red and round The timer resets Taking photos To access the photo camera of ANAFI USA tap the photo video toggle in the middle of the bottom bar of the HUD to circle the photo camera left icon in white Five photo modes are available on ANAFI USA Single shot Burst Bracketing Timer and Panorama 5 format...

Страница 58: ...The Panorama mode is indeed the only photography mode which requires the drone to be flying before you can activate the shutter Refer to the next section Generating Panoramas for additional details about the Panorama mode Selecting the Timelapse mode opens six options 5 secs 10 secs 15 secs 30 secs 60 secs and 120 secs When one of these options has been selected the soft shutter button of the HUD ...

Страница 59: ...black and white to confirm 14 pictures have been taken in the span of 1 second The number to the left of the soft shutter button of the HUD is increased by 14 In Bracketing mode the screen flashes white then freezes briefly in black and white to confirm 3 5 or 7 pictures have been taken The number to the left of the soft shutter button of the HUD is increased by 3 5 or 7 depending on your option c...

Страница 60: ...hutter button reflects the total number of medias on the microSD card of the drone About ANAFI USA photo formats JPEG RECT 4 3 aspect ratio up to 16MP and 75 5 horizontal field of view HFOV JPEG WIDE 4 3 aspect ratio 21MP 84 HFOV zoom is disabled for this format DNG JPEG 4 3 aspect ratio 21MP 84 HFOV zoom is disabled for this format The DNG JPEG option produces at least 2 files 1 DNG 1 JPEG for ea...

Страница 61: ... shutter button icon reflects your choice as on the screen capture below Panorama formats When you are happy with your framing press the hard shutter button on the right of the Parrot Skycontroller USA or tap the soft shutter button of the HUD to begin the Panorama capture ANAFI USA starts taking pictures and the bottom of the HUD displays a progress bar which fills with green as the capture unfol...

Страница 62: ...6 displays a page from where you can delete the downloaded photos tap Yes to keep the originals on the microSD card tap No to delete them FreeFlight 6 displays the Local Parrot Skycontroller USA gallery which contains only the media you have downloaded from ANAFI USA s microSD card Local gallery Finally select the panorama you want to generate from your Local gallery FreeFlight 6 displays the foll...

Страница 63: ...t quality 360 panorama 32 MP it can take several minutes Generating a Sphere panorama When the panorama creation is complete FreeFlight 6 displays the panorama and gives you the option to delete the original files For each Vertical or Horizontal panorama capture you will be able to generate one panorama only For each 360 capture you will be able to generate three different preset panoramas Sphere ...

Страница 64: ...ditor screen when you create a custom panorama the direct rendering is a preview only For each custom panorama you decide to create FreeFlight 6 completely reprocesses the data to minimize stitching issues and discrepancies An example of custom panorama ...

Страница 65: ...er USA this action also resets the zoom factor of the lens to 1x Zoom control ANAFI USA s zoom control is activated through the right trigger of Skycontroller USA It is available in all video modes and in JPEG RECT photo mode with an impact on the final resolution of your pictures WIDE photo modes imply the use and rendering of all 21MP delivered by ANAFI USA s CMOS sensors zoom is deactivated in ...

Страница 66: ...66 x5 3 Zoom x32 Zoom ...

Страница 67: ...rizon perfectly straight again This feature is accessible from the ANAFI USA box on the FreeFlight 6 homepage or from the ANAFI USA box of the HUD and from the PREFERENCE Camera menu Before starting this procedure you need to position ANAFI USA on a flat and perfectly level surface exactly perpendicular to any pattern containing straight lines you can use as horizon references A set square can hel...

Страница 68: ...n from the following screen ANAFI USA gimbal camera calibration The following screen appears Gimbal camera calibration before Tap or until the artificial horizon of ANAFI USA matches the horizon reference facing the drone Do not worry about vertical lines as you can see from the screenshots they do not appear straight or parallel on the gimbal calibration screen ...

Страница 69: ... powered on Be aware that FreeFlight 6 can require you to carry out this procedure as it can require you to perform a drone magnetometer calibration before allowing you to fly ANAFI USA Camera Calibration Cameras alignment exceptional procedure Use this option to align the images of your visible and thermal spectrum cameras As the interface advises due to cameras parallax use the farthest possible...

Страница 70: ...70 Tap or on each axis to align visible and thermal views ANAFI USA Camera alignment after Tap on the top left of the screen to exit the interface and confirm your settings ...

Страница 71: ...liver a perfectly balanced photo or video not too dark and not too light Tap the 0 0 EV box to activate the EV slider Slide your finger on the screen to adapt your EV toward negative values and darken your picture or video Use positive values to lighten your images This can be useful if you want to capture a backlit scene and to fade surroundings in light 1 0 EV 1 0 EV To activate further settings...

Страница 72: ... digital grain Therefore under good lighting conditions such as sunny daylight outside shots low ISO values 100 or 200 should always be selected The sensitivity of the sensor increases as the ISO value goes up 3200 ISO can be used to capture low light interior scenes or exterior shots at dusk or dawn for example By default in Auto mode ANAFI USA constantly adapts its ISO and shutter speed values t...

Страница 73: ...t or both The display of the HUD reflects your settings and helps you make the best choice Auto WB Incandescent WB Fluo WB Sunny WB Cloudy WB Shaded WB WB 2 000 K WB 10 000 K HDR HDR high dynamic range is another great way to enhance a video or a photo The HDR option is available for Standard video mode 4K 2 7K and 1080p formats regardless of framerate values and JPEG photos ...

Страница 74: ...e Note that activating or deactivating HDR stops any ongoing video recording NATURAL Style The Natural Style is the default ANAFI USA Style it respects nature s colors and tones Activate the NATURAL Style from the Style box of the Video Photo settings menu P LOG Style One alternative Style to Natural looking images default value can be selected for ANAFI USA both in the video mode and in the photo...

Страница 75: ...f the Video Photo settings menu ADJUSTMENT The ADJUSTMENT button next to the P LOG box provides three additional settings for your Normal Style still images and films Saturation sets the intensity of the colors from 2 to 2 Contrast sets the degree of difference between lightest and darkest parts of the image from 2 to 2 Sharpness sets the distinction of the reproduction of details from 1 to 1 All ...

Страница 76: ...t of the HDR icon it replaces the HDR icon in DNG JPEG photo format since HDR is not available with this setting Tap the Lock AE icon to lock the exposure value to that of the current view The icon turns to yellow A yellow Lock AE box appears under the Next available action box at the center of the top bar of the HUD Move ANAFI USA around or tilt its gimbal to change the frame the exposure setting...

Страница 77: ...section When the exposure is locked touch the part of the frame you want to base your exposure on A yellow square animates around this spot and the yellow Lock AE box is replaced by a yellow Lock AE Touch box Refer to the following screen captures for additional details on the logic of this great feature Exposure is locked on the top of the trees shutter speed is set at 1 240 s Exposure is locked ...

Страница 78: ...t Thermal Presentation of the Thermal HUD post processing Spectrum blending the thermometer icon indicates only the IR spectrum is displayed Lock scale Pause view Take a screenshot Thermal mode selection Note that when post processing is activated default value the Pause view and Lock scale buttons are available they disappear when post processing is deactivated refer to the PREFERENCES Thermal Th...

Страница 79: ... In other words for example switching from Visible Spectrum photo mode calls the last Thermal Spectrum photo mode that was selected similarly switching from Thermal Spectrum video mode calls the last Visible Spectrum video mode that was selected Relative Thermal mode The Relative mode is the default thermography mode of ANAFI USA which is activated upon first access to the Thermal HUD The Relative...

Страница 80: ...rom hot to cold or from cold to hot and slide your finger along the scale to adapt the threshold of the scale to your scene and highlight only coldest or hottest spots Spot Thermal mode only the hottest elements of the scene are colored Note that in Spot Thermal mode the thresholds you set manually are only reset when you tap the RESET THERMAL SETTINGS button in the Thermal Preferences tab ...

Страница 81: ...odes Relative hot and cold spots and their associated thresholds at any point of any video or on any photo modify the blending between Visible and Thermal spectrums save as many screenshots as you want However Thermal analyzer videos cannot be saved or exported by FreeFlight 6 even if the Parrot Skycontroller USA enables you to record your screen To analyze a thermography media access your Local F...

Страница 82: ...82 Same image hot Spot mode ...

Страница 83: ...ur drone to rotate and to activate the 360 After a countdown on the HUD ANAFI USA starts its rotation An animation flashes on your screen and the 360 box progressively fills with green as the Cineshot unfolds Reveal The Reveal Cineshot is a classic motion picture opening shot when it is activated ANAFI USA tilts its camera toward the ground and starts moving forward in a straight horizontal line S...

Страница 84: ...nd the Spiral box progressively fills with green as the Cineshot unfolds Epic The Epic Cineshot offers another great way to dramatize any scene or location When it is activated ANAFI USA moves away backward in a smooth ascending line keeping its subject in the center of its frame for 30 or 60 meters The Epic Cineshot gives best results when ANAFI USA starts from a close up position relative to its...

Страница 85: ...bject you want ANAFI USA to follow or double tap this object or subject When your target is locked the blue rectangle turns to green and the orange LAND box at the center of the top bar of the HUD turns red and displays STOP ANAFI USA s frame centers on your target inside the green box Drag the green box to the area of the frame where you want your target to remain at Fly ANAFI USA around your tar...

Страница 86: ...tion Fly ANAFI USA at least 5 meters 15ft high and 10 meters 30ft in front of you facing you FreeFlight 6 will inform you with a red alert at the bottom of the HUD if you are too close from ANAFI USA or if it is flying too low Frame yourself Tap the PILOTING MODE box in the bottom bar of the HUD to access the options Tap Follow Me to select this piloting mode Both a drone GPS synchronization and a...

Страница 87: ...ng you tap the red STOP box at the center of the top bar of the HUD When no target is selected or when the tracking has been ended by the pilot ANAFI USA s behavior is similar to that of the Manual flight mode In addition the Follow Me mode features a series of exclusive Dronies which can be activated as you move always keeping you in the center of the frame For each Dronie two options are availab...

Страница 88: ...of ANAFI USA s dronies is the Dolly Zoom We will not spoil it for you just make sure you have a memorable scenery behind you Frame yourself or better yet your group of friends with ANAFI USA keep the drone at least 5 meters away at man level between 1 and 2 meters above the ground Check that the flight path of your drone is perfectly clear at least 30 meters behind it flat and without obstacles Ta...

Страница 89: ...ion will teach you the basics of automated flight and shooting management with ANAFI USA and Flight Plan Tap Flight Plan from the PILOTING MODE box menu The map of your surroundings opens full screen If you are not connected to ANAFI USA the minimized live view is black as on the screen captures that follow Find your next dream flying spot on the map Flight Plan Consider this pointy bit of land wi...

Страница 90: ... represents the waypoint the white figure the altitude of the drone and the white arrow the direction of ANAFI USA s camera Initial waypoint WP Tap the white arrow and hold it to move it around In this example we want ANAFI USA to frame the lighthouse as it starts the flight Initial waypoint with the camera framing the lighthouse ...

Страница 91: ... the waypoint In this example ANAFI USA will climb from 3 to 30 meters between the initial waypoint and the second waypoint Second waypoint Add waypoints to tour the area and end your Flight Plan where you intend to land Full Flight Plan The tip of the peninsula is a POI we want ANAFI USA to focus on it while it flies around it Tap it and hold your finger on the screen to call choices POI Close Se...

Страница 92: ... now be selected to be linked to the POI Open waypoints Tap waypoints to link them to the POI In this example we want ANAFI USA to film the tip of the peninsula as it flies around it we have selected the three waypoints to the left of the peninsula The arrows of those waypoints have turned toward the POI and are colored in blue the last one which was selected has a blue border around the white arr...

Страница 93: ... edit it use the slider on the right of the screen to modify its height tap and move its white arrow to set the direction of ANAFI USA s camera For this example we had the drone point toward the land at most steps of the Flight Plan and toward the lighthouse at take off and landing with a descent from 30 to 3 meters between the last two waypoints POI Flight Plan All you have to do now is to close ...

Страница 94: ...A lands at or hovers over the last waypoint you have set That is why for this section we have chosen to consider that ANAFI USA s final waypoint is also its landing spot Activate and monitor every Flight Plan with extreme care always check your drone s route is clear from obstacles and safe always retain visual contact with ANAFI USA and always be ready to stop the Flight Plan tap the STOP box of ...

Страница 95: ...n confirmation screen Activate Touch Fly Waypoint with care be especially careful with your touches on the screen in this mode as after the initial confirmation any tap on the map will immediately send ANAFI USA to the corresponding spot For this reason Parrot recommends you set your FreeFlight 6 filming or photography options before activating the Touch Fly Waypoint mode If by mistake you have se...

Страница 96: ...o halt ANAFI USA or to reset a POI From the Smartdronies box next to the Type box of the lower bar of the HUD you can also activate Smartdronies Orbit Parabola Dolly Zoom Boomerang of your POI Refer to the Smartdronies section of this guide for additional information on Smartdronies types ...

Страница 97: ...N AND IMPORT The free software QGIS provides an easy way to convert GeoTIFF maps into FreeFlight 6 compatible PNG tiles Follow this procedure to convert your files 1 Launch QGIS this is the software s main interface 2 Import your GeoTIFF file in the software s main interface ...

Страница 98: ...98 3 Check your GeoTIFF file has been imported on the screen of your PC 4 From the Processing menu select the Toolbox to open it ...

Страница 99: ...the original file 8 Compress together all new folders from the output directory without renaming them 9 Turn the Skycontroller USA to Maintenance Mode and copy the compressed folder to the FreeFlight6 Custom maps directory of the Skycontroller USA refer to the Skycontroller USA Maintenance Mode section of this guide for additional information 10 At the next launch of FreeFlight 6 the new map appea...

Страница 100: ...ation to fail 4 Press and hold the battery s power button after 8 seconds a battery s LED lights up in red 5 Release the battery s power button ANAFI USA powers off briefly then reboots 6 Check the contents of ANAFI USA s microSD card the hard reset procedure has generated a TXT document named wifi_security_key at the root of the microSD card This document confirms the hard reset procedure is comp...

Страница 101: ...e never been paired and to restore the lost pairing between a drone and a controller 1 Power ANAFI USA on 2 Power the Parrot Skycontroller USA on 3 Plug the drone and the controller together with an USB A controller to USB C drone cable 4 The LED of the Parrot Skycontroller USA flashes briefly in green it is acknowledging ANAFI USA 5 Wait for synchronization between Parrot Skycontroller USA and AN...

Страница 102: ...SA but won t take off when I hit the take off button The drone or controller boxes of the homepage of FreeFlight 6 either signal you that you must update your Parrot Skycontroller USA your ANAFI USA or both or you must calibrate your ANAFI USA s gimbal or you must carry out a magnetometer drone calibration or you must calibrate your Parrot Skycontroller USA What do I do if my ANAFI USA flips over ...

Страница 103: ...uested by FreeFlight 6 gimbal magnetometer or both 4 Fly ANAFI USA in a mission take pictures and videos 5 Check your ANAFI USA pictures and videos to see if your drone s horizon if offset 6 If your horizon is offset carry out the Correct horizon procedure refer to ANAFI USA s User Guide for details of FreeFlight 6 s Camera Preferences 7 If the Correct horizon function cannot make your horizon str...

Страница 104: ... ANAFI USA UPDATED Magneto calibration OK Skycontroller USA calibration OK Gimbal calibration OK Skycontroller USA ANAFI USA OFF Arms unfolded locked Arms mechanical lash NONE Lens cap OFF Check drone and gimbal OK Check propellers intact free Check Skycontroller USA OK 100 charged ANAFI USA battery OK 100 charged ANAFI USA battery LED 4 x OK ANAFI USA battery temp OK Device OK 100 charged MicroSD...

Страница 105: ...cial mode Map on app OK Micro SD card Formatted Battery levels XXX report on flight log if from 100 Global reactivity set Camera tilt speed set Inclination set Vertical speed set Rotation speed set Before take off ANAFI USA GPS signal Red Orange Green check status matches mission SCUSA GPS signal Red Green check status matches mission Flight mode MANUAL Weather OK Take off Zone Clear Drone status ...

Страница 106: ...tus Check ANAFI USA Battery OFF Skycontroller USA OFF Check drone gimbal propellers OK Lens cap ON ANAFI USA Battery Disengaged stored away Micro SD card Stored away ANAFI USA arms Folded no mechanical lash ANAFI USA drone Stored away Device OFF Stored away Skycontroller USA Stored away Cables Stored away Documents Flight batteries info Report on flight log ...

Отзывы: