


30
31
First set your timer to 3 minutes and 30 seconds. The Habu will fly for 4 minutes at full throttle. By setting
your timer to 3:30 it will give ample time for a go-around if necessary. With throttle management the flight
time can be extended significantly. You can adjust the timer as you become more accustomed to the flight
time of the Habu.
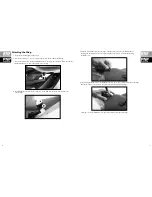
ROG Takeoff
Taxi into position on the runway. Avoid sharp turns when taxiing at higher speeds as it is possible to have
the plane tilt onto its side. Once in position on the runway, start your timer. Hold 1/2 to full up elevator
at the start of the takeoff roll to get weight off the nosewheel and allow for smoother takeoffs. Steer with
the rudder and as speed increases, reduce the up elevator input to 1/4 to 1/2 up elevator. The airplane
will fly off the runway when flying speed is reached.
Handlaunch
It is advisable to have a helper for the first few hand launches. Hold the airplane behind the wing with the
throwing hand and support the nose with the opposite hand. Run the motor up to full throttle and give a
FIRM throw straight ahead. Plane should be launched firmly with nose up 5–10 degrees and directly into
the wind, do not throw nose down.
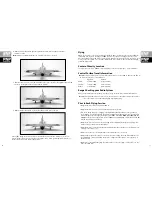
Flying
The Habu is a go-where-you-point-it airplane. It tracks very straight and is capable of many maneuvers.
The speed range of the Habu is very wide. From full throttle, high-speed passes to slow flight, the Habu
has great handling qualities throughout the flight envelope. The Habu is capable of slow rolls, point rolls,
large loops, knife edges and spins. If this is your first ducted fan, just remember that because there is
no prop blast blowing air over the control surfaces, the controls will not be as responsive at low-speeds.
The Habu is easy to fly, but because it can reach high speed, plan your flight path to avoid obstacles or
people.
Landing
The Habu is very easy to land and can reward you with very smooth scale-like touchdowns. Approach
the runway with a 1/4 to 1/8 throttle. Use the power to control altitude and elevator to control angle of
attack. Once your glide path is established, fly the airplane down to about a foot off the runway. Gradually
reduce power and flare the airplane to touch down on the main wheels first. Reduce elevator input to set
the nosewheel on the ground and steer with the rudder stick until the plane has come to a stop. You can
hold the nosewheel off the runway while landing for aerodynamic braking. However be aware that the
airplane can hop back into the air if a gust of wind or if too much elevator input is given while holding the
nose off the ground. Avoid sharp turns until the plane has slowed to prevent tipping the plane on its side.
Belly Landing
If landing on grass without the landing gear, use the same approach as if flying with landing gear. Start
your flare with the power off about 1 foot above the ground and hold the nose off until the tail touches
down. Try to keep the wings level to prevent grabbing a wing and turning the plane sideways.
Repairs
Thanks to the Habu’s Z-foam construction, repairs to the foam can be made using virtually any adhesive
(hot glue, regular CA, epoxy, etc). Do to fact that the Habu is a low wing airplane and it is possible, when
belly landing, to catch a control horn, replacement servos and gears are sold separately. See the parts
list for the item numbers.
Habu Flying Tips
Appendix
Содержание Habu BNF
Страница 20: ...38 39...


