PARKZONE Habu BNF Скачать руководство пользователя страница 15

28

29

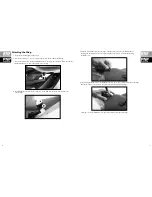
4. With the aileron stick pushed right, the right aileron should move up and the left aileron 

should move down. 

Note: If using a Spektrum transmitter, the ailerons will need to be reversed.

5. Move the rudder stick to check yaw control. When the stick is pushed to the right the rudder should 

also move to the right (if viewed from behind the airplane).

6. With the rudder stick pushed to the left, the rudder should move to the left.

If at any time during the test the controls respond in the opposite direction, it may be necessary to 

reverse/change the direction of operation of the flight controls. Follow your transmitter instructions to 

change the direction of the various flight controls.

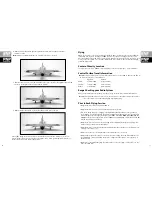
Always choose a wide-open space for flying your ParkZone Habu. It is ideal for you to fly at an AMA sanc-

tioned flying club. If you are not flying at an AMA approved site, always avoid flying near houses, trees, 

wires and buildings. You should also be careful to avoid flying in areas where there are many people, such 

as busy parks, schoolyards, or soccer fields. Always follow local ordinances. We recommend only flying 

your Habu in light winds.

The CG location is 4 inches (102mm) from leading edge at the root of the wing +/- 1/4 inch (6.4mm).

Note: Measured at widest point of control surface. Dual rates are set for 100% on high rate and 70% for 

low rate with all surfaces set for 100% ATV.


High Rate  


Low Rate

Aileron:  

3/4-inch (19mm) 

1/2-inch (13mm)

Elevator: 

5/8-inch (16mm) 

1/2-inch (13mm)

Rudder: 

1-inch (25mm)   

3/4-inch (19mm)

After you have finished the final assembly, it is time to range check the radio system within the Habu.

Note:  Before flying after all control surfaces have been centered it is advisable to re-bind the airplane so 

the control surfaces are neutral when plugging in the flight battery. 

• Always make sure your Habu is properly trimmed.

• Always make sure the receiver, ESC, and battery are properly secured.

• Turn on the transmitter prior to plugging in the flight battery. With the airplane on the ground and 

motor running, you should walk away approximately 100 feet and still have full control of all functions 

while following the specific range test feature of your DSM2 transmitter. If this is not the case, do 

not fly . Call the Horizon Support Team at 1-877-504-0233, United Kingdom at +44 (0) 1279 641 097 

or Germany at +49 4121 46199 66.

• Always make sure that all controls are functioning per the transmitter input that you are giving. This 

includes ailerons, rudder, elevator and throttle.

• Always make sure you have fully charged the transmitter batteries or make sure your transmitter has 

fresh dry cells before you fly.

• Always ensure the servo reversing switches on the transmitter are set correctly.

• Always verify the dual rates switch is set at where you plan on flying. We recommend LOW rates for 

your initial flying. The Habu is VERY maneuverable on high rates and requires a lot of experience to 

handle properly. 

• Always remove the flight battery from the airplane when you are done flying, or when you are on the 

way to the flying field.

Flying

Control Surface Travel Information

Center of Gravity Location

Range Checking your Radio System

Prior to Each Flying Session

Содержание Habu BNF

Страница 1: ...Hobby Inc The Spektrum trademark is used with permission of Bachmann Industries Inc Spektrum radios and accessories are exclusively available from Horizon Hobby Inc Futaba is a registered trademark o...

Страница 2: ...ng skills not your building skills Warning Although your ParkZone Habu comes almost ready to fly this aircraft is for experienced RC pilots only and is not a toy Misuse of the plane can cause serious...

Страница 3: ...1 5mm Hex Wrench Fin Mount Plates Left and Right 3200mAh 4 cell 30C Li Po battery Left Main Landing Gear Right Main Landing Gear Nose Gear PNP Contents Fuselage includes the following 60 Amp Pro Switc...

Страница 4: ...k with a Li Po specific charger only such as the included charger Never leave the battery and charger unattended during the charge process Failure to follow the instructions properly could result in a...

Страница 5: ...sure all wires are clear of the hatch and that the hatch attaches firmly in place before flight Note Only plug in your flight battery once you have bound the receiver BNF or after you have installed y...

Страница 6: ...he airplane The LED on the receiver will begin flashing C Move the sticks and switches on the transmitter to the desired failsafe positions low throttle and neutral control positions D Pull and hold t...

Страница 7: ...sitions E Press the black bind button on the back of the transmitter while turning the transmitter on Release the button after 2 3 seconds F The LED on the receiver will go solid amber and the system...

Страница 8: ...lecting a battery for your Habu we recommend the E Flite 3200mAh 30C 4 cell battery EFLB32004S30 or the Thunder Power 3300mAh 30C 4 cell battery THP33004SP30 If using a battery other than those recomm...

Страница 9: ...ar of the wing into the two small holes in the rear of the fuselage Attaching the Wing 5 Slide the aileron leads inside the fuselage so that they will not become pinched in between the wing and the fu...

Страница 10: ...r leads into the horizontal stabilizer 3 Place the horizontal stabilizer on the fuselage making sure it is resting on the fuselage without any gaps Attaching the Tail 3 Screw the horizontal stab onto...

Страница 11: ...eattach rudder pushrod on second outermost servo arm hole and outermost rudder control horn hole 8 Power on transmitter and airplane and adjust clevis so rudder is centered 9 Once rudder is centered s...

Страница 12: ...10 Slide tailcone on to the rear of the fuselage Press firmly in place to make sure tailcone is fully seated Secure in place with the included 4 pieces of tape at the locations shown in the following...

Страница 13: ...x wrench Installing the Landing Gear The Habu was intentionally designed to provide the choice to fly with or without landing gear If you prefer to fly at the highest speed or in the most precise mann...

Страница 14: ...nd skid in front of the exhaust nozzle This will help protect the bottom of the airframe for belly landing Configuring without Landing Gear Control Direction Test 1 Move the elevator stick on the tran...

Страница 15: ...mm 3 4 inch 19mm After you have finished the final assembly it is time to range check the radio system within the Habu Note Before flying after all control surfaces have been centered it is advisable...

Страница 16: ...n just remember that because there is no prop blast blowing air over the control surfaces the controls will not be as responsive at low speeds The Habu is easy to fly but because it can reach high spe...

Страница 17: ...gation hereunder shall be that Horizon will at its option i repair or ii replace any Product determined by Horizon to be defective In the event of a defect these are the Purchaser s exclusive remedies...

Страница 18: ...ght Please advise us of your preferred method of payment Horizon accepts money orders and cashiers checks as well as Visa MasterCard American Express and Discover cards If you choose to pay by credit...

Страница 19: ...environment For more information about where you can drop off your waste equipment for recycling please contact your local city office your household waste disposal service or where you purchased the...

Страница 20: ...38 39...

Отзывы: