background image

Technical manual-C190CubetapePRO


16


2. 


Integration 

Bluetooth HID mode is ideal for demonstration as there is no need for any software on 

the host. Data will appear in the active application wherever the cursor is located, and 

format characters (tab, cr, lf for example) can be used to position the data in the right 

location. However if cursor independence is an issue, Cubetape can instead be 

connected to the host using Bluetooth serial port profile (SPP). The data sent from 

Cubetape can be accessed at the relevant COM port on the host and can be made 

available programmatically. To simplify this process for the host application, Parceltools 

has published an SDK comprising a dll and a sample desktop application. The dll 

manages the low level Cubetape interface (BT and COM port connection) and makes 

the data available via a higher level set of methods and properties. We envisage the 

major shipping applications would require cursor independence, and if so the SDK may 

be a useful tool. There are a number of implementations in Australia and Asia where 

this approach has been us used 


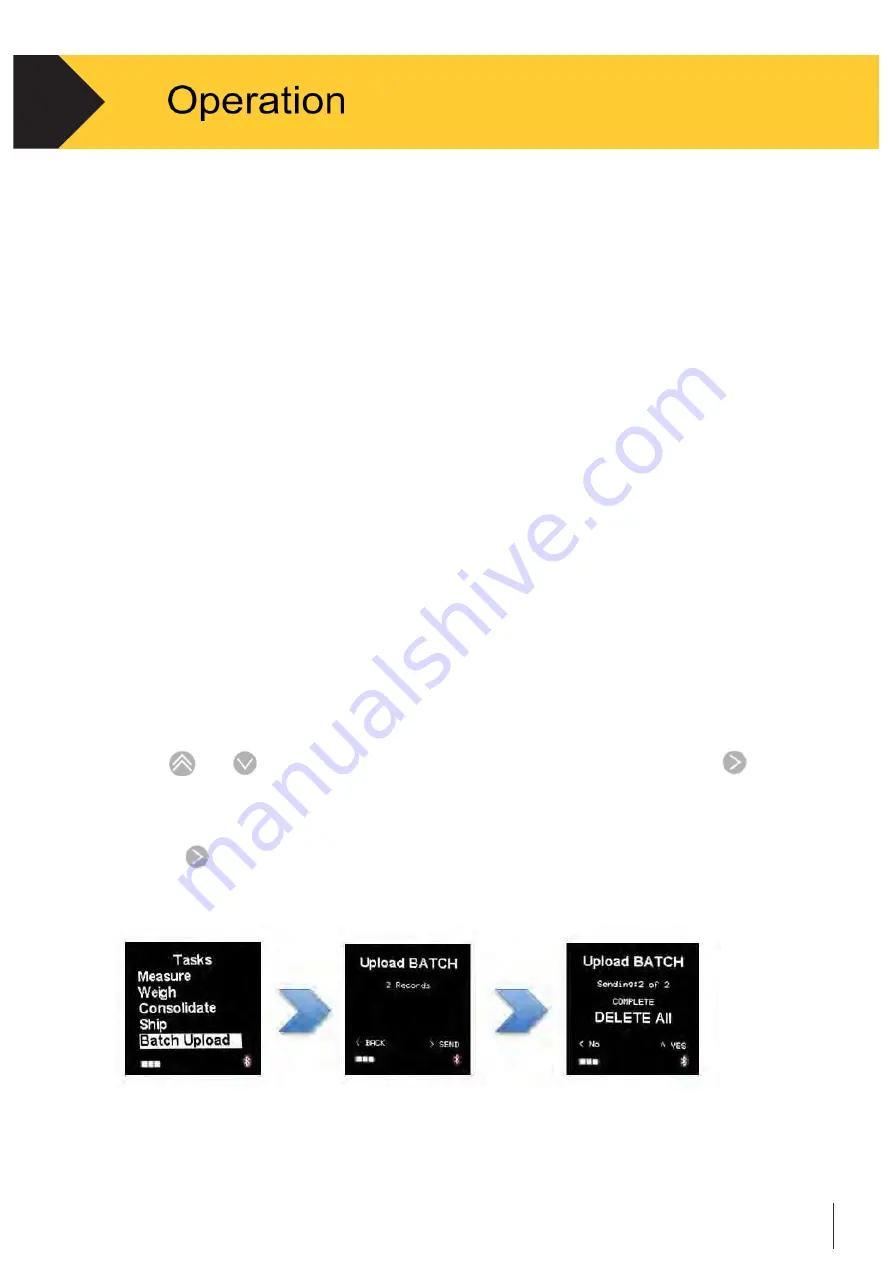
2.4.5 Batch  Upload


Batch Upload functions when there is locally saved data records in the device.


Note: 

Please note the configuration for the communication.  Usually, this  function  works 

under the 

USB connection 

option. See Section 3.3.5 and Section 4.3 for detailed  information.


 Use 


and 


to scroll, when the cursor is on the Batch Upload tab, press 


to 

select. See Figure 2-16.


 The display will show the number of records saved in the device. See Figure 2-16. 

Press 


to send the data.


 Completing the data transmission, select to keep or delete the current records.


Figure 2-16 


Содержание C190 CubetapePRO

Страница 1: ...O provides exact volumetric weight measurement by measuring L x W x H of an object An optional cradle can be used for charging the unit and also for HID connectivity to a host application For example...

Страница 2: ...rake Operation 6 Operation 8 Overview 8 Power On Off 8 Basic Functionality 8 Scan 9 Measure 9 Transmit Data 10 Insert Pallet 10 Append 11 Return to Last Recorded Data 11 Tasks 11 Measure 12 Weigh 13 C...

Страница 3: ...ted Weighing Indicator 35 4 5 1 Connection Method 35 4 5 2 Connection Procedure 35 4 6 SDK 36 4 6 1 SDK Overview 36 4 6 2 SDK Contents 36 4 6 3 PC Requirements 37 4 6 4 Samples 37 4 6 5 Device Keyboar...

Страница 4: ...hed data transmission can be performed in either online or batch modes Cubetape supports multiple data capture tasks which can be selected and loaded by an operator from the application menu Standard...

Страница 5: ...betape Manger configuration and management utility CheckMate for Windows CheckMate App for Android CheckMate for server PDA Pairing Utility Windows Mobile and WinCE utility to simplify and streamline...

Страница 6: ...remove the device from its protective package noting how it was packed and inspect each component for damage If shipping the device is required it is best to use the original shipping container The d...

Страница 7: ...Status area provides information on the battery and Bluetooth Battery information is displayed at the bottom left corner of the screen while Bluetooth connectivity is displayed at the bottom right cor...

Страница 8: ...data collection purposes The button press to record measurement The button press to scan a barcode label The button for power on off Buttons are context sensitive Figure 1 3 Tape retraction brake The...

Страница 9: ...Power On Off To turn on the device short press Legal for trade versions will present an info screen press any key to proceed To shut down the device press for approximately 3 seconds then release when...

Страница 10: ...s to scan Figure 2 1 Scan Operation 2 3 2 Measure Stretch the tape tip to one end of the object then align the Tape Stop with other end of the object Make sure the tape is parallel with the edge of th...

Страница 11: ...ed data can be sent to a host system using the Batch Upload method in the application menu via USB connection See Section 2 4 5 in this chapter for detailed instruction In the Ship or Scan task transm...

Страница 12: ...ressing whiles take your last measurement The length recorded will be the sum of length 1 2 and length 3 2 3 6 Return to Last Recorded Data Press several times until the cursor is in the length field...

Страница 13: ...the next step directly Figure 2 3 Figure 2 5 Figure 2 4 Figure 2 6 Figure 2 7 Scan the operator ID This operation needs to be performed when the device is powered on only To change the Operator ID re...

Страница 14: ...the first step in the Weigh workflow The Weigh workflow is similar to the Measure application See Section 2 4 1 for more details Keep the goods on the scale before scanning the barcode label on the g...

Страница 15: ...nd to scroll when the cursor is on the Consolidate tab press to select See Figure 2 11 Figure 2 11 Figure 2 12 Figure 2 13 The display will be redirected to the first step in the Consolidate workflow...

Страница 16: ...can be used for this functionality If using an iPad as a demo host the right arrow acts as a keyboard escape key pressing it when connected will display or hide the iPad on screen keyboard This is us...

Страница 17: ...ages the low level Cubetape interface BT and COM port connection and makes the data available via a higher level set of methods and properties We envisage the major shipping applications would require...

Страница 18: ...viously configured settings If a different settings configuration is needed the operator has to enter the Settings menu to adjust To enter the Settings menu power the device on When the display is sho...

Страница 19: ...lay will show Comm Method tab in Config screen press to select Select desired Bluetooth connection profile according using Up and Down keys Press to accept a new setting Press to go back 3 2 1 2 About...

Страница 20: ...ovides ready access to different data capture tasks The default taskbar contains 5 tasks for use in presenting the main features of the device with minimal setup and configuration In production end us...

Страница 21: ...etape Manager software USB connection is the supported method for connection Turn on the CubetapePRO device Connect the CubetapePRO with PC by plugging in the USB ports with the USB cable at both ends...

Страница 22: ...onfiguration from the connected Cubetape into Cubetape Manager To load the existing configuration to the Cubetape Manager click the File on menu and then click Load Configuration See Figure 3 4 After...

Страница 23: ...b See Figure 3 5 To change the unit for measurement adjust in Units of Measure bar See Figure 3 6 To change values of dimension weight factor default pallet size adjust in corresponding bars under Glo...

Страница 24: ...e removed altogether See Figure 3 8 Note that needs be careful to remove the Task from the list To find back the Task that is removed the only way is turning to the Connect tab and clicking the Reset...

Страница 25: ...operation in application Figure 3 10 Figure 3 11 Figure 3 12 Figure 3 13 3 Enable to Enter should show Piece window during application See Figure 3 11 Set the maxim piece number which can be entered...

Страница 26: ...t ID window once See Figure 3 14 When operator ID is scanned successfully one time the ID will store in the device Figure 3 14 Note that the Cubetape needs to restart to reenter the operator ID 9 The...

Страница 27: ...ion tab Device information such as model ID serial number firmware version time and date and tape counter can be reviewed under the tab See Chapter 1 Section 1 5 also Figure 3 16 Bluetooth Pair with t...

Страница 28: ...lly See Figure 3 19 After the paring successfully wait for 5 seconds the Bluetooth icon on the bottom right corner would turn to blue 3 3 8 Advanced Menu Item Advanced menu option allows password acce...

Страница 29: ...ted with a host before data can be transferred Pairing can be performed with no physical connection between the device and the host The process should be straight forward but issues can arise across d...

Страница 30: ...using Cubetape Manager Click on the Bluetooth Device icon at the bottom right corner of your PC screen then select Add a Device Cubetape should be displayed in the Add a Device dialogue box This may...

Страница 31: ...ePRO 30 4 and Figure 4 2 Select Enter the device s pairing code and key the default PIN code 1234 See Figure 4 3 Figure 4 3 Typically there will be some driver installation then a success message will...

Страница 32: ...vices and select Properties The Services tab displays the services and the COM port in use See Figure 4 5 Figure 4 5 Cubetape is now connected and data can be transferred under the Serial Port Profile...

Страница 33: ...g See Chapter 3 Section 3 2 1 1 for more detail or configure from Cubetape Manager Turn on the Bluetooth switch on the upper right corner of the task bar See Figure 4 6 Figure 4 6 Select Open Bluetoot...

Страница 34: ...uccessful a small subtext indicating connected will be displayed underneath the Cubetape icon See Figure 4 10 Figure 4 10 Cubetape is now connected and data can be transferred under the Human Interfac...

Страница 35: ...onnection and battery charging 4 3 1 PC Requirements The USB port is solely provided for data connection to Windows PCs Connection with host systems other than Windows PCs via USB functions as chargin...

Страница 36: ...mized under the Workflows tab in Cubetape Manager Table 5 Field Typical Field symbol Pieces Dimensional Volume Operator ID Cubetape ID ID1 ID2 ID3 WW WW PW VV OP OpID Operator ID Scanned at beginning...

Страница 37: ...scale via Bluetooth communications The weighing scale should have a Bluetooth interface available Make sure to select the Weigh application in the Cubetape Application menu as discussed in Chapter 2...

Страница 38: ...ation menu on the Cubetape and select Weigh to start tasks Sample tasks can be found in Chapter 2 Section 2 4 2 3 4 6 SDK 4 6 1 SDK Overview The SDK is provided to simplify the integration of Cubetape...

Страница 39: ...ustrates how to use the Cubetape Manager class in the SDK to connect to the device and receive data A pre compiled version of the Desktop Sample is installed which you can access from the Desktop Samp...

Страница 40: ...strokes The default behavior is ID id PC pc LL ll WW ww HH hh UN un ENTER The two letter codes in curly braces are replaced with the values of those specific fields ENTER is a constant which defines t...

Страница 41: ...o pair with a PDA and transfer data records from Cubetape Power up the PDA Ensure that Bluetooth is turned on Power up the Cubetape Select Cubetape sample from the PDA start menu or menu bar To pair t...

Страница 42: ...em Cubetape firmware includes an alert system to support the process of cleaning and replacement of tapes Cubetape tracks tape usage and will issue two types of service alerts clean tape and replace t...

Страница 43: ...ersonnel should perform installation programming and service Please contact a local authorized Parceltools representative for assistance Parceltools recommends periodic preventative maintenance for th...

Страница 44: ...and then lifting the tape away from the device slowly 5 6 2 Battery Replacement To replace the tape cassette and battery remove the rubber sleeve first Then slide the rear cover of the device down by...

Страница 45: ...assistance Symptom Suggestion Device breakdown or not responding Replace the battery then reassemble Unable to connect to STManager via USB Disconnect all components then follow the instructions in ch...

Страница 46: ...ng is finished the charge light will go off If the battery remaining drops below 10 the symbol turns red and alerts the operator Cleaning and Maintenance Process For sensor versions daily clean the sy...

Страница 47: ...ScanTapeLoader exe and follow the prompts x Cubetape or ScanTape firmware will be updated Process requires Cubetape firmware V1 12C and above Prior to firmware version V2 02 14 Bluetooth serial conne...

Страница 48: ...SE965 Setup Barcodes for C190PRO May 2019 Set Factory Defaults Disable adaptive Scanning Enable M2of5 M2of5 length within range 01 and 04 0 1 0 4 Write to PT Defaults...

Отзывы: