


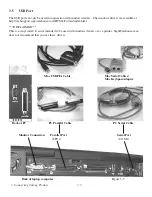


3. Connecting Cutting Plotters
The cutting plotter communicates with a computer through a
USB (Universal Serial Bus), Parallel port
(Centronics)
or a
Serial port (RS-232C)
. This chapter shows you how to connect the cutting plotter to a host
computer and how to set up the computer/cutting plotter interconnection.
!!Notice: When USB connection is enabled, both parallel port and serial port will be disabled automatically.
3.1
Parallel
Transmission
Connecting to the Parallel Port (Centronics)
1.
Connect a parallel cable to the cutting plotter and the host computer (Figure 3-1)
2.
Set up the output port
LPT1
or
LPT2
from your software package
3.2
Serial
Transmission
Connecting to the Serial Port (RS-232C)
1.
For IBM PC, PS/2 users or compatibles, connect the RS-232C cable to the serial connector of the
assigned serial port (COM1 or COM2) of your host computer.
2.
Set up the communication parameters (Baud Rate and Data Bits/Parity) to match the setting of software
package, refer to chapter 3 – “Misc” key description.
Parallel port
Serial port
Figure 3-1
3. Connecting Cutting Plotters 3-1


