Panduit Atlona AT-UHD-SW-510W Скачать руководство пользователя страница 87

AT-UHD-SW-510W

87

The Web GUI

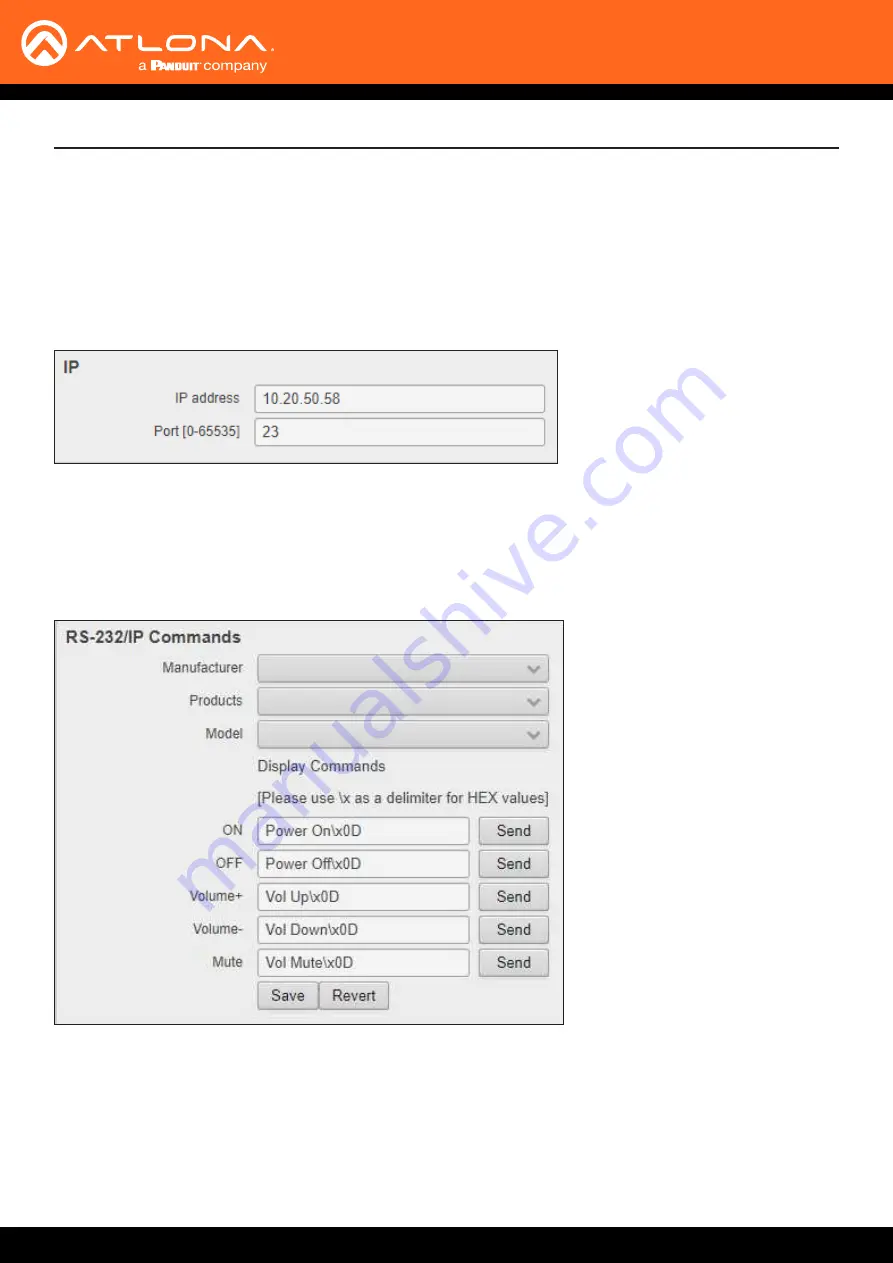
IP Address 

Enter the IP address of the remote device.

Port [0 - 65535] 

Enter the listening port for the remote device.  Values from 0 through 65535 are valid.

Control Type : IP 


When 

IP

 is selected from the 

Control Type

 drop-down, both the 

IP

 and 

RS-232/IP Commands

 section is displayed.

Save


Click this button to commit all 
changes.

Revert


Click this button to undo all changes.

RS-232/IP Commands 

Click the 

Manufacturer

Products

, and 

Model

 drop-down lists to select the desired product.  Note that only a 

minimal set of devices have been included.  Once a device is selected, the 

ON

OFF

Volume-

, and 

Mute


fields will be populated with the correct information for that device.  If a device is not listed, enter the appropriate 

commands the device in each field.  Commands can be either ASCII or hexadecimal.  If hexadecimal values are 

used, then use the 

/x

 delimiter at the end of the string.

Содержание Atlona AT-UHD-SW-510W

Страница 1: ...AtlonaManuals Switchers AT UHD SW 510W Five Input Universal Matrix Switcher with Wireless Presentation Link 4K UHD...

Страница 2: ...ect firmware 2 0 0 9 Jan 2019 Updated to reflect firmware 2 2 0 10 Mar 2019 Updated to reflect firmware 2 3 0 11 May 2019 Updated to reflect hardware revision C 12 May 2019 Updated to reflect firmware...

Страница 3: ...34 United States Office 1 877 536 3976 US Toll free Office 1 408 962 0515 US International Sales and Customer Service Hours Monday Friday 6 00 a m 4 30 p m PST http www atlona com International Headqu...

Страница 4: ...of purchase date for hardware electronics products purchased on or after June 1 2013 3 years from proof of purchase date for hardware electronics products purchased before June 1 2013 Lifetime Limited...

Страница 5: ...ts or states do not allow the exclusion or limitation of relief special incidental consequential or indirect damages or the limitation of liability to specified amounts so the above limitations or exc...

Страница 6: ...5 Do not use this product near water 6 Clean only with a dry cloth 7 Do not block any ventilation openings Install in accordance with the manufacturer s instructions 8 Do not install or place this pro...

Страница 7: ...Setting the System Date and Time 21 Manual Adjustment 21 Using an NTP Server 22 The Splash Screen 23 Customizing the Splash Screen 23 Displaying Metadata 25 Displaying the Wireless Password 27 Changi...

Страница 8: ...h Screen page 78 Splash Screen 78 Images 79 Routing page 80 Input Selection 80 Matrix Switching 80 Display page 81 Control 81 CEC Commands 83 Relay 83 Trigger I O 84 EDID page 88 Administration page 8...

Страница 9: ...rates up to 18 Gbps For integration convenience and flexibility simultaneous 18 Gbps HDMI and 10 Gbps HDBaseT outputs make the SW 510W ideal for various presentation scenarios such as primary and conf...

Страница 10: ...t Panel Revision C 1 Input Indicators Displays the currently selected input 2 INPUT Press this button to cycle through each input 3 IP Press this button to display the IP address of the AT UHD SW 510W...

Страница 11: ...screens drapes lights or other devices 5 TRIGGER I O Connect voltage controlled device to this port A 4 pin captive screw connector is required 6 RS 232 Use the included captive screw connector to co...

Страница 12: ...t supported Audio Trigger 1 2 3 1 2 3 GND GND The TRIGGER I O port allows voltage controlled devices such as an occupancy sensor to be connected to the AT UHD SW 510W Use the included 4 pin captive sc...

Страница 13: ...10W provides a RELAY port which allows the control of screens curtains and other devices Use a 48 V DC relay with no more than 1 A current draw When the AT UHD SW 510W is powered on or rebooted C1 and...

Страница 14: ...6 Connect the relay leads from the control motors of the projection screen blinds or curtains to the relay outputs to the RELAY port using the included 3 pin captive screw connector Use a 48 V DC rel...

Страница 15: ...48V RS 232 HD Bas eT IN HD MI OU T RX TX AT UHD EX 100CE RX PSE H D M I UHD HD Display D i s p l a y P o r t AT UHD SW 510W E t h e r n e t P o E E t h e r n e t P o E H D B a s e T U S B C E t h e r...

Страница 16: ...ered 2 Connect a display to one of the video outputs on the rear of the unit Make sure the display is powered 3 Press and release the IP button Switching the IP Mode Using the Front Panel 1 Make sure...

Страница 17: ...thernet 1 IP 192 168 41 68 MAC B8 98 B0 05 7E 73 Ethernet 2 IP 169 254 7 58 MAC B8 98 B0 05 7E 72 7 The IP address of the AT UHD SW 510W is listed under Ethernet 1 Setting the IP Address using the Web...

Страница 18: ...Properties dialog box select Internet Protocol Version 4 and then click the Properties button 5 Click the Use the following IP address radio button IMPORTANT Before continuing write down the current I...

Страница 19: ...ill display instructions on connecting wireless devices and how to connect devices directly to the AT UHD SW 510W using cables 4 The unit is now ready for use The entire boot process takes approximate...

Страница 20: ...PLAY INPUT AT UHD SW 510W POWER IP Basic Operation Selecting the Input Press the INPUT button to cycle through each of the available inputs on the unit If the unit is powered off then powered on the A...

Страница 21: ...internal clock to store the current date and time When setting the time and date Universal Coordinated Time UTC must be used 1 Login to the web GUI Refer to Introduction to the Web GUI page 71 for mo...

Страница 22: ...re information 2 Convert the local time to 24 hour time 3 Click System in the side menu bar 3 Under the Time window group enter the desired server in the NTP Server field The default NTP server is poo...

Страница 23: ...sition of the Panel can be adjusted using the Y Offset feature Displaying Metadata page 25 can be enabled or disabled The background image can also be changed This area displays information on how to...

Страница 24: ...be placed in any of these fields To display a list of available system values click Legend Each tag in the legend is defined as follows Tag Description name This is the system name and is usually the...

Страница 25: ...urrent date wired IP address current firmware version and some image references used by the AT UHD SW 510W The name can be changed under the General page page 74 of the Web GUI The date and time can b...

Страница 26: ...tlona com casting or SW510 E573 SW510W 08 29 2018 10 0 1 83 2 3 3 opt tomcat webapps ROOT static images icons led_grey_small png image src url led_grey opt tomcat webapps ROOT static images icons led_...

Страница 27: ...the wireless password will automatically be displayed by default at the bottom of the screen as shown below In addition to the password the Name field represents the SSID of the AT UHD SW 510W and is...

Страница 28: ...sh Screen Image 1 Launch a web browser and enter the IP address of the AT UHD SW 510W in the address bar 2 Login to the web GUI Refer to Introduction to the Web GUI page 71 for more information 3 Clic...

Страница 29: ...currently active splash screen the splash screen will be replaced with the uploaded image Any one of the splash screens or the loading screen can be replaced with a custom image 1 Launch a web browser...

Страница 30: ...25px icon width auto height 35px vertical align middle OutlineText font Tahoma Geneva sans serif font size 64px color white text shadow HTML If a dynamic image is used only the first frame of the imag...

Страница 31: ...etc can be placed in folders if desired or can also be left in the root directory The file structure for the default html zip file located on the AT UHD SW 510W is as follows airplay png cast png chr...

Страница 32: ...of the AT UHD SW 510W in the address bar 2 Login to the web GUI Refer to Introduction to the Web GUI page 71 for more information 3 Click Splash Screen from the menu bar on the left 4 Click the Type d...

Страница 33: ...roduction to the Web GUI page 71 for more information 4 Click Administration Networking from the menu bar on the left 5 Under the Wifi tab select Access Point from the Mode drop down list 6 The name o...

Страница 34: ...select the rotation time interval for new password generation The default setting is 1 hour 12 Enter the wireless channel number in the Channel field Contact the network administrator if necessary Ba...

Страница 35: ...he firewall can be configured or disabled at any time The default setting is None Setting Description None default Select this option to disable the firewall on the AT UHD SW 510W and allow all incomi...

Страница 36: ...ser and enter the IP address of the AT UHD SW 510W in the address bar 2 Login to the web GUI Refer to Introduction to the Web GUI page 71 for more information 3 Click Administration Networking from th...

Страница 37: ...dialog box Click the Cancel button to return to close the dialog and return the Wifi tab 8 Enter the password for the wireless network in the Password field 9 Click the Save button near the bottom of...

Страница 38: ...tion Connected The AT UHD SW 510W is connected to the wireless network Not Connected Unsuccessful connection Check to make sure the password was entered correctly This state will also occur if the wir...

Страница 39: ...be unable to decode and present the content iOS Devices 1 Select the BYOD input on the AT UHD SW 510W 2 On the iOS device go to Settings Wi Fi 3 Select the network to which the AT UHD SW 510W is conn...

Страница 40: ...90 degrees then the image on the screen will also be rotate 90 degrees AirPlay is only supported on Mountain Lion 10 8 or later To determine if AirPlay is supported on the system being used click Sys...

Страница 41: ...e AirPlay icon and select Use As Separate Display from the list of displays to extend the Desktop to another display Turning Off AirPlay Click the AirPlay icon and select Turn AirPlay Off AirPlay can...

Страница 42: ...can be done in more than one way Three methods are discussed below The first method is the most direct method 1 Press keys simultaneously 2 The list of available devices will be displayed on the righ...

Страница 43: ...e AT UHD SW 510W and the casting computer are on the same network 2 Launch Google Chrome 3 Click the icon in the upper right corner of the Chrome browser 4 Click the Cast option from the drop down men...

Страница 44: ...n the upper right portion of the menu bar Clicking this icon will display the Casting tab dialog In addition a blue rectangle will be displayed in the browser tab which is sharing casting the content...

Страница 45: ...AT UHD SW 510W and the mobile device are on the same network 2 On your mobile device press and hold the icon The Cast screen context menu will be displayed 3 From the Mirror device screen tap the butt...

Страница 46: ...he web GUI Refer to Introduction to the Web GUI page 71 for more information 2 Click Routing from the menu bar on the left 3 Click the Matrix Switch drop down list and select Matrix Mode 4 Click the M...

Страница 47: ...splay 24 Display AT UHD SW 510W AT VGW 250 AT VTP 800 H D M I U S B C E t h e r n e t E t h e r n e t P o E LAN Tablet BYOD Laptop ETHER NET HDMI OUT MDP OUT DC 19V 1 2 AT VG W 250 Laptop Tablet Lapto...

Страница 48: ...itching The instructions below provide an example setup 1 Login to the web GUI Refer to Introduction to the Web GUI page 71 for more information 2 Click Routing from the menu bar on the left 3 Click t...

Страница 49: ...ay Near End AT UHD SW 510W Codec H D M I H D M I H D M I H D M I E t h e r n e t E t h e r n e t LAN Tablet BYOD Tablet FarEndContent T a b l e t 1 0 X Z o o m F 1 6 F3 0 f4 7m m f 4 7 m m 1 0 X Z o o...

Страница 50: ...N port on the rear panel This port accepts a 3 5 mm mini stereo cable LAN DC 24V HDBaseT OUT HDMI OUT HDMI IN DP IN USB C IN 2 3 4 1 RELAY RS 232 TRIGGER I O MIRACAST WiFi AUX AUDIO OUT L R IN USB C1...

Страница 51: ...a check mark in it then the feature is enabled Also make sure that Airplay Enable is checked 6 Go to the AirPlay device and activate Screen Mirroring The AT UHD SW 510W will now be displayed in the de...

Страница 52: ...nting unauthorized users from accessing the AT UHD SW 510W NOTE Android devices do not support PIN code security 1 Login to the web GUI Refer to Introduction to the Web GUI page 71 for more informatio...

Страница 53: ...will be displayed only for about 10 seconds If the PIN code is not entered within the time interval then the PIN code will be removed from the screen The example below shows an AirPlay device prompti...

Страница 54: ...nds to elapse before another PIN code is generated For example if another connection is made within 20 seconds after the nth connection then the same PIN code will be used to connect to the system 1 L...

Страница 55: ...page 91 for more information 3 Click the Enable check box on the Moderator page In order to monitor which devices are allowed to display content this box must be checked before a device begins casting...

Страница 56: ...vices are displayed in this table an Allow and Kick button will also be available for each device 5 Click the Allow button to permit a device to begin casting to the display device Once the selected d...

Страница 57: ...nnect a casting device from the AT UHD SW 510W Once a device has been kicked it will no longer appear in the Users table In the example below Brenda s iPhone has been removed To reconnect a device tha...

Страница 58: ...lick the Display Auto Power check box 4 Click the Enable Time Display Control check box 5 Click drop down lists next to Start Time to set the hour and minute when the display will be powered on Time i...

Страница 59: ...ice passes the authentication process the authentication server notifies the switch allowing the client to access the LAN The illustration below shows the basic architecture E t h e r n e t E A P O L...

Страница 60: ...W Note that the PKCS 12 file pfx file should not include a private key To delete an existing certificate click the Delete button 7 Click the Pick button and select the desired wireless network to whic...

Страница 61: ...DHCP Static IP or Factory Static Refer to IP Configuration page 16 for more information 4 Click the 802 1x Enable checkbox 5 Enter the required credentials in the Identity and Password fields 6 Click...

Страница 62: ...r to Introduction to the Web GUI page 71 for more information 2 Click Administration Networking from the menu bar on the left 3 Under the Wifi tab click the Mode drop down list and select Access Point...

Страница 63: ...rt Type DTE Pin Descriptions DCE Pin Descriptions Pin Signal Description 1 DCD Data Carrier Detect 2 RxD Receive Data 3 TxD Transmit Data 4 DTR Data Terminal Ready 5 GND Ground Signal 6 DSR Data Set R...

Страница 64: ...ove at least 3 16 5 mm of insulation from the TxD RxD and GND wires Cable Assembly When connecting a DTE device to a DCE device a straight through cable should be used A straight through cable is wire...

Страница 65: ...48V DC FA CTO RY RES ET AT UHD SW 510W AT UHD 100CE RX PSE Display Control System DC 48V RS 232 HD Bas eT IN HD MI OU T RX TX US B C DP HD MI 3 HD MI 4 BY OD DIS PLA Y INP UT AT UHD SW 510W 1 Connect...

Страница 66: ...e information The factory default username and password are listed below Username admin Password Atlona 5 Click Display in the menu on the left side of the window 6 Click the Control Type drop down li...

Страница 67: ...is being controlled 10 Continue fine tuning the device selection by clicking the Products and Model drop down lists Once all fields have been set to the proper values the AT UHD SW 510W will populate...

Страница 68: ...TO RY RES ET Control System AT UHD SW 510W US B C DP HD MI 3 HD MI 4 BY OD DISPLA Y INPU T AT UHD SW 510W 1 Connect the RS 232 cable between the control system and the AT UHD SW 510W Refer to Cable As...

Страница 69: ...he RS 232 section Click the RS232 Mode drop down list and select Local RS232 Only The RS 232 section is available only if the Control Type is set to RS 232 6 Click the Baud Rate Data Bits Parity and S...

Страница 70: ...Volume Volume and Mute fields can be entered manually Consult the User Manual for the sink device to obtain the correct command format 8 Continue fine tuning the device selection by clicking the Prod...

Страница 71: ...nch a web browser and enter the IP address of the unit If the default static IP address is being used enter 192 168 1 254 3 The AT UHD SW 510W Login page will be displayed Introduction to the Web GUI...

Страница 72: ...yed Menu Bar The window on the left side of the screen is the is the menu bar and lists all available menus Click on the desired menu item to open that page In this example clicking Display in the men...

Страница 73: ...iversal Coordinated Time UTC Master Version The version of firmware Firmware Version The version of firmware that the AT UHD SW 510W is running Always make sure to check the AT UHD SW 510W product pag...

Страница 74: ...he OSD Derived This field will automatically be populated by the AT UHD SW 510W based on the information provided in the Name field This field provides a computer friendly name used by the SSID If spe...

Страница 75: ...ttings Resetting to factory default setting may take up to five minutes to complete Set System Date Time Click this button to set the month day and time in UTC Set Local Date Time Click this button to...

Страница 76: ...to download the current AT UHD SW 510W configuration to a zip file The default filename is config zip Within the config zip is the configuration zip file Note that the information within the configur...

Страница 77: ...0W 77 This page provides a information about the current state of the AT UHD SW 510W such as IP information memory usage casting devices active sources date time and various other settings Status page...

Страница 78: ...egative values move the panel up Title The title of the overlay panel The default value is Welcome Subtitle The text directly under the text in the Title field The default text contains the name of th...

Страница 79: ...for more information on using the following features Column 2 The text positioned in the right hand column The default text is Connect wirelessly Connect the Wi Fi network entercode and enable AirPla...

Страница 80: ...ix mode Refer to Matrix Modes page 46 for more information Routing page Input Selection Matrix Switching Modes Description Disabled Matrix mode is disabled default setting Matrix Mode Allows the AT UH...

Страница 81: ...etected on the input This applies to either physical source connections or casting The Auto Power Off Timer must expire before the power off command is sent Active Video Presence w Occupancy Sensor Si...

Страница 82: ...power off command from being sent while the lamps are warming up A minimum of 45 seconds is recommended for projectors Available values are 15 to 300 seconds 5 minutes The default value is 15 seconds...

Страница 83: ...ommand to the display device These buttons will only be enabled if a device is connected to the AT UHD SW 510W using the correct cable For example the HDMI ON OFF buttons will only be enabled when an...

Страница 84: ...ltage levels Either or both of the following conditions can be enabled or disabled Enable Trigger On Enable Trigger Off Uncheck the box to enable a power off state when the trigger voltage is pulled f...

Страница 85: ...system Both Both HDBaseT OUT and the RS 232 port are used Note that when using both ports the RS 232 settings must be identical Baud Rate Data Bits Parity and Stop Bits The RS 232 settings for the sel...

Страница 86: ...s selected the ON OFF Volume Volume and Mute fields will be populated with the correct information for that device If a device is not listed enter the appropriate commands the device in each field Com...

Страница 87: ...Revert Click this button to undo all changes RS 232 IP Commands Click the Manufacturer Products and Model drop down lists to select the desired product Note that only a minimal set of devices have be...

Страница 88: ...k the drop down list under the Selection column to select the desired EDID to be used Click the Save button to accept the changes The table below lists the available EDID presets The table below provi...

Страница 89: ...AT UHD SW 510W 89 The Web GUI Administration page The Telnet page provides an emulated terminal for entering commands Telnet page...

Страница 90: ...devices are allowed to display content this box must be checked before a device begins casting If a device is already casting then enabling this feature will have no effect Users This table lists all...

Страница 91: ...age General Ethernet Mode Click this drop down list to select the desired IP mode Setting Description DHCP Select this option to have a DHCP server if available assign an IP address to the AT UHD SW 5...

Страница 92: ...is set to Static 802 1x Security Enable Click this checkbox to enable 802 1x authentication mode When enabled the RADIUS server port and secret fields will be available Refer to 802 1X Authentication...

Страница 93: ...rol of incoming and outgoing network traffic The AT UHD SW 510W provides the following firewall modes Block Private Network Block Internet Block All and None Setting Description None Select this optio...

Страница 94: ...o display a pop up dialog displaying all available WiFi networks Click the desired WiFi network from the list and click the OK button to accept the selection or click Cancel to return without making a...

Страница 95: ...onnect to WiFi from the Mode drop down list 2 Click the Pick button to open the Pick a Wifi Network dialog box 3 Click on the desired wireless network from the list 4 Click the OK button 5 The wireles...

Страница 96: ...e Debug logs are used by Atlona Technical Support Engineers to identify functionality issues 1 Click Debug on the side menu bar 2 Click the Downloads Logs button to display the Save As dialog box 3 Br...

Страница 97: ...t password to be changed 1 Click the Change button to display the Change Password dialog box 2 Enter the new password in the Password field 3 Re enter the same password in the Repeat Password field 4...

Страница 98: ...will be required at the beginning of the Telnet session The default login credentials are the same default credentials used by the web GUI Enable Whitelisting Click this check box to enable whitelisti...

Страница 99: ...before a new PIN code is requested by the system This drop down list is only available if the Airplay Miracast P2P PIN check box is checked Setting Description Update Pin every new connection A new P...

Страница 100: ...he output volume respectively OSD The up arrow button displays the OSD The down arrow button hides the OSD Front Panel Revision A and B only Portal Mode Click this drop down list to select the desired...

Страница 101: ...U firmware Allow Maintenance Window Check this box to enable maintenance mode This feature can only be enabled if the local time has been set Refer to Setting the System Date and Time page 21 for more...

Страница 102: ...AT UHD SW 510W 102 The Web GUI Pre Release page This page lists beta features which are currently in the pre release testing stage It should be noted that these features may not function reliably...

Страница 103: ...t is adjustable from 80 to 0 dB Audio Input Click these drop down lists to select the desired audio input source If Analog is selected then the analog audio source connected to the 3 5 mm AUDIO IN por...

Страница 104: ...AT UHD SW 510W 104 The Web GUI The Web GUI Event Viewer page Displays a dynamic list of events returned in JSON format The image below shows a list of sample events...

Страница 105: ...510W must be running version 2 0 0 in order to upgrade to the latest version If the AT UHD SW 510W is running an earlier version of firmware refer to Updating from 1 2 1 5 or earlier on page 3 and co...

Страница 106: ...up to five minutes to complete The unit will automatically reboot as part of the update process 9 After the firmware process has completed the AT UHD SW 510W will automatically reboot and the followin...

Страница 107: ...front panel The IP address will appear on the connected display NOTE Depending upon the currently loaded firmware a hard reboot may be required in order to reestablish communication with the webGUI T...

Страница 108: ...ess is complete No additional steps are required If the Firmware Version is an earlier firmware then continue with Step 11 10 Click Info on the side menu bar and check the Firmware Version 11 Click Sy...

Страница 109: ...ot and the following message will appear at the top of the screen 15 Click the message or press the ESC key to return to the Login screen Enter the login credentials 16 Click Info on the side menu bar...

Страница 110: ...1 Attach the included small rack ear sold separately to one side of the AT UHD SW 510W using the included screws 2 Attach the included longer rack ear sold separately to the opposite side of the AT UH...

Страница 111: ...the mounting plate should face upward U SB C D P H D M I 3 H D M I 4 B Y O D A T U H D S W 5 1 0 W U SB C D P H D M I 3 H D M I 4 B Y O D D IS PL A Y IN PU T IP PO W ER Countersink bevel AT RON 444 U...

Страница 112: ...ing plates should face upward U S B C D P H D M I 3 H D M I 4 B Y O D Countersink bevel Flat Surface 3 Mount the unit using the circular holes on each mounting plate If using a drywall surface a 6 dry...

Страница 113: ...female AV input Alternate Mode USB 3 USB 2 0 Type A for Wi Fi antenna modules RS 232 1 3 pin captive screw bidirectional RELAY 1 3 pin captive screw normally open NO with adjustable Toggle and Pulse m...

Страница 114: ...TPS SSL TLS Authentication IEEE 802 1x Ethernet Speed 10 100 1000 Mbps Addressing DHCP static Wi Fi IEEE 802 11n ac 2 5 GHz 5 GHz Wi Fi Protocols WPA WPA2 PSK Antenna 2 included Power Consumption full...

Страница 115: ...put selecting 20 Installation 12 IP configuration 16 auto IP 18 DHCP 16 static IP 16 M Miracast configuring 41 Moderator mode 53 Mounting instructions 112 O Operating notes 3 P Panel descriptions 10 P...

Страница 116: ...names and trademarks or registered trademarks are the property of their respective owners Pricing specifications and availability subject to change without notice Actual products product images and o...

Отзывы: