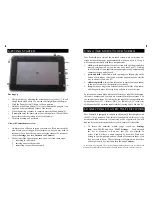


Connecting To A Network (Cont’d)
2. According to the security protocol used by your chosen network,
a box will appear requesting an access code or encryption key.
Touch it to summon the on-screen keyboard and carefully
copy the access key from your Router or Wireless Hub.
Take care to copy it exactly. It is case sensitive.
Use the Caps Lock,
and [ABC/123/ALT] toggle key to find the symbols you require, and
then touch the [Done] button at the bottom right of the screen.
3. When you enter the key correctly your Pandroid will connect to your
chosen network and indicate the signal strength. It will keep the key
details for future access so that you do not have to enter them again,
unless you explicitly delete the connection. To test your network link
click the ‘Home’ (house icon) in the top navigation browser and touch
the ‘Browser’ or ‘Opera Mini’ icon.
Setting The Date And Time
Your Pandroid’s date and time can be set automatically by the geographical
positioning feature of the Operating System. However if you are not planning
to use the Wi-Fi network, or if you find that the date or time is not set correctly,
you can turn this feature off and set them by hand by following these steps.
1.
From the Home screen touch the
Settings icon
, then
Date and Time
Settings
and uncheck the
Automatic
checkbox
2.
Click to set the time using the
Up
and
Down
buttons for the hour,
minutes, seconds and AM or PM (or choose the 24 hour clock style)
3. Choose a Date Format and then one-by-one click on the Day, Month
and Year fields and set them using the
Up
and
Down
Keys
Setting The Country And Language
To change the preset country and language, please follow these steps:
1.
From the Home Screen press
Menu
and then
Settings
and then
Regional and Text
2.
Click Select to make your choice with the
Up
and
Down
Keys.
10
Setting Up And Using eMail
Please make sure that your Pandroid’s date and time are set correctly
before setting up or accessing your mailbox or Google Market. Providers
often use the local date and time to synchronise mail and applications.
If necessary follow the steps on the previous page to make any changes.
Initial Set-Up
You can skip the steps on this page if you use an on-line browser-based
mailbox like 1&1. These steps allow you to set up a local mailbox on your
Pandroid and to make a background check for mail every few minutes.
Your Pandroid includes an open systems email client and the popular
Gmail application. Whichever you choose, it is easy to set up.
1.
Click the arrow key to the right of the main dektop and then touch the
either the
email icon
or the
Gmail icon
.
2.
A wizard opens. The email wizard needs settings from your provider,
who will tell you whether your mailbox is a ‘POP3’ or ‘IMAP’ type.
Enter the details and press ‘
Next
’. (Gmail skips this step)
3. Enter the email address and the alias (the name that is to appear in the
‘From’ line of outgoing emails) and click
Next
4. The Pandroid will access the chosen mailbox if it is available.
If you are unable to connect to the mailbox, you may need to reconnect
your Wi-Fi. To do this go to the Home Screen and then touch the
Settings
Icon
, then
Network
and then
Connect
.
Connecting and sending from an existing mailbox
1.
Click the arrow to the right of the desktop and then the
eMail icon
2.
Click on the
email display
and then
Inbox
3.
Press the
Menu
button for options to create, forward, delete or send
Follow the steps at the end of last paragraph if you have difficulty
accessing your mailbox.
11