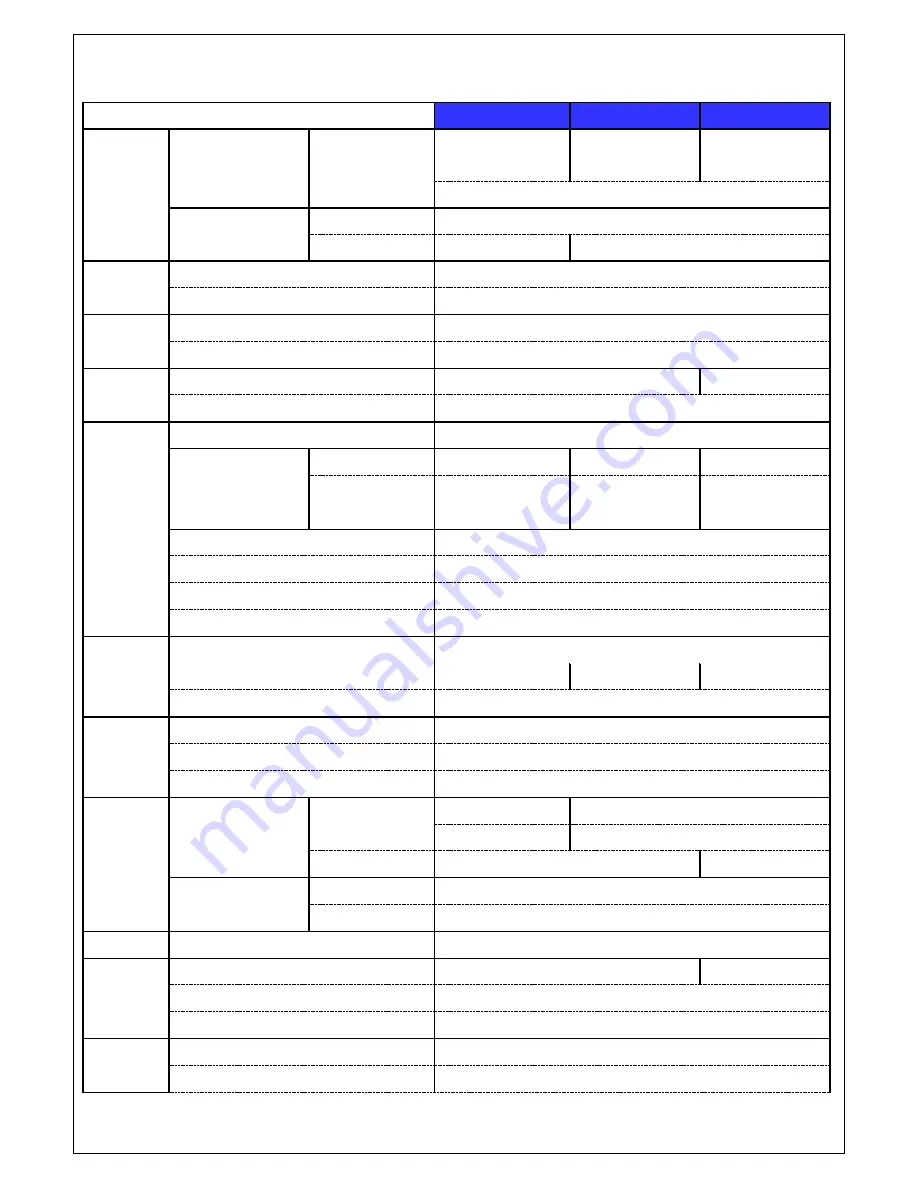
background image


Specifications 

MODEL 

SP-DRH04 

SP-DRH08 

SP-DRH16 

Video 

Input 

Number of 

Channels 

4CH 

(650/700TVL) 

8CH 

(650/700TVL) 

16CH 

(650/700TVL) 

Signal Format 

NTSC/PAL 

Output 

Main Monitor 

VGA and HDMI (1920x1080) 

Sub Monitor 

CVBS or SPOT 

CVBS and SPOT 

Audio 

Input & Output 

4 Line Input & 1 Line Output 

Audio Codec 

G.711 

Alarm 

Sensor Input 

Alarm Output 

Serial 

RS-232C 

None 

Yes 

RS-485 

Yes 

Recording 

Compression 

H.264 

Resolution 

  & Frame Rate 

960H(960x576) 

100fps 

200fps 

400fps 

4CIF(704x576) 

100fps 

200fps 

400fps 

CIF(352x288) 

100fps 

200fps 

400fps 

Recording Quality Grade 

5 Levels 

Recording Mode 

Continuous / Motion / Sensor / Schedule / Manual 

Pre Recording 

Max. 20 Minutes 

Post Recording 

Max. 60 Seconds 

Playback 

Search 

Date/Time, Event, Archive, Log 

Multi-Decoding 

1, 4 

1, 4, 8 

1, 4, 9, 16 

Playback Speed 

x0.25, x0.5, x2, x4, x8, x16, x32, x64 

Backup 

Media 

USB drive, External HDD, Network, DVD-R (for only 8&16CH DVR) 

Format 

BMP, AVI, Proprietary Format 

Huge Backup 

Yes (Max. 24 hours) 

Storage 

HDD 

Capacity of 1 HDD 

Up to 2TB 

Up to 3TB 

Internal HDDs 

2    (1 with DVD-R) 

e-SATA 

None 

Yes 

USB 

Front 

Rear 

User I/F 

Input Method 

Front Button, IR, Mouse, Keyboard Controller 

Network 

Interface 

10/100 Base-T 

10/100/1000 Base-T 

Dynamic DNS 

Yes (Free DDNS) 

Dual Encoding for Network 

Yes 

Features 

Digital Zoom 

Yes 

DLS (Day Light Saving) 

Yes 

Содержание X-Plus Series SP-DRH04

Страница 1: ...Series _Ver 1 0_131114 H 264 Video Compression 960H Digital Video Recorder User Guide About this user guide Before installing and using this unit please read this user guide carefully Be sure to keep it handy for later reference ...

Страница 2: ...losion if battery is incorrectly replaced Replace only with the same or equivalent type recommended by the manufacturer Discard used batteries according to the manufacturer s instructions This symbol indicates the presence of important operating and maintenance servicing instructions in the literature accompanying the product This symbol indicates the presence of uninsulated dangerous voltage with...

Страница 3: ...power plug with wet hands Do not sit on Make sure the cables are connected properly Do not place heavy objects on connected units Never move this unit while the power is turned on Remove the power plug from the outlet when the unit is going to remain unused for long periods of time Do not block the cooling fans or air ducts Do not expose to extreme temperatures or humidity changes Warning Installa...

Страница 4: ... 16CH DVD RW option for 8 16CH DVR Client Software CD Remote Control Battery1 5V AAA x 2EA Quick Guide HDD DVD RW data power cable HDD DVD RW mounting bracket Screw HDD DVD RW fixing screw Adaptor DC12V 3A or 5A Power Cable Mouse Items 4CH DVR 8 16CH DVR HDD DVD RW data power cable 1EA 2EA HDD DVD RW mounting bracket 1 Set 2EA 2Set 4EA HDD DVD RW Mounting bracket screw 4EA 8EA HDD DVD RW fixing sc...

Страница 5: ...ews onto HDD 2 After installing bracket and screws onto HDD 3 Installation HDD and Bracket onto base case Inside 4 Installation HDD and Bracket onto base case Outside 5 After connecting power cable and data cable with HDD 6 Whole picture after installation HDD and DVD RW for only 8 16CH ...

Страница 6: ... ST31000340SV Surveillance 1 TB SATA 2 7200 RPM 32 MB ST31000528AS Barracuda 1 TB SATA 2 7200 RPM 32 MB ST500DM002 barracuda 500 GB SATA 3 7200 RPM 16 MB ST3500312CS pipeline 500 GB SATA 2 5900 RPM 8 MB ST3500411SV Surveillance 500 GB SATA 3 7200 RPM 16 MB ST3500413AS Barracuda 500 GB SATA 3 7200 RPM 16 MB ST3500830SCE 500 GB SATA 2 7200 RPM 8 MB ST3500418AS Barracuda 500 GB SATA 2 7200 RPM 16 MB ...

Страница 7: ...TB SATA 3 5400 RPM 64 MB WD10EVDS 63U8B1 1 TB SATA 3 7200 RPM 32 MB WD10EALX 229BA1 1 TB SATA 3 7200 RPM 32 MB WD10EALX 009BA0 1 TB SATA 3 7200 RPM 32 MB WD10EVVS 1 TB SATA 2 5400 RPM 8 MB WD10EACS 1 TB SATA 2 16 MB WD10EUCX 1 TB SATA 3 16 MB WD10EURS 630AB1 1 TB SATA 2 5900 RPM 64 MB WD5000AAKX 221CA1 Caviar Blue 500 GB SATA 2 7200 RPM 16 MB WD5000AAKX 001CA0 500 GB SATA 3 7200 RPM 16 MB WD5000AV...

Страница 8: ...ality Grade 5 Levels Recording Mode Continuous Motion Sensor Schedule Manual Pre Recording Max 20 Minutes Post Recording Max 60 Seconds Playback Search Date Time Event Archive Log Multi Decoding 1 4 1 4 8 1 4 9 16 Playback Speed x0 25 x0 5 x2 x4 x8 x16 x32 x64 Backup Media USB drive External HDD Network DVD R for only 8 16CH DVR Format BMP AVI Proprietary Format Huge Backup Yes Max 24 hours Storag...

Страница 9: ...fari PC Client Single Multi Client Remote Setup and Upgrade Yes Power Power Supply Voltage DC 12V 3A DC 12V 5A Temperatur e Operation Temperature 5 C 40 C During storage 10 C 50 C Weight Unit Weight Gross weight 1 5 Kg 3 Kg 4 1 Kg 6 2 Kg Dimension Unit Dimension W x D x H 340 x 262 x 63mm 380 x 340 x 72mm Please note that specifications and unit exterior design are subject to change without notifi...

Страница 10: ...3 4 4 Motion Zone Setup 30 3 5 Setup Storage Mode 31 3 6 Setup System Mode 33 3 7 Setup SECURITY Mode 37 3 8 Setup Network Mode 39 3 8 1 Port Network Audio Port and Web Port 40 3 8 2 Network Types 40 3 8 2 1 DHCP 40 3 8 2 2 STATIC 41 3 8 3 DDNS 41 3 8 4 Network Stream 41 3 9 Setup CONFIG Mode 42 3 10 Quick Setup 44 3 11 Saving Setup 45 4 Live Search and Playback 45 4 1 Live Viewing Screen 45 4 2 S...

Страница 11: ...functions 64 8 6 PC System configuration 67 9 Network access using the Exclusive network viewer UMS multi 70 9 1 Overview 70 9 2 Minimum PC requirements 70 9 3 Installing the program 70 9 4 Live Window 72 9 4 1 Main user interface 72 9 4 2 Control buttons 72 9 5 Search and Playback Window 73 9 5 1 Main user interface 73 9 5 2 Main control panel 74 9 6 Setup of UMS Multi Client 76 9 6 1 General 76 ...

Страница 12: ...ork By an web browser viewer 93 APPENDIX How to connect network 96 A How to set IP address of the DVR and open TCP port of the router 96 B How to access DVR from Remote PC 98 C How to access DVR with iPhone 101 D How to access DVR with Android 102 ...

Страница 13: ... Pop up HDMI Video output 4Channel audio recording Individual channel operation Motion detection Automatic video input and video loss detection Covert camera operation provides enhanced security Built in PTZF camera control Easy and simple user interface Easy scheduler Easy software upgrade ...

Страница 14: ...trol PTZ operation SETUP To launch SETUP menu CAPTURE To start operations of capture a still image in live mode or backup a video data in playback mode SEARCH To go to the search menu REC To start and stop manual recording PLAY PAUSE To play or to pause the footage in playback mode REW To rewind the footage at 1x 2x 4x and more speed during playback F REW During playback To move the playback posit...

Страница 15: ...ayback Or to select desired menu item and to store the setup value ⓕ To return to previous menu screen or to exit from playback Figure 2 1 2 Front panel SP DRH08 DRH16 Table2 1 1 Indication lamps NO Name Description A CH1 16 Indicating that the channel is being recorded B HDD Indicating that the system is accessing the hard disk C ALARM Indicating that when sensor s is are triggered or motion is d...

Страница 16: ...play mode 10 Press to play pause the footage in playback mode 11 Press to enter SETUP menu 12 Enable disable the automatic sequence of display of channels in full screen quad 9 split display mode 13 Press to control Pan Tilt Zoom operations 14 Press to capture video in jpeg format in live or playback mode 15 LEFT Press to move left or to change the values in Setup mode 16 UP Press to move up the m...

Страница 17: ...or for VGA monitor 6 HDMI OUT HDMI out terminal 7 ETHERNET RJ 45 connector for LAN connection 8 SENSOR IN ALARM OUT RS 485 4 connectors for sensor device connection 1 connector for alarm device connection Provides simple On Off switching by using relay 0 5A 125V 1A 30V RS 485 control terminal 9 POWER SOCKET Connect DC12V 3A Adaptor 10 USB Port To archive still image or video into a USB memory or u...

Страница 18: ...ng by using relay 0 5A 125V 1A 30V RS 485 control terminal 10 POWER SOCKET Connect DC12V 5A Adaptor 11 USB Port To archive still image or video into a USB memory or upgrade firmware with USB memory stick connect a USB memory to the USB terminal 12 GROUND Use for ground port Figure 2 1 5 Rear panel SP DRH16 NO Connection Purpose 1 VIDEO IN 16 connectors for video input NTSC PAL 2 CVBS Video output ...

Страница 19: ...TA Port 1 connector for External SATA 13 HDMI OUT HDMI out terminal 14 GROUND Use for ground port 2 3 Remote control ID To set the remote control ID REC To start and stop manual recording SEARCH To go to SEARCH menu F ADV During playback To move the playback position 60 seconds forward During Pause To move the playback position moves 1 frame forward F REW During playback To move the playback posit...

Страница 20: ...o sequencing the screen in full screen mode Toggle BACKUP To start a backup operations in live or playback mode 0 9 To select channel 1 2 3 or to enter a NVR ID number or use as number key 3 Setting up the DVR The following sections detail the initial setup of a DVR 3 1 Setup Main Screen When booting a system at first the following messages display After initializing select a language and set the ...

Страница 21: ...f each channel SYSTEM INFORMATION Display a software version storage size network type IP address MAC address DDNS status DVR ID and remote controller ID of the system SYSTEM LOCK To lock the system user input a password To unlock the system please press ESC button for 5 seconds on a front panel or a remote control You can also unlock the system when pressing LOCK icon on the screen using a mouse ...

Страница 22: ... ID SENSOR TYPE VIDEO INPUT TRIMMING STORAGE OVERWRITE DISK FORMAT DISK INFO RECORDING LIMIT RECORDING LIMIT DAYS SYSTEM DVR ID DESCRIPTION LANGUAGE DATE FORMAT SET DATE TIME TIME ZONE DAYLIGHT SAVING SET DATE TIME CLIENT ACCESS NTP SEND EMAIL SYSTEM EVENT NOTIFICATION SECURITY USER AUTHENTICATION USER NAME USER PASSOWRD PLAYBACK AUTHORITY ...

Страница 23: ...CONDARY DDNS OFF DDNS SERVER 1 DDNS SERVER 2 DDNS SERVER 3 NETWORK STREAM RESOLUTION FRAME RATE QUALITY USE MOBILE CONFIG SAVE SETUP TO A USB LOAD SETUP FROM A USB LOAD DEFAULT LOAD FACTORY DEFAULT SOFTWARE UPGRADE QUICK SETUP USE QUICK SETUP INPUT DESIRED DAYS CUSTOMER SETTINGS RESOLUTION FRAME RATE QUALITY RECORDING DAYS TO RECORD ...

Страница 24: ...play mode setup screen Table 3 2 1 Menu items in DISPLAY mode setup Item Description OSD Enable disable on screen display OSD CONTRAST Set the visibility level of the On Screen Display OSD 50 100 SEQUENCE Enable disable sequential display of video in full screen mode SEQUENCE DWELL TIME Set the dwell time of each quad 9 or 16 channels display in sequential display mode 3 60seconds CHANNEL Select a...

Страница 25: ...display mode BRIGHTNESS Change the brightness value of the specified channel 0 100 CONTRAST Change the contrast value of the specified channel 0 100 HUE Change the hue value of the specified channel 0 100 SATURATION Change the saturation value of the specified channel 0 100 VIDEO OUTPUT HDMI VGA Set the proper HDMI or VGA resolution among the following various resolutions 1024x768 4 3 1280x720 16 ...

Страница 26: ... Description CHANNEL Select a channel for applying the following settings using the mouse or the control button on the remote control Press the right square button to change the setting value of all channels at once Once you select an item then press OK to set value for all channels RESOLUTION FRAME RATE QUALITY RECORDING PRE RECORD POST EVENT RECORD and AUDIO RESOLUTION Select one type among CIF ...

Страница 27: ...ly from channel 1 to channel 4 SCHEDULE Set the recording schedule Press SEL to go to schedule setup screen 3 3 1 Recording Schedules To setup a recording schedule select SCHEDULE in the RECORD menu Navigate through the menu items using the mouse or the control button on the remote control Channel Select the specific channel Setup Set up using the left button of the mouse to section under the spec...

Страница 28: ...splayed as picture below Navigate through the menu items using the mouse or the control button on the remote control and change the value of the menu item Figure 3 4 1 Device mode setup screen Table 3 4 1 Menu items in Device Setup screen Item Description ALARM OUT Select alarm out channel and set up the alarm duration 5 SECONDS INFINITE CONTROLLER PTZ Set the controller and PTZ camera speed numbe...

Страница 29: ... displayed on Live screen of DVR that respond to the remote control The options are from 0 to 99 SENSOR Select sensor Number from 1 to 4 TYPE Set the type of sensor for the specified channel Options are OFF N O normal open and N C normal closed VIDEO INPUT TRIMMING ON Display 960x 576 OFF Display 944 x 576 Select this menu after checking the right inputting camera resolution 3 4 1 ALARM OUT Figure...

Страница 30: ...hat the PTZ is connected to CAMERA camera protocol type SPEED 19200 14400 9600 4800 and 2400 ID 0 63 3 4 4 Motion Zone Setup Select MOTION ZONE using the mouse or the control button on the remote control and select either PARTIAL ZONE or FULL ZONE using the mouse control The default value is FULL ZONE If FULL ZONE is selected the motion setting screen is not displayed Only set the level of sensiti...

Страница 31: ...is displayed as picture below Navigate through the menu items using the mouse or the control button on the remote control and change the value of the menu item Figure 3 5 1 STORAGE setup screen Table 3 5 1 Menu items in STORAGE Setup screen Item Description OVERWRITE When enabled the DVR will continue recording and overwrite the oldest existing recorded data once the hard drive is full When disabl...

Страница 32: ...S or NO for the hard drive format Caution We recommend that you archive any data that you may need in the future before you format the hard drive DISK INFO DETAIL HELP Hard disk drive information RECORDING LIMIT Enable disable recording limit ...

Страница 33: ...he value of the menu item Figure 3 6 1 SYSTEM Setup Screen Table 3 6 1 Menu items in SYSTEM Setup screen Item Description DVR ID Set DVR ID using the mouse or the control button on the remote control Press OK button on SYSTEM menu to apply the set DVR ID SPACE Caps Lock Select either Capital or Lower letter BS Back space Erase previous character Clear Erase all characters The DVR ID can be made by...

Страница 34: ...the control button on the remote control and press OK button to set the present date and time DAY LIGHT SAVING Select DAYLIGHT SAVING using the mouse and the control button on the remote control and select the appropriate daylight saving time zone If choosing EU or OTHERS set the applicable conditions The options are OFF USA EU OTHERS 1 OFF Daylight saving is not set 2 USA Applies the USA daylight...

Страница 35: ...f the primary NTP time server SECONDARY SNTP SERVER Input the address of the secondary NTP time server TIME ZONE Greenwich Mean Time GMT is a term originally referring to mean solar time at the Royal Observatory Greenwich in London Because NTP synchronizes with Greenwich Mean Time GMT regardless of geography users must set their own time difference for example KOREA GMT 09 00 CONNECTON MODE Select...

Страница 36: ...E MAIL SECURE OPTION ID Outgoing mail address ID PASSWORD Outgoing mail password MAIL TO Recipient s email address MAIL FROM Sender s name TEST test the email sending after setup the SEND EMAIL menu SYSTEM EVENT NOTIFICATION HEALTH CHECK Select time of Daily Weekly and Monthly HDD BAD SECTORS Select a bad sector percentage 0 50 HDD TEMPERATURE Select a HDD temperature 40C 140F 80C 176F HDD ALMOST ...

Страница 37: ...ST FULL Select Yes or No Yes is sending an email or not HDD FULL Select Yes or No Yes is sending an email or not HDD FAILURE Select Alarm out Beep and Sending an email 3 7 Setup SECURITY Mode Press the SETUP button and select SECURITY icon Then the SECURITY menu is displayed as picture below Navigate through the menu items using the mouse or the control button on the remote control and change the ...

Страница 38: ...tions are ADMIN USER1 USER2 and USER3 Select USER PASSWORD using the mouse or the control button on the remote control and press SEL button Select user type and enter the current password And enter a new password enter the same password again to confirm and select OK Then the message PASSWORD CHANGED is displayed The factory default password is 1111 PLAYBACK AUTHORITY Enable disable a covert funct...

Страница 39: ...the system User can assign a new password in the SECURITY setup menu 3 8 Setup Network Mode Press the SETUP button and select NETWORK icon Then the network menu is displayed as picture below Navigate through the menu items using the mouse or the control button on the remote control and change the value of the menu item Figure 3 8 1 NETWORK setup screen Table 3 8 1 Menu items in Network Setup scree...

Страница 40: ... so when each port is accessed on the IP sharing device it will forward to the appropriate DVR Note This port number is listed next to the Port menu option in the Network Setup screen If you plan to access the DVR units only from within the same LAN the TCP port does not have to be changed 3 8 2 Network Types 3 8 2 1 DHCP An IP address is automatically assigned by the DHCP server which automatical...

Страница 41: ...1 user can select one type among three DDNS Servers which be supporting for free bestddns com is default The DDNS interval can be set from 5 to 60 minutes To connect to a network with a domain name user also has to register a MAC address and create a unique domain name to http www bestddns com Please refer to Appendix How to connect network section for the detail of the registration Figure 3 8 2 N...

Страница 42: ...s displayed as picture below Navigate through the menu items using the mouse or the control button on the remote control and change the value of the menu item Figure 3 9 1 CONFIG setup screen Table 3 9 1 CONFIG setup Item Description SAVE SETUP TO A USB User can save the current configuration Setting values of DVR to the USB memory stick Put the USB stick on the front panel and press the button to...

Страница 43: ...ettings The follow settings such as Language DVR ID Security User Authentication Security User P W Date format DLS settings Network settings HDD overwrite Limit recording HDD serial number and HDD error time will not be reset This is different from Load Factory Default LOAD FACTORY DEFAULT Press the button to reset the system to the factory default settings SOFTWARE UPGRADE User can upgrade the la...

Страница 44: ...o channel Figure 3 10 1 Quick Setup screen Table 3 10 1 Quick Setup Item Description USE QUICK SETUP Tick in a box to use the Quick Setup When user inputs period which they want to record the system displays a recommended resolution frame rate quality and recording type after calculating the capacity of the mounted HDD At that time the priority is followed by the order of the items resolution fram...

Страница 45: ...e displayed as they are configured in the Display Setup screen Various on screen display OSD symbols which indicate the status of the DVR are described in Table 4 1 1 Figure 4 1 1 Live Viewing Screen The following status bar hides automatically and appears again when putting a mouse pointer to the bar Table 4 1 1 Status Indicator Icons in Live Viewing Screen Icon Description Power Off button Lock ...

Страница 46: ...he alarm is in progress Click the split screen icon to change the current split screen mode using the mouse or SEL button Displays the current date and time Remote control ID display If a remote ID is not set the message A all is displayed Displays the amount of recording on the hard disk from 0 99 Indicates that HDD is recycled Continuous recording in progress Manual recording in progress To set ...

Страница 47: ...cted to the DVR Indicates that sequencing mode is enabled 4 2 SEARCH Screen To enter the search screen select SEARCH menu on the screen using the mouse or press SEARCH icon on live screen Figure 4 2 1 Search Screen There are 7 ways of search menu such as Quick SEARCH TIME LINE Calendar EVENT GO TO FIRST TIME GO TO LAST TIME GO TO SPECIFIC TIME ARCHIVE LIST and LOG LIST on the screen 4 2 1 QUICK Se...

Страница 48: ...lendar 2 Select a channel from Channel Selection Screen Then 24 Hourly Thumbnail Search screen displays 3 Select the hourly thumbnail Then Minute Thumbnail Search screen displays 4 Select the thumbnail of minutes that you want to playback 4 2 2 TIME LINE Search The TIME LINE search window is used to find the stored video by using the time line bar ...

Страница 49: ...Search The Event Search window is used to find stored video Figure 4 2 3 Event Search screen When the Event menu is selected the user can see a calendar which has recorded data Select a specific date and the event log will be displayed Press the PLAY button to playback the data or the SAVE button to save the data after selecting the specific data User can find a data of the specific channel and ev...

Страница 50: ...menu Use the mouse or the control button on the remote control to change the date and time value and press the PLAY button after setting If there are not video data in the set date and time the DVR will play the latest video data 4 2 7 Archive Search The ARCHIVE Search window is used to find previously stored video or images Figure 4 2 7 Archive Search Screen When it clicks an Archive menu user ca...

Страница 51: ...e data is saved to text file format 4 3 Play mode During playback of a recorded event the mode changes from SEARCH to PLAY While in PLAY mode you may return to the SEARCH screen by pressing the X button on the status bar or the ESC button of a remote control Figure 4 3 1 PLAY Mode Screen The following status bar hides automatically and appears again when putting a mouse pointer to the bar Table 4 ...

Страница 52: ... Jump Step forward Playback position moves 60 seconds forward Press to fast forward the footage at 1x 2x and 4x speeds Playback speed is indicated as 1x 2x and 4x for normal twice and 4 times of the regular speed at the bottom right of the screen Press to backup the video 5 PTZ Control To control the PTZ functions of the camera select PTZ menu on the screen using the mouse Select the item you wish...

Страница 53: ...return to the main menu Press the PTZ button to escape from the OSD menu AUTOSCAN Press the right key on the control button to start auto scan Press the left key on the control button to stop auto scan PRESET Select the PRESET and press the left key on the control button Then number input window will appear Set the number 3 digits using the number key and press the SEL to set the preset number for...

Страница 54: ...Back up 6 1 Still Image backup onto USB flash memory Still images can be captured and archived onto the USB stick or hard drive in live mode or while playing back recorded video In live mode press the BACKUP button to launch the archive function or select BACK UP menu on the screen using the mouse 1 Select a specific channel which wants to backup on live screen Data Data ...

Страница 55: ...clip 2 If the user selects VIDEO the DVR will ask for the media To use the Huge Backup the external USB HDD has to be mounted 3 After selecting the media the DVR will ask for the channel and the setting of the archiving duration If the huge Backup is selected the duration is from 1 hour to 24 hours 4 After selecting the channels and setting of the duration the system will start to archive the data...

Страница 56: ... to view the still image or the first frame of the selected video 6 Press the BACKUP button to launch the archiving function in playback mode 7 Press CLOSE button to return to the SEARCH window Figure 6 3 1 Archive Search Screen 6 4 Playback of Backup Video NSF format NSF format video can be played back by the player the HD player that the DVR copies on USB thumb drive with video Two folders are c...

Страница 57: ...ory stick Create a new folder in the USB memory stick and name it upgrade Copy the firmware upgrade file xxxxxx bin into the upgrade folder NOTICE A format of the USB stick has to be set to FAT32 The folder on the USB memory stick must be named upgrade After the firmware upgrade file is copied into the USB memory stick connect the USB memory stick to the USB port on the front or rear panel and do ...

Страница 58: ...e scan button Please check the current firmware version and the firmware version which you want to upgrade The system will upgrade automatically when pressing the upgrade button After upgrading the system should be restarted At that time the USB memory stick has to be pulled out on the system 4 You could see the following warning message if you don t pull out the USB memory stick ...

Страница 59: ...pgrade User can upgrade the firmware via Network as follows 1 Go to the Remote Setup menu on the UMS Single UMS Multi or Web Viewer 2 Press the password for admin Just admin is possible to connect to the remote setup menu ...

Страница 60: ... your PC and press the UPGRADE button 4 Then you can see the following progress bar and it would be taken around 150 seconds to upgrade 5 When finishing the upgrade the network streaming would be connected again automatically and you can see the following screen Please check the current F W version if the upgrade is succeeded ...

Страница 61: ...requirements CPU Intel Pentium Ⅳ 1 4Ghz or higher Memory 512MB 1GB or higher is recommended VGA memory 16MB 64MB or higher is recommended Resolution 1024x768 O S Windows 2000 XP Professional XP home Direct X DirectX 8 1 or higher 8 2 Installing the network viewer 1 Insert the provided CD in the CD drive and double click UMSClient XXXX exe 2 Select a destination folder and click Next 3 Select the t...

Страница 62: ...CONNECT Connect disconnect network connection SEARCH Switches the live mode to search mode DISPLAY MODE Select a channel and screen display mode PAN TILT ZOOM FOCUS Control the PAN TILT ZOOM FOCUS features on the remote camera SCAN TOUR MENU CAPTURE Capture a still image from live screen PLAY PAUSE Play pause live video BACKUP ...

Страница 63: ...sferred frames and network bandwidth AUDIO Adjust the volume The audio can be turned on or off by clicking the audio icon LOG WINDOW Operations of the display mode of the main screen Single channel display Click the one of channel button or double click the channel screen QUAD screen display Click the QUAD button to switch to quad screen display Full screen display Click the maximize button to dis...

Страница 64: ...layed 3 Set the conditions and click OK button Then still image is saved 8 4 Bi directional audio The UMS Client allows for bi directional audio between the client and a dvr unit On the PC to use bi directional audio you will need a sound card of handling a microphone and speakers On the dvr side you will need to connect a microphone to the audio in connection and a pair of amplified speakers to t...

Страница 65: ...the selected recorded video as AVI format SEARCH CALENDAR The calendar shows dates with recorded video in a light blue and the selected date in dark blue TIMELINE BAR The timeline shows recorded data in dark blue on the bar PLAYBACK BUTTON The playback buttons DISPLAY MODE Select a channel and screen display mode GO BACK 0 60 To change a time line scale from 24 hours to 60 minutes or vise versa Th...

Страница 66: ...ng the video recorded in the PC Do not connect the network to the DVR 2 Select the date to search the video 3 Drag the slid on the time scale and drop it between 0 to 24 4 Press the PLAY button Then the video recorded in the remote DVR is played back Backup of video in the remote DVR Video recorded in the remote DVR cab be backed up on the PC HDD as AVI format 1 Connect the network to the remote D...

Страница 67: ...up dialog is displayed Click the OK button Then the marked video is backed up Start time Stop time Backup time can be changed File path Shows the folder that the backup file is recorded Channel Shows backup channel 8 6 PC System configuration Click the SETUP button Then the Setup dialog is displayed Setting General Set the Security Option Save Path and Miscellaneous ...

Страница 68: ...ion the client S W will automatically try to connect to the previously connected IP address if the network connection is lost Display network statistics If a user selects this function the client S W will display network status Bit rate and Frame rate Time Format Change the mode the Client software displays the time Setting Site The remote DVRs can be added modified and removed Setting Event Set t...

Страница 69: ...EVENT LIST Select to show the event in the Event List window of live mode Search and check the recorded log data Setting Record Set the recording conditions and select channels to record Select the local disk to use and the amount of disk space you want to allow the program to use for recording ...

Страница 70: ...em to devices on site user may make bi directional audio communication over the network 9 2 Minimum PC requirements Before installing the program check the PC specifications The DVR remote software may not perform correctly if the PC does not meet the minimum requirements 9 3 Installing the program 1 Insert the provided CD in the CD drive and double click UMSMultiClient XXXX exe CPU Intel PentiumⅣ...

Страница 71: ...ct a destination folder and click Next 3 Select the program folder and click Next 4 The setup status screen is displayed 5 After the installation is completed UMS Multi Client icon displays on the desktop screen ...

Страница 72: ...n local PC REMOTE PLAYBACK Click this icon to run a playback window to search and play videos that are recorded in remote DVR SITE MANAGEMENT THUMBNAIL REFRESH Click this icon to refresh and renew thumbnail image of every connected site SITE ADDITION Click this icon to open Site Addition window SITE DELETE Click this icon to delete site from the index window after disconnect a site NET FINDER Sele...

Страница 73: ...nu AUDIO Use the volume control bar to set the audio level MIC Use the micro phone volume control bar to set the micro phone level User can control PAN TILT ZOON FOCUS Camera Preset Scan Tour Menu CHANNEL SPLIT To select the numbers of display channel channels Single quad 9 channels and 16 channels of highlighted site DVR SITE SPLIT To select the numbers of DVR DVRs 1 DVR 4 DVRs 9 DVRs 16 DVRs on ...

Страница 74: ...REMOTE PLAYBACK Click this icon to run a playback window to search and play videos that are recorded in remote DVR Directory window shows site sites that are pre registered CONNECT Click this icon to connect the selected site sites DISCONNECT Click this icon to disconnect the selected site sites SETUP Click this icon to setup configuration of UMS MULTI CLIENT ...

Страница 75: ...Rs 1 DVR 4 DVRs 9 DVRs 16 DVRs on main display screen CHANNEL SPLIT To select the numbers of display channel channels Single quad 9 channels and 16 channels of highlighted site To select the channel to playback The calendar shows dates with recorded video in color To display the recorded data of selected channel or all channels on a time line scale To change a time line scale from 24 hours to 60 m...

Страница 76: ...ath for capturing and backup 9 6 1 2 Save Path Specify the location to save captured still image for Capture and Backup data 9 6 1 3 Miscellaneous Automatic reconnection If a user selects this function client S W will automatically try to connect the finally connected IP address after the network is disconnected Always On Top If a user selects this function client S W will display continuously at ...

Страница 77: ...lways Event or Auto record And you can also select target DVR DVRs and channel channels When you set the recording condition to event you can set event for motion or alarm with duration 9 6 3 2 Record local storage setup You can select the local disk to use and the amount of disk space you want to allow the program to use for recording You can also select the option to overwrite data or stop recor...

Страница 78: ...78 9 6 4 OSD You can select the OSD to be display 9 6 5 Language You can select a language to be display 9 6 6 About About provides network client version information ...

Страница 79: ...e site and press the right Then the following window is displayed Select the Remote Setup Then the setup window is displayed as follows to check the password for admin Just admin is possible to connect to the remote setup menu The specified menu screen is displayed on the upper side of the screen Setting is basically the same as with the DVR menu setting ...

Страница 80: ...e on this remote setup page After setting the value please press the APPLY button Then the value would be applied to the system without the system rebooting RELOAD button is used when user want to bring the value in the system 9 7 2 RECORD ...

Страница 81: ...81 9 7 3 DEVICE ...

Страница 82: ...82 9 7 4 STORAGE 9 7 5 SYSTEM ...

Страница 83: ...83 9 7 6 SECURITY 9 7 7 NETWORK ...

Страница 84: ... displays o Site Name Input a name that properly describes a site o Site Address Input IP address Public IP address of a router that DVR is connected or Domain name that is registered at www bestddns com default DDNS server o Port Number Input port number of DVR default number is 5445 o ID Input ID of DVR o Password Input network password of DVR 2 Click OK button And then the registered site is ad...

Страница 85: ...delete from the directory window 2 Click SITE DELETE button And then the selected site sites is are deleted 9 8 1 3 Modify of sites 1 Select the site sites to modify from the directory window 2 Click NET FINDER button And then the following window displays ...

Страница 86: ...86 3 Click MODIFY button And then the modified information is applied 9 8 2 Connect and Disconnect 9 8 2 1 Connect 1 Select site sites to connect from the directory window ...

Страница 87: ... CONNECT button and then site sites displays display as connected 9 8 2 2 Disconnect 1 Select site sites to disconnect from the directory window 2 Click DISCONNECT button and then selected site sites disconnected ...

Страница 88: ... will be captured 2 Click CAPTURE button And then a Capture window displays 3 Set Save path File Name and File Format And then click OK button 4 Still image is saved as set in Capture window 9 8 4 Recording video on local PC during Live 1 Click SETUP button And then a setup window display 2 Select Record and set the values ...

Страница 89: ...5 Live video data is recorded as set in Record and Disk setup These video data can be searched and play backed with Local Playback 9 8 5 Local Playback and Remote Playback 9 8 5 1 Playback of recorded video on local PC 1 Click LOCAL PLAYBACK button And then Playback Window display over Live Window ...

Страница 90: ...r displays on Search calendar and slide window 4 Move scroll bar on where there is video data and Play button 5 Video data that is recorded on local PC will be play backed 9 8 5 2 Playback of recorded video on remote DVR 1 Click REMOTE PLAYBACK button And then Playback Window display over Live Window ...

Страница 91: ...then Green bar displays on Search calendar and slide window 4 Move scroll bar on where there is video data and Play button 5 Video data that is recorded on a remote DVR is play backed 9 8 6 AVI Backup during playback You can back up the recorded videos in AVI format during playback ...

Страница 92: ...the scale on the target time as the ending time of backup and clicking MARK OUT button Then color of the timeline between the beginning time and ending time will be changed into dark Green 5 Click BACKUP And then the window appears as below 6 You can also set the beginning time and ending time on this window After selecting a channel for backup click the OK button The backup will begin 7 AVI video...

Страница 93: ...e by web browser viewer 1 Check the IP address of the DVR from SETUP SYSTEM DESCRIPTION IP ADDRESS 2 Input the IP address or Domain name address that you pre registered on www bestddns com on the address field and press Go Notice When it does a backup with NSF format user can do a playback using the DVR player The DVR player is installed with the S W in user s PC ...

Страница 94: ... ActiveX control 5 Web Browser Viewer is displayed as bellow 6 Click CONNECT button on the Left upper corner of web viewer Then Connect dialog is displayed Enter IP address or Domain name address that you pre registered on www bestddns com Port number and Password and click Connect ...

Страница 95: ... on SETUP NETWORK PORT ID Input ID of DVR Password Input network password of DVR The number is set on SETUP SYSTEM NETWORK PASSWORD 7 Then the cameras connected to the DVR are displayed on the screen 9 SETUP The menu settings for the DVR unit can be set from a PC via network Refer to the detail of Remote Setup description of UMS Multi Client Please check the detail to the page 77 Remote Setup ...

Страница 96: ...DVR and Router or ADSL modem 1 Default network setting on DVR are Port 5445 WEB Port 80 Network DHCP 2 From PC connected in the same Router find IP address Gateway and Subnet mask by IPCONFIG command in command prompt 3 But if IP is something else like 192 168 x xxx you should change IP address Subnet Gateway on the DVR Go to SETUP NETWORK LAN of the DVR and change the IP settings to be like IP 19...

Страница 97: ...ast number of the port you need to port forward Example 5445 iv Protocol Select Both v IP address Enter the IP address of the DVR on SETUP NETWORK LAN IP ADDRESS vi Enable Check the enable box 7 Select the Save settings button located on the bottom of the window Then Port forwarding is finished Network access beyond a router In order to access the DVR remotely beyond a router firewall the user mus...

Страница 98: ...ddress from SETUP SYSTEM DESCRIPTION of DVR 3 Run network client software and click button 4 Input Site Name Site Address IP address Port No and Password on the connect window And click OK Then press button after checking the left check box Internet ADSL Connection using DDNS Connect to the system using an Router or ADSL modem and an Ethernet cable 10BASE T 100BASE TX CAT 5 LAN cable You can learn...

Страница 99: ... panel of the DVR 4 Open the web browser and log on http www bestddns com MAC Address Input the Mac address EX 0002690XXXXX without any space 5 Domain Name Input Domain Name for your DVR system 6 Click the DUPLICATION CHECK button to see if the domain name is available 7 If you see the screen You can use the Domain name you entered then click RETURN and click REGISTER button to complete the regist...

Страница 100: ...ra Site Name Input the name of the DVR Site Address Input the Domain Name that is registered on http www bestddns com EX XXXXX bestddns com Port Number Input the DVR port number Password Input the network password 10 Press button after checking the left check box of the site that you will access ...

Страница 101: ...ne and search iUMS to the search menu Then download the iUMS application 2 Register your DVR and input the IP address or domain name ID and password Then press Live or Playback mode iUMS supports Live mode Playback mode PTZ camera control Audio and Live Zoom functions ...

Страница 102: ...id and search iUMS to the search menu Then download the iUMS application 2 Register your DVR and input the IP address or domain name ID and password Then press the specific channel More functions such as Playback and etc will be supported to the next version The End ...

Отзывы: