About operating windows
13
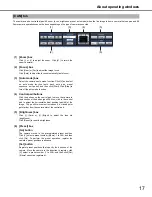
The following operation panel appears when you click the [Setup]
button.
Refer to the Setup Instructions (PDF file) for more information.
(1) [Quick] button
Displays a menu with the minimum settings necessary to
operate the recorder.
(2) [Basic] button
Displays a menu for system and date/time settings
necessary for basic operations of the recorder.
(3) [Emergency rec.] button
Displays a menu for emergency recording settings.
(4) [Event] button
Displays a menu for setting the operations for the occurrence
of each type of event (site alarm, terminal alarm, command
alarm).
(5) [Schedule] button
Displays a menu for setting recording/event action for
specified days and times.
(6) [Camera] button
Displays a menu for setting the network, group, and
sequence of cameras.
(7) [Server] button
Displays a menu for setting the server of recorder.
(8) [Network] button
Displays a menu for setting the network of recorder.
(9) [User mng.] button
Displays a menu for setting authentication.
(10) [Maintenance] button
Displays a menu for setting HDDs.
(11) [Config.] button
Displays a menu for disk information, data encryption
settings, and formatting disks.
(12) [Help] button
Displays the Help window.
[Setup] button
(1)
(2)
(3)
(4)
(5)
(6)
(7)
(8)
(9)
(10)
(11)
(12)
Important:
•
When settings are activated, all logged in users log out.


