background image

6. VL-V900 basic operations

14

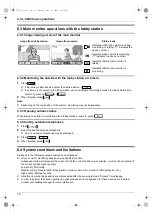
6.3 Main monitor operations with the lobby station

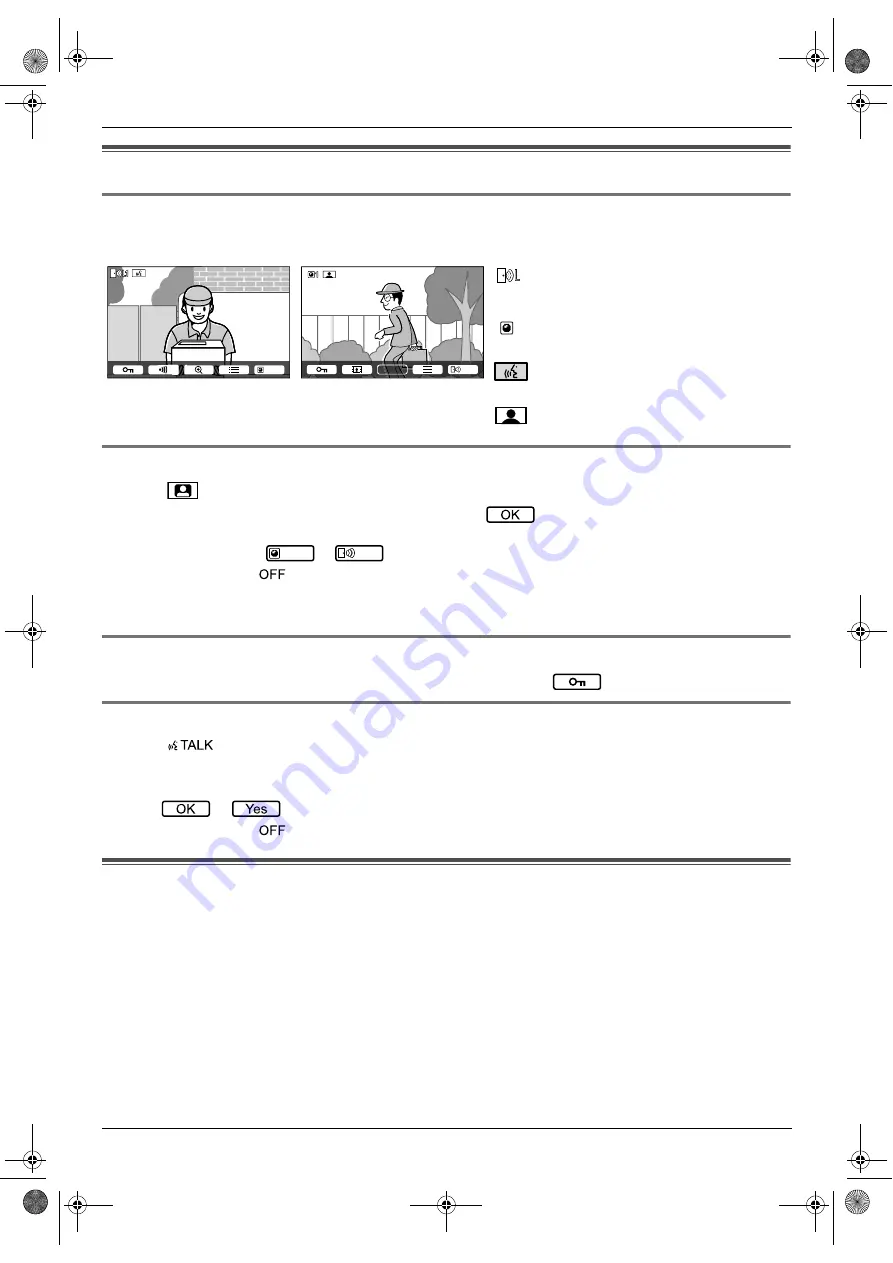
6.3.1 Image viewing screen of the main monitor

6.3.2 Monitoring the outside with the lobby station or camera

1

Press 

M

N

.

R

If there are multiple devices, select the desired device 


.

R

If a camera is connected to the lobby station, you can alternate monitoring between the lobby station and 
camera by pressing 

 or 

.

2

When finished, press 

M

N

.

Note:

R

Depending on the composition of the system, monitoring may not be available.

6.3.3 Opening entrance doors

While talking to a visitor or monitoring with a lobby station or camera, press 

.

6.3.4 Calling extension telephones
1

Press 

M

N

.

2

Select the desired extension telephone.

R

Up to 4 extension telephones may be displayed.

3

Press  


.

4

When finished, press 

M

N

.

6.4 System conditions and limitations

Please note the following system conditions and limitations.

R

Only one call or monitoring session can be handled at a time.
Subsequent calls will disconnect the current call (if the current call has lower priority), or will not be connected (if 
the current call has higher priority).
Low priority: Monitoring
Medium priority: General calls (lobby station to main monitor, main monitor to PBX extension, etc.)
High priority: Emergency calls

R

All calls and monitoring sessions are disconnected after the pre-programmed "timeout" time elapses.

R

In order to perform the above operations, optional devices and configuration for those devices are required. 
Contact your building manager for more information.

Image from lobby station

Image from camera

Status icons

Indicates which lobby station is calling, 
monitoring, or talking. ("1" indicates the 

device number.)
Indicates which camera is monitoring. 

("1" indicates the device number.)

Indicates that the main monitor is 

talking.

Indicates that the main monitor is 

monitoring.

Camera

1

1

Lobby

1

1

1

Camera

Lobby

273_iiqg.book  Page 14  Tuesday, April 25, 2017  10:48 AM

Содержание VL-MWD273

Страница 1: ...onsible in the event that property loss occurs while this system is in operation Thank you for purchasing a Panasonic product Please read this document before using the product and save it for future reference Carefully read the information found in the section titled For your safety in particular VL MWD273 VL SWD273 VL SVD273 Model Name Model No Video Intercom System Wireless Video Intercom Syste...

Страница 2: ...n 1 2 1 Supplied accessories For the sub monitor Note R Accessories for installing the main monitor and the doorphone are described in the supplied Installation Guide Model composition Main Monitor Station 1 Main monitor 2 Wireless monitor station Sub monitor 2 Door Station Doorphone 2 VL SWD273 VL MWD273 VL WD613 VL V554 VL SVD273 VL MWD273 VL V554 VL MWD273 VL MWD273 Accessory item AC adaptor PN...

Страница 3: ...site and find the document https panasonic net cns pcc support intercom v900 For Europe Declaration of Conformity R Panasonic Corporation declares that the radio equipment type VL MWD273BX is in compliance with Directive 2014 53 EU The full text of the EU declaration of conformity is available at the following internet address http www ptc panasonic eu doc Contact to Authorised Representative Pana...

Страница 4: ...tration of the corresponding soft key icon is used Navigator key sub monitor only Either referred to by name or with a black and white illustration R Use the navigator key to select R Press to select R Select Procedures Usually written in an abbreviated style The verb may be omitted Unless otherwise stated all procedures are for both the main monitor extension monitor and sub monitor Main monitor ...

Страница 5: ... process of any parts of the product R Completely insert the AC adaptor and AC cable plug into the power outlet Failure to do so may cause electric shock and or excessive heat resulting in a fire Do not use damaged AC adaptor AC cable plug or power outlets R Regularly remove any dust etc from the AC adaptor and AC cable plug by unplugging them from the power outlets then wiping them with a dry clo...

Страница 6: ...cial disposal instructions SAVE THESE INSTRUCTIONS 2 3 For best performance Location avoiding noise main monitor sub monitor The main monitor sub monitor and other compatible Panasonic units use radio waves to communicate with each other The product operates in the frequency range of 1 88 GHz and 1 90 GHz with a peak transmission power of 250 mW max R For maximum coverage approx 100 m and noise fr...

Страница 7: ... resulting from the loss or alteration of recorded images Requesting repairs for the product R Before submitting the main monitor extension monitor and sub monitor for repair initialize them This will delete all information saved in the main monitor extension monitor and sub monitor 1 R Even if the product is sent for repairs without being initialized the memory including recorded data and setting...

Страница 8: ...Soft key icons B Soft keys Icons indicate the functions that can be operated by the soft keys 3 1 3 Sub monitor A Display page 9 B Multifunction buttons C Monitor button M N D Charge indicator page 10 E Antenna built in R Do not cover the antenna This may weaken radio waves F Speaker G Page button M N H OFF button M N I TALK button M N J Microphone A Lens cover B LED lights C Name plate supplied a...

Страница 9: ...monitoring or on a call with another device Indicates that the main monitor is on a call Indicates that a doorphone and a PBX extension are talking Indicates that the main monitor is monitoring Indicates that images are being recorded Indicates that the doorphone s LED lights are on Indicates that Press to talk mode is on 1 1 1 P P A B 1 ࠉ ࠉ ࠉ ە 5 5 ە 5 A Battery level Range status The more bars d...

Страница 10: ... 1 week or more remove the batteries in order to maintain battery performance and prevent the batteries from discharging 3 5 Setting the language date and time R The play lamp lights if these settings are not configured 1 Press the M N button to turn on the display 2 Press or to select the desired language 3 Press 4 Press again 5 Set the date and time R Press to select an item i e year month day e...

Страница 11: ... multiple doorphones select the desired doorphone R The images from the doorphone are displayed 2 Monitor the sound and image R You can talk to the monitored party by pressing M N 3 When finished press M N 4 4 Recording manually recording while monitoring The main monitor extension monitor and sub monitor can manually record 8 images while monitoring R Main monitor extension monitor While monitori...

Страница 12: ...Select Register R When you are prompted to register your main monitor select Main monitor 3 Select Extension monitor 4 Select the registration number of the extension monitor to be registered 5 Extension monitor Press M N select Register Cancel 6 Select Register R When you are prompted to register your extension monitor select Extension monitor 7 Select the registration number of the extension mon...

Страница 13: ...tom of the screen 3 Press M N or M N to search for the desired name 4 Press M N to call Searching through all names 1 Press M N 2 Press M N or M N to search for the desired name 3 Press M N to call Switching the image displayed on the main monitor While talking to the main monitor press M N to switch the image displayed on the main monitor from the lobby station to the camera To return to the lobb...

Страница 14: ... conditions and limitations R Only one call or monitoring session can be handled at a time Subsequent calls will disconnect the current call if the current call has lower priority or will not be connected if the current call has higher priority Low priority Monitoring Medium priority General calls lobby station to main monitor main monitor to PBX extension etc High priority Emergency calls R All c...

Страница 15: ... 116 100 54 VL PS241 Approx 104 100 54 excluding protruding sections Mass weight VL PS240 Approx 230 g VL PS241 Approx 215 g Operating environment Ambient temperature approx 0 C to 40 C Relative humidity non condensing up to 90 Installation method Attach to DIN rail Power source Power supplied by the main monitor 20 V DC 0 23 A Dimensions mm height width depth Approx 169 118 30 excluding protrudin...

Страница 16: ...with a moist cloth Important R Do not use any cleaning products that contain alcohol polish powder powder soap benzine thinner wax petroleum or boiling water Also do not spray the product with insecticide glass cleaner or hair spray This may cause a change in colour or quality of the product Cleaning the charger For safety disconnect the charger from the power supply before cleaning Cleaning the s...

Отзывы: