


Advanced
M a i n m e n u
P i c t u r e m e n u
S o u n d m e n u
S e t u p m e n u
Access
Q-Link
Control with HDMI
Off timer
Tuning menu
Owner ID
Shipping condition
Setup menu
AV2
On
AV2 out
Monitor
Off
Power on preference
TV
Teletext
FASTEXT
Side panel
Off
Power save
Off
Programme edit
Auto setup
Manual tuning
Tuning menu
Access
Fine tuning
STR
F
- /
+ /
TV / AV
CH12
1
Manual tuning (Front panel)
01 99:21 41
-, +
: Search
TV / AV : Move cursor
STR
: To store
F :
To
exit
Ad
Delete
d
Download
Move
Programme edit
Prog.
Chan.
Name
Lock
2 :
4 :
5 :
CH51
CH47
CH37
Off
Off
Off
XYZ
1 :
CH44
Off
ABC
123
456
:
3
CH41
Off
FTP
Programme edit
Prog.
ABCDEFGHIJKLMNOPQRST
-. 0123456789
Chan.
Name
Lock
1 :
2 :
3 :
4 :
5 :
CH44
CH51
CH41
CH47
CH37
Off
Off
Off
Off
Off
XYZ
FTP
123
456
Programme edit
Prog.
Chan.
Name
Lock
1 :
2 :
3 :
4 :
5 :
CH44
CH51
CH41
CH47
CH37
ABC
XYZ
FTP
123
456
Off
Off
Off
Off
Off
All current tuning
data will be erased
WARNING
Exit
Return
Start Auto Setup
AUTO SETUP IN PROGRESS
SEARCHING : PLEASE WAIT
01 99:21 41
CH12
Exit
Return
Manual tuning
01 99:21 41
CH12
1
Exit
Search down/up
Return
Direct entry
Store
C
0
9
3 FTP
TV
22
23
(Press repeatedly until "Tuning mode" appears)
or
(Access "Manual tuning")
(Select programme position or channel number)
•
Selected item will
fl
ash.
or
(Change programme position or start searching channels)
(Store)
- (Repeat)
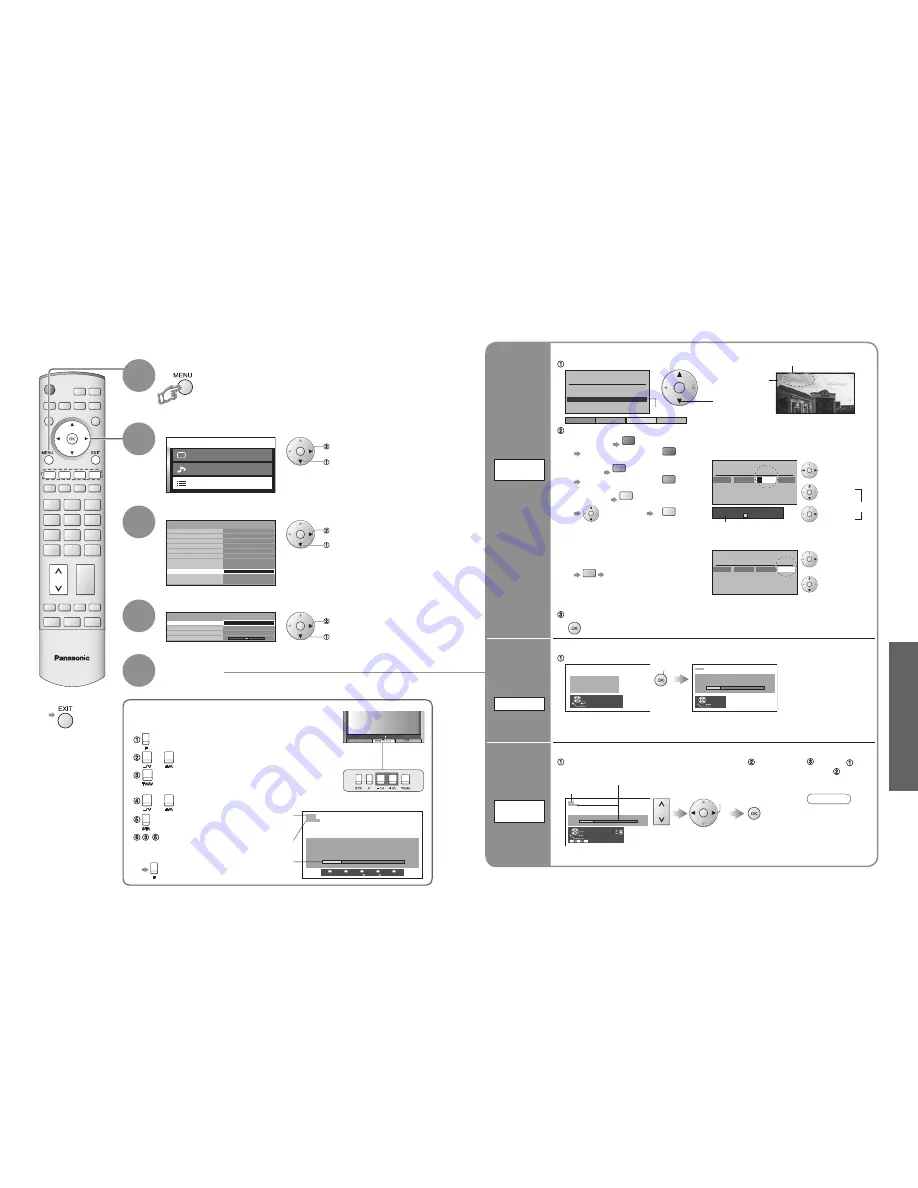
Editing and Setting Channels
Select "Setup menu"
Select "Tuning Menu"
3
Select the function
4
Display the menu
5
How to set
For Manual tuning, using the buttons on
the front of the set
("Manual tuning" on p. 7)
Programme
position (
fl
ash)
Channel number
(
fl
ash)
Channel
The channel settings can be changed according to your needs and reception conditions.
■
To return to TV
■
To return to TV
(Manual tuning screen)
Edit
channels
■
Delete
■
Add
■
Move
■
Change
name
■
Lock
■
Download to
equipment
Programme
edit
Set
automatically
Auto setup
Set
manually
Manual
tuning
■
To download channel
information to a Q-Link
compatible equipment
connected to the unit
blue
Automatically
transmitted
(for a few sec.)
•
For details (p. 30)
■
To lock
■
To change the name of the broadcaster
displayed when selecting channels
Cursor
Usable characters
Select the
"Name"
fi
eld
Select the
character
To next
character
Repeat
Select the
"Lock"
fi
eld
Select "On"
Start Auto setup
start
Settings are made automatically
Select the programme position
and search through the channel
Store
Programme
position
Channel
Repeat
and
Select the channel to edit
Note
•
If a VCR is
connected with
only the RF
cable, select
programme
position "0".
Channel
Name
Edit
•
You cannot select the channel with numeric
buttons or the "C" button when locked.
Store
•
The settings are
downloaded to a Q-Link
compatible equipment
connected to the unit.
•
All previous settings are
erased.
•
No data is stored if an
Auto setup sequence is
interrupted.
•
The
programme
position
blinks.
Automatically set the channels received in the area
To freely change settings after Auto setup
■
To delete
red
After con
fi
rming, press
red
■
To add
green
After con
fi
rming, press
green
■
To move
yellow
Select new
position
yellow
•
Editing and Setting Channels
Edit the programme position settings
•
When the operation is completed,
the broadcast of programme
number "1" will appear.
"Off" to
unlock
)
(
1
2
access
select
access
select
access
select
select
search


