background image

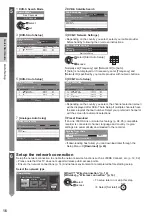
 Auto Setup

 Quick Start Guide

18

 6


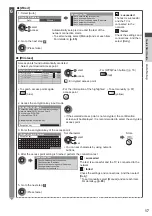
  [WPS(Push button)]

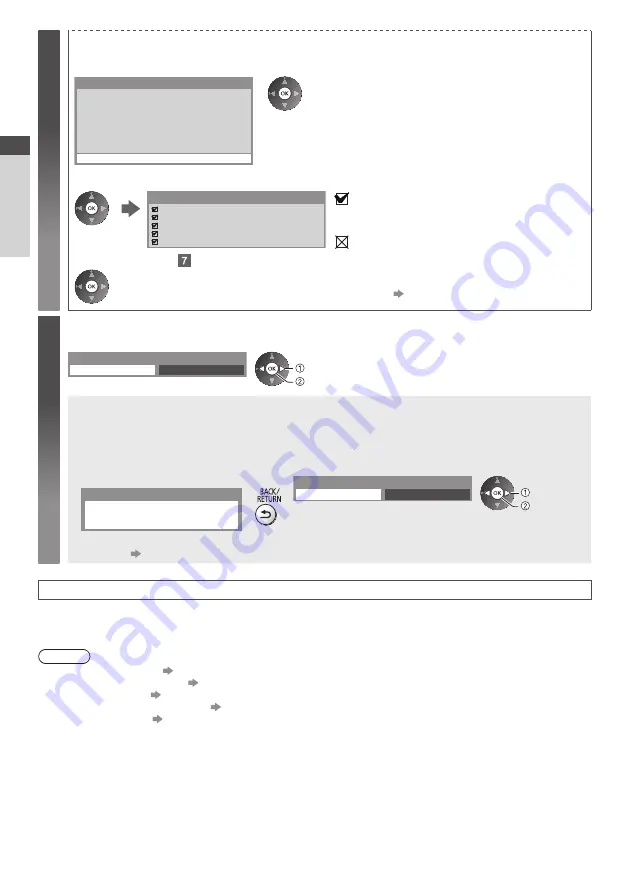
 1.  Press the WPS button on the access point until the light flashes
 2.  Connect the TV with the access point


1) Please press the ‘WPS’ button on the wireless 

access point until its light flashes.

2) When the light is flashing select ‘Connect’ on 

TV.

If you are unsure, please check the instruction 

manual of the wireless access point.

 WPS(Push button)

 Connect


 Ensure that your access point supports WPS for this setup.


 WPS: Wi-Fi Protected Setup™


 If the connection has failed, check the settings and positions of 
your access point. And then, follow the on-screen instructions.

 3.  After the access point setting is finished, perform the connection test


 Check wireless network connection.

 Check acquired IP address.

 Check for devices using same IP address.

 Check gateway connection.

 Check server connection.

 Connection Test


 :  succeeded

 The test is successful and the TV is connected to the 
network.


 :  failed

 Check the settings and connections. And then select 
[Retry].


 To set manually, select [Manual] and set each item. 
For details 

 (p. 85)

 4.  Go to the next step 


 (Press twice)

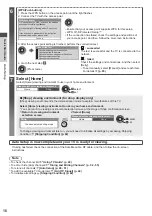
 7


 Select [Home]

 Select [Home] viewing environment to use in your home environment.


 Please select your viewing environment.

 Home

 Shop


   select
   set


 [Shop] viewing environment (for shop display only)

 [Shop] viewing environment is the demonstration mode to explain main features of this TV.

 Select [Home] viewing environment to use in your home environment.


 You can return to viewing environment selection screen at the stage of Shop confirmation screen.

 1

  Return to viewing environment 

selection screen

 2

  Select [Home]


 Please select your viewing environment.

 Home

 Shop


   select
   set


 Shop

 You have selected shop mode


 To change viewing environment later on, you will need to initialise all settings by accessing Shipping 
Condition. 

 [Shipping Condition] (p. 62)

 Auto Setup is now complete and your TV is ready for viewing.

 If tuning has failed, check the connection of the Satellite cable, RF cable, and then, follow the on-screen 
instructions.

 Note


 To check the channel list   

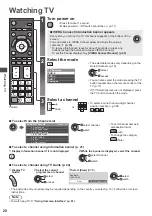
“Using TV Guide” (p. 24)


 To edit or hide (skip) channels   

“Tuning and Editing Channels” (p. 52 - 55)


 To retune all channels 

 [Auto Setup] (p. 48 - 51)


 To add the available TV mode later 

  [Add TV Signal] (p. 44)


 To initialise all settings 

 [Shipping Condition] (p. 62)

Содержание TX-P42GT50E

Страница 1: ... these instructions carefully before operating this product and retain them for future reference The images shown in this manual are for illustrative purposes only Please refer to Pan European Guarantee Card if you need to contact your local Panasonic dealer for assistance English Model No TX P42GT50Y TX P50GT50Y ...

Страница 2: ... AVC H 264 digital cable services and DVB S MPEG2 and MPEG4 AVC H 264 digital satellite services Consult your local dealer for availability of DVB T T2 or DVB S services in your area Consult your cable service provider for availability of DVB C services with this TV This TV may not work correctly with the signal which does not meet the standards of DVB T T2 DVB C or DVB S Not all the features are ...

Страница 3: ...n to obtain such permission on your behalf It is your responsibility to ensure that your use of this or any other device complies with applicable copyright legislation in your country Please refer to that legislation for more information on the relevant laws and regulations involved or contact the owner of the rights in the content you wish to record or playback This product is licensed under the ...

Страница 4: ...r as live parts are accessible when it is removed There are no user serviceable parts inside High voltage components may cause serious electrical shock Have the TV checked adjusted or repaired at your local Panasonic dealer Do not expose to direct sunlight and other sources of heat Avoid exposing the TV to direct sunlight and other sources of heat To prevent the spread of fire keep candles or othe...

Страница 5: ...es Irreversible damage can be caused Do not apply strong force or impact to the display panel This may cause damage resulting in injury The TV is heavy Handle the TV by 2 or more people Support as shown to avoid injury by the TV tipping or falling Built in wireless LAN To use the built in wireless LAN an access point needs to be obtained Do not use the built in wireless LAN to connect to any wirel...

Страница 6: ...0 vertical to 20 degrees TX P42GT50Y 10 degrees TX P50GT50Y Rear of the TV Holes for wall hanging bracket installation 400 mm Depth of screw minimum 10 mm maximum 16 mm Diametre M8 300 mm View from the side Screw for fixing the TV onto the wall hanging bracket not supplied with the TV Warning Using other wall hanging brackets or installing a wall hanging bracket by yourself have the risk of person...

Страница 7: ...the pedestal Otherwise the TV may fall over and become damaged and personal injury may result Caution Do not use any pedestal other than the one provided with this TV Otherwise the TV may fall over and become damaged and personal injury may result Do not use the pedestal if it becomes warped or physically damaged If you use the pedestal while it is physically damaged personal injury may result Con...

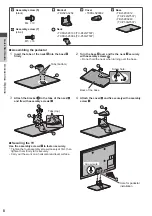
Страница 8: ...and fix the neck securely with assembly screws Do not hold the neck when turning over the base B F Back of the base Screw hole F D Tabs bottom 3 Attach the bracket to the tabs of the neck and fix with assembly screws 4 Attach the cover and fix securely with assembly screw B C D Tabs top E A Securing the TV Use the assembly screws to fasten securely Tighten the four assembly screws loosely at first...

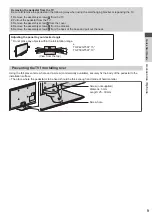
Страница 9: ...t 5 Remove the assembly screws from the back of the base and pull out the neck Adjusting the panel to your desired angle Do not place any objects within the full rotation range View from the top TX P42GT50Y 15 TX P50GT50Y 10 Preventing the TV from falling over Using the fall prevent screw hole and a screw commercially available securely fix the body of the pedestal to the installation surface The ...

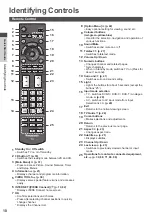
Страница 10: ...een yellow blue Used for the selection navigation and operation of various functions 10 Sound Mute Switches sound mute on or off 11 Teletext p 27 Switches to teletext mode 12 Volume Up Down 13 Numeric buttons Changes channel and teletext pages Sets characters When in Standby mode switches TV on Press for about 1 second 14 Surround p 41 Switches surround sound setting 15 Light Lights the buttons fo...

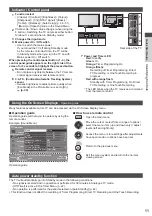
Страница 11: ...ed for the period selected in Auto Standby p 42 This function does not affect the recording of Timer Programming Direct TV Recording and One Touch Recording 1 Function select Volume Contrast Brightness Colour Sharpness Tint NTSC signal Bass Treble Balance Auto Setup p 48 51 Music or Speech mode in the Sound Menu 2 Channel Up Down Value change when using the F button Switching the TV on press eithe...

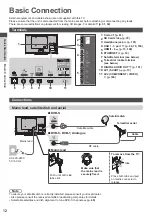
Страница 12: ...w 8 Terrestrial cable terminal see below 9 DIGITAL AUDIO OUT p 101 10 AV1 SCART p 13 11 AV2 COMPONENT VIDEO p 100 Connections Mains lead satellite dish and aerial Cable DVB C DVB T Analogue AC 220 240 V 50 60 Hz Mains lead Terrestrial aerial RF cable Mains lead Push until both side tabs click Make sure that the mains lead is securely fixed To remove from the TV tabs Press both tabs and pull on mai...

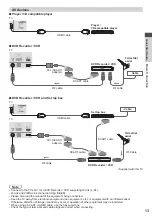
Страница 13: ...rial aerial RF cable RF Cable Supplied with this TV Cable Note Connect to the TV s AV1 for a DVD Recorder VCR supporting Q Link p 94 Q Link and VIERA Link connection p 92 93 Please also read the manual of the equipment being connected Keep the TV away from electronic equipment video equipment etc or equipment with an infrared sensor Otherwise distortion of image sound may occur or operation of oth...

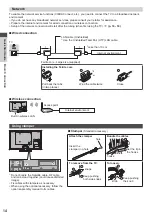
Страница 14: ...ielded Use the Unshielded Twist Pair UTP LAN cable Ferrite core Large size supplied Installing the Ferrite core Pull back the tabs in two places Wind the cable twice Close Wireless connection Internet environment Access point Built in wireless LAN Using clamper Clamper Standard accessory Attach the clamper Bundle the cables hole Insert the clamper in a hole hooks Set the tip in the hooks To remove...

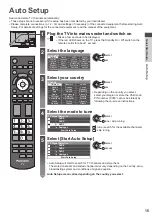
Страница 15: ... Română Lietuvių Nederlands select set 3 Select your country Country Germany Denmark Poland Austria Sweden Czech France Norway Hungary Italy Finland Slovakia Spain Luxembourg Slovenia Portugal Belgium Croatia Switzerland Netherlands Estonia Malta Turkey Lithuania Andorra Greece Others select set Depending on the country you select select your Region or store the Child Lock PIN number 0000 cannot b...

Страница 16: ...nel BBC Radio Wales E4 100 62 100 Cartoon Nwk Searching CH Channel Name Type Free TV Free TV Free TV Free TV Quality Free TV 4 Pay TV 0 Radio 0 DVB T Auto Setup Progress This will take about 3 minutes Depending on the country you select the channel selection screen will be displayed after DVB T Auto Setup if multiple channels have the same logical channel number Select your preferred channel or ex...

Страница 17: ...t manually p 87 yellow 2 Access the encryption key input mode Encryption Key Setting Security type WPA PSK Encryption type TKIP Please input the encryption key Encryption key Connection will be made with the following settings Network Name SSID Access Point A If the selected access point is not encrypted the confirmation screen will be displayed It is recommended to select the encrypted access poi...

Страница 18: ...h item For details p 85 4 Go to the next step Press twice 7 Select Home Select Home viewing environment to use in your home environment Please select your viewing environment Home Shop select set Shop viewing environment for shop display only Shop viewing environment is the demonstration mode to explain main features of this TV Select Home viewing environment to use in your home environment You ca...

Страница 19: ...ck to the previous level select BACK To return to VIERA Connect home screen To exit from VIERA Connect To set the VIERA Connect introduction banner display off VIERA Connect Banner p 45 Setup menu Items in Setup may change without notice Customize HomeScreen Changes the position of each services on VIERA Connect home screen My Account Confirms or removes the account information of the TV you enter...

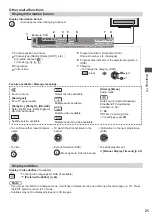
Страница 20: ...s not displayed press the TV button to switch the mode 3 Select a channel up down or To select a more than two digit channel position number e g 399 To select from the Channel List 6 Cartoon Nwk 7 BBC Radio Wales 8 BBC Radio Cymru 1 BBC ONE Wales 2 BBC THREE 3 BBCi 4 CBBC Channel All DVB T Channels Sorting 123 select channel watch To sort channel names in alphabetical order red To change the categ...

Страница 21: ...C Dolby Digital Plus Dolby Digital or HE AAC audio track Subtitle service available Teletext service available Multiple audio available Multiple video available Multiple audio and video available Stereo Mono Audio mode Data service Hybrid Broadcast Broadband TV application available p 60 1 90 Off Timer remaining time For settings p 22 To confirm another tuned channel name To watch the channel list...

Страница 22: ...d appear if available Teletext Character Set Sets the teletext language font p 45 Teletext Language DVB Selects between alternative language for teletext if available MPX Analogue Selects multiplex sound mode if available p 41 Volume Correction Adjusts volume of individual channel or input mode Safely remove USB Takes this operation to remove the connected USB device safely from the TV Off Timer T...

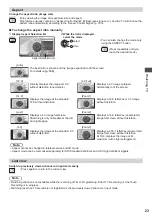
Страница 23: ...zontally to fit the screen 14 9 Zoom1 Displays the image at the standard 14 9 without distortion Displays a 16 9 letterbox or 4 3 image without distortion Just Zoom2 Displays a 4 3 image full screen Stretching is only noticeable at the left and right edges Displays a 16 9 letterbox anamorphic image full screen without distortion 4 3 Zoom3 Displays the image at the standard 4 3 without distortion D...

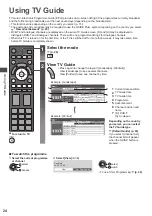
Страница 24: ... 21 00 21 00 22 00 22 00 23 00 23 00 23 30 Das Erste DIY SOS The Bill Red Cap Live junction POP 100 D BBC ONE 1 D BBC THREE 7 D E4 14 D BBC FOUR 70 TV Guide Portrait Wed 26 10 2011 10 46 Wed 26 10 2011 All Types All Channels Example Landscape Example Portrait Das Erste DIY SOS The Bill Red Cap 19 30 20 00 20 30 21 00 The Bill Good bye Hot Wars Holiday Program Pepsi Char Emmerdal 10 O clock News BB...

Страница 25: ...elect the programme 2 View details Press again to return to TV Guide View advertisement Depending on the country you select this TV supports the GUIDE Plus system in DVB T or Analogue mode The postcode entry or update is required Follow the on screen instructions You can also setup manually from the Setup Menu Update Postcode in GUIDE Plus Settings p 46 Enter your postcode when using this function...

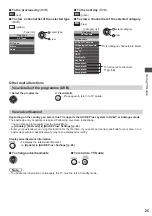
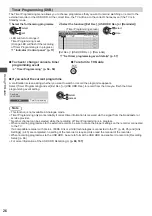
Страница 26: ...f you select the current programme A confirmation screen asking whether you want to watch or record the programme appears Select Timer Programming and set Ext Rec or USB HDD Rec to record from the time you finish the timer programming event setting Das Erste 19 30 20 00 View Timer Programming select access Note This function is not available in Analogue mode Timer Programming only works reliably i...

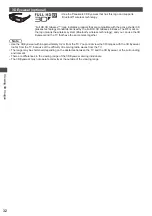
Страница 27: ...p down red green To select among subject blocks blue To select next subject within the subject block After the last subject it moves to the next subject block yellow What is List mode In List mode four differently coloured page numbers are situated at the bottom of the screen Each of these numbers can be altered and stored in the TV s memory Store frequently viewed pages p 28 To change mode Telete...

Страница 28: ... number press and hold View sub page View sub page Only when Teletext is more than one page Appears at top of the screen The number of sub pages varies depending on the broadcasters up to 79 pages It may take some time for searching during which time you can watch TV To view specific sub page blue Enter the 4 digit number Example P6 Watch TV while waiting for update View the TV picture while searc...

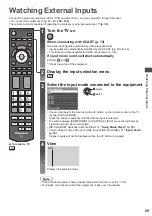
Страница 29: ...lection menu 3 Select the input mode connected to the equipment Input Selection AV2 AV1 SD Card USB TV HDMI4 HDMI3 HDMI2 HDMI1 select watch You can also select the input using the AV button on the remote control or the TV except SD Card USB Press the button repeatedly until the desired input is selected To switch between COMPONENT and VIDEO in AV2 move the indicator by pressing left and right curs...

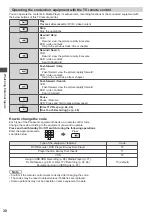
Страница 30: ...ure rapidly forward DVD video content Search forward Pause Pause Resume DVD Press and hold to play at slow speed Direct TV Rec p 94 96 One Touch Recording p 68 How to change the code Each type of the Panasonic equipment has its own remote control code Change the code according to the equipment you want to operate Press and hold Standby On Off switch during the following operations Enter the approp...

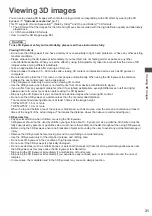
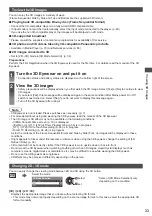
Страница 31: ... differences in left and right please ensure to correct your vision before using the 3D Eyewear Stop using the 3D Eyewear if you can clearly see double images when viewing 3D content Do not use the 3D Eyewear at a distance less than the recommended distance The recommended viewing distance is at least 3 times of the image height TX P42GT50Y 1 6 m or more TX P50GT50Y 1 9 m or more When the top and ...

Страница 32: ...eless technology and you can use the 3D Eyewear and the TV that have the same mark together Note Use the 3D Eyewear within approximately 3 2 m from the TV You cannot view the 3D images with the 3D Eyewear too far from the TV because of the difficulty of receiving radio waves from the TV The range may be shortened depending on the obstacles between the TV and the 3D Eyewear or the surrounding envir...

Страница 33: ...message again Turn off the 3D Eyewear after using it Note 3D Eyewear is not included Please purchase as necessary p 7 For more detail about using and wearing the 3D Eyewear read the manual of the 3D Eyewear The 3D image or 3D effect may not be available in the following conditions VIERA Connect home screen p 19 is displayed Ext Rec or LT1 LT2 of Timer Programming p 56 is in progress LT1 LT2 of One...

Страница 34: ...nto 3D Please note the 3D images appear slightly different from the originals Using this function for profit making purposes or publically showing images converted from 2D to 3D in places such as shops or hotels etc may infringe on the rights of the copyright holder protected under copyright law Table of images that can be seen for each 3D Mode Selection Manual and the source image format If the p...

Страница 35: ...s the BACK RETURN button to go to Effect setting Effect Adjusts the 3D depth according to the contents or to your preference Picture Sequence Select Reverse if you feel that the sense of depth is unusual except in 2D 3D mode Normal Reverse Edge Smoother Set to On if you feel the contoured parts of an image are not smooth enough except in 2D 3D mode Off On 3D Detection Automatically detects the 3D ...

Страница 36: ...each feature VIERA Link p 96 99 Photo p 72 Video p 76 Recorded TV p 77 Music p 80 VIERA Connect p 19 82 Media Server p 88 When two or more available devices are connected a selection screen will be displayed Please select the correct description and access Note If the selected feature is not available the demonstration to explain how to use it can be displayed Press the OK button to view the demon...

Страница 37: ...djust using the slide bar 5 Sharpness Moved change store Go to the next screen Child Lock Access Displays the next screen access To return to TV at any time To return to the previous screen To change menu pages up down Enter characters by free input menu You can enter names or numbers freely for some items A B C D E F G H I J K L M N O P Q R S T U V W X Y Z 0 1 2 3 4 5 6 7 8 9 a b c d e f g h i j ...

Страница 38: ...Professional2 may be displayed as isf Day and isf Night In each Viewing Mode Contrast Brightness Colour Sharpness Tint Colour Balance Vivid Colour Colour Remaster Eco Mode P NR and 3D COMB can be adjusted and stored for each input Additionally you can adjust and setup the detailed settings when Advance isfccc in the Setup Menu is set to On p 46 You can set Viewing Mode in 2D and 3D mode for each T...

Страница 39: ... Settings 1080p Pure Direct Reproduces the original image quality in detail for 1080p HDMI input signal Off On Not valid on 3D mode Intelligent Frame Creation Automatically compensates the picture frame rate and removes juddering movements to make the images smooth Off Min Mid Max Depending on the contents images may be noisy To prevent the noise change the setting Not valid when Viewing Mode is s...

Страница 40: ...he image to prevent panel image retention Auto On Auto Automatically works only for the appropriate images and you rarely recognise the wobbling Scrolling Bar Displays scrolling bar pattern to assist elimination of panel image retention Press the OK button to start scrolling and press any buttons except Standby to exit this mode For positive effect to eliminate image retention it may be necessary ...

Страница 41: ...ow frequency sound due to the distance between the speakers and the wall Over 30cm Up to 30cm If the back space between the TV and wall is over 30 cm Over 30cm is recommended If the back space between the TV and wall is within 30 cm Up to 30cm is recommended MPX Selects multiplex sound mode if available Stereo Use this normally Mono When stereo signal cannot be received M1 M2 Available while mono ...

Страница 42: ...ARC function terminals if the sound does not synchronise the image For DVB mode Reset to Defaults Press the OK button to reset the current Sound Mode Balance Headphone Volume and Surround to the default settings Network Connection Test Network Connection Wireless Network Settings IP DNS Settings Sets the network setting to use in your network environment p 85 86 Network Link Settings Sets to contr...

Страница 43: ... to Q Link TV AV2 Monitor Monitor Image displayed on screen Component and HDMI signals cannot be output Power on Link Sets to use Power on Link function Off On p 94 95 Power off Link Sets to use Power off Link function Off On p 94 95 Standby Power Save Controls the connected equipment to reduce power consumption in Standby Off On p 96 This function is available when VIERA Link is set to On and Pow...

Страница 44: ...One LNB MiniDiSEqC DiSEqC 1 0 Single Cable p 48 This TV supports DiSEqC Version 1 0 For DVB S mode LNB Configuration Selects the satellite for each LNB p 48 For DVB S mode Attenuator Automatically reduces the DVB C signal to avoid the interference Off On If the DVB C signal is too strong the interference may occur In this case set to On to reduce the signal automatically Add TV Signal Adds the TV ...

Страница 45: ...ation and selection in TV Selection p 20 Input Selection p 29 or banner To name each input mode freely select User input and set characters maximum 10 characters To skip the input mode select Skip Banner Display Timeout Sets how long the Information banner stays on screen 0 No display 1 2 3 4 5 6 7 8 9 10 seconds VIERA Connect Banner Sets the VIERA Connect introduction banner display Off On p 19 2...

Страница 46: ...rmation System Information Displays the system information of this TV Device Information Displays the device information of this TV Other Settings GUIDE Plus Settings Update Performs the update of the GUIDE Plus schedule and advertising information for the GUIDE Plus system only available in some countries p 25 Postcode Sets your postcode to display advertisements in the GUIDE Plus system only ava...

Страница 47: ...DVB S Channel List settings using the SD Card to share the same settings with VIERA which has the same function The settings in Tuning Menu are applicable only for the selected TV mode The menu name varies depending on the TV mode DVB S Tuning Menu DVB C Tuning Menu DVB T Tuning Menu Analogue Tuning Menu A different menu will be displayed when Advance isfccc in the Setup Menu is set to On or in th...

Страница 48: ... 3 Select DVB S Tuning Menu DVB S Tuning Menu Access select access 4 Set Antenna System and LNB Configuration Antenna System DiSEqC 1 0 LNB Configuration Access DVB S Tuning Menu 1 Select Antenna System and set You can receive several satellites if you have DiSEqC control antenna system Antenna System DiSEqC 1 0 DVB S Tuning Menu select access store This TV supports DiSEqC Version 1 0 One LNB Comp...

Страница 49: ...t Eurobird at 25 5 East Astra at 23 5 East Eutelsat at 21 5 East Astra at 19 2 East Eutelsat at 16 East Hot Bird at 13 East Eutelsat at 10 East Eurobird at 9 East Eutelsat at 7 East Astra at 4 8 East Thor at 0 8 West Intelsat at 1 West Amos at 4 West Atl Bird at 5 West Atl Bird at 7 West Atl Bird at 8 West Atl Bird at 12 5 West Telstar at 15 West NSS at 22 West Intelsat at 24 5 West Hispasat at 30...

Страница 50: ... Setup Settings Quick Auto Auto Auto Start scan select access store After settings select Start scan Scan Mode Full Scans the whole frequency range Quick Scans the suitable frequency in your country Normally set Frequency Symbol Rate and Network ID to Auto If Auto is not displayed or if necessary enter the value specified by your cable provider with numeric buttons 6 Start Auto Setup Settings are ...

Страница 51: ...g CH Channel Name Analogue 2 Analogue Auto Setup Scan This will take about 3 minutes The channel language and country region settings are downloaded to Q Link or VIERA Link compatible equipment connected to the TV When the operation is completed the channel at the lowest position will be displayed Auto setup using the buttons on the TV For Auto Setup using the buttons on the TV p 11 1 Press the F ...

Страница 52: ...p 48 51 List favourite DVB channels Favourites Edit Create your favourite channel lists from various broadcasters up to 4 Favourites 1 to 4 The DVB Favourites lists are available from Category in the Information banner p 21 and the TV Guide screen p 24 1 Select a channel to list Encrypted channel Example DVB C 1 BBC One Wales 7 BBC THREE 14 E4 CBBC Channel 70 72 Cartoon Nwk 105 719 720 BBCi BBC Ra...

Страница 53: ...BBC Channel 72 Cartoon Nwk 105 BBCi 719 BBC Radio Wales 720 BBC Radio Cymru 1 BBC ONE Wales 7 BBC THREE All DVB C Channels Sorting 123 select Reveal Hide To reveal all channels yellow Reveal Hide skip To sort channel names in alphabetical order DVB red To change the category DVB blue To edit channels To swap move the channel position if available Select the new position Store Example Analogue gree...

Страница 54: ...Service ID Auto Start scan Signal Quality Signal Strength No Channel Name Type New select access Normally set Symbol Rate and Service ID to Auto DVB T 1 Adjust frequency for each channel 2 Search 100 CH21 474 00 MHz 100 DVB T Manual Tuning Frequency Signal Quality Signal Strength No Channel Name Type New select channel adjust frequency Set where the level of Signal Quality becomes the maximum Set ...

Страница 55: ...ccess store After settings select Start scan Display a notification message New Channel Message DVB Selects whether to give a notification message when a new DVB channel is found New channels found Press OK to update channel list Press EXIT to ignore Selecting OK will perform Update Channel List Check DVB signal Signal Condition Selects a channel and checks the DVB signal condition A good Signal S...

Страница 56: ...e When recording programmes to the external recorder be sure to make the proper settings on the recorder connected to the TV If a recorder compatible with Q Link VIERA Link or similar technologies is connected to the TV p 94 95 and Link Settings p 43 are completed no setting of the recorder is required Also read the manual of the recorder If the recorder is not compatible with Q Link VIERA Link or...

Страница 57: ... the programmed channel 3 Set the channel date and time repeat the operations as below Set items in the order of 1 to 4 select the item set 1 3 and 4 can also be entered with numeric buttons D 7 BBC7 17 00 18 30 D 1 BBC1 STTL 18 00 20 00 C 3 ITV1 21 30 22 30 Timer Programming Function No Date Start End Channel Name Wed 26 10 2011 10 46 Ext Rec Ext Rec Reminder Wed 26 10 2011 90 min 120 min 60 min ...

Страница 58: ...ew the programme or the EXIT button to cancel the reminder The timer programming event that the reminder is set for ends identifies that two or more timer programming events are overlapped Ext Rec and USB HDD Rec are given priority over Reminder As for the overlapped recording events the first event starts and finishes as programmed The next event can then start The recording of Timer Programming ...

Страница 59: ... 14 E4C VCR 1 BBC1 2 AV1 AV Child Lock List TV and AV Sorting 123 Name Input DVB C DVB T DVB T Analogue Analogue Analogue External Type Free TV Free TV Free TV Analogue Analogue Analogue Lock Appears when the channel input is locked select lock To cancel Select the locked channel input To sort channel names in alphabetical order red To cancel all locks yellow To lock all green To jump to the top o...

Страница 60: ...1 Select DVB S DVB C or DVB T p 20 2 Display the menu and select Setup Setup select access 3 Select Display Settings Access Display Settings select access 4 Select Data Service Application and set to Auto Start On Display Settings Data Service Application Auto Start On select access set Notification message will appear when the application is available Follow the on screen instructions Note Operat...

Страница 61: ...iew card and a card reader come as a set first insert the card reader then insert the view card into the card reader Insert the module in the correct direction Insert or remove completely CI slot CI module Rear of the TV Insert the CI module optional The features that appear on screen are dependent on the contents of the selected CI module Normally encrypted channels will appear Follow the on scre...

Страница 62: ...up select access 2 Select System Menu System Menu Access select access 3 Select Shipping Condition System Menu Shipping Condition Access select access Restore Settings Shipping Condition 1 Check the message and initialise 2 Follow the on screen instructions Shipping Condition All tuning data will be erased Are you sure Are you sure 1 Confirm 2 Confirm 3 Start Shipping Condition Reset to Factory Sh...

Страница 63: ...rch in Standby and downloads an update if any software updates are available The automatic updating is performed under the following conditions Standby TV turned off with the remote control Recording of Timer Programming Direct TV Recording or One Touch Recording is not in progress If System Update is performed the software will be updated it may change TV functions If you do not want to do so set...

Страница 64: ...ced Settings select adjust access store Colour Management is available when Viewing Mode in the Picture Menu is set to Professional1 or Professional2 Menu Item Adjustments Configurations alternatives Picture Colour Gamut Reproduces image colour precisely according to the colour gamut standards Remaster Rec 709 SMPTE C EBU Remaster Displays deep colours by expanding the colour gamut at a maximum Re...

Страница 65: ...he gain of gamma for selected signal level Reset to Defaults Press the OK button to reset to the default detailed Gamma Reset to Defaults Press the OK button to reset to the default Gamma Lock the picture setting Lock Settings White Balance and Gamma can be locked for each Viewing Mode and each input Additionally Contrast Brightness Colour Sharpness Tint Colour Gamut Colour Management and Reset to...

Страница 66: ...r PC For details read the manual of the USB HDD The data recorded on the USB HDD with this TV can only be played back on this TV You cannot play back its contents with another TV including the TV of the same model number or any equipment Do not turn the TV off pull out the mains plug or remove the USB HDD during operation formatting recording etc It may cause malfunction of the device or damage th...

Страница 67: ...atted and all contents deleted Are you sure USB HDD Formatting Yes No select Yes set select Yes set select Yes set 3 Confirmation of USB HDD name USB HDD Formatting Edit name Yes No Name USB Drive A select set The name for the USB HDD is created automatically If you want to edit the name select Yes Set characters Store USB HDD 1 USB HDD Name select set You can set characters by using numeric butto...

Страница 68: ...dicator Control panel p 11 Default REC Mode You can select default recording mode for One Touch Recording Recording time for the USB HDD p 107 DR Direct recording normal mode LT1 Long time recording LT2 Extra long time recording To start One Touch Recording Start No other channel can be selected while the recording is in progress To stop recording on the way or To play back or delete the recorded ...

Страница 69: ...e to operate Search backward Playback Pause Return to the current programme Search forward Search backward forward Pause Playback Playback Return to the current programme To stop REW LIVE TV REW LIVE TV Recording Setup Off Auto select Off If you stop REW LIVE TV the recorded content for REW LIVE TV will be deleted REW LIVE TV will be stopped and the recorded content deleted automatically in the fo...

Страница 70: ...n p 93 and set to use theatre speakers p 99 Date shows the date on which the recording was made by the recording equipment The file without record of the date is shown The picture may not appear correctly on this TV depending on the recording equipment used Display may take some time when there are many files and folders Partly degraded files might be displayed at a reduced resolution Picture sett...

Страница 71: ...s EXIT Select RETURN Slideshow View Select Drive Select Contents Select Info View Option Menu SD Card Media Player Photo All photos Selected device name To display the information of the highlighted content 1 48 p1010001 JPG 23 10 2011 1600X1200 File name Date Pixel File number Total file number Note You can also access each mode directly by using VIERA TOOLS p 36 Recorded TV is available for cont...

Страница 72: ...ts Select Info View Option Menu SD Card Media Player Photo All photos To change the size of photos on a thumbnail screen select Change Size change Error display Single view Photos are displayed one at a time Select the file from the thumbnail of photos to be viewed select access Example Single view Single view Stop EXIT Select RETURN Rotate Operation guide To display hide the operation guide To re...

Страница 73: ...It is recommended to take a photo for L and then move your camera to the right about 5 cm and take another photo for R To view the created 3D photo with 3D effect you need the 3D Eyewear Optional accessories p 7 1 Display the option menu in the thumbnail view 2 Select Multi Shot 3D Slideshow Settings Multi Shot 3D Change Size Option Menu select access 3 Select two photos for L left and R right EXI...

Страница 74: ...splayed at a random position and random scale Drift calendar Drift Photos are displayed like flow images You can select to display the calendar or not The month of calendar is turned by pressing the left or right cursor button Gallery calendar Gallery The various sizes of photos in the frame are displayed You can select to display the calendar or not The month of calendar is turned by pressing the...

Страница 75: ...t to Motion Repeat Slideshow repeat Off On Back Ground Music Selects the back ground music during Photo mode Off Type1 Type2 Type3 Type4 Type5 User Auto Type1 5 are the fixed music each installed in this TV User Music data in the device registered by yourself will be played back To register the music 1 Select the music file Depending on the condition of the device select folders until you reach th...

Страница 76: ...ere you stopped last time or from the beginning Error display The file does not support thumbnail view Playback from the selected scene in the title SD Video or AVCHD Playback of the selected scene will start to the end of the title 1 Select the title 2 Select the scene 3 Start playback select access red The structure of titles and scenes may vary depending on the digital video camera used To repe...

Страница 77: ... original size You can also change the aspect using the ASPECT button Aspect change may not work depending on the content Only available during playback Repeat Playback repeat within the title or selected file depending on the content Off On Title Selects from a group of titles if available Recorded TV mode For exclusive USB HDD Contents list of the selected device will be displayed BBC 1 12 00 IT...

Страница 78: ...ton to display the grouped contents To exclude only the specific content from the group tick it and then select Exclude from Group To exclude several contents at once tick all the desired contents Change Protect Status Select the content to protect from deletion and then select Change Protect Status Perform the same way to cancel the protection To change the status of several contents at once tick...

Страница 79: ...rive Select Option Menu Create Group Release Group Drive Select Contents Select Change Protect Status select access 3 Select the device to access USB HDD1 USB Flash Drive Select USB HDD1 EXIT Select RETURN Access SD Card select access If you select the device to play back photos videos or music change to the appropriate content To change the content select Contents Select access Audio output Setti...

Страница 80: ...t the folder 2 Select the file 3 Start playback select access red How to operate in the playback Example Playback My Song_9 My Favourite My Music_1 00 02 43 00 05 44 EXIT RETURN Operation guide To display hide the operation guide To operate the playback Rewind Pause Playback Stop Fast forward To the previous track red To the next track green To return to thumbnail Music Setup Setup the setting for...

Страница 81: ...isit the website of TwonkyMedia Additional fees may be charged to obtain server software Note For more information about the server software please consult each software company When server software for the media server is installed on the PC the data may be at risk of being accessed by other people Please take care of the settings and connections under the network circumstances at the office hote...

Страница 82: ... encrypted copy protected programmes When the broadcast prohibits the output of video and audio VIERA Connect VIERA Connect is a gateway to the internet services unique to Panasonic VIERA Connect allows you to access some specific websites supported by Panasonic and enjoy internet contents such as videos games communication tools etc from VIERA Connect home screen To enable this function connect t...

Страница 83: ...and connect any equipment required for the network environment You cannot make settings for the equipment on this TV Read the manual of the equipment If your modem has no broadband router functions use a broadband router If your modem has broadband router functions but there are no vacant ports use a hub Ensure that the broadband routers and hubs are compatible with 10BASE T 100BASE TX If you use ...

Страница 84: ...ttings VIERA Name Sets your favourite name for this TV This name will be used as the name of this TV on the screen of the other network equipment DLNA Remote Control Enables to control the TV using Windows 7 via the network Off On DLNA Remote Volume Enables to control the volume of the TV using Windows 7 via the network Off On Network Remote Control Enables to control the TV from the network equip...

Страница 85: ...Auto The available settings are displayed automatically Manual settings IP Address Subnet Mask Default Gateway DNS Address select access store 3 Select Proxy Settings and set the items Acquire IP Address IP Address Subnet Mask Default Gateway Acquire DNS Address DNS Address Proxy Settings IP DNS Settings Auto Auto Access select access After settings return to the previous menu Proxy Sets Proxy add...

Страница 86: ...access store 2 Select Wireless Network Settings Connection Test Network Connection Wireless Network Settings IP DNS Settings Network Link Settings Software Update Wireless New Software Message Network Status On Access select access When the access point is already set Current Settings screen will be displayed To change the settings select No on this screen and go to the next step 3 Select your des...

Страница 87: ... PIN Enter the PIN code to the access point and then select Connect Please register the following PIN codes on the wireless access point PIN code 12345678 Select Connect after entering and saving the settings on the wireless access point WPS PIN Connect Manual You can setup SSID security type encryption type and encryption key manually Follow the on screen instructions and set manually When you us...

Страница 88: ... 10 15 20 2011 12 19 12 39 2011 12 25 14 06 2012 01 06 13 52 2012 01 12 15 56 2012 01 20 10 08 2012 01 28 14 48 2012 02 09 19 58 P000135 P000180 P000214 P000251 P000276 P000293 V100025 V100042 M10054 M10078 3648x2736 JPEG Info Select Pixel Media Server Format EXIT RETURN View Slideshow Option Menu select access Depending on the condition of media server you may need to select the folder before sel...

Страница 89: ... Press to skip forward about 30 seconds To change aspect For music file Playback Playback will start Example Playback My Song_9 My Favourite My Music_1 00 02 43 00 05 44 EXIT RETURN Operation guide To display hide the operation guide To operate the playback Rewind Pause Playback Stop Fast forward To the previous track red To the next track green To return to list For DIGA Recorder Control the DIGA...

Страница 90: ...he back ground music during Photo mode Off Type1 Type2 Type3 Type4 Type5 Video Setup Video Preview Sets to start the preview of the title or scene in the thumbnail screen Off On Image may not be displayed for an instant in the thumbnail screen Set the preview Off to resolve this Multi Audio Dual Audio Dual Mono Audio Selects between selectable sound tracks if available It may take several seconds ...

Страница 91: ... SPDIF Selection and set 2 2 SPDIF Selection Reset to Defaults Auto Reset select access store Menu Item Adjustments Configurations alternatives Sound SPDIF Selection SPDIF A standard audio transfer file format Selects the initial setting for digital audio output signal from DIGITAL AUDIO OUT and HDMI2 ARC function terminals Auto PCM Auto Dolby Digital Plus Dolby Digital and HE AAC multi channel ar...

Страница 92: ...nk Power off link Direct TV Recording Connection SCART cable DVD Recorder VCR with Q Link function Use fully wired SCART cable Connect the DVD Recorder VCR supporting Q Link to the TV s AV1 terminal via a SCART cable VIERA Link HDMI connection Connected equipment Features DIGA Recorder with VIERA Link function DVD Player Blu ray Disc Player with VIERA Link function HD Video Camera LUMIX Camera wit...

Страница 93: ...itor in the Setup Menu p 43 Use the optical digital audio cable or SCART cable for audio output from the TV 1 Available with the equipment which has HDAVI Control 2 or later function 2 Available with the equipment which has HDAVI Control 3 or later function 3 Available with the equipment which has HDAVI Control 4 or later function 4 Available with a DIGA Recorder which has HDD 5 This function is a...

Страница 94: ...HDD for recording is not connected TV TV monitor out AV watching recorder s tuner AV Recorder s tuner AV watching recorder s external input AV Recorder s external input AV watching TV s external input AV TV monitor out When Direct TV Recording is performed the recorder is automatically turned on if it is in Standby mode You can change channel or turn the TV off while the recorder is recording from...

Страница 95: ...e manual of the equipment For optimal recording the settings of the recorder may need to be changed For details read the manual of the recorder Download preset channel language and country region settings Preset download see below Set VIERA Link to On in the Setup Menu VIERA Link p 43 Set up the TV After connection turn the equipment on and then switch the TV on Select the input mode from HDMI1 HD...

Страница 96: ...properly depending on the connected equipment If required set to Off Direct TV Recording What you see is What you record Direct TV Rec Records the current programme in the DIGA Recorder immediately If you connect a variety of recorders including other manufacturers recorders at the same time connect the DIGA Recorder to the TV s lower HDMI terminal number For example if you use HDMI1 and HDMI2 for...

Страница 97: ...ded on HDD from where it was paused If the paused TV picture disappears after a few minutes press OPTION button to restore the pause picture Follow the operation guide to operate Pause Live TV function To operate Pause Live TV Search backward Search forward Stop If you stop playback the recorded programme will be deleted from HDD Playback Pause Operations may vary depending on the recorder In this...

Страница 98: ...de If other manufacturers equipment is accessed Setup Contents Selection menu may be displayed Available VIERA remote control buttons depend on the connected equipment Note Some operations may not be available depending on the equipment In this case use its own remote control to operate the equipment If multiple recorders or players are connected VIERA Link Menu Pause Live TV Direct TV Rec VIERA L...

Страница 99: ... speakers is mute When the equipment is turned off TV speakers will be active TV TV speakers are active Multi channel sound If you want to enjoy the multi channel sound e g Dolby Digital 5 1ch via an Amplifier connect it with HDMI cable and Optical digital audio cable p 93 and then select Home Cinema If your Amplifier has HDAVI Control 5 function you only need to connect it with HDMI cable to the ...

Страница 100: ...table p 102 and the specifications p 118 119 Check the type of terminals and cable plugs are correct when connecting To use the specific devices supporting Bluetooth wireless technology Bluetooth Setup p 109 Rear of the TV AV2 COMPONENT VIDEO adaptor supplied To watch DVDs DVD Player Listening Viewing USB devices USB cable USB HDD Communication Camera HDMI equipment Fully wired HDMI compliant cabl...

Страница 101: ...ulti channel sound e g Dolby Digital 5 1ch connect the equipment to the amplifier For the connections read the manuals of the equipment and amplifier Headphones Less than 10 cm M3 stereo mini plug Ferrite core Small size supplied Installing the Ferrite core Pull back the tab Wind the cable twice Close To adjust volume Headphone Volume p 41 Camcorder Game equipment Viewing Listening Camcorder Game ...

Страница 102: ...s Video camera To play games Game equipment To use amplifier with speaker system 3 To use network services 4 USB HDD Recording 5 Q Link VIERA Link with HDMI Direct TV Recording Recommended Connection 1 To connect the equipment the terminal adaptor supplied is necessary 2 Use HDMI1 for automatic input switching 3 Use HDMI2 for connecting an amplifier This connection is applicable when using an ampl...

Страница 103: ...60p 625 576 50i 50p 750 720 60p 50p 1 125 1 080 60i 50i HDMI1 HDMI2 HDMI3 HDMI4 525 480 60i 60p 625 576 50i 50p 750 720 60p 50p 1 125 1 080 60i 50i 1 125 1 080 60p 50p 24p Auto mode Auto mode determines the best aspect ratio to fill the screen using a four step process WSS Control signal through SCART HDMI terminal Letterbox detection or Justify to fill the screen This process may take several min...

Страница 104: ...MOV mov qt DivX3 DivX4 DivX5 DivX6 H 264 BP MP HP Motion JPEG MPEG1 MPEG2 MPEG4 SP ASP AAC Dolby Digital Dolby Digital Plus DTS core HE AAC LPCM MPEG Audio MP3 This TV supports Motion JPEG recorded by Panasonic LUMIX Camera 1 This TV is not available for playing back Motion JPEG with the media server 1 Some products of before the year 2004 may not be available The compatibility with future product...

Страница 105: ...SP ASP AAC HE AAC PS mpg mpeg vob vro H 264 2 MPEG1 MPEG2 VC 1 2 AAC 2 Dolby Digital Dolby Digital Plus 2 HE AAC 2 LPCM MPEG Audio MP3 2 2 This codec can be played back only in Media Player TS m2ts tp trp ts H 264 MPEG1 MPEG2 VC 1 3 AAC Dolby Digital Dolby Digital Plus DTS core 3 HE AAC MPEG Audio MP3 3 3 This codec can be played back only in Media Player Music Codec File extension Restrictions MP...

Страница 106: ...ABOUT DIVX VIDEO ON DEMAND This DivX Certified device must be registered in order to play purchased DivX Video on Demand VOD movies To obtain your registration code locate the DivX VOD section in the Setup Menu Go to vod divx com for more information on how to complete your registration To show DivX VOD registration code DivX VOD p 46 If you want to generate the new registration code you have to d...

Страница 107: ...d Check the USB HDDs that have been tested for the performance with this TV at the following website English only http panasonic jp support global cs tv Note Data modified with a PC may not be displayed Do not remove the device while the TV is accessing data Otherwise this can damage device or TV Do not touch the pins on the device Do not subject the device to a high pressure or impact Insert the ...

Страница 108: ...RA Link HDAVI Control 5 VIERA Link p 95 3D Content Type Deep Colour x v Colour Audio Return Channel 2 HDMI2 terminal only DVI connection If the external equipment has only a DVI output connect to the HDMI terminal via a DVI to HDMI adaptor cable 3 When the DVI to HDMI adaptor cable is used connect the audio cable to AUDIO terminal with the supplied AV2 COMPONENT VIDEO adaptor Note Audio settings c...

Страница 109: ...e Menu Item Adjustments Configurations alternatives Setup Bluetooth Setup Devices Searches and registers the available devices You cannot use two or more A2DP compliant audio devices simultaneously Not paired The device is not registered Register the device by following the on screen instructions to use with this TV Connected The device is registered and you can use with this TV Not connected The ...

Страница 110: ...e of the keys of gamepads correspond to the operation of the remote control Select Start 10 11 1 7 6 9 8 2 3 4 5 Example Remote Control Remote Control 1 Volume Up Down 7 VIERA TOOLS 2 Channel Up Down 8 EXIT 3 GUIDE 9 INPUT AV 4 OK 5 BACK RETURN 10 MENU 6 INTERNET 11 Cursor buttons Characters table for numeric buttons You can enter characters by using numeric buttons for free input items A B C D E ...

Страница 111: ...ed for optimal viewing on your display PC signal is magnified or compressed for display so that it may not show fine detail with sufficient clarity SCART and HDMI terminal information AV1 SCART terminal RGB VIDEO Q Link Socket Earth 21 CVBS out video 19 CVBS earth 17 Red in 15 Red earth 13 Green in 11 Green earth 9 Blue in 7 Blue earth 5 Audio out L 3 Audio out R 1 20 CVBS in video 18 RGB status e...

Страница 112: ...er installed nearby Check the analogue broadcast If the image quality is poor check the aerial and consult your local dealer Neither image nor sound is produced Check the TV is turned on Check the mains lead is plugged into the TV and the socket outlet Check the TV is in AV mode Check the correct input mode is selected Check the Picture Menu p 38 40 and volume Check all required cables and connect...

Страница 113: ... Eyewear support Bluetooth wireless technology p 32 Ensure that 3D Mode Selection is set to 3D p 33 Some 3D image signals may not be automatically recognised as 3D images Set 3D Mode Selection Manual to match the picture format p 34 Use the 3D Eyewear within approximately 3 2 m from the TV Check that there are no obstacles between the TV and the 3D Eyewear For some people the 3D images may be diff...

Страница 114: ...re the batteries installed correctly p 7 Has the TV been switched on The batteries may be running low Replace them Point the remote control directly at the front of the TV within about 7 m and a 30 degree angle of the front of the TV Situate the TV away from sunshine or other sources of bright light not to shine on the TV s remote control signal receiver Parts of the TV become hot Even when the te...

Страница 115: ...his may cause scratches on the surface Take care not to subject the TV s surfaces to water or detergent Liquid inside the TV could lead to product failure Take care not to subject the surfaces to insect repellent solvent thinner or other volatile substances This may degrade surface quality or cause peeling of the paint The surface of the display panel is specially treated and may be easily damaged...

Страница 116: ...mark of Skype Limited DLNA the DLNA Logo and DLNA CERTIFIED are trademarks service marks or certification marks of the Digital Living Network Alliance Windows is a registered trademark of Microsoft Corporation in the United States and other countries HDMI the HDMI Logo and High Definition Multimedia Interface are trademarks or registered trademarks of HDMI Licensing LLC in the United States and ot...

Страница 117: ...e no more than our cost of physically performing source code distribution a complete machine readable copy of the corresponding source code covered under LGPL Contact Information cdrequest am linux jp Source code covered under LGPL is also freely available to you and any other member of the public via our website below http www am linux jp dl EUIDTV12 For the software categorized as 5 and 6 please...

Страница 118: ...hones M3 3 5 mm stereo mini Jack 1 Receiving systems Band name Check the latest information on the available services at the following website English only http panasonic jp support global cs tv PAL B G H I SECAM B G SECAM L L VHF E2 E12 VHF A H ITALY CATV S01 S05 CATV S11 S20 U1 U10 VHF H1 H2 ITALY UHF E21 E69 CATV S1 S10 M1 M10 CATV S21 S41 Hyperband PAL D K SECAM D K VHF R1 R2 VHF R6 R12 VHF R3...

Страница 119: ...Fibre optic Built in wireless LAN Standard compliance and Frequency range 3 IEEE802 11a n 5 180 GHz 5 320 GHz 5 500 GHz 5 580 GHz 5 660 GHz 5 700 GHz IEEE802 11b g n 2 412 GHz 2 472 GHz Security WPA2 PSK TKIP AES WPA PSK TKIP AES WEP 64 bit 128 bit Bluetooth wireless technology 4 Standard Compliance Bluetooth 3 0 Frequency Range 2 402 GHz 2 480 GHz 1 Energy consumption XYZ kWh per year based on th...

Страница 120: ...al service or the point of sale where you purchased the items Penalties may be applicable for incorrect disposal of this waste in accordance with national legislation For business users in the European Union If you wish to discard electrical and electronic equipment please contact your dealer or supplier for further information Information on Disposal in other Countries outside the European Union ...

Отзывы:

Похожие инструкции для TX-P42GT50E